
Does your Mac not recognizing external hard drive? Here is the fix for External Hard Drive Not Showing Up on Mac issue.
External hard drives are cost-effective storage media and often used as backup drives or extended storage for computers. Once an external hard drive is plugged into a Mac through the USB port or a USB hub, the Mac will show its icon and name on desktop, in Finder and in Disk Utility for easy access and management to the files and the disk.
However, sometimes you probably can’t see it on Mac. Then you need to fix the problem.
Why is My external hard drive not showing up on Mac?
There are a few reasons why the external hard drive doesn’t appear on Mac where it is supposed to be, but most of the reasons are not catastrophic.
1. The first reason could be a faulty connection, leading to the Mac computer not recognizing the external hard disk. For example, a broken USB port or a cable could cut off the connectivity between the external hard drive and the Mac computer.
2. Another reason could be the logical errors such as a damaged partition table and file system on the external hard drive. These errors may prevent the macOS from reading the core information to mount the drive. As a result, the external hard drive can’t be fully mounted for use. Those damages or corruption can be caused by a sudden interruption during data transferring or virus infections.
3. The last reason for not showing up external hard drive is the least concerning and the most surprising. That is the visibility of the external hard drive is blocked because of wrong settings or incompatibility between the file system of the drive and the computer.
With the knowing of the potential reasons, it will be easier to comprehend why those methods below will work.
Troubleshooting the external hard drive not showing up on Mac issue
1. Verify the connections
The external hard drive is connected with the Mac through a USB port and cable, or sometimes through a USB hub or a USB adapter, all those parts need to be checked or changed to make sure they provide good and stable connectivity. In addition, if your external hard drive needs extra power supply instead of through USB port, you need to check if your external hard drive is powered on as well.
2. Restart the Mac
It sounds dumb but it does work. The macOS is a sophisticated system but sometimes it could be stuck on some minor operations. Especially after you unplug an external drive without safe ejection, it may believe that the USB port is still in use without detecting another insertion. Restarting the computer can re-read all hardware information and release all available USB ports.
3. Enable the visibility of the external hard drive
You can’t see the external hard drive for easy access on the desktop or in the Finder and it may be because it is hidden from you. To enable the visibility, you need to click Finder on the top of the screen and go to Preferences. Tick the little box in front of External disks under General and Sidebar options.
Besides, if your external hard drive has incompatible file system, the Mac computer may not be able to read and mount it either. It is better to use a Windows Pc to read the external hard drive. On top of that, if your external hard drive is hidden by third-party software, you need to enable the visibility by using the relevant software first.
3.1.Why an external hard drive is not showing up on Mac?
There might be many reasons but most of them are as follows.
- Damaged USB cable. Check it twice whether wires are exposed or not.
- Recheck whether the drive is properly connected or not.
- Try a different outlet. The using one might not be working for now.
- The external drive may not be read by Mac and is formatted for windows.
- External drive damaged. Check by connecting to another Mac.
- Reboot.
- Data settings might be corrupted.
Not sorted out yet?
Also Read,
3.2.How to enable visibility of external hard drive on mac
Below are the possible options to enable visibility of external hard drive on Mac. Do follow the process only after checking the basic troubleshooting options shared as above.
Later implement the things one by one.
From general options
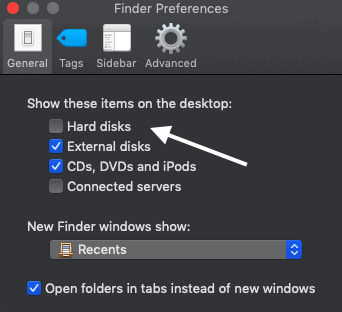
Go to Finder->preferences->General. In general choose “Show items on desktop”. Tap on Hard disks and then on external hard disks.
From sidebar options
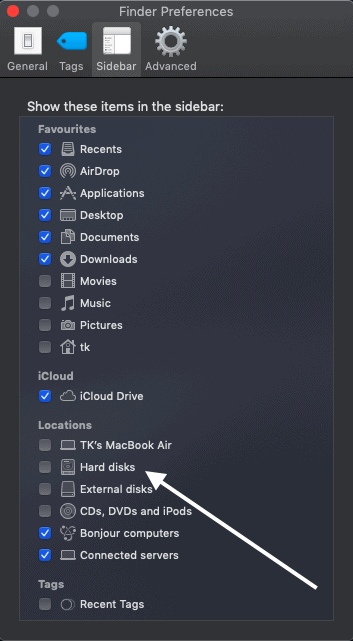
Same as above browse to sidebar options using finder.Finder->preferences->sidebar. Click on show these items in sidebar and choose hard disks and then external drives.
From disk utility
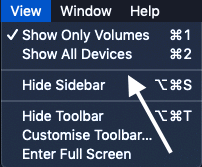
Launch disk utility through finder or spotlight search. Click on “view” from top left and click on “show all devices”.
3.3.Update MacOS if available
Before updating make sure to have a backup of your data.
Update to the latest OS available to fix issues related to the connectivity.
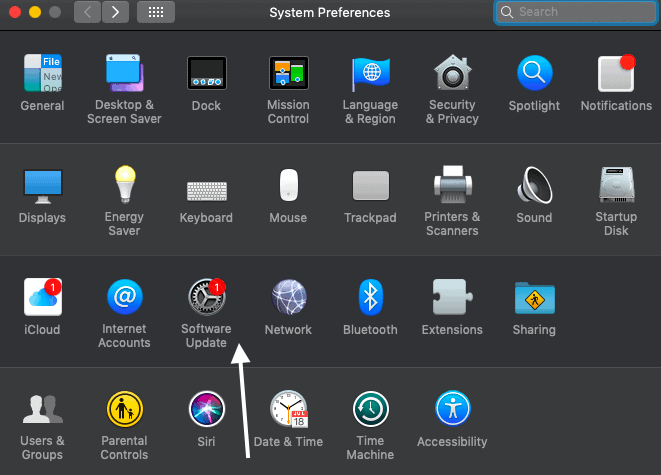
- Go to Apple Menu -> System preferences
- In System preferences choose software update
- Let the macOS check for updates.
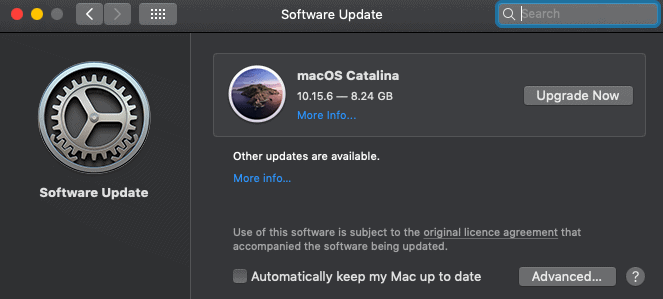
- If available update and restart the device.
3.4.Repair external hard drive using Disk Utility
This is completely different from enabling the visibility using the same system app.Disk utility is often used to repair the external hard drives if not connected.
- Go to utilities and click on disk utility. Use finder or spotlight to search.
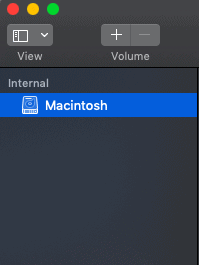
- Check for the external hard drive from the sidebar. If it is listed and is having an issue then select it.
- Click mount option from the main menu.(In below screenshot I selected my main drive instead of external disk)
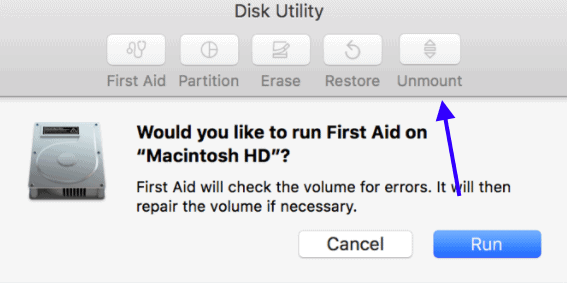
- If the drive is inaccessible then do click on first aid from the same menu.

- Wait until the process is completed. If it is failed, it shows an error messages such as disk needs to be replaced.
Also read,
- How to read external drive not showing up on mac
- How to back up mac to external drive with time machine
3.5.Repair external hard drive using terminal
Terminal is a go-to option if disk utility is unable to do the task. Here is the procedure to do so.
- Go to Utilities and then to the terminal.
- Enter command diskutil list and hit enter and note down the disk.
- Type diskutil mountDisk /dev/disk# and hit enter.
- Now type diskutil repairVolume /dev/disk# and wait for the process to get completed. Quit terminal.
3.6.Replace or Erase external drive
This should be your last step and it requires some related knowledge as well.
If the disk is not showing after all the above checks it might be damaged physically. Get a new one.
Or if the data of external drive is not accessible then it might be due to file corruption. Recover all the data using any data recovery software.
4. Check and Repair directory damages
What causes directory/disk damages?
It depends upon a couple of things or more. Do remember, damage related to disk can result in data loss and can’t be recovered(If yes, at least not easily). The more time you took to run a repair, the less likely inbuilt tools will be able to fix problems.
Some common issues for damages are,
- Power issues
- Hardware issues related to disk and RAM
- Malware
- Shutting down mac frequently if not responding
- Manually removing external drive without ejecting it properly
Connected external drives can also be affected under these cases .
Note: While dealing with issues related to data and storage it is recommended to have a backup. Do a quick backup if you haven’t yet.
Also Read:
Here are some of the Methods to check and repair directory damages. Check out and proceed accordingly. Sometimes just a check is quite enough to make things clear. Most of the times, we will be using inbuilt tools in this guide.
4.1.Using First aid
First Aid is a small utility on Mac computer for checking and repairing directory damages, and it is suggested to run First Aid for more than once to see if you can get consistent reports. But its function is very limited, for serious corruption on a drive, First Aid cannot help.
When to use first aid?
Most of the times, first aid is the first step to perform in case of unusual behaviour. At these conditions first aid is mandatory.
- Unusual messages being displayed.
- Mac shutting down frequently.
- You can use it to audit the storage corruptions as well.
How to check and repair directory damages using first aid
The procedure below is tested on macOS Catalina and screenshots are from the same. If you are using some advanced versions, options might varies.
Total Time: 3 minutes
Open disk utility
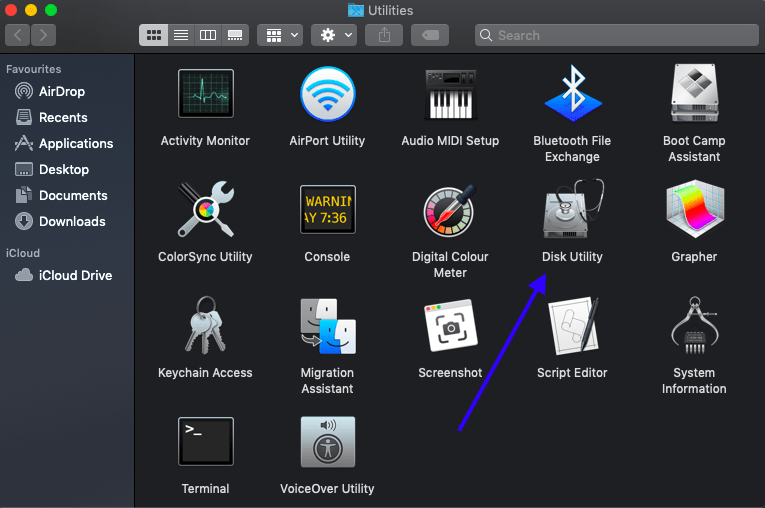
Head on to the utilities and then to disk utility.
Choose to show all devices

Click on choose view from menu bar and tap on “show all devices”.
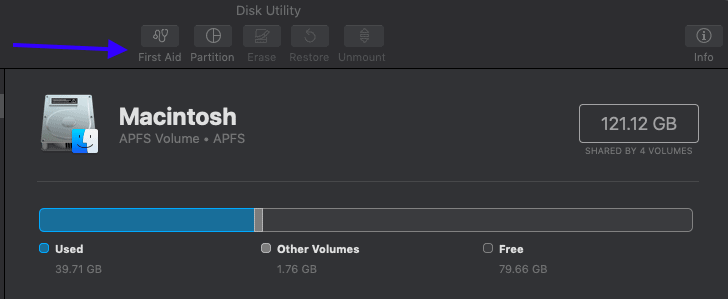
Choose disk
The sidebar shows up all the disks and connected drives. Usually, it starts with your startup disk. Here is where you need to choose the disk/drive to repair. Below each disk, there will be containers and volumes of the disk.
Repair volumes, containers and then disks
As said above, after choosing the disk, go by volumes i.e from the last volume of the disk. Select it and click on first aid. A pop up opens up asking to run. Run it. If there is no popup, click on “Repair Disk”. This is how to do first aid for disks. Repeat the process for all volumes and disks.
If the first aid program shows errors on any of the volumes, proceed according to the error. One of the major ones is “overlapped extent allocation” which can be solved by a replace.
No disk showing up in disk utility? Try the following.
If you are about to repair an external drive, be sure to connect it with a good working cable and check the connection twice.
If it is not showing up, restart the device and try checking again. Still not showing? then it might time for service.
4.2. Using safe mode
Use following trouble shoot methods only after trying the first aid. Using the safe mode boot, mac can address it’s issues of disk and repairs them.All logins and third party extensions will be skipped.
Boot in safe mode: Shut down your mac and press shift key until it boots.If had issues on boot, try using power off button. Try to boot and restart in normal. Continuously hanging? Try CMD+v to check the issue causing extension. Now restart in safe mode and remove the cause properly.
4.3. Try file system consistency check
FSCK which stands for file system consistency check is a Unix tool for checking and fixing drive issues. One should perform this procedure using a single user boot mode which provides access to the Unix commands.
However, it is a bit time taking process depending upon the size of the volume/disk.
Boot to a single-user mode where a command line prompt is displayed. Enter fsck -fy to run fsck. Some key points to note are,
- If the drive is password-protected, you must log in as a relevant user.
- Single user mode is not accessible for those who set a firmware password.
- Don’t interrupt the process until it gets completed.
If none of the processes works, I would suggest you visit a service centre as soon as possible.
5. Format the external hard drive in Disk Utility
If all the methods above don’t satisfy you, formatting the external HD might be the last try. Formatting will assign a new file system to the drive, which will remove all errors as well as all files.
If you have backed up important files to the latest version, go ahead to format it. If not, you’d better use a data recovery tool like Wondershare recoverit to recover data from the corrupted external hard drive first.
To format the external hard drive, open Disk Utility and select the external hard drive on the left list. Click Erase, input a name and click on Run button. If you are going to use the external hard drive on both a Mac and a PC, choose FAT or ExFAT as Format.
One must format the drive properly to use it further. Here are the methods to format external hard drive on mac with proper knowledge(Because it involves more than clicking the format button.).
Make sure to backup files if you really want them. There is nothing you can do after following the procedure. Hope you are sure about it and going with the article.
Note: Fact is most of the drives are for windows and it also works fine with Mac OS. But if you are using the drive between Mac OS, Windows OS or somewhere then formatting with Mac compactable filesystem is highly recommended and must.
5.1.Which file system and the scheme should you use?
As said above, it must be compactable with Mac filesystem to read and write. There are a few filesystems which we will be described below. Choose any of them as per your need.
One must need to know about the file systems and schemes before formatting external hard disk on mac.
Apple file system
Simply well-known APFS which was brought to life with Mac OS High Sierra and the file format will be APFS for Sierra users by default. Do remember, updates always tend to improve features and it suits here too. But APFS is not recommended as the same drive is not readable by any device except mac which is running the same sierra OS. Moreover, it currently works well with SSD and flash drive. If you okay with the storage and had devices with the mentioned OS then you are good to go with Apple file system.
MacOS Extended
This is an earlier version of APFS and is popularly known as HFS+. It was the default file system in Mac running with older OS. There are two more versions in this file system.
- macOS Extended(Journaled and encrypted): This will be helpful to those who carry their drives outside where there are chances of losing it. All the data can be encrypted and requires a password to access it.
- macOS Extended(Case sensitive, Journaled and encrypted): Usually used when files names are being saved with capital letters.
Windows OS can read HFS+ drives but can’t write to them. Choose only if you are surrounded with macOS devices.
FAT32
Mac, Linux and windows can read and write to FAT32 drives. If switching between the systems is necessary then FAT32 might be an option. It is important to mention that they are of old school and only allows 4GB files. Moreover, it is well known for casual disk errors all the time and is not recommended in this new age.
ExFAT: This is more similar to FAT32 but it can allow than 4GB and is the only difference.
NT File system
Popularly known as NTFS which is the default for windows OS. macOS can read the drives but can’t write to them. However, there are a number of third-party tools which can help you to write to drives from Mac.
Here is the quick summary ,
- macOS Extended- Usually considered as the best option for mac as it is compatible with all other Macs.
- APFS-Works for all the Macs which are running with the latest OS.
- FAT32 and ExFAT-Works with both PC and Mac and support transfer of files which are less than 4GB and more than respectively.
- NTFS-Mac is able to read but unable to write.
Coming to schemes,
- GUID Partition Map: Select for drives 2TB and larger.
- Master Boot Record: Drives cannot exceed 2TB and are limited to 4 partitions(FAT32 And ExFAT)
- Apple Partition Map: Works for older PowerPC-based Mac computers.
Also Read,
5.2..How to format external hard drive on Mac
macOS is equipped with disk utility option which makes the process easier.
Important: If you are using a used external drive, make sure to backup all the existed files. Format erases the complete data and can’t be restored again.
Disk utility is a system utility which is more focused on disk volume and its all related tasks. One can know more about the volumes after using it.
Total Time: 5 minutes
Connect external hard drive and launch disk utility
It depends as some external hard drives are to be connected to go on with the procedure. After, use spotlight or some other to find disk utility app.
Open disk utility app
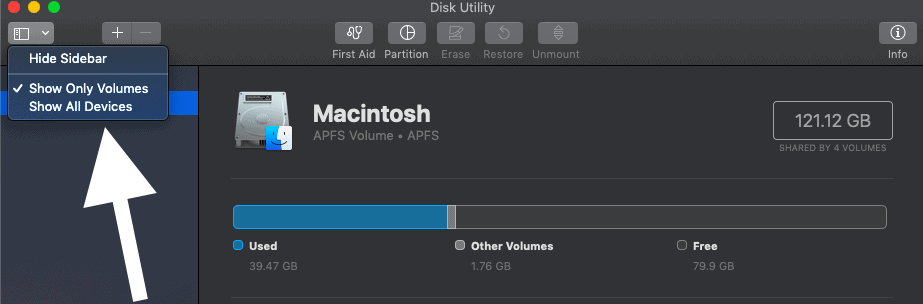
It shows all the internal and external disks which are connected to the mac.Now click on “view” which is in top left corner and tap on “show all devices” which was previously set to “show only volumes”
Choose the drive and erase
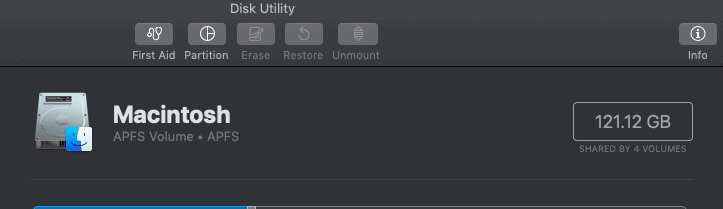
Now choose the drive which you wish to format. After click on erase from the top menu which throws a mandatory warning saying about the data loss after format. The external drive is not connected in the above image. If you connect it, choose it and erase
Give a name and choose format,scheme of the drive
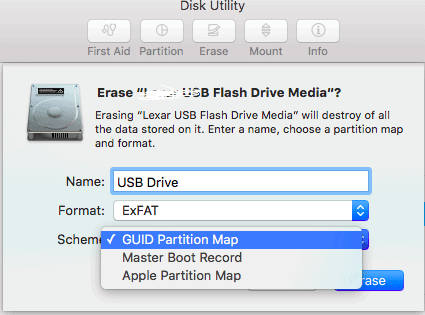
Give a name of your choice and choose GUID Partition Map(works for most of the cases)and file format as per your choice.
Erase now
Once you are done with the details, everything is set to erase the external disk.This will immediately wipe out the complete data.
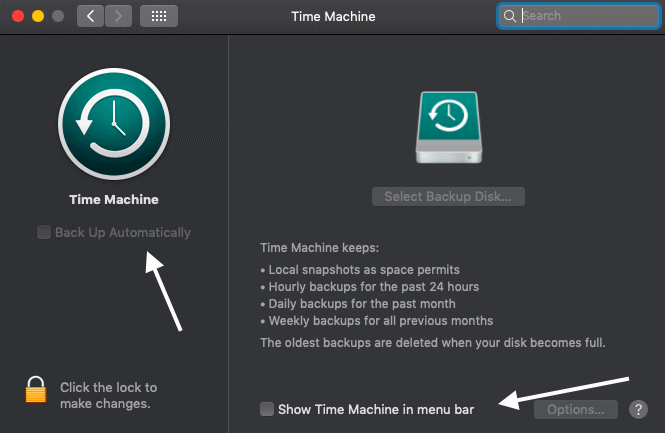
5.3.Erase process has been failed {Solution}
Usually, the complete data will be wiped off after tapping on erase now. But it might not be same with all. Sometimes it throws out an error saying “Erase process has been failed”.Don’t jerk out as it is easy to solve.
This is mostly due to the time machine which is running on your external hard drive. Simply head on to system preferences, and uncheck the box which is next to Backup automatically. Now tap on “Show Time Machine in the menu bar.” which opens a new window. Click Cancel and repeat the above steps.
5.4.How to Partition an External Hard Drive on Mac
Why? In short, it solves the problem of buying different hard drives for different operating systems.
Partition allows a drive to have separate disk space for different operating systems. It is really useful if you are regularly switching between operating systems.
Dedicated space can be allocated for time machine backup files or bootable backup of OS.
- Open disk utility and locate the external hard drive
- Select partition from the top menu
- It displays a pie chart with a Plus sign at the bottom. Tap on the sign.
- Give a name and choose format and size for each partition.
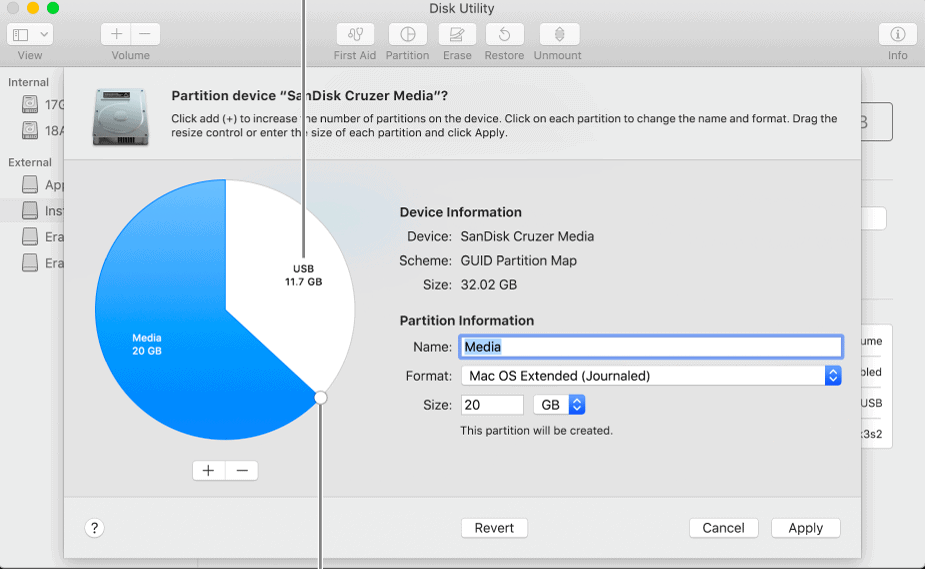
- Click apply and its done.
Conclusion
When your Mac not reading the external hard drive, it doesn’t necessarily mean that the external HD is dead. Among all of the solutions to bring back the visibility of the external hard drive and the access to the files, the first you should do is to verify the connectivity and look for it in Disk Utility. If you cannot find the external hard drive in the Disk Utility, your external hard drive might have physical damage preventing it from being detected by the computer.
I hope this tutorial given the fix for External Hard Drive Not Showing Up on Mac issue. If you like this article, please share it and follow WhatVwant on Facebook, Twitter, and YouTube for more tips.
External Hard Drive Not Showing Up on Mac – More Details
Do I need to format external hard drive for Mac?
To read and write data on mac, an external hard disk must be formatted or reconfigured.
Do all external hard drives work with Mac?
Any drive can work well with mac with the help of connectors. But the thing is they must be formatted to reconfigured for the use.
Is Apfs better than Mac OS Journaled?
It is better only if you are surrounded by newer versions of macOS because they only work with sierra or higher.
Why is my Mac not reading my external hard drive?
Answers may be many. But start the troubleshoot process by double checking the ports, changing ports and cables. Later shift to disk utility and use first aid, mount options.
How do I access my external hard drive on Mac?
Simple. With USB cable.Go to finder->Devices and check the icon of external drive after plugging in.
How do I make my external hard drive compatible with Mac and PC?
Drive partition and selecting the required file system and schemes works here.
How do I find corrupted files?
The behaviour of machine changes. Crashing of files, apps is also one more indication to run the first aid. Troubleshoot and find the issues using utility software in early stage.
How do I repair my Macbook Pro disk?
Whatever the machine maybe, the process of first aid using utility software is same. So each and every macOS devices can run first aid as their first option.
How do you hard restart a Mac?
Press command and control keys along with power button until the screen restarts. It might varies according to models.