
Using Gmail 2 factor authentication is one of the best ways to secure your Google account. Gmail is one of the leading email service providers all around the globe. No matter which device you use whether its Android or iOS you will have a Google Mail account. Google Mail comes bundles with many services which makes our lives easier. They sync our contacts, calendar, photos etc. As it will contain most of the information about you, you need to keep it safe from hackers. If you are using a weak password or using the same one on all your online accounts then you are more prone to hacking attempts.
Hackers are getting smarter every day and they are using data hacked from other sites to break into your Google accounts. To stay safe from these type of attacks google has an inbuilt feature known as 2FA or Two Factor Authentication.
- Related: 2 Ways to add Hyperlink to Email in Gmail
- How to Create Contact Group in Gmail to Send Bulk Emails
What is Gmail 2 factor authentication?
2 step Verification on Gmail is known as 2FA or Two Factor Authentication. It acts as an extra layer of security on top of your regular password. If your social media accounts got hacked and you are using the same password for Gmail, In that case, if you have 2 step Verification enabled then you are safe. Whenever the attacker tries to log in to your account with your password it will ask for a code which can be One Time Password, Authenticator Code or Google prompt. Unless you share the code or Tap yes on Google prompt your account is safe.
Note: It is not recommended to use the same passwords for all accounts. You must use different and complex passwords for all accounts. Of course, it is tough to remember all passwords, I recommend Sticky password which is the best password manager. Our readers get a special 85% discount on Sticky password through this discounted link.
- Related: Sticky password premium review
As we discussed 2 Step verification, now let’s have a look at different types of 2FA for Gmail and How to Enable them. Below are some of the most used 2 step Verification on Gmail.
- Google Prompt
- Voice or Text Message
- Backup Codes
- Authenticator App (Most Used)
How to Enable Gmail 2 factor authentication?
As we discussed the advantages of 2 step verification on Gmail, let’s see how to enable the same. The process of enabling the 2 step verification is easy and quick. All you need to do is follow the below steps carefully.
- Go to https://myaccount.google.com/security.
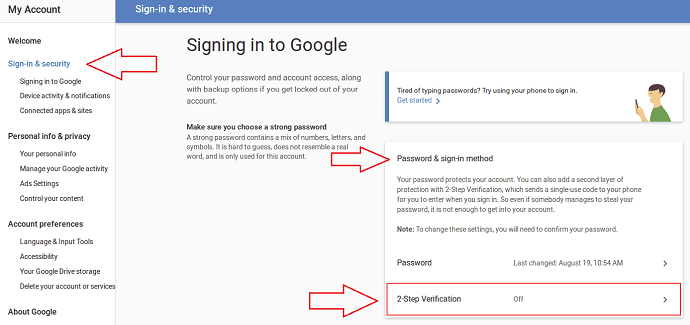
- If you signed into your Gmail account it will take straight to the security page and In case if you aren’t it will ask you to log in first.
- Next Under “Password & Sign-in method” you can find 2-step verification.
- You will be asked to enter your password to confirm it’s you.
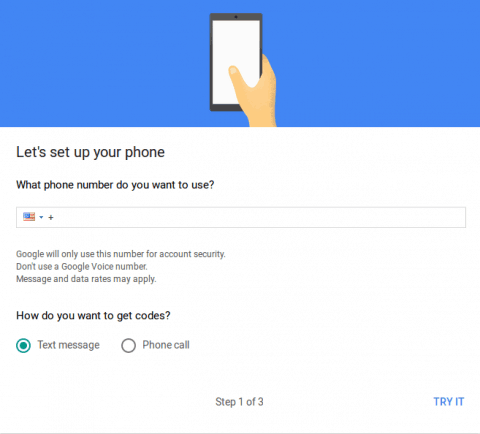
- In the next screen, you need to enter your phone number to receive OTP via SMS or Voice Call.
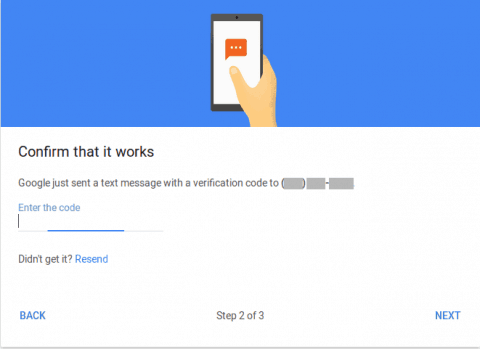
- Enter the OTP on the next screen and Click on next.
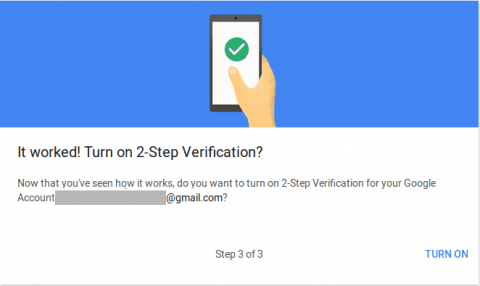
- You can Turn ON 2-Step verification.
Methods to Use Gmail 2 factor authentication
Now that you have successfully enabled 2-Step verification on Gmail, You can set Alternative method to login in case if you are having trouble with your cell reception. We already mentioned some of the most common methods used by many so let’s have a look at them.
- Related: How to send large files through Gmail using Google Drive
- How to Get Gmail Notifications on Desktop
1.Authenticator App
Authenticator App is one of the most used 2-step verification for Gmail and many other online accounts. The authenticator is the application developed by Google itself which generates new secret code every 60 seconds which will be synced with their servers. It is easy to set up and hard to break.
How to Setup 2 step verification to Gmail using Authenticator App
As mentioned above Authenticator is one of the most used 2FA application and let’s see how to set up the same with Gmail.
- Make sure that you have followed above steps to enable 2 Step authentication on your Google Account.
- Next, navigate to https://myaccount.google.com/security and enter your password if prompted.
- Tap on 2 Step Verification and you will get a list of alternatives like below.
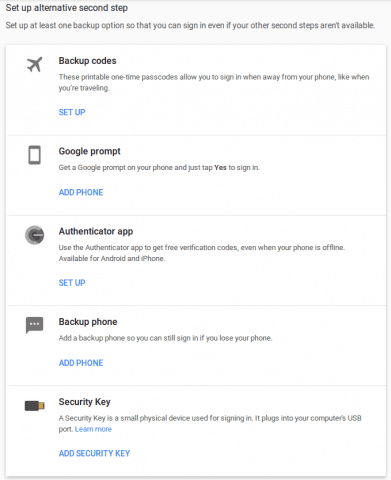
- Tap on Set Up under Authenticator and you will be prompted to choose your device Android or iPhone and install the application.

- Next, you will get a barcode which you need to scan with the application
- You will be prompted to enter the code to verify.
- You have successfully enabled 2FA using the authenticator.
You can also check other methods to enable 2FA on your Gmail or Google account.
2.Google Prompt
Google Prompt is a new feature from Google which makes Sign In even easier. You won’t need to enter anything while signing into your account. All you need to do is tap “yes” on the banner when prompted.
3.Backup Codes
Backup Codes comes to the rescue when you are out of options, Maybe you lost your device and don’t have access to your phone number or authenticator application. These codes will help you login to your Gmail account and reset the 2-Step verification.
The above method will help you Add and Use Gmail 2 factor authentication. In case if you are having any issues with the same then do drop a comment below so that we can help you out. Don’t forget to share this article with your friends. Just follow whatvwant on Facebook and Twitter for more tips.
I have been locked outofmy gmail and fb account was wondering if you could help
http://whatvwant.com/forgot-gmail-password-recover/ might help.