
Want to make a table in Word? While working with MS Word sometimes we need to enter some list of items and their details in a tabular manner. Then you must know how to make a table in Word. Do you know how to make a table in Word? When you don’t know How to make a table in word, read this simple tutorial.
In this tutorial, I am showing you, just how to insert a table in a Microsoft 365 word and older version MS word document. We can create a more attractive table by using colors and shadings. You will learn them in other articles.
- You may also Like: How to Insert and Format Pictures in Word Document
- Secret Guide to Create PDF from word in word
In Microsoft 365 Word:
Video tutorial:
For our reader’s convenience we provided this tutorial in video form. If you are interested to watch video then click on it. Otherwise, skip this video and continue reading.
1. How to make a table in word by selecting cells?

When there is a need to enter the list of items, we use the table in the Word document. Let us see how to insert a table in Word document of Microsoft 365.
Total Time: 3 minutes
Step 1: Create or Open document and place the cursor

Firstly, create or open the Word document in Microsoft 365 Word which you want to insert the table. When you open the document you can see many options in the menu tab. Place the cursor in the document where you want to insert the table.
Step 2: Click on Insert

After placing the cursor in the required place, go to the Menu bar for the insert option. Click on the Insert option which is placed at the third position from the left side of the screen. This insert option is used to insert anything like Pictures, Links, Header & Footer, etc into the document. Here our requirement is to insert the table. So first click on that Insert option.
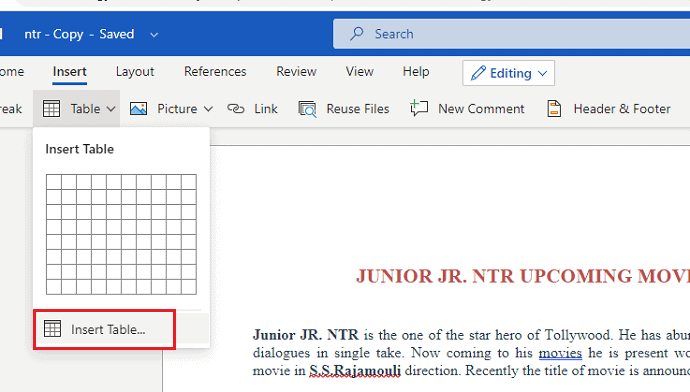
Step 3: Click on Table and select number of rows and columns

In the Insert menu, you can see various options like table, picture, link, etc. Click on the Table option.
When you click on the table option, cells will appear as shown in the above image. Move the cursor across cells to select the number of rows and columns. Once the number of rows and columns selected, hit Enter. Then the table with the desired number of rows and columns will be inserted into your Word document.
This is the procedure for inserting a table into the Word document in M 365 Word.
Estimated Cost: 9.99 USD
Supply:
- Microsoft 365
Tools:
- Microsoft 365
Materials: software
2. How to make a table in word by Insert table option?
In the previous section, we have seen the procedure for inserting table into a Word document by selecting the number of cells that represent rows and columns. Now in this section, we are going to see how to insert a table directly with the help of the Insert table option. Follow the below steps for detailed procedure.
Step 1: Open document

Firstly, open the word document in the Office 365. And place the cursor where you want to insert the table.
Step 2: Click on Insert menu
Now in the menu bar, you can see many options to make your document more stylish and professional. Click on the Insert option from that menu options.
Step 3: Click on Table
In the Insert menu, you can see different options for inserting into Word document. Here our requirement is to insert a table, so click on the Table option.

Step 4: Click on the Insert Table
Now in the Table menu, you can see a group of cells. Under that, you can see an option namely Insert table. Click on that Insert table.
Step 5: Enter number of rows and columns

When you click on the Insert table then you can see a new screen to enter rows and columns. Enter the desired number of rows and columns in the mentioned place. Then click on the OK option at the bottom of the dialogue box.
This is the procedure for inserting a table into the Word document of Microsoft 365 Word.
In Older version MS Word:
Note: It is not recommended to use the older version. We suggest you buy Microsoft 365 for the better features.
Video Tutorial
We provided this article in the form of a video tutorial for our reader’s convenience. If you are interested in reading, you can skip the video and start reading.
3. By selecting Rows & Columns?
Open word document with MS word. Click on the document, where you want to insert the table.
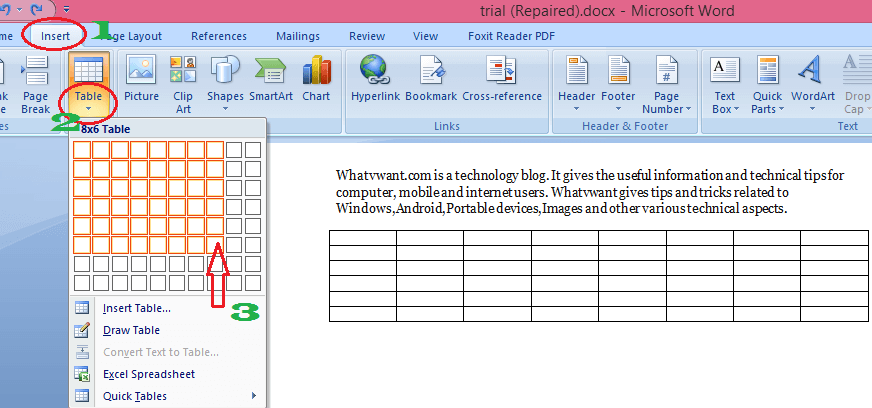
- Click “Insert” on the top menu.
- Click down-arrow mark under “Table”.
- Place the cursor on rectangular boxes. Move the cursor on boxes. You will see the table in a word document. Move the cursor until you get the required number of columns and rows and Click on it. Your table is ready.
4. Using Insert table
- Open word document with MS word. Click on the document, where you want to insert the table.
- Click “Insert” on the top menu.
- Click the down-arrow mark under “Table”.
- Click “Insert table” which is just below the rectangular boxes shows that in the above screenshot. You will see a small “Insert Table” box shows that in the below screenshot.
- Now Insert table dialogue box will appear as shown in the below image.

- Change the Number of Columns and Number of Rows according to your need.
- If you want, you can change “AutoFit behavior” or leave it as it is.
- Click “Ok”. You can see the table on word document.
5. Using Quick tables
MS word provides some pre-designed tables. If you want, you can use them as it is. Of course, you can edit the content of table.
- Open word document with MS word. Click on the document, where you want to insert table.
- Click “Insert” in the top menu.
- Click down arrow mark under “Table”.
- Click “Quick Tables” which is the last option below rectangular boxes. You will see the available templates shows that in the below screenshot.
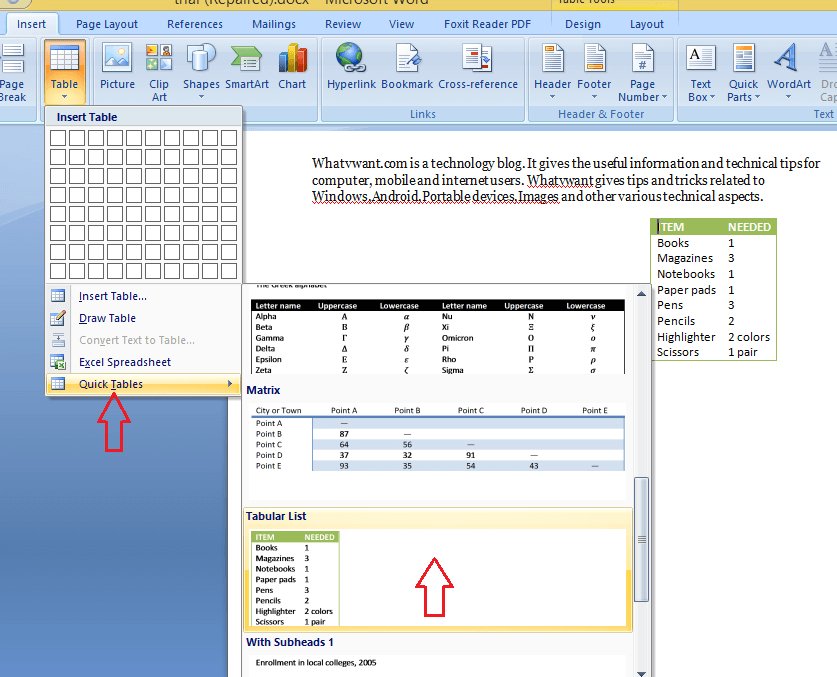
Select any one of the templates. Immediately you can see the table on document. Edit content of table.
6. Insert Excel into word
You can directly use the Excel spreadsheet in Word document. I have already written a separate tutorial about that.
Conclusion:
We think now you might know complete details about How to make a table in Microsoft 365 and older versions. Once again we recommend to buy Microsoft 365. Because it gives you many features.
- Also Read: 2 Methods to insert Excel in to word document
- How to add line and page border in word
- How to Password protect Word document
Thanks for reading my tutorial about How to make a table in word. If you like it, do me favor by sharing it with your friends. Please follow whatvwant on Facebook and Twitter. Subscribe to whatVwant channel on YouTube for regular updates.