This article is all about how to Password protect Excel file to make it Read-Only. You will also see the possible methods to unprotect Excel sheets with and without using the password.
What is Excel?
Microsoft Excel is a spreadsheet developed by Microsoft for Windows, macOS, Android, and iOS. It features to perform calculation, graphing tools, pivot tables, and a lot more for Applications. Excel is a helpful and powerful program for data analysis and documentation. Microsoft Excel has all the basic features of all spreadsheets, using a grid of cells arranged in numbered rows and letter-named columns to organize data manipulations like arithmetic operations.
Why should we make Excel read-only?
The Windows network files are available to any user or anyone who has access to do anything to the shared network drive. If you want to prohibit or restrict edits to the Excel file on the network it will do as explained below. If you want to restrict others in modifying your excel, you can do that very easily.
The Excel sheet includes “Read-Only” protection security in the workbook’s settings. This means a lot to you as that users can only read the content of the Excel file, but they cannot make any changes without the appropriate permissions.
By this, your Excel file is protected safely from unauthorized access and it’s read-only not allowing anyone to do changes to your content.
How to Password protect Excel File
Video Tutorial:
We provided this article in the form of video tutorial for our reader’s convenience. If you are interested to read, then you can skip the video and start reading.
Below are the steps that help you to make Excel sheet read-only with Password protection.
- Open the Excel workbook that you want to make and set as read-only on the network.
- By default, the ‘File’ tab will be selected as soon as you open the Excel.
- Now click on the ‘Review’ tab from the top main menu.
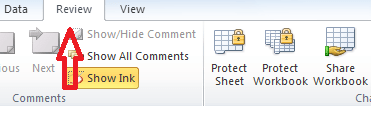
- You can able to see the ‘Protect and Share Workbook’ group.
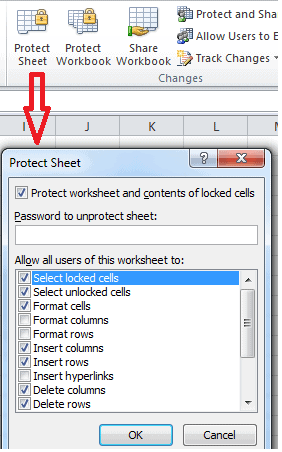
- Click on the ‘Protect Sheet’ option. It will open a Protect Sheet small window with a lot of options in it.
- By default, the Protect worksheet and contents of locked cells option will be checked.
- There will be a textbox labeled as ‘Password to unprotect sheet:’.
- Select the list of options you wish to protect from unauthorized access and enter the password you desire in the textbox.
- Click on the OK button to save the settings.
- Once you click on the OK button with the password, then a small ‘Confirm Password’ dialogue box will open.
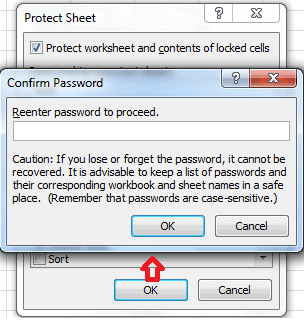
- It will ask you to ‘Reenter password to proceed’. Enter the same password you entered in the first textbox.
- You can notice here the ‘Protect Sheet’ option will turn into the ‘Unprotect Sheet’ option.
- Save the excel workbook once your settings are done.
- Now if anyone tries to do any changes to your worksheet, then it will prompt them the message “The cell or chart that you are trying to change is protected and therefore read-only” and they cannot perform any modifications in the sheet.

So your Excel worksheet is now protected and read-only.
Methods to unprotect excel sheet
Below are the methods that will explain you in details how to unprotect excel sheet with and without password.
Method-1: How to unprotect an Excel sheet with password
If you know the password for the protected excel sheet, then removing protection from it is a matter of seconds of time.
To unprotect an Excel sheet, follow these steps:
- First, go to the excel worksheet that you want to unprotect.
- Then click on the ‘Review’ tab from the top main menu.
- In the ‘Protect and share Workbook’ space, you can view the option ‘Unprotect Sheet’ if it is already protected.

- You can also see the option of ‘Unprotect Sheet’ when you navigate through File tab from the top main menu, click on the Protect option from the list of options and then
- Choose the ‘Unprotect Sheet’ option.
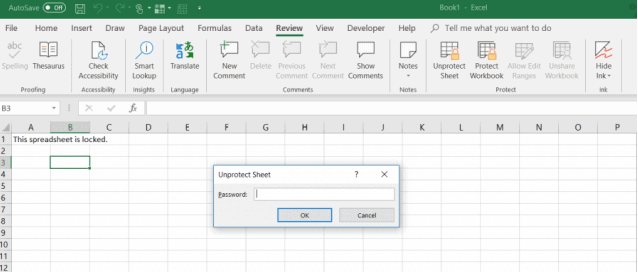
- Click on the option ‘Unprotect Sheet’, then a small dialog box will appear.
- Enter the password that you have used to this sheet in the Unprotect Sheet dialog box.
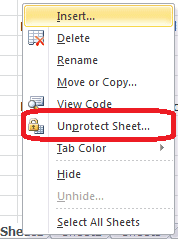
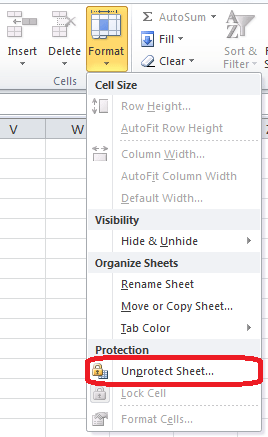
- You can even choose the ‘Unprotect Sheet’ from the context menu by right-clicking on the sheet that you wish to unprotect. This option will be available under the Protection menu.
- On the Home tab also, in the Cells group, click on the Format, and select ‘Unprotect Sheet’ from the drop-down menu.
- In this case, you are dealing with a password-protected sheet, so enter the password when it is prompted.
- If the worksheet was not protected with a password, then clicking the Unprotect Sheet button would all help you to unlock the excel sheet.
- Click on the ‘OK’ button, then your excel sheet is now Unprotected.
Method-2: How to open locked Excel file without password(2010 and Older versions)
Unlock Excel spreadsheet with VBA code:
If you are using Excel 2010 or older version, you can definitely unlock a password-protected sheet with the following macro.
- First. Open your Excel document and switch to the password-protected sheet. Please note that it should be active when you run the macro.
- Press the keys combination of Alt + F11 to open the Visual Basic Editor (VBA).
- Right-click the workbook name on the left pane (Project-VBAProject pane) and select Insert and then Module option from the context menu.
- In the next window that appears, paste in the following code:
Sub PasswordBreaker()
‘Breaks worksheet password protection.
Dim i As Integer, j As Integer, k As Integer
Dim l As Integer, m As Integer, n As Integer
Dim i1 As Integer, i2 As Integer, i3 As Integer
Dim i4 As Integer, i5 As Integer, i6 As Integer
On Error Resume Next
For i = 65 To 66: For j = 65 To 66: For k = 65 To 66
For l = 65 To 66: For m = 65 To 66: For i1 = 65 To 66
For i2 = 65 To 66: For i3 = 65 To 66: For i4 = 65 To 66
For i5 = 65 To 66: For i6 = 65 To 66: For n = 32 To 126
ActiveSheet.Unprotect Chr(i) & Chr(j) & Chr(k) & _
Chr(l) & Chr(m) & Chr(i1) & Chr(i2) & Chr(i3) & _
Chr(i4) & Chr(i5) & Chr(i6) & Chr(n)
If ActiveSheet.ProtectContents = False Then
MsgBox “Password is ” & Chr(i) & Chr(j) & _
Chr(k) & Chr(l) & Chr(m) & Chr(i1) & Chr(i2) & _
Chr(i3) & Chr(i4) & Chr(i5) & Chr(i6) & Chr(n)
Exit Sub
End If
Next: Next: Next: Next: Next: Next
Next: Next: Next: Next: Next: Next
End Sub
- Press the keyboard button F5 in the keyboard, or click on the Run button on the toolbar and wait for a couple of minutes of time.
- The macro created now will report a cracked password for you, which is not same as the original one (it will be always some combination of A’s and B’s),
- You do not need to remember this macro reported password or enter it anywhere.
- Simply click on the OK button and now the sheet is unprotected! for you.
- Suppose if your Excel file contains more than one protected sheet, then you have to run the macro for each sheet individually to unprotect it.
Method-3: How to open locked Excel file without password(Modern versions)
- One more important thing to unprotect an Excel sheet without a password in the modern versions like Excel 2019, Excel 2016, and Excel 2013, you suppose to save the document as Excel 97-2003 workbook (*.xls) first. Then, close an Excel and reopen the workbook – it will be opened in compatibility mode.
- Run the above macro mentioned in method 2 to unprotect the worksheet, and then save the workbook back as a .xlsx file.
Method-4: How to unprotect Excel workbook online free with Google Sheets
Suppose if you forget or lose the password on a protected Excel worksheet, for sure you can be scary.
Your first thought maybe that you have completely lost all the data present in the excel sheet.
But the good news is that there is a creative workaround that allows you to unprotect an Excel sheet. You will need a Google Drive account to do this and it will help in the following way.
- Open your Google Drive account, then select New and select Google Sheet to open a new sheet.
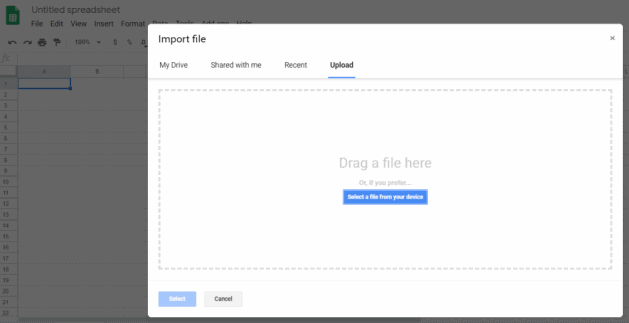
- In the sheet, select the option File and select Import.
- In the Import file dialogue box or window, select Upload from the menu.
- Click Select a file from your device.
- Browse to the Excel spreadsheet on your computer where your excel sheet is located. Select it, and then click on the Open button.
- In the Import file window, you can select Replace spreadsheet and select Import Data.
- This will import you the protected Excel worksheet into your Google Sheets worksheet.
- The surprising thing here is, now you will notice that the sheet is no longer protected.
- You can edit it all you like.
Now that it is unprotected and you can export the sheet back to Excel format again.
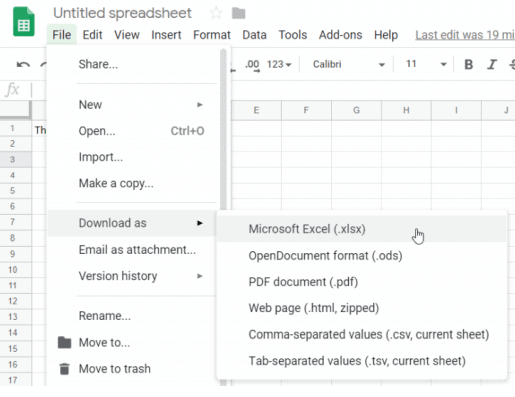
First, in the unprotected Sheet, select the File tab from the top main menu and choose the Download as Excel to save it as an excel worksheet.
Select Save As, give the file a name as you wish and select Save.
Now you have the same exact Excel sheet with you, but the protection is removed as you expected and it is unprotected now.
I hope you like my tutorial about how to password protect Excel File and unprotect Excel sheet. Making your Excel protected and read-only. If you Like it!! then please Share it. If you want to add anything to it, please let us know through the comments section.
Want regular updates, follow WhatVwant on Facebook, Twitter, and YouTube.
How to Password protect Excel file & 4 Free Ways Unprotect Excel sheet-FAQ
Can i make an Excel sheet read only?
Yes.
How to open locked Excel file without a password?
Press the keys combination of Alt + F11. Right-click the workbook name on the left pane and select Insert and then Module option from the context menu. Copy and paste the code above in the window and click on the run button or press F5.
Is there any online solution to crack the protected Excel sheet without password?
Yes. Google sheets is the best solution to unprotect Excel worksheet online without password.