Want to Set Disk quota limits for users in your Windows7 system. Fortunately, there is a simple method to allocate the required Disk space in Windows7.
What is the Disk quota?
A disk quota is a limit set by a system administrator that restricts certain aspects of file system usage on modern operating systems. The function of using disk quotas is to allocate limited disk space in a reasonable way. Read more details from Wikipedia.
Types of quotas
There are two basic types of disc quotas. The first, known as a usage quota or block quota, limit the amount of disk space that can be used. The second, known as a file quota or inode quota, limit the number of files and directories that can be created.
In addition, administrators usually define a warning level, or soft quota, at which users are informed they are nearing their limit, which is less than the effective limit, or hard quota. There may also be a small grace interval, which allows users to temporarily violate their quotas by certain amounts if necessary.
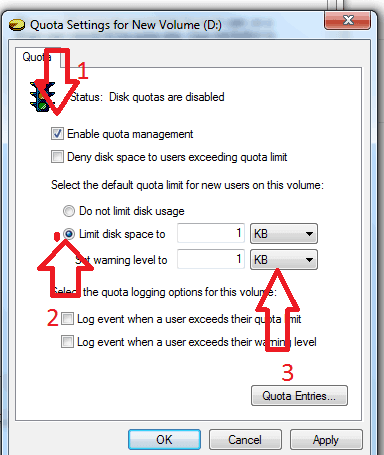
Procedure to set Disk quota in Windows 7
- Go to the start button
- Open computers

- Right-click on required drive and then click on properties

- Select quota option
- Select show quota setting

- Select enable quota management
- Select limit disk space

- Enter disk levels
- Click Apply and then OK
Disk Quota Limits
The disk space that each file uses is charged directly to the user who owns the file. The owner of a file is identified by the security identifier (SID) in the security information for the file. The total disk space charged to a user is the sum of the length of all data streams. In other words, property set streams and resident user data streams affect the user’s quota.
Quota is not charged for re-parse points, security descriptors, or other metadata that is associated with the files. Compressing or decompressing files does not affect the disk space reported for the files. Therefore, quota settings on one volume can be compared to settings on another volume.
There are two types of disk quota limits, as shown in the following table.
Advantage
Although there are advantages to having users store their documents and profiles on the network, it is possible for a few users to use all the available hard disk space on a server. You can configure disk quotas to prevent this, and to balance the needs of users for file storage space vs. the costs of adding more storage space.
- You can set disk quotas on a per-user per-volume basis. If the individual user’s profile exceeds the predetermined file limit, the user will not be able to log off the computer until the user reduces the size of the file. Per-user per-volume quotas have two key advantages:
- When you set quotas on a volume, these quotas are valid only for that volume. If users store files on several NTFS file system volumes, you can configure separate quotas on each volume.
- Quotas are charged to the person who owns the file. Thus, lines of ownership are clear-cut, even if a user shares one or more files with others
Guidelines for Setting Disk Quotas
It is important that you provide sufficient disk space for your users’ valid storage requirements, without forcing your organization to add unnecessary servers for all the files that users could post to a network share. Rather than ask users themselves how much network disk space they require, consider using your initial pilot deployments to develop meaningful data on how much network storage users actually require.
Keep in mind that not all users will have the same storage requirements. Software developers, for example, require greater network storage than other users. Financial and engineering users represent two other user groups that frequently have larger and more numerous files than other users.
In order to set effective disk quotas for your organization, learn what your users’ legitimate requirements are before enforcing rigid quotas.
I hope you like my tutorial about how can i give disk quota in window 7. If you like it, do me favor by sharing it with your friends. If you want to add any other point, do share in the comment section.
Follow WhatVwant on Facebook and Twitter for more tips. Subscribe whatvwant channel on YouTube for regular updates.
