Want to know How to set up a VPN in Windows 7, 8, 10. VPN connection (Virtual Private Network) is to secure our web activity from ISP’s(Internet Service Providers), Governments, and Hackers. Set up a VPN connection to get anonymous web browsing without any interrupts.
It is easy to set up a VPN connection in any windows os (win XP,7.,8,8.1,10). Before setting up to VPN connection, we need to know about VPN and its advantages. Below I briefly explain VPN and its advantages and give steps to set up vpn connection in windows.
What is VPN?
VPN(Virtual Private Network) is a technology to send or receive encrypted data between VPN servers and internet users over a secure connection.`Only The user can decode this Encrypted data. It is not easy to decode another system (ISP’s, government, hackers etc,.). Read more details about VPN.
Importance of VPN connection
Nowadays hacking a system is easy and stolen personal information like bank details, emails, etc,. from electronic devices. Because our internet connections are less secure. We can avoid hacking the system using a VPN(Virtual Private Network) connection. VPN servers provide encryption and it can’t easy to hacking.
While browsing we suddenly get interrupted and shows “Website blocked” popups. Nowadays it is common to everyone in any country. This is due to the government’s imposed censorship on internet websites. To avoid this interrupt and unblock these sites, we need a VPN connection. VPN hides our browsing and it is invisible to ISP’s. Thus we can browse anonymously using a VPN.
Update: US senate allowed ISPs to collect and sell your personal data without your permission. To stop the ISP monitor, you must use a VPN service and browse using some other country IP.
Advantages of VPN connection
- Hide the real IP address of computer and shows VPN IP.
- Secure web activity from ISP’s, government, and hackers.
- Avoid stolen personal information while using wifi in public places.
- Anonymous browsing(unblock the websites which are blocked by ISP’s due to internet censorship of governments).
- Provide more privacy than other networks.
- Free from viruses and malware from the internet.
- Torrent sites browsing.
How to setup VPN in Windows
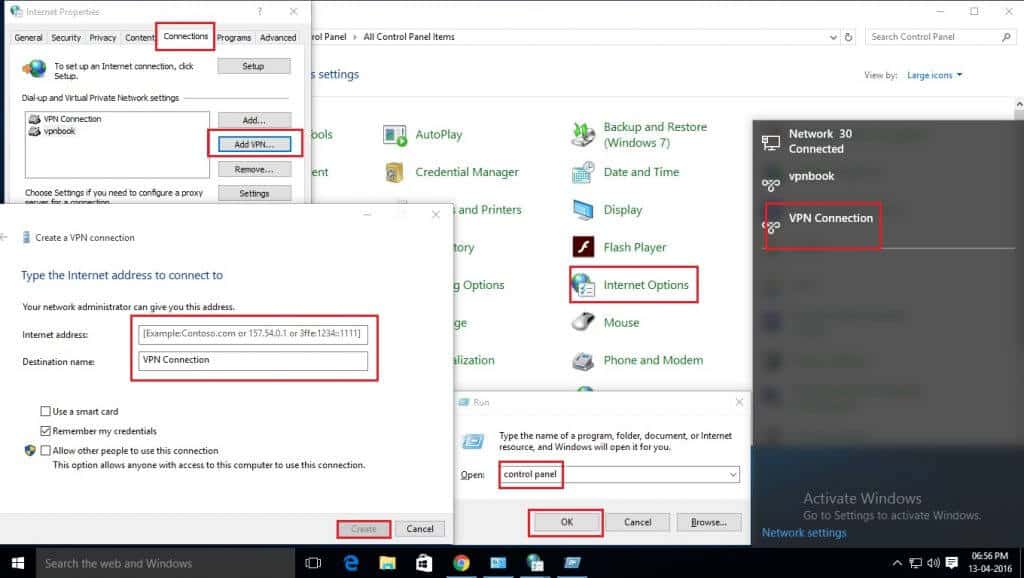
1.Open control panel window.
- Press windows button on keyboard and click on control panel option to get control panel window.
(or)
- Press window button + R and type control panel in run tool.
2.Open internet properties window.
- Find the Internet option and click on that.
- If you cannot find an internet option then click on Network and internet and you can find the internet option.
3.Now click on connection tab on top of the window of internet properties.
4.Now find and click on Add VPN… to open a window of Create a VPN connection.
5.Type vpn server details.
- Internet address: type VPN server address
- Destination name:type name of the VPN server
6.Click on create to complete the creation of vpn connection.
Now you can connect to the VPN as visible in the name which you write in the destination name. Click on that VPN and click on the connect option. Now you see a sign-in window, fill up the username and password provided by your VPN.
When you don’t want to take a VPN from your ISP, there are many VPN services available in the internet world. I can recommend you to use the fastest VPN ExpressVPN Or the cheap and best VPN NordVPN(75% Special Discounted Link).
I think you have learned about How to setup a VPN in Windows from the above article. If you like it, please do me favor by sharing it in social media networks.
Follow WhatVwant on Facebook and Twitter for more tips. Subscribe to whatvwant channel on YouTube for regular updates.


Thank you for posting this awesome article.
I search since a long time an answer to this subject and I have finally found it on your site.
I registered your blog in my rss feed and shared it on my Twitter.
I will come back for sure to check your future articles!