Do you want to sign documents online in an easy, fast, and best manner? And are you searching for the best signature software for this? Then this article is the right way for you. Just you can go through this article to learn and pick the best signature software that suits your needs. Almost every software mentioned in this article will have a free version with limited features.
What is an electronic signature? And why should I need it?
An electronic signature is an online signature taken from your customers, employees, and others. In most of the countries, electronic signatures are permissible and are legally binding. If you are an owner of a leading company, then you must go for electronic signature options because of the following benefits.
- Convenient for your customers.
- Saves Time and Money.
- Increases Productivity.
- Easy to use.
- Real-Time Visibility.
- And a lot more.
Where do I require electronic signatures?
You require an electronic signature in signing the following forms.
- Sales Contracts.
- Purchase Orders.
- New Hire Documentation.
- Vendor Agreements.
- Expense Reporting.
- And a lot more.
How do you create an electronic signature? Can I type an electronic signature? How do I create a handwritten signature?
There are many online eSignature software sites on the web that aid you in creating an electronic signature with ease and fast. In general, those sites provide three ways to create an electronic signature. Those are.
- Type your name
- Converts your entered name into a signature.
- Draw.
- You can draw your sign using a mouse or touchpad.
- Image.
- You can sign on a paper. And take a scan or photocopy. And upload it as an image. This is how to create a handwritten signature online.
To know the list of best online eSignature software sites, you can just go through this article.
- RELATED – Nitro Productivity Suite Review: An All-In-One PDF Solution
- How to Edit A PDF on Mac: 4 Methods (3Free & 1Premium)
7 Best Online Software to Sign Documents Online
The following are the 7 best online software sites that aid you in getting ‘eSignatures’ from your customers with ease and fast.
Video Tutorial:
We provided this article in the form of a Video Tutorial for our reader’s convenience. If you are interested in reading, skip it for now and watch it after the completion of reading.
1. DigiSigner: Sign documents online for free

DigiSigner is another popular online signature software provider to sign documents online for free. It permits you to invite your customers to sign your documents in just two clicks. It is easy, fast, and the best online signature software trusted by all kinds of businesses. It is ideal for businesses like real estate, Human Resources, and small businesses.
This section helps you to know the procedure to sign the documents online using DigiSigner software.
Total Time: 5 minutes
STEP-1: Visit the site and upload the file
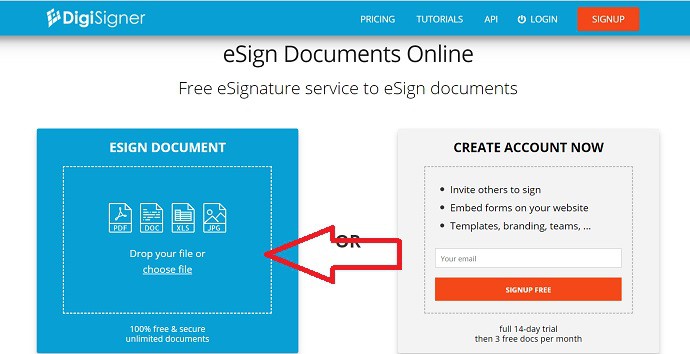
Visit the DigiSigner official site. Click on Choose File to upload the file that you want to sign or else simply drag and drop the file.
STEP-2: Select My Signature
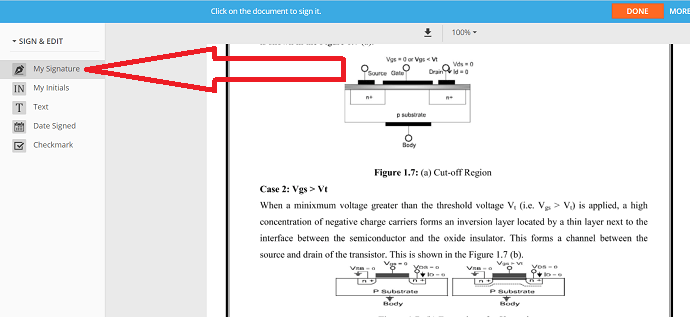
Once the file is uploaded, the file will appear on the screen. Select the “My Signature” option from the left side of the screen and click on the document at the place where you want to add your signature.
STEP-3: Select the signature format
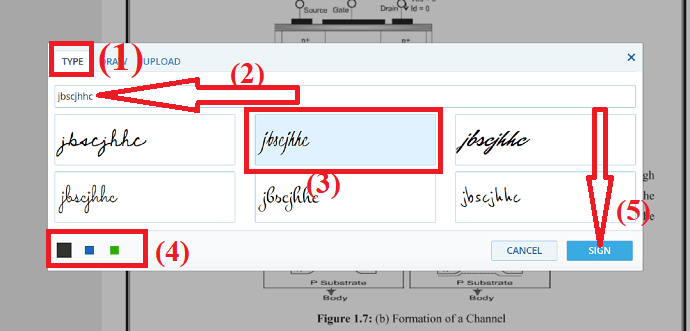
Once you click on the document a pop-box will display on the screen. You can observe different signature formats known as type, draw, and upload. Select the one you want. Here select the “Type” option. Enter the name that you want to add as a signature, and select the font, and color. Finally, click on “SIGN”.
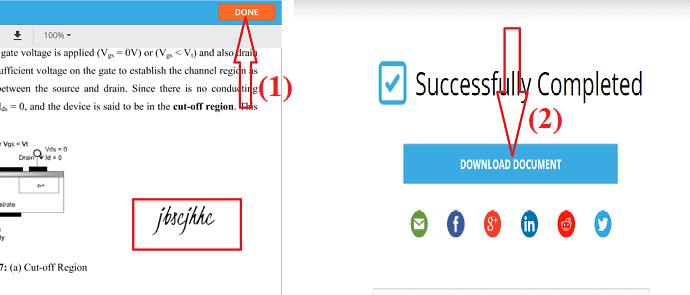
STEP-4: Click on Done
The sign will be added to the document at the place where you select. Click on the “Done” option. Once you click on the Done option, the signature will be added to the document and the download option will appear on the screen. Click on “Download document” to download the file.
Tools:
- DigiSigner
Materials: Online sign software
Features of DigiSigner
- Less than 2 minutes!
- Oh Great! You and your clients can sign documents online in less than 2 minutes!
- Just 2 clicks.
- You can invite your partners, employees, and customers to sign documents in just two clicks.
- Three ways to sign.
- Draw your signature with a mouse or touchpad.
- Type your name.
- Upload a scanned image copy of your signature.
- Legally binding.
- All your signed documents are legally binding.
- Mac, PC, and Mobile.
- It permits you to manage your documents from any of your devices.
- No fee for recipients.
- You can send documents to your customers from DigiSigner.
- Then it sends a link to your customers to sign your documents asking to pay.
- Safety and Security.
- It guarantees full safe with SSL encryption to all your documents stored on its site.
- Unlimited Pro.
- Its Pro plan permits you to sign countless documents. And you can send unlimited sign requests to your customers.
- And more.
Cons of DigiSigner
- With a free account, you can sign just 3 documents for one month.
- If you want to sign unlimited documents, then you have to buy its premium plans.
Price and Plans of DigiSigner
- It provides three plans to purchase.
- PRO.
- The cost of this plan is $10 for one month for one user to be paid annually.
- TEAM.
- The cost of this plan is $40 for one month for five users to be paid annually.
- ENTERPRISE.
- To buy this plan, contact its site sales officials.
Supported Document Formats of DigiSigner
PDF, Word, IMG, TXT, XLS, and more.
RELATED – 3 Ways to Convert PDF to Word on Mac (Free Online&Offline)
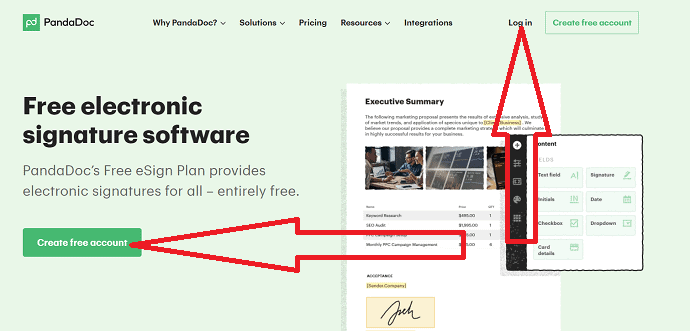
2. PandaDoc

PandaDoc is another online signature software site. It is the best eSignature solution for all types of businesses. It comes with many integrations, like payments and more. Here ‘Payments’ is the best integration feature, which aids you to increase your revenue. It makes it easy for you to send and sign your documents within minutes.
Let’s see how to sign Documents using PandaDoc:
STEP-1: First, Visit the PandaDoc official page. If you have an account in PandaDoc, then click on “Log in” at the top right. Otherwise, click on “Create a free account” to create an account. A pop-up box will display on the screen, provide the required credentials, and click on “start using PandaDoc”.
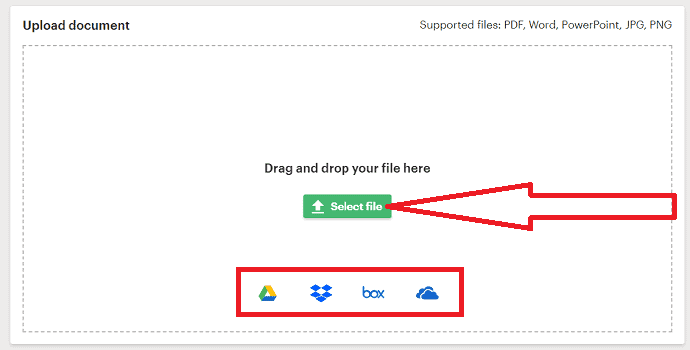
STEP-2: You will be redirected to the PandaDoc dashboard. Click on “Select file” to select the file from your device or else drag and drop the file. You can also upload the file from Dropbox, Google Drive, box, or Cloud by selecting its respective icon on the screen.
STEP-3: Next you need to add the Email ID, First Name, and Last Name of the Recipient. If you want to send the document to more than one at once, click on the “Add recipient” option and enter the details. Click on “Continue”.

STEP-4: The uploaded document will be displayed on the screen. Drag and drop the Signature option at the place where you want. You will observe the signature box on the document. Click on the Signature box, and a new pop will appear on the screen. Select the signature type. If you select the Type option, then choose the font and color of the signature. Enter the name that you want to add as a signature and click on “Accept and sign”.

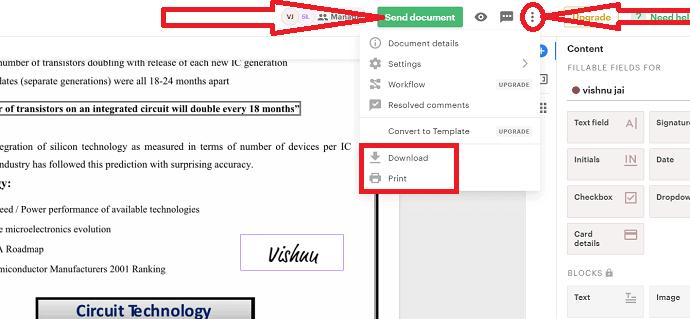
STEP-5: The signature will be added to the document. Click on the “Send document” option to share the signed document. If you want to download or print the document, then click on three vertical dots. A dropdown box will appear, and you will find both the download and print options. Select the one you want.
Features of PandaDoc: Is Panda DOC free?
- iOS, Android, tablet, and PC.
- Your customers can sign on the received documents from any device.
- Legal and Secure.
- It provides a legally binding to all your signed documents. And provides 256-bit SSL encryption to secure your stored documents on its site.
- Mobile App.
- It provides a mobile app too. You can install this app on your mobile. And can use it to manage your documents.
- 14 days of free trial is there.
- Oh! It has payment integration.
- It too has the signing order feature.
- And more.
Cons of PandaDoc
- They provide just 14 days of free trial. After completion of the free trial, buy its premium plan to continue to use its application.
Price and Plans of PandaDoc
- It provides three plans for you to buy.
- eSignature (Annual Plan)
- The cost of this plan is $25 for one month for one user.
- Business (Annual Plan)
- The cost of this plan is $49 for one month for one user.
- Enterprise
- You need to talk to sales officials to buy this plan.
Supported Document Formats of PandaDoc
Word, PDF, and more.
3. DocuSign
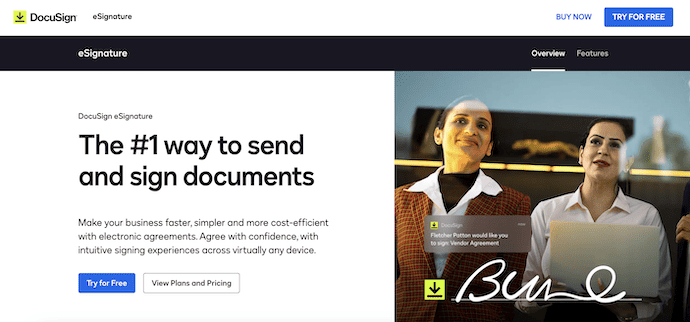
DocuSign is the most popular and World’s number 1 online eSignature software provider. It has hundreds of millions of users around the world. The online software permits you to sign any of your documents just in a few minutes. It provides a free link for your recipients to sign your documents.
Features of DocuSign: Can I use DocuSign for free?
- Send and Receive.
- It permits you to send your documents to your clients via a free link to add eSignature to the sent documents. After the sign, the documents are emailed back to you.
- Status.
- You can see the status too regarding the signing process of the documents which you have sent to your clients.
- Add Fileds.
- You can add standard fields like Signature, Date, and more as you need.
- Reusable templates.
- It permits you to store frequently used agreements. Next time you can use those with little modifications to prepare new documents.
- Legal bind.
- It turns your signed documents into lawful and court-permissible documents. That is it provides a legal bind to all your signed documents.
- A sign from any device.
- It provides a mobile app for iOS, Android, and Windows mobiles. So, you and your clients can sign from any device and from anywhere.
- More than 350 Integrations.
- It is integrated with more than 350 applications that you use. Just like Google, Microsoft, SAP, Salesforce, workday, and more.
- Support for 43 languages.
- It permits you and your clients to sign documents in 43 localized languages.
- It too permits you to send documents in 13 languages.
- Upload from anywhere.
- It permits you to upload documents to sign not only from your PC but also from cloud-sharing sites like Google Drive, OneDrive, Box, and Dropbox.
- A 30-day free trial is there.
- And more.
Cons of DocuSign
- Its free trial lasts after 30 days of usage. Later, if you want to continue to use this online software, then you need to purchase its premium versions.
- The premium versions permit you to send a maximum of 100 documents to get the sign from your clients.
Price and Plans of DocuSign: How much does it cost to use DocuSign?
- It provides three plans for you to buy.
- Personal Plan.
- The cost of this plan is $10 for one month for one user to be paid annually.
- Standard Plan.
- The cost of this plan is $25 for one month for one user to be paid annually.
- Business Pro.
- The cost of this plan is $40 for one month for one user to be paid annually.
Supported Document Formats of DocuSign
.doc, .docx, .pdf, .xls, .xlsx, .txt and more.
4. DocHub

DocHub is another popular online signature software site. It permits you to send sign requests to your clients and receive the signed forms in a faster and easier manner than ever before. It creates legally binding documents to sign for your clients. Your customers can import your document to DocHub straight from their inbox. Then just drag & drop the signature and email it back.
Just follow the below steps to know how to sign on documents using DocHub:
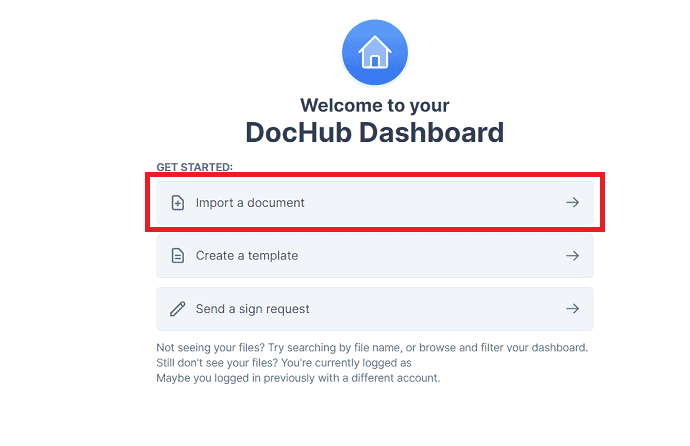
STEP-1: Visit the DocHub official page using any search engine and click on the “Create free account” option to create a DocHub account.

STEP-2: Once the account is created, the DocHub Dashboard will be displayed on the screen. You will find three different options. Select the “Import a document”.
STEP-3: You will be redirected to a new page. Drag and drop the document on the page or else export the files from Dropbox, Google Drive, box, or OneDrive by selecting their respective options.

STEP-4: The uploaded file will process and appear on the screen. Tap on “Sign” at the top. Select “Create your signature” from the dropdown box.
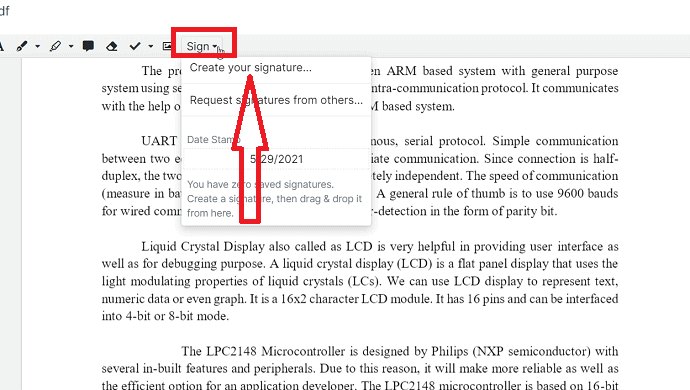
STEP-5: A pop box will appear on the screen. You will find different options to add a signature from and select the one you want. If you select the “Type” option enter the name in the box, select the font, and click on the “Save as default” option.

STEP-6: The signature will appear on the screen. Drag the signature to the place where you want to add. Select the Print icon at the top left to print the document. Click on the “Share” icon at the top to share the document with others.

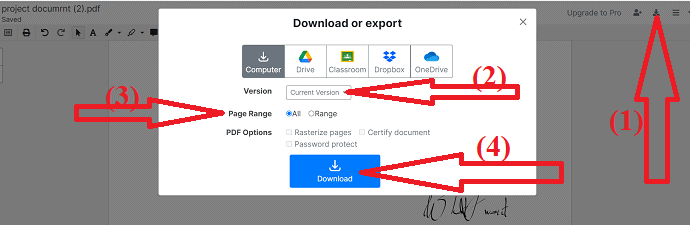
STEP-7: Select the download icon at the top right. A pop-box will appear on the screen from that select the version, and page range and click on “Download”. You can also export files to Google Drive, Dropbox, OneDrive, and Classroom by selecting their respective options from the top.
Features of DocHub
- Unlimited Signs.
- It’s Pro plan permits you to sign unlimited documents.
- Unlimited Sign Requests.
- With its Pro plan, you can send unlimited sign requests to your customers.
- More than one signature in a document.
- It permits to signing of a single document with multiple individuals.
- All your documents are legally binding.
- And more.
Cons of DocHub
- With a free account, you can sign just five documents for one month. And you can send just three sign requests to your customers for one month.
- If you want to sign countless documents and send countless sign requests to your customers. Then you need to buy its PRO plan.
Price and Plans of DocHub
- It provides annual and monthly plans for you to buy.
- PRO (Annual Plan)
- The cost of this plan is $4.99 for one month for one user.
- PRO (Monthly Plan)
- The cost of this plan is $6.99 for one month for one user.
Supported Document Formats of DocHub
.pdf, .doc, .docx, .xls, .xlsx, .ppt, .rtf, .txt, .png, .jpg, .jpeg, and .gif (non-animated).
RELATED – 2 Ways to Convert PDF To Editable Word (Free Online & Offline)
5. RightSignature: What is RightSignature?

RightSignature is the easiest and fastest way online signature software site for you to get eSignatures. Easy to send and easy to sign. Everything happens in a matter of a few minutes! not in hours or days. Even a non-technical person can send documents to sign. That’s how it works! So easy to understand everything from sending to receiving the documents.
just follow the below steps to learn how to sign documents using RightSignature:
STEP-1: Visit the Official site of RightSignature and click on “Start My free trial” to create an account to use it for free.

STEP-2: Once you log in to your account, you will be redirected to a new page. Click on the “Start Document” option at the top.

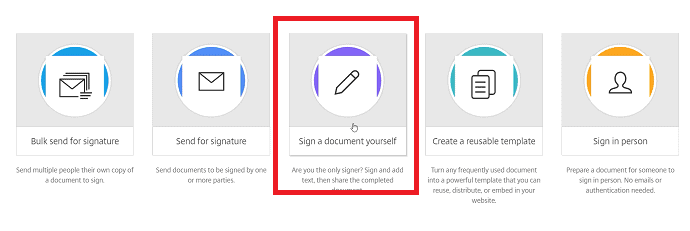
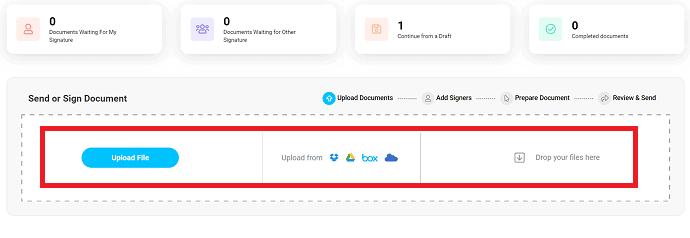
STEP-3: You will find different options on the screen. From that select the “Sign Document yourself” option.
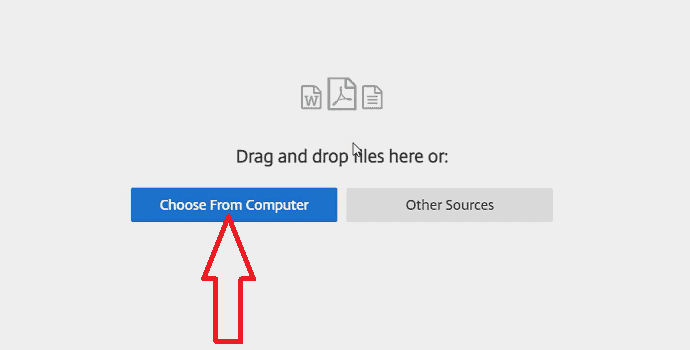
STEP-4: The Upload page will be displayed on the screen. Select the “Choose from computer” option or else simply drag and drop the file. If you want to upload the file from other sources like Google Drive, Dropbox, etc., click on the “Other Sources” option.
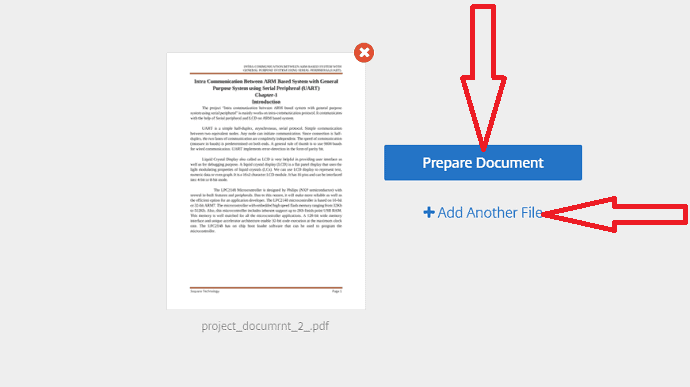
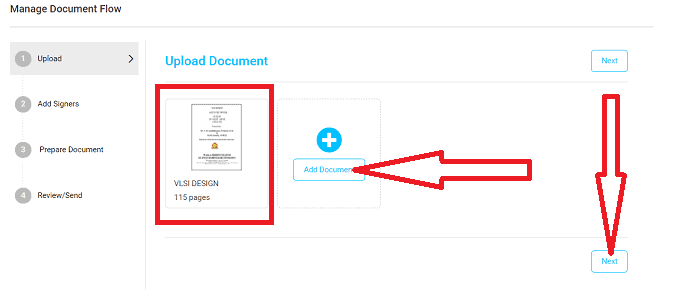
STEP-5: The uploaded file will appear on the screen. If you want to add another file, tap on Add Another file option. Next, Click on “Prepare Document”.
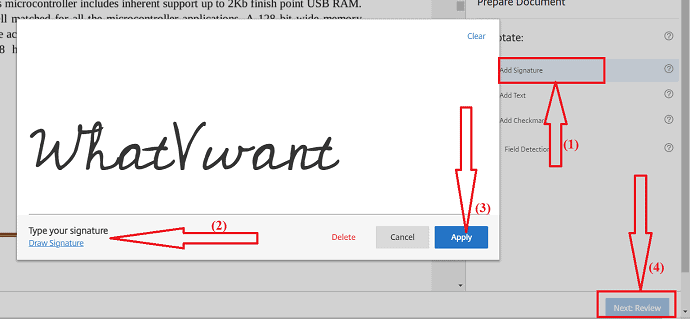
STEP-6: The uploaded document will process and appear on the screen. Select “Add Signature” from the right and click on the document at the place where you want to add a signature. A pop will be displayed on the screen, from that select the type signature or draw signature option. Enter the signature that you want to add to the document and click on “Apply”. Once the signature is applied to the document, click on “Next”.
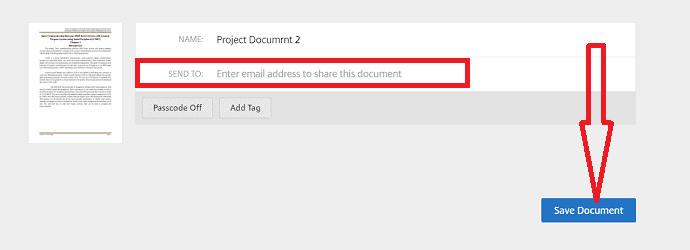
STEP-7: Finally, the signed document will appear on the screen. Click on “Save Document” to save the document to your device. If you want to share the document with others, then enter the recipient Email ID in the “Send To” box.
Features of RightSignature: Is RightSignature secure?
- PC, Mac, iPhone, iPad, Android, and more.
- It provides a mobile app for iOS and Android.
- This app aids your customers in signing your documents from any device.
- Multi-party signing.
- You can send a document to one recipient or many. You can mention the order in which they have to sign.
- Bulk at once.
- It permits you to send several documents to a single recipient at once.
- Secure link.
- You can send your RightSignature documents to your clients via email with a secure link to get a signature from them.
- All your documents are secure, legally binding, and Industry-compliant.
- It provides a 14-day free trial to you.
- It provides payment options to collect payments from your customers after completion of the sign-on of your documents.
- It provides digital fingerprint protection to prevent any party from modifying your document.
- And more.
Cons of RightSignature
- It permits just a 14-day free trial for you to test and use. After that, you have to purchase its premium plans to continue to use this application.
Price and Plans of RightSignature
- It provides three plans for you to purchase.
- PERSONAL (Annual Plan).
- The cost of this plan is $12 for one month for one user.
- BUSINESS (Annual Plan).
- The cost of this plan is $60 for one month for three users.
- ADDITIONAL PLANS (Annual Plans).
- These plans start at $99 for one month.
Supported Document Formats of RightSignature
.pdf, .doc, .docx, and image files.
6. OneSpan: What is OneSpan sign?
OneSpan formerly known as eSignLive is a flexible online eSignature software site to use and get signs. It permits you to work from out of the box to securely send and e-sign your documents. It captures everything from the start of the signing process to the finish and receives. You can store those web screen captures and can use them in case of any disputes.
Features of OneSpan
- A sign from any device and anywhere.
- It provides mobile-optimized web pages and mobile apps to make the signing process easy.
- It provides military-grade and digital signature technology to secure your signed documents.
- All your OneSpan’s signed documents are legally binding.
- It provides a 30-day free trial for you to test and use.
- And more.
Cons of OneSpan
- The 30-day free trial lacks many options like mobile apps, group signing options, and more.
- You must buy its premium plans to get those features.
- The premium plan Professional permits 1000 transactions for one user. It does not permit unlimited transactions.
Price and Plans of OneSpan
- It provides two plans for you to purchase.
- Professional (Annual Plan).
- The cost of this plan is $20 for one user for one month. Up to 49 users are allowed in this plan.
- Enterprise (Annual Plan).
- You can buy this plan if the number of users exceeds 49. To get the cost of this plan, you have to contact its sales officials on its site.
Supported Document Formats of OneSpan
PDF, DOC, JPEG, and more image formats.
RELATED – How to Insert Date and Time in Word Document
7. eSign Genie

eSign GENIE is an easy and fast online eSignature software site to get legally binding signature documents. It has all features like Templates, API, Embedded Signing, Integrations, and more. You can send, save, and archive tamper-proof documents.
Let’s see how to use the eSign GENIE to sign the documents
STEP-1: Visit the eSign GENIE official site and sign up for the tool with Google or LinkedIn. If you want to start a free trial then enter the details and click on the “start free trial” option.

STEP-2: You will be redirected to the new page. Click on the “Upload file” option or drag file option or simply drag and drop the file. You can also select the file from Dropbox, Google Drive, and more. Once you select the file it starts working on it.
STEP-3: The uploaded file will appear on the screen. If you want to add another document, click on “Add Document”. You will find two Next options. one is at the top and another one is at the bottom, select anyone to proceed to the next step.
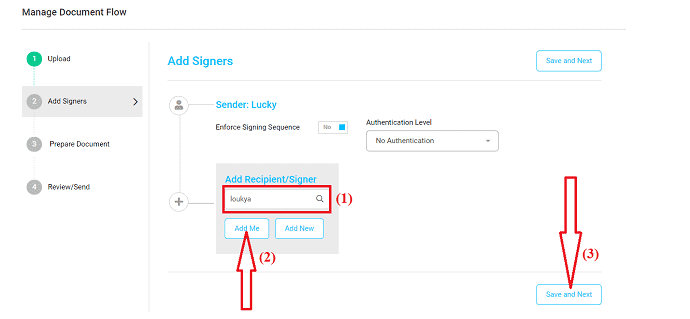
STEP-4: In this step add the sender and recipient details and also add at least one party for sending. So, enter the Recipient in the particular box and click on “Add Me” or “Add Now”. Finally, click on “Save and Next”.
STEP-5: Drag and drop the particular option like a Signature field, initial field, Signature name field, Date signed, and signer email in the document from the Signature field. Once you have done all the processes click on “send” to share the document with others. Otherwise, click on the “save” option to save the document in your account.

Features of eSign Genie
- Complete Security.
- It provides full security from sending to receiving your documents.
- All your stored documents on its site are secured with 256-bit encryption.
- And all your signed documents have a legal bind.
- Seamless Integrations.
- Oh Great! It integrates with your favorite applications like Google Drive, Salesforce, Microsoft OneDrive, Box, and DropBox.
- It provides a 14-day free trial for you to test and use.
- And more.
Cons of eSign Genie
- Its free trial feature permits you to send just 5 documents to get signatures. And you can use just two templates.
Price and Plans of eSign Genie
- It provides four plans for you to buy.
- Pay As You Go (For Frequent Use Users)
- The cost of this plan is $2 for one document. And a minimum of $10 at a time.
- Professional (Annual Plan).
- The cost of this plan is $8 for one month for one user.
- Business Premium (Annual Plan).
- The cost of this plan is $20 for one month for one user.
- Enterprise.
- To get this plan details, you have to contact its salespersons on its site.
Supported documents of eSign Genie
PDF and Word.
Comparison(DigiSigner Vs PandaDoc Vs DocuSign Vs DocHub Vs RightSignature Vs OneSpan Vs eSign Genie)
| Features | DigiSigner | Panda Doc | DocuSign | DocHub | Right Signature | OneSpan | eSign Genie |
| Support Document formats | PDF, Word, IMG, TXT, XLS, and more. | Word, PDF, and more. | .doc, .docx, .pdf, .xls, .xlsx, .txt and more. | .pdf, .doc, .docx, .xls, .xlsx, .ppt, .rtf, .txt, .png, .jpg, .jpeg, and .gif (non-animated). | .pdf, .doc, .docx, and image files. | PDF, DOC, JPEG, and more image formats. | PDF and Word |
| Integrations | No | payment integrations | 350+ Integrations | 16 Integrations | integration add-ons | 18 Integrations | 13 Integrations |
| Signatures | Type, Draw, and upload. | Draw, Type, and Upload. | Type, Draw, and upload. | Phone, Draw, Upload, and Type. | Type, Draw. | Handwritten, Remote, Uploaded. | Remote, Handwritten, Uploaded |
| security | Strong SSL encryption | 256-bit SSL encryption | High security | secure your documents. | Bank-level data security | military-grade and digital signature technology | 256-bit high security. |
| price (Annually) | Pro: $10/month per user Team: $40/month per user Essential: contact sales officials | eSignature: $25/month per user Business: $49/month per user. Essential: Contact sales officials. | Personal: $10/month per user standard: $25/month per user Business Pro: $40/month per user | Pro: $4.99/month per user | Personal: $12/month per user. Business: $60/month per user Additional plans: $99/month | Professional: $20/month per user. It supports up to 49 user Essential: contact its sales officials. | Professional: $8/month per user Business: $20/month per user. Enterprise: Contact salespersons. |
| Free Trial | Offers free account. | 14-days | 30-days | 30-days | 14-days | 30-days | 14-Days |
| Supported platform | Mac, PC, and mobile | iOS, Android, and PC including Web | Android, Windows, Mac, and web. | Web-based. | PC, Mac, iPhone, iPad, Android, and more. | Web-based and Mobile apps. | Windows, Mac, iPhone, Android, and Web-based |
| Customer Support | Email chat support and, help-center. | 24/7 email and chat Support. | Live chat. | Online. | call | Contact support, Trust center | Email or Phone number, Live chat, and more. |
Conclusion
Now you can select the best online signature software that suits all your needs. Definitely, you can pick DigiSigner for its simplicity. If you need a robust one, you need to go with DocHub as the best online signature software site. As it offers the lowest premium plan. And you can go for unlimited sign requests with this plan. So you can use DocHub to get signatures from your customers.
I hope this tutorial helped you to know about the “7 Ways to Sign Documents Online”. If you want to say anything, let us know through the comment sections. If you like this article, please share it and follow WhatVwant on Facebook, Twitter, and YouTube for more Technical tips.
- RELATED – 4 Free Ways to Download Vimeo Videos Online & Offline
- Vimeo vs YouTube: Which is better and What’s the difference
7 Ways to Sign Documents Online – FAQ
Which is the best online software to sign documents?
Definitely, DigiSigner is the best online software to sign documents.
Is it safe to add eSign online?
Yes, it is safe but it allows you to add eSign for a few documents only. If you are running an organization and frequently working on eSign then it’s better to buy the pro version.
What type of document formats DigiSigner support?
DigiSigner supports the most common document formats like PDF, Word, IMG, TXT, XLS, and more.
Does DocHub allow printing the signed Document?
Yes, DocHub allows you to print the document directly. You can also share the file with others easily.
Can I export the signed document to Google Drive?
Yes, you can easily export the signed document to Google Drive. The DocHub software helps you to export the document to Google Drive.