
Are you going to download Windows 11? Then the first thing you need to do is “Prepare Hard Drive for Windows 11”. For that purpose, there are several tools. In this article, you can find the detailed steps on how to prepare hard drive for Windows 11.
Before going to prepare the Hard Drive, you need to know the basic requirements of Windows 11 and check whether the system has all those requirements are not. Below are the basic and main system requirements of Windows 11 to download and use the Windows 11 OS easily.
Windows 11 System Requirements
Many users are excited to switch from Windows 10 or other versions to Windows 11. It contains so many new and exciting features. However, you may only update to the latest version of your system that matches the Windows 11 minimum system requirements.
The basic system requirements that you need to know before going to install or update the OS to Windows 11 are listed below:
| Processor | 1 gigahertz (GHz) or faster with 2 or more cores on a compatible 64-bit processor or a chip |
| Memory | 4 GB RAM |
| Storage | 64 bit or large |
| System Firmware | UEFI, secure boot cable |
| TPM | Trusted Platform Module |
| Graphics card | DirectX 12 compatible graphics / WDDM 2.X |
| Display | >9″ With HDR resolution |
| Internet connection | Microsoft account and internet connectivity required for setup for Windows 11 home |
Certain features require specific software, see detailed system requirements. If the system satisfies all the system requirements, then move to the next step. You can use the best tool – EaseUS Windows 11 Checker app to check whether your system meets the minimum system requirements or not.
- Related: Windows 11: The complete details you need to know
- How to manage partition on Windows 11/10/8/7
How to Prepare Hard Drive for Windows 11
To prepare the Hard Drive, you need to change the hard Drive format for better spacing and number of partitions. If you want to use the new hard drive then install it on your device and convert it to GPT format. If you are using the Old disk, then convert the disk to GPT format.
You need the best tool to install and initialize to GPT or to convert the MBR disk to GPT. The best and stunning tool is EaseUS Partition Master. Let’s see how to install and initialize to GPT, convert to GPT using EaseUS Partition Master.
New disk: install and initialize to GPT
1.Install a new disk
It is a simple task to install a new disk on your Laptop. The new generation laptops support adding two or more hard drives. While the old and slim laptops allow only one hard drive. If you are using the new generation laptop, then you easily insert the new disk in it and make it useful.
If you using the old generation or slip laptop, then there are two ways to install a new disk in your laptop.
- One is by replacing the DVD or Blu-ray Drive with the new HDD or SSD.
- Replace old drive with New Drive.
For Desktop:
- Shut down the device and take the new drive from the drive box.
- Prepare the new drive. If it is already prepared, then remove the screws on both sides of this disk.
- Slide the drive bays into the screw holes on both sides of the new drive.
- If it is an SSD, then you will need to add a special mounting slot or a drive adapter.
- Remove the computer case.
- Slide the new drive into the computer case next to the old drive.
- Now connect the new drive to your computer motherboard with the SATA cable.
- Plug in a power cable to power on the drive.
- Clouse the computer case and reboot the device. That’s it….
After the completion of installing the new drive on to PC or laptop, move the next step to initialize the hard drive as GPT. For that purpose, we would like to recommend a stunning Partition Master tool is the EaseUS partition Master.
2.How to initialize the disk as GPT
In this section, you can find the solution for how to initialize the disk as GPT using the free partition tool known as EaseUS Partition Master. It enables you to initialize the drive as GPT with a click. Let’s see how to initialize the disk as GPT using the free EaseUS Partition Master.
Step 1: Download and install the EaseUS Partition Master from its official site. You get it without paying a single penny. Launch the EaseUS Partition Master application. Connect the hard drive or SSD to your device.
Step 2: Give a right-click on the target drive or SSD and select the “Initialize to GPT” option from the drop-down menu.

Step 3: Now click on the Execute operation option at the top. A pop-up window will appear on the screen. Click on “Apply”. That’s it… The disk has been initialized as GPT.
After the completion of initialization, all the disk space remains unallocated. So still, it is impossible to be used to install any programs and OS or file storage. You can turn the unallocated to usable space using the EaseUS free Partition Master to create partitions and set the file system.
Step 4: To turn the unallocated space into usable space. Give a right-click and select the create option.

Adjust the partition by moving the dots to right or left, change the file system option as NTFS, choose the drive letter, partition label, and many more. Click on OK.
Now click on the Execute operation button at the top. A prompt will appear on the screen. Finally, click on “Apply”
Old Disk: convert to GPT
If you are using the Old disk. Then the first thing you need to do is convert the disk to GPT before going to prepare the disk for Windows 11 installation. Here is the detailed process on how to convert the old disk to GPT Using the best and amazing tool EaseUS Partition Master. For a more detailed process, visit the article “Convert MBR to GPT“.
1.Convert MBR to GPT using EaseUS Partition master
EaseUS partition master is one of the best and easy tools to convert MBR to GPT without any data loss and corruption. It is the best reliable disk conversion tool that enables you to convert your disk from MBR to GPT directly in only a few clicks. It exceeds both Disk Management and DiskPart in the following aspects:
- Keep All Partitions: EaseUS Partition Master doesn’t delete any partitions for disk conversion.
- No Data Loss: EaseUS Partition Master keeps all data safely stored on the disk while converting it from MBR to GPT, or vice versa.
Step 1: Install and open the EaseUS Partition master
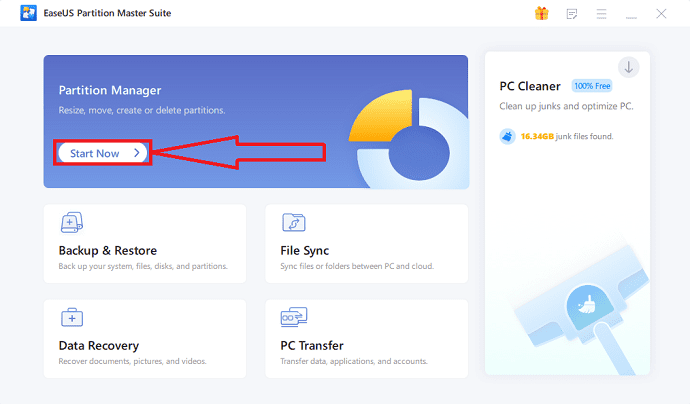
Download and install the EaseUS Partition Master on your Windows device from its official site. Click on the “Start Now” option under partition Manager. You will redirect to the new interface.
Step 2: Selection of Convert to GPT option
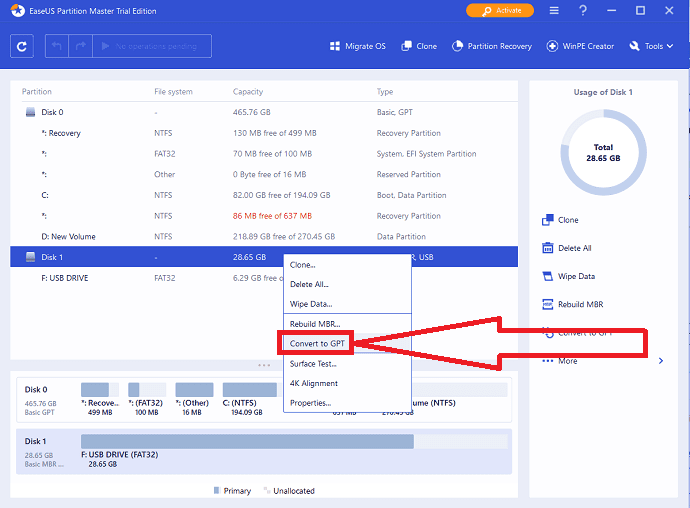
Give a right-click on the MBR files that you want to convert and choose the “Convert to GPT” option from the drop-down menu.
Step 3: Execute the changes

Click on the “Execute 1 Operation” button at the top. A prompt will appear on the screen. Finally, click on Apply option.
Extend target partition with EaseUS partition Master
EaseUS Partition Master is an amazing hard disk partition management software that helps to extend or shrink partitions on Windows 11/10/8/7/vista/XP of 32-bit and 64-bit Operating Systems. It offers strong protection to your data during the partition.
If your disk has unallocated space next to the target drive, just combine those two to extend the target partition.
Download and install the EaseUS Partition Master from its official site. Launch the application.
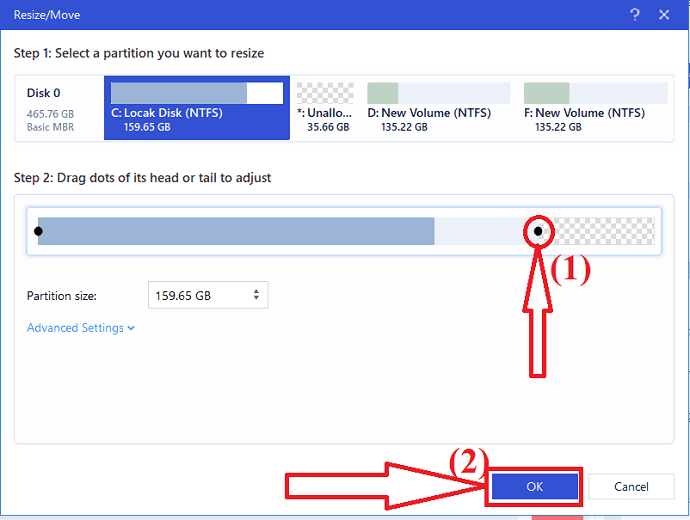
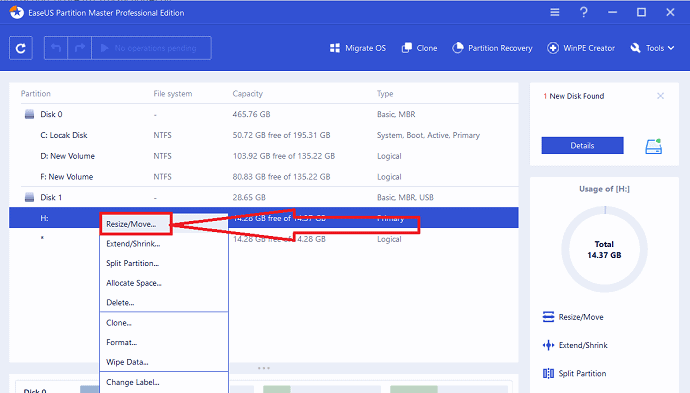
It displays all the system information on the screen. Select the target drive that you want to extend. Just give a right-click on it and select the Resize/Move option from the drop-down menu.
Drag the partition to the end of the unallocated space to add it to the target drive and click on OK.
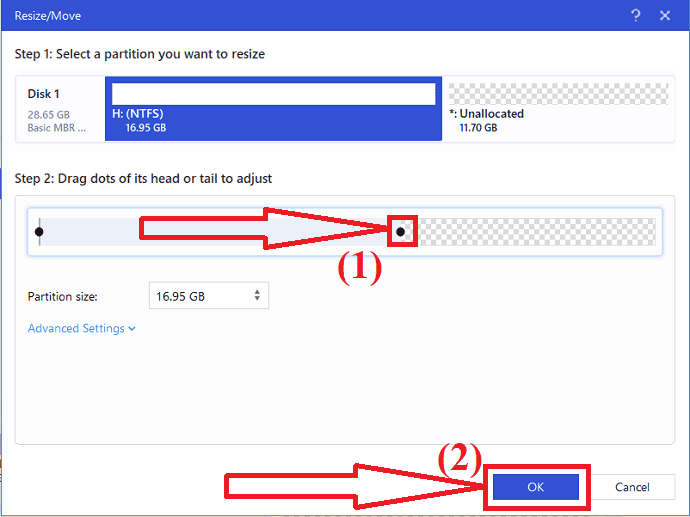
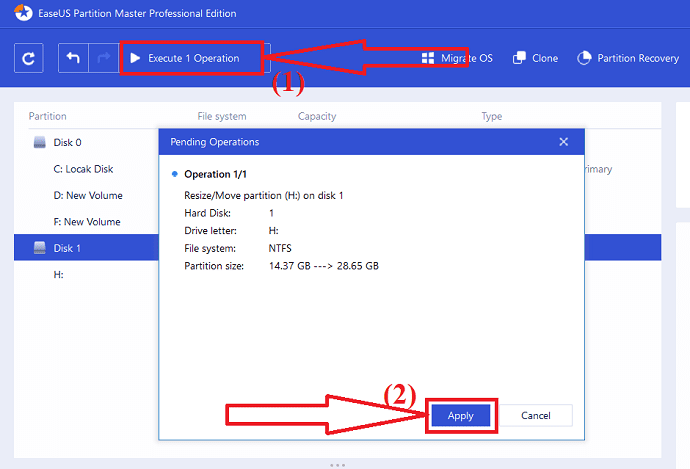
Click on Execute operation at the top left and click on Apply. That’s it…
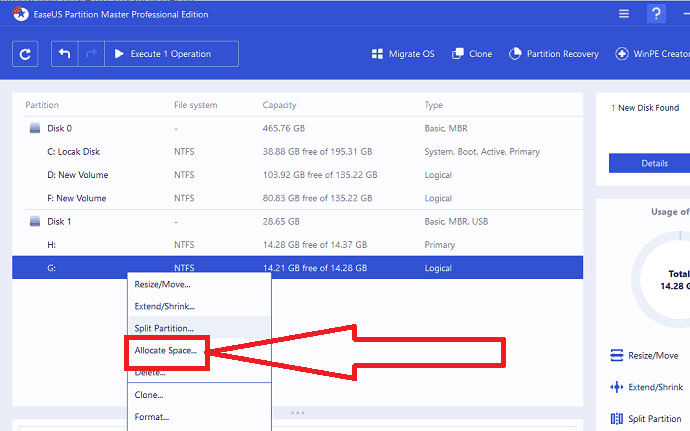
If you didn’t find any unallocated space beside the target drive/partition, then follow the below steps:
Select the partition that has enough free space on the system disk. Give a right-click and select the “Allocate space” option from the drop-down menu.
Choose the target drive at the “Allocate bytes Space from ( ) to” section. Drag the end of the partition up to the space you want in the next partition and click on “OK”.
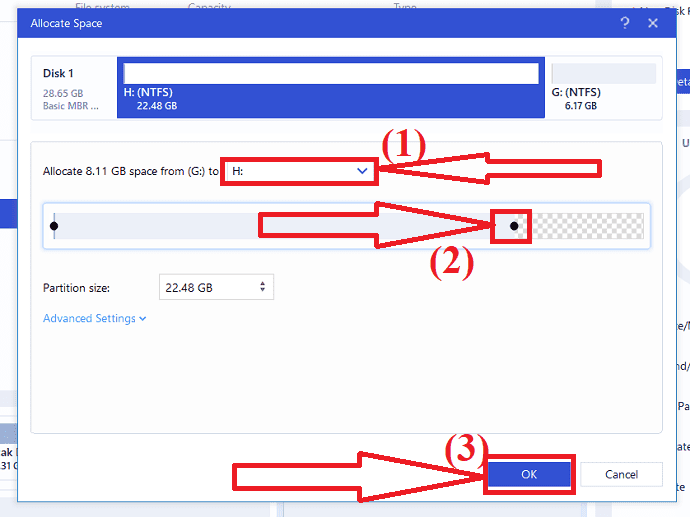
Click on Execute operation at the top left. It will display all the pending operations. Click on the “Apply” option to save the changes.
- Also Read: EaseUS Data Recovery Review: Test, Pros & Cons
- How to recover deleted partition with free undeleted tool on Windows 11
Install or migrate Windows 11 to target drive
if you want to migrate Windows 11 Operating System to a new HDD or SSD, then the best and stunning tool for beginners is the EaseUS Partition Master tool. Let’s see how to migrate Windows 11 to the target drive using EaseUS Partition Master.
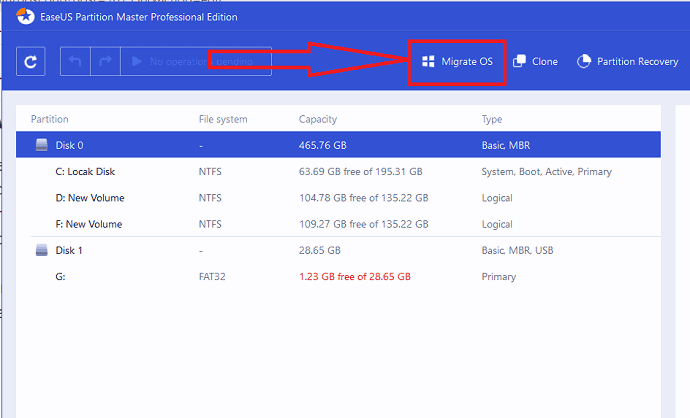
Step 1: Download and install the EaseUS Partition Master. Launch the application. Click on the “Migrate OS” option at the top of the menu.
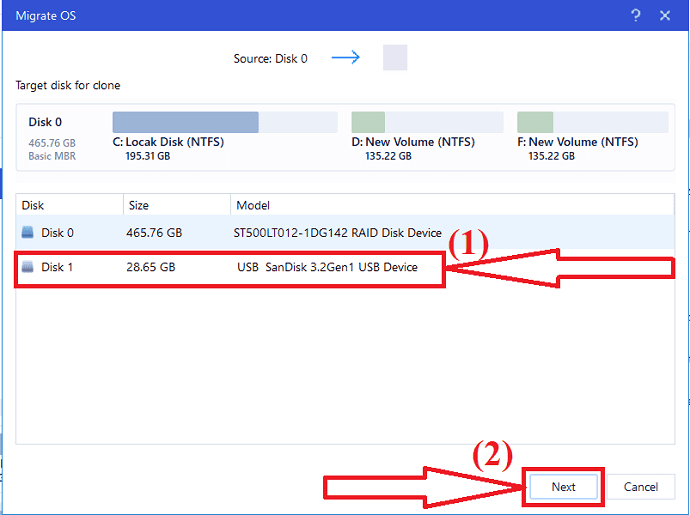
Step 2: A window will appear on the screen. Select the target disk to which you want to migrate the Windows 11 to New disk. Click on “Next”.
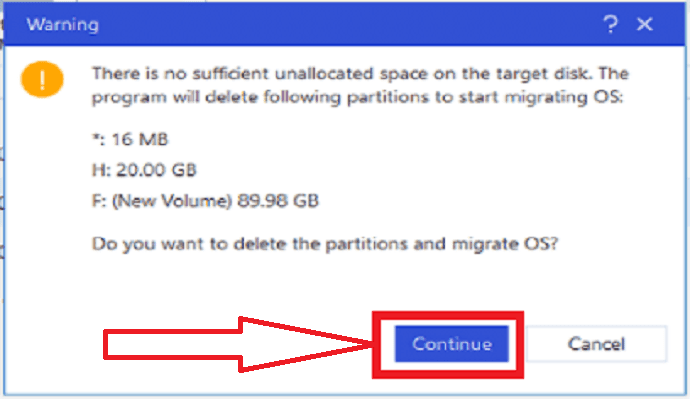
Step 3: A prompt will appear on the screen with a warning message. Click on Continue to move to the next space. The warning message says that “if there is no sufficient unallocated space, it will delete all the partitions and programs in the disk to migrate the OS”.
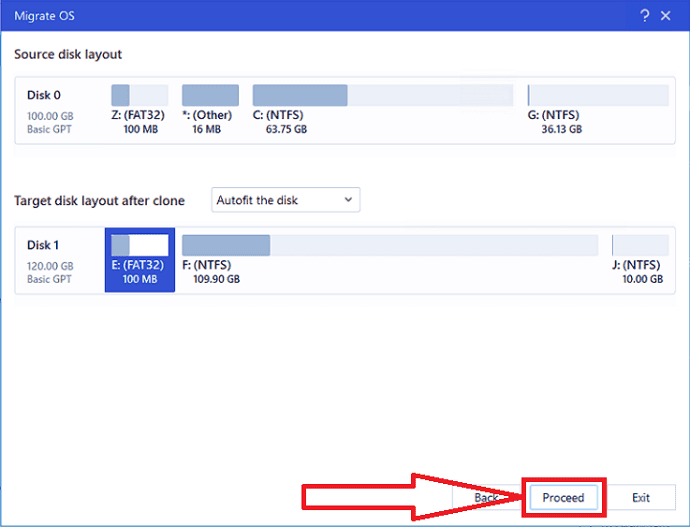
Step 4: Check the partitions on the disk. Customize the disk with the label, drive letter, partition size, and many more as your wish. Finally, click on the “proceed” option.
After the completion of the migration process. You need to boot the device to save all the changes.
Note: The operation of migrating OS to SSD or HDD will delete and remove existing partitions and data on your target disk when there is not enough unallocated space on the target disk. If you saved your important data there, backup them to an external hard drive in advance.
How to install Windows 11 on your device
One of the best and easy ways to install Windows 11 on your device is using updates. If you want to upgrade the OS from Windows 10 to Windows 11. We recommend you wait until you are notified through Windows update that the update is ready for your device. To check if Windows 11 is ready for your device,
- Got to settings using search bar.
- Select the update & Security option from the list of tools.
- Click on Windows Update from the left side panel.
- Check for Updates. That’s it…
Install Windows 11 using Windows 11 installation Assistant.
Windows 11 installation Assistant is a great choice to upgrade Windows 10 to Windows 11. Make sure your PC has a Windows 10 license and runs Windows 10, version 2004 or higher. Also, ensure your PC meets the Windows 11 minimum specifications and has 9 GB of free disk space.
Step 1: Visit Microsoft’s Download Windows 11 webpage using any web browser.
Step 2: Find the Windows 11 installation Assistant at the top of the page and click the “Download Now” option.
Step 3: Once the download process is completed, run the application as administrator. After the tool confirms your PC is compatible, select the “Accept and Install” to start the installation.
Step 4: Follow the instructions to install Windows 11 on your device. It takes some time to download and install the new system, and your PC will restart a few times. Make sure you don’t turn off your device.
If you want to install Windows 11 from USB on different devices or an ARM64 device, use EaseUS Win11 Builder or Microsoft’s create Windows 11 installation Media.
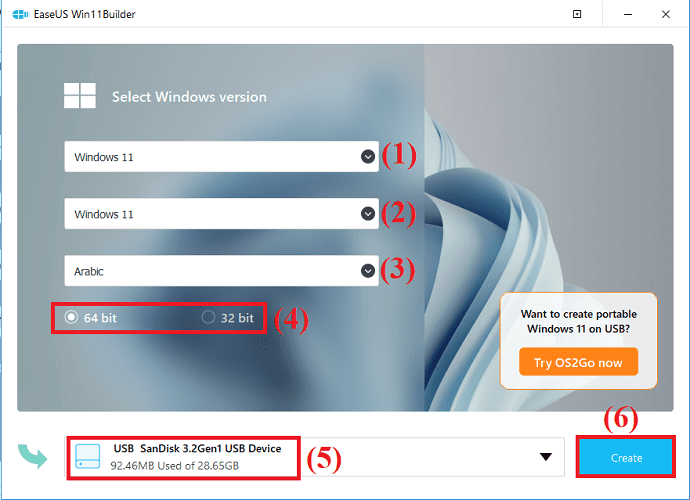
Install Windows 11 from USB Drive using EaseUS Win 11 Builder
The best and the most simple way to get Windows 11 is using EaseUS Win 11 Builder, Which enables you to download Windows 11 with a simple click. All you need is to prepare a USB flash drive of 4GB to download the Win 11 ISO file we have prepared for you, and then you can install Windows 11 with the bootable USB drive.
Step 1: Download and install EaseUS Win 11 builder on your device. It’s a free iOS downloader that helps you to download the latest version of Windows 11 OS.
Step 2: Once the installation is completed, launch the Win11 builder application. The System information will be displayed on the screen. It also supports you to download Windows 10/8.1 along with windows 11.
Step 3: Connect the USB drive to the device. EaseUS Win 11 builder will automatically detect the USB drive. Click on Create option at the bottom right.
Step 4: The device will erase all the data in the USD while during the process. Wait for some time to finish the process.
Step 5: After the completion of the download process, start to install Windows 11 from the bootable USB drive on your device by following the installation steps.
Use Create Windows 11 Installation Media Tool
To download and install Windows 11 on a new or used PC, you can make it by using the “Create Windows 11 Installation Media” tool. Make sure that there is an internet connection, Blank USB, and others.
Step 1. Go to Microsoft’s Download Windows 11 page. Click “Download Now” after finding “Create Windows 11 Installation Media.”
Step 2: To run the media creation tool, log in as an administrator.
Step 3: Select the “Create installation media” from another PC” on the “What do you want to do?” page, and click on “Next”.
Step 4: For Windows 11, select the language, edition, and architecture(64 bit).
Step 5: Select the USB flash drive or ISO file to create the bootable installation media.
Step 6: Once the completion of the process, insert the bootable USB in the device where you want to install Windows 11, and then restart it.
Step 7: Immediately after turning on the computer, press F2, F12, Del, or Esc to access the boot menu and select USB or DVD boot.
Finally, follow the on-screen instructions to finish installing Windows 11.
Create Portable windows 11 USB using EaseUS OS2GO
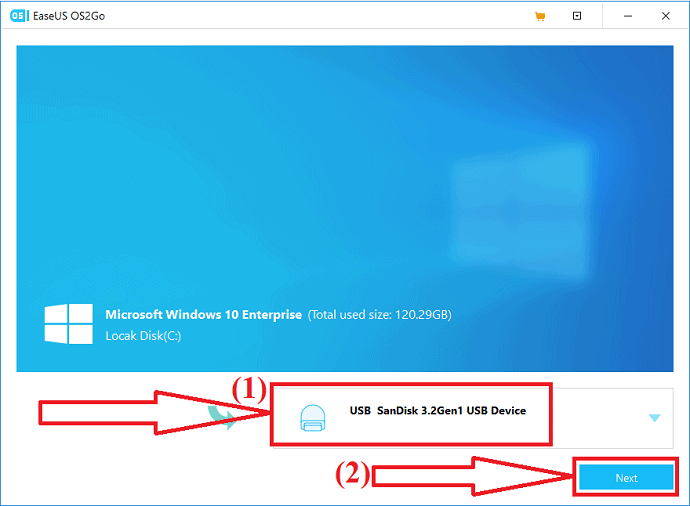
Step 1: Download and install EaseUS OS2GO on your Windows device. It will display all the system information on the screen. Plugin a USB drive in the drive slot. Make sure that the USB space is more than the System drive space. Click on “Next”.
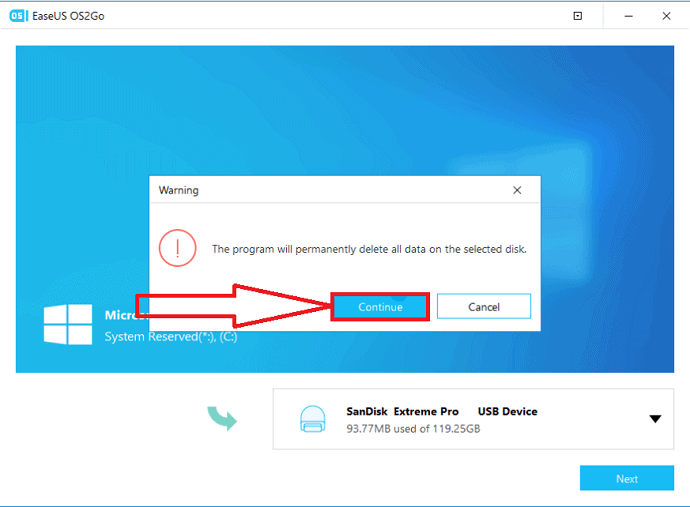
Step 2: A prompt will appear on the screen with the warning that the following operation will delete all the data on your device. Before going to proceed to the next step, make sure that you have backed up all the important data. Click on the Continue option to move to a further step.
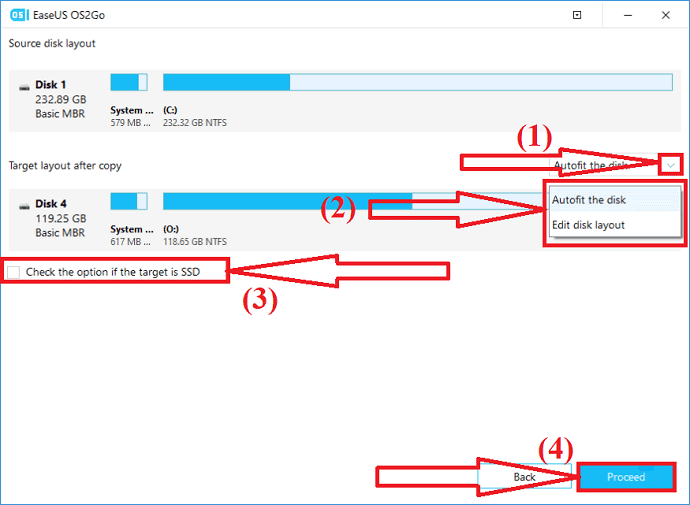
Step 3: Make changes to the disk layout if you want. The target drive’s default disk layout will be similar to the source drive’s. You can also change the layout that suits your needs. If you are using an SSD as your Windows bootable drive, check the box below the target drive. Then, click on the “proceed” option at the bottom.
Step 4: EaseUS OS2GO will start to create the portable USB drive. It takes some time depending upon the network connection and size of the OS. Once the process is completed, the USB drive should be bootable now.
Step 5: Insert the portable windows USB in the device where you want to insert Windows 11 and restart the device. Press F2, F12, Del or Esc to access BIOS mode. Choose the boot from the USB disk.
Note: Make sure that the boot mode of the portable USB flash drive and the target device are the same. Otherwise, it doesn’t allow you to boot mode.
Configure UEFI and Secure Boot
To check the UEFI and Secure boot on your device, Go to the search bar and type system information. Click on the Open option.
System information Window will appear on the screen with all the information. Check the BIOS mode and Secure boot state. If BIOS mode is legacy, then the Secure boot is disabled or unavailable. You need a few additional steps to enable the secure boot.

To enable the BIOS mode as UEFI, You need to convert the drive MBR to GPT. After the completion of converting MBR to GPT, enable the UEFI boot mode on your device to make the OS bootable. These steps are optional. Let’s see how to enable UEFI boot mode.
- Restart your PC and press F2, F8, F12, Del to enter the BIOS boot menu.
- Locate the boot options menu and enable the UEFI mode.
- Change the Launch CSM to Enabled state. If CSM is set to disabled, you can skip to step 4.
- Set Boot Device Control to UEFI only.
- Set Boot from storage Devices to UEFI driver first.
- Set the USB UEFI OS Boot option is at the top of the Boot Priority List.
- Save the changes and exit the BIOS, reboot PC from the GPT disk.
- Wait for some time. Your device will automatically reboot from the GPT disk.
Closing Words:
This is a complete guide on Windows 11. In this you can know how to prepare the hard Drive for Windows11, minimum System requirements to upgrade to Windows 11, Migrate Windows OS, Install Windows 11, and Secure boot. For all these processes, I will recommend you to use the EaseUS Windows 11 upgrade tool. It helps you complete your task as early as possible without data loss and in a hassle-free manner.
Offer: Our readers get a special 25% discount on all EaseUS products. Visit our EaseUS Discount coupon page for the promo code.
I hope this tutorial helped you to know about How to prepare Hard Drive for Windows 11. If you want to say anything, let us know through the comment sections. If you like this article, please share it and follow WhatVwant on Facebook, Twitter, and YouTube for more Technical tips.
How to Prepare Hard Drive For Windows 11 – FAQ
Do all drives need to GPT in Windows 11?
Windows 11 supports only UEFI booting, which means the system drive of Windows 11 must be GPT.
How to convert the hard drive MBR to GPT for Windows 11?
EaseUS Partition Master is the best device to convert MBR to GPT without any data loss.
Is it possible to extend the target?
Yes. It is possible to extend the Target. Just you need to combine two partitions if you have any unallocated partitions. Otherwise, Allocate some space in the larger partition for the target partition.
How can I install Windows 11 on Windows 10 laptop?
You can install Windows 11 using the installation Assistant, Portable USB drive, or using the installation Media tool. Just go through the article for a detailed process.