Want to Change margins in word for Mac? Do you want to adjust the margins Left/Right & Top/Bottom to a Microsoft Word Document. In this guide, you are going to learn about changing margins in word on Mac.
It is very important for everyone and standard to add pagination to the concept of documentation. Along with pagination, the document margins also play a key role. The margins should change accordingly based on whom we are creating the document. Pagination lets everyone know the number of pages in the specific document has. Many organizations and entities will make strict guidelines to add the specific margins for the document. Here are the steps on how to change the margins in a Microsoft Word document on your Mac:
How to Change margins in word for Mac?
1. Open the Spotlight search from the menu bar.
2. Enter ‘Microsoft Word’ in the Spotlight search to open the Word application.

3. Create a new document.
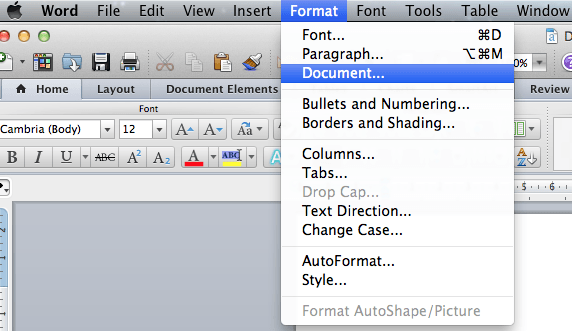
4. Click on the Format menu on the top menu bar.
5. Select the ‘Document’ option from the Format menu as shown in the below screenshot.

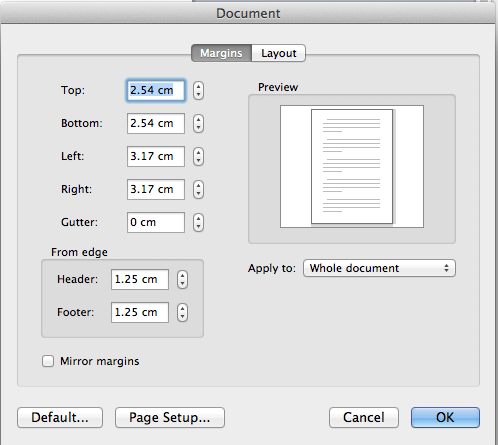
6. The Document window will appear as shown below.

7. You can change the values in Left, Right, Bottom and Top fields to adjust the document margins as you desire.
8. The ‘Apply to:’ menu will have the options to apply the changes to whole document or from specific point forward.

9. Click on ‘OK’ button to apply the changes done.

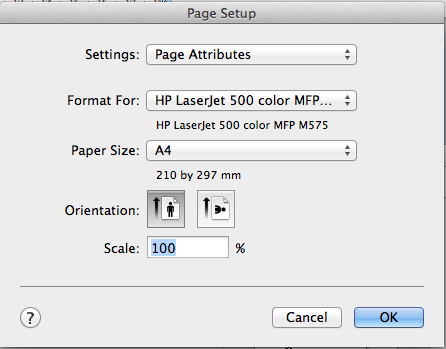
10. The ‘Page Setup’ button will display the settings for the page/document in the Page Setup window.

- You May Like : How to Add Page Numbers to a Microsoft Word document
- 9 Best Ways to Improve Mac performance and Speed
Now you may know how to Change margins in word for Mac. If this tutorial helped you, please share it and follow us on Facebook or Twitter. Subscribe to WhatVwant channel on YouTube for regular updates.
