
Do you want to know complete details about Bluestacks? This tutorial will tell you what is BlueStacks, how to use it on Windows and Mac, and the alternatives to Bluestacks.
Android has been popular for years and is an open-source project which creates more options for developers. Initially, it was only for mobiles. However, to ease one own’s work operating android applications from a PC is required(Maybe windows or Mac). Emulators entered the game and the ease of using Android applications or software on PC becomes easy and that too for free.
If you want to convert your PC experience replica watches into mobile easily, then Bluestacks is one of the best options for you. It is the best and fastest android emulator software compared to other software. Don’t worry if you are not familiar with this software. After the completion of this article, you will be familiar with Bluestacks and feel the software is easy to use.
- READ MORE – How To Speed Up BlueStacks for Faster Gaming Experience?
- Princess connect Re: Dive Best Tier List Play with the Free Android Emulator
What is an Android Emulator?
Usually, emulators enable one computer system to behave like another computer system without much effort. Android emulator works the same i.e., it enables the computer system to behave like an android operating system.
Android Emulator is the software that helps you replica Rolex to create Android Virtual Device on your Desktop/Pc. With this Emulator, you can browse, download, install and uninstall the apps from Playstore on Windows/macOS, just like you do on an Android Device. Moreover, it is also helpful for the application developers to test their app on this emulator simply by changing the profile of the device rather than testing it on several physical devices. The emulator provides you all the features and options that are available on an Android Device. In recent times, most gamers are using Android Emulator software to play games. If you are a gamer, then you will find more advantages while gaming compared to an Android Device.
Some Advantages of using an Android Emulator are listed below.
- No worry about Batter life
- No need to use high-end Phones
- Effortless multitasking
- No Text or Calls interruptions
And for Gamers,
- Bigger screen, never miss a detail
- 100% Accuracy with Keyboard and Mouse controls
- Mobile-exclusive Android Games on Pc
- Multiple games at the same time
- READ MORE – How To Text With iMessage on Windows 10?
- How To Make WhatsApp Group Video Call on Android, iOS, and Desktop devices:
What is Bluestacks?
Bluestacks is an Android Emulator software that allows you to create an Android Virtual Device on your computer. BlueStacks is an American tech company that is well known for its BlueStacks app player which helps to run android applications on PC running with Windows and Mac operating systems. No fee or subscription is required to run it and use android apps on windows and MacOs. It really helps a lot on a well-configured system. However, it lags on laptops with basic configurations.
It gives the mobile experience on the desktop/Laptop. You can install all the applications and games that are available in the Android Playstore and can use them on Windows and macOS. This is the fastest android emulator for both Windows/macOS. It also Rolex replica ensures your Pc’s safety in downloading the software from its official website and using it. This uses less storage and less ram. It performs the functions in the fastest and most powerful way.
Bluestacks provides all the features and updates itself up to date to deliver the user the best experience while using it. The unique and best features are listed below.
- Gives the best Android Gaming on Pc
- Smart Controls
- Enable higher frame rates for smoother gameplay
- High Definition Graphics
- Disk Clean-up
- Video Recording and screenshot
- Real-Time Translation
- Eco Mode – To optimize the Pc usage when running multiple instances
- Play multiple games simultaneously
- READ MORE – What if Apple brings iMessage On Android phones?
- Whatsapp messenger for pc (Windows 7/8) without bluestacks
What does Bluestacks do to your Computer
BlueStacks is an Android Emulator that uses your Pc’s hardware power much more efficiently and lets you use and play the most advanced mobile games with top graphics quality without any lags and frame drops in the gameplay. The main aim of Bluestacks is to provide users mobile experience on their computers. Bluestacks is just software like other software installed on your computer. It doesn’t affect the health of your computer unless you use the software downloaded from third-party sites. So, always try to download the software from the official site.
Using Bluestacks will never make you get banned. But in some cases, you may. This is not because of using Bluestacks software, but because of using the few games that are intended to be for Android use. The company claims as Bluestacks can support and run more than 1.5 million Android apps safely and securely.
- READ MORE – 7 Best Ways to Prevent Android From Hackers
- 9 Ways To Change IP Address on PC/Mac/Android/iPhone
System Requirements of Windows & Mac
The minimum system requirements for Windows are listed below
- Windows 7 or higher
- 2 Gb or higher system memory
- 5Gb of hard drive space
- Administrator rights
- Intel or AMD processor
- Updated graphic card version
For macOS,
- macOS Sierra or higher
- 4Gb RAM
- 4Gb disk space
NOTE – BlueStacks clearly stated that they haven’t supported Apple’s Sierra yet.
Versions of Bluestacks, Which is Best?
Bluestacks is available in four full versions and one beta version. The updated version available for now is Bluestacks 5 Beta and this version is announced on 21st February 2021. As you know beta version will be released for testing purposes. So there might be some bugs and Bluestacks tries to fix them through regular updates. If you want to use the full version with no bugs, try to download and use the latest version – Bluestacks 4. This version is compatible with the latest version of windows. The errors and bugs present in the previous versions of Blustacks are fixed in the latest version of Bluestacks. Also, added some more interesting and useful features for a better look and performance.
How to Download Bluestacks Older version
Every developer wants to make their application up-to-date to withstand the competition present to their category. In every update, modification to the app is done in its features, look, and many more aspects. But on the other hand, they remove features which they feel as outdated which may be liked and used by some users. In that scenario, the user may want to use the older version of the application. Moreover, the latest version of Bluestacks no more compatible with low-end devices or lower version mobile applications.
To download the older version of Bluestacks, Uptodown is the best option. On this website, you will find the last 20 older versions of Bluestacks. Downloading the Bluestacks from Uptodown is safe and secure. Also, it is totally free to download.
- You can download the BlueStacks older versions for Windows Here.
- You can download the BlueStacks older versions for Mac Here.
What is Bluestacks Portable & How to Download it?
Bluestacks Portable is a Bluestacks application that allows you to experience and use the Android Emulator without installing it on the computer. Portable applications can be used through an External Hard disk. It doesn’t occupy any space as it is not installed on your computer. The portable application provides all the features and options similar to the original applications.
But unfortunately, Bluestacks doesn’t have any portable versions to download. The only way to experience the android emulator through Bluestacks is only by downloading and installing it on your computer.
What is meant by Bluestacks Offline Installer?
Bluestacks Offline Installer is nothing but installing the application after downloading the whole resource files directly from the website. As you know, to install a normal Bluestacks application, firstly you need to download an installer file. And later on by running the installer, the resource files start downloading. But it takes a lot of time to download resources using an installer and also, you may have to face issues if your internet connection is slow or unstable. So, to overcome those issues, Bluestacks offline installer made to be available on its official website itself. When you try to download the Bluestacks through an offline installer, the application and the resource files are directly downloaded.
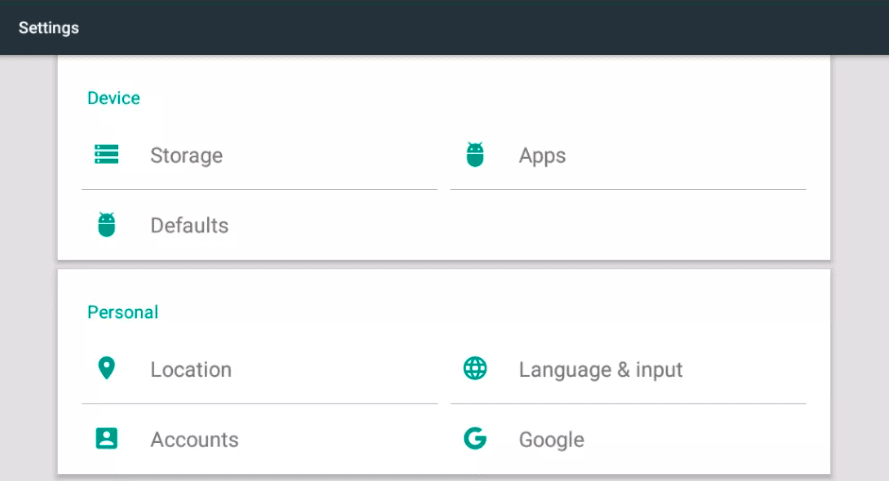
Bluestacks Best Device Profile
Bluestacks provides a lot of device profiles in its settings section and adjustments. Most of the time, Bluestacks itself adjusts its device profile according to the applications that you are using in Bluestacks. Even if it makes the modifications automatically, the custom-created device profile will perform better. so here is the answer to the most asked question “What is the Best Device Profile for Bluestacks?”, “How To Create a Custom Device profile?, and BlueStacks Tablet profile, etc.,
When you go to the settings>Devices, it shows a lot of predefined device profiles like Asus ROG 2, Google Pixel 2XL, LG v30, OnePlus 3T, OnePlus 8T, Samsung Galaxy A90 5g, Samsung Galaxy S10, Samsung Galaxy S20+, Samsung Galaxy S21 Ultra, and much more. By choosing the device profiles, Bluestacks adopts that specific device setting and performs accordingly.
You can also create a custom device profile by clicking on the “Create a Custom Profile” option. After choosing the option, it shows three columns. such as Manufacturer, Brand, and Model. Fill the three columns with the respective information. Later, Click on “Save changes” to save your custom device profile. You can also set up a Bluestacks tablet profile by providing the tablet manufacturer, brand, and model details in the custom profile section.
Best Device for Bluestacks
Choosing the best device for Bluestacks is one of the main things that create an impact on the performance. So, try to set the best device profile for Bluestacks. Change the options in the performance section and enhance the app experience.
- CPU Allocation – High(4GB)
- Memory Allocation – High(4GB)
Modifying these settings to the highest will enhance the performance of the Bluestacks. On the other hand, you need to modify the graphics settings in the application that you use in the Bluestaks.
How to Use BlueStacks on Windows
Video Tutorial
We provided this article in the form of a video Tutorial for our reader’s convenience. If you are interested in reading, you can skip the video for now and watch it after the completion of reading this article.
Using BlueStacks on Windows is very easy. It involves 3 simple steps and they are installing the software on Windows, downloading the application that you want to use, and customizing the settings.
1. Download and Install the BlueStacks on Windows
One thing to remind is to download the software only from the official website. Don’t download the software from third-party sites. Your windows may get affected by viruses and malware by downloading the software from third-party sites.
Step 1: Visit Official Site & Download File
First, visit the BlueStacks Official website and click on the download option as shown in the screenshot. Then, the download will start automatically.
Download the installer file from the official website of Bluestacks to avoid malware or any virus affecting the Pc.
Step 2: Download and Install the Software

Run the downloaded installer file, then a window will pop up. Click on “Install Now” to start the Downloading process It may take time to download the application. And automatically installation will be done after the completion of downloading the file.
Step 3: Sign-in to Google
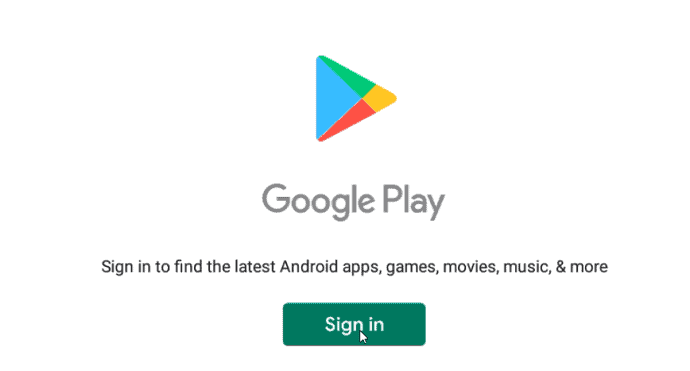
The first thing you have to do after the completion of installation is to “sign in to Google” to use Google services on BlueStack. Otherwise, you won’t get access to Google Playstore to download the applications or games.
Step 4: Interface of the Emulator
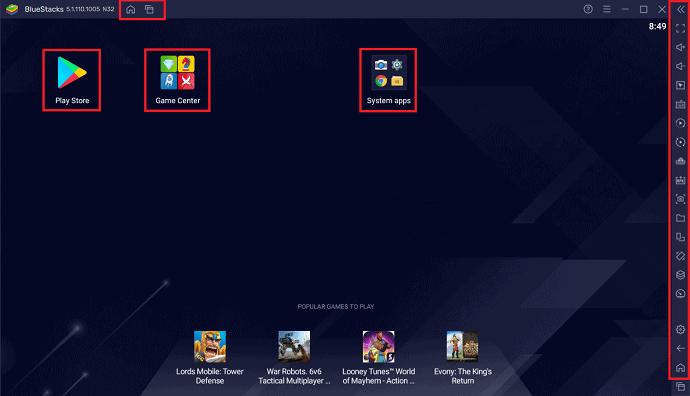
Bluestacks has a clean and simple user interface in its latest version. Whenever you open the Bluestacks application, you will find the interface as showing in the above screenshot.
On the top bar of the application, you will find two options. One is the Home tab option and the other is the recent tabs option.
On the right side, you will find a list of options like the Toggle screen, Volume up, volume down, settings, and many more useful tools.
- READ MORE – 5 Best Android Apps for Students
- 12 Effective methods to Download YouTube playlist on Android, PC, Mac
2. Download the Android application
There are a lot of ways to download an application on Bluestacks. Among them, three are the most used methods. They are
- Game Center
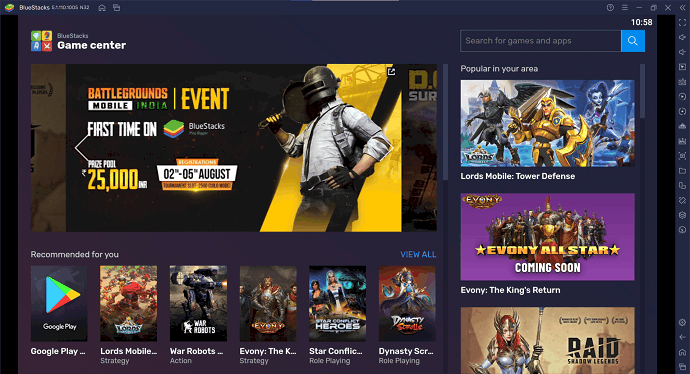
Game Center is the inbuilt Appstore for Bluestacks. This will be found on the homepage of the application itself. It provides a lot of apps and games to download and use on Bluestacks. One more thing about the Game center is you can also download the Google Playstore from it. Click on the application to select and click on install to download the application. The interface of the Game center will be seen as shown in the above screenshot.
- Google Playstore
Google Playstore is the default app store for Android users. Likewise, you will find the same in the Bluestacks emulator. If the Google Playstore application is not found, then you can download it from the Bluestacks default app store named Game Center. To download any application, just search for it and click on it to open. There, you will find an install option. Click on it and the app starts downloading. After the completion of downloading, it will be installed automatically and a desktop shortcut will be created. The interface of Google Playstore looks similar to the Android and is showing in the above screenshot.
- External Sources
This is the method used when the application that you want to download is not found on the Game Center and Playstore. In this method, you have to search for the application on your browser and download it in APK format. After downloading, run the application and it will be installed directed on Bluestacks.
3. Customize the BlueStacks settings
Using the emulator right after installation will make you feel hard to use due to its default settings. So, to make the emulator perform at a higher rate modify or customize the settings according to your windows specifications. There are a lot of sections to modify in the emulator settings and they are listed below.
Click on the Settings gear icon, which is on the right side of the window. Then, another window will pop up and from there you can start modifying. The first and foremost is
- Performance
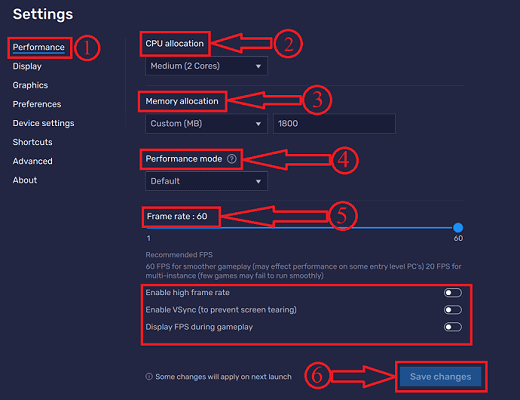
In the Performance settings, you will find the options like CPU allocation, Memory allocation, Performance mode, and frame rate. All the options available in this section help you to improve the performance of the Bluestacks.
CPU Allocation allows you to choose the number of courses to be used. Basically, the available cores are Low(1 Core), Medium(2 Cores), and high(4 Cores). It also provides another option as custom. By choosing the custom option, you can choose the cores manually ranging from 1 to 4.
Memory Allocation is nothing but allowing the space or memory for Bluestacks. It provides 4 inbuilt allocation options like Low(1GB), Medium(2GB), High(4GB), and Custom. By choosing the custom, you have to enter the amount of memory you want to allow for Bluestacks(Memory will be entered in MB only).
Performance Mode is another option available in this section, it provides 3 modes of performance modes like Low Memory, High Performance, and Default.
- low memory mode – Bluestacks saves the memory(RAM).
- High Performance Mode – Increases the usage of RAM for optimised performance(Best for Gaming).
- Default – Balances the RAM usage and performace.
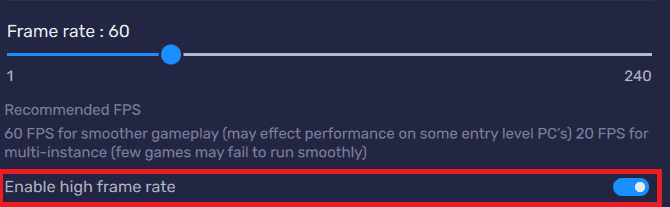
Frame Rate is another option available in this section. By default, it was set to 60FPS which gives smoother Gameplay. You can also increase the FPS up to 240 by enabling the Higher Frame rate option. If you want to find the frame rate at which Bluestacks is performing, enable the option Display FPS During gameplay option. Then, you will find the frame rate at the left corner of the Bluestacks window.
After modifying the options, click on “Save Changes”. Changes will apply on the next launch.
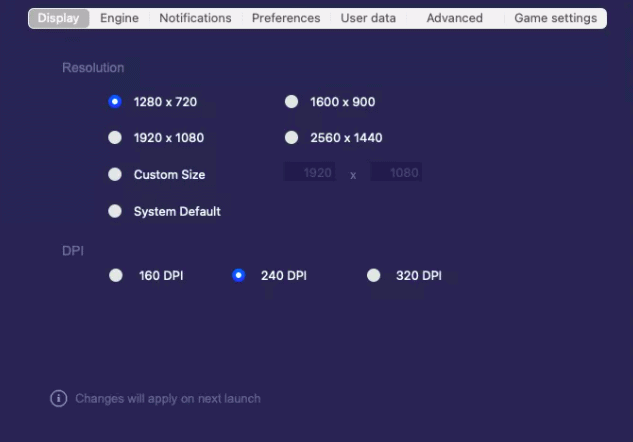
- Display
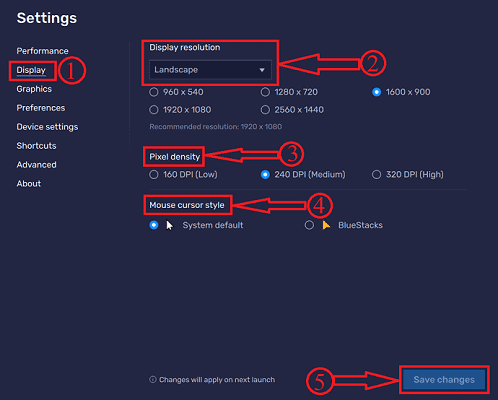
In the Display section, you will find the options related to the display of the Bluestacks and the available display settings are Display Resolution, Pixel Density, and Mouse Cursor Style.
In the Display Resolution, you will find the resolutions like Landscape, Portrait, Ultra-wide, and custom. Further, in every option different resolutions are provided and they are listed below.
- Landscape – 960 x 540, 1280 x 720, 1600 x 900, 1920 x 1080, 2560 x 1440 (Recommended – 1600 x 900).
- Portrait – 540 x 960, 720 x 1280, 900 x 1600, 1080 x 1920, 1440 x 2560 (Recommended – 900 x 1600).
- Ultra-wide – 1680 x 720, 2560 x 1080, 3440 x 1440, 5120 x 2160 (Recommended – 2560 x 2160).
- Custom – Here you can type the width and Hight in px.
Pixel density is another option available to improve the display. It provides the Pixel density options like 160 DPI (Low), 240 DPI (Medium), 320 DPI (High). DPI (Dots Per Inch)is the measure of dots that are squeezed in 1 inch of space on a printed image or scanned page. The higher number leads to a higher resolution display.
Mouse Cursor Style is the option that transforms your regular mouse cursor into a new style.
After modifying the options, click on “Save Changes”. Changes will apply on the next launch.
- Graphics
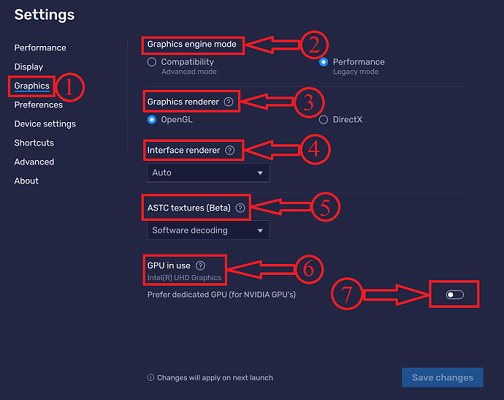
In this section, you will find all the details regarding your graphics settings and from there itself you can improve the graphics. The options available in this section are Graphics Engine Mode, Graphics Renderer, Interface Renderer, ASTC texture, and GPU in use.
Graphic Engine Mode provides two options as Compatibility and Performance. By default, it was set to Performance and provides higher graphic performance.
Graphics renderer is the software that helps to display an image or video on Bluestacks screen. These are mainly used in video games. In common, Bluestacks provides two Graphic renderer options like OpenGL and DirectX.
Interface Renderer works similar to graphic renderer but to display the interface. For this, Bluestacks provides 3 options like DirectX, OpenGL, and Software. If you are confused about choosing one, you can set it to Auto and Bluestacks chooses the interface renderer accordingly.
ASTC (Adaptive Scalable Texture Compression) texture is the tool that helps to give the detailed texture of present in most of the games. With the detailed representation, you will experience a good gaming experience. Bluestacks makes this work in two ways, i.e., software encoding, and Hardware encoding. You can also turn it off by choosing the “Disabled” option. At present this option is in beta version.
GPU in use shows you the details of graphics on which it is working right now. If you are using NVIDIA graphics, turn on “prefer dedicated GPU” for more features.
- Preferences
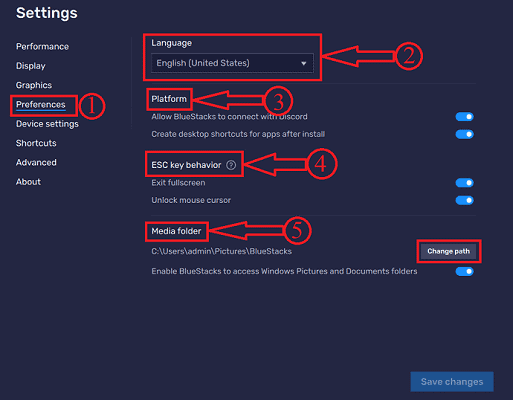
In this section, you will find the options like Language, Platform, ESC key behavior, and Media folder.
By using the language option, You can choose the Bluestacks language. Bluestacks is available in all popular languages.
In the platform tool, you will find an option to connect Bluestacks with Discord. Click on the toggle bar to enable. Also, you have an option to enable or disable the creation of desktop shortcuts for apps after install.
ESC key behavior is the option that enables and disables ESC key functions like Exit full screen and Unlock mouse cursor.
Media folder is another option available in the preference section. By clicking on the Change path, you can choose the location to store the Bluestacks files.
- Device Settings
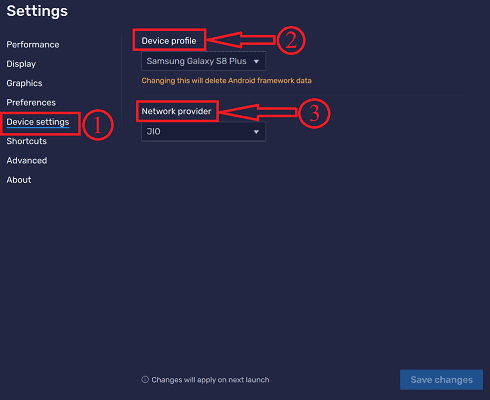
In the Device settings section, you will find only two options. Such as Device Profile and Network Provider.
Device Profile is nothing but the section of model or profile as to how you want to use the Bluestacks. It provides a lot of device profiles and is viewed once clicking on the drop-down menu. The profiles found are Asus ROG 2, Google Pixel 2XL, LG v30, OnePlus 3T, One Plus 5, Samsung Galaxy A80, Samsung Galaxy A90 5g, Samsung Galaxy S10, Samsung Galaxy S10 5g, Samsung Galaxy S20 Ultra, Samsung Galaxy S20+, Samsung Galaxy S8 Plus, and Xperia XZ.
Network Provider is the option that allows you to choose a network carrier for your Bluestacks. It provides 3 networks such as Airtel, Vodafone, and Jio.
- Shortcuts
In the Shortcuts section, you can assign keyboard shortcuts to access the Bluestacks easily and also to reduce the time of action. Bluestacks divided its shortcuts into 5 groups according to their actions, such as Windows Actions, System Actions, Android Actions, Game controls, and Miscellaneous. Further, they contain other shortcuts and they are provided below.
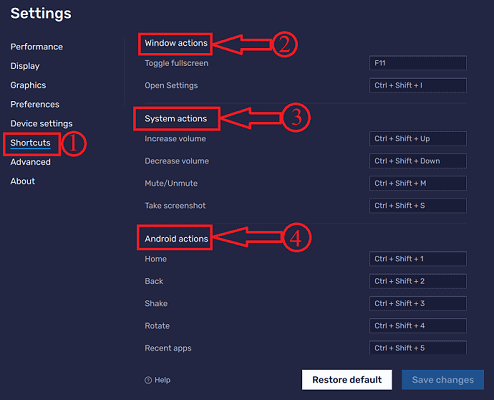
The first group in the shortcuts section is Windows actions. It contains shortcuts for actions like Toggle fullscreen and Open settings.
System actions contain the shortcuts like Increase volume, Decrease Volume, Mute/Unmute, and Take a screenshot. These are used to control the system functions easily.
Android actions contain the shortcuts like Home, Back, Shake, Rotate, and Recent apps. With these shortcuts, you can access and control the functions stated above with the keyboard.
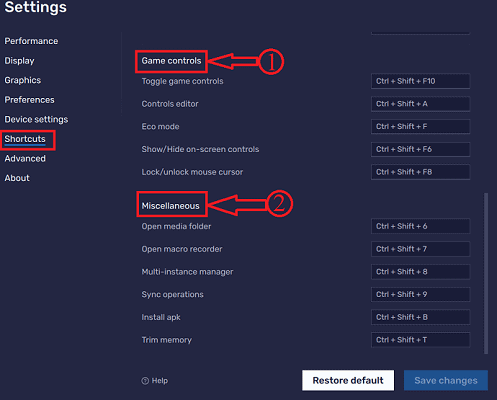
Game Controls are another group of shortcuts. It contains the shortcuts like Toggle Game controls, Controls editor, Eco mode, show/Hide on-screen controls, and Loc/unlocks mouse cursor. These shortcuts help you to improve your gameplay experience.
Miscellaneous is the shortcuts used to access the functions of Bluestacks like open media folder, Open macro recorder, Multi-instance manager, Sync Operations, Install apk and Trim memory. These shortcuts help you to optimize the performance of Bluestacks.
All these shortcuts can be customized and modified whenever needed.
- Advanced
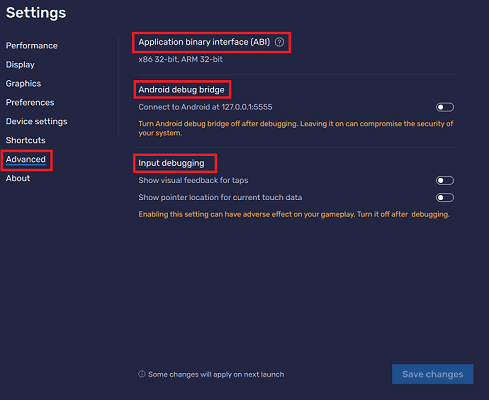
In the Advanced section, You will find the information regarding the Application binary interface(ABI), Android debug bridge, and Input debugging.
- About

In the About section, you will find the important link of Bluestacks like Support email, Support, and Website. Moreover, from here itself you can update the application from this section by clicking on Check for Updates.
- READ MORE – 13 Best Project Management Apps For iPhone, Android, & Desktop
- How To Make Facebook Messenger Group Video Call With 50 People With No Time limit On Android, iOS, and Desktop devices
How to use BlueStacks on mac
For now, we will be going through the guide on how to use Bluestacks on Mac which simply makes to use android applications on Mac. Using Bluestacks is only the better free way to run android on Mac.
Summarizing,
- BlueStacks is a Free android emulator that works with macOS too.
- All android apps can be used on mac with proper configuration.
- Update mac if required to make most of this software.
- While writing this, BlueStakcs is working fine with Latest Big Sur update too. However, BlueStacks need to be updated to the latest version as well. The company confirms the same with a blog post.
First, we can learn “How to download BlueStacks on mac” followed by “How to use BlueStacks on mac”. Fixes for some of the popular issues will be discussed as well.
- Also Read: Top 5 best free games for mac
How to download and Install BlueStacks on mac
Before you install it, here are few things need to check.
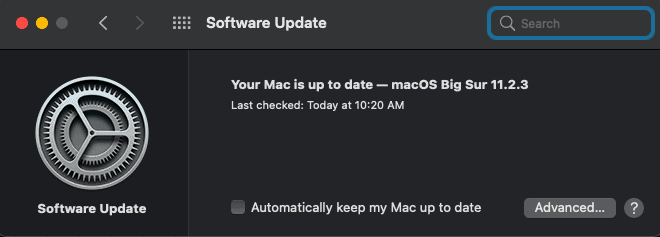
- Head on to “System Preferences” and choose “Software update”. This will give you more information about the current macOS. Update it to the latest available version.
- Visit the BlueStacks official site and download the file. Not to forget, update the PC to the latest update to make more use of it.
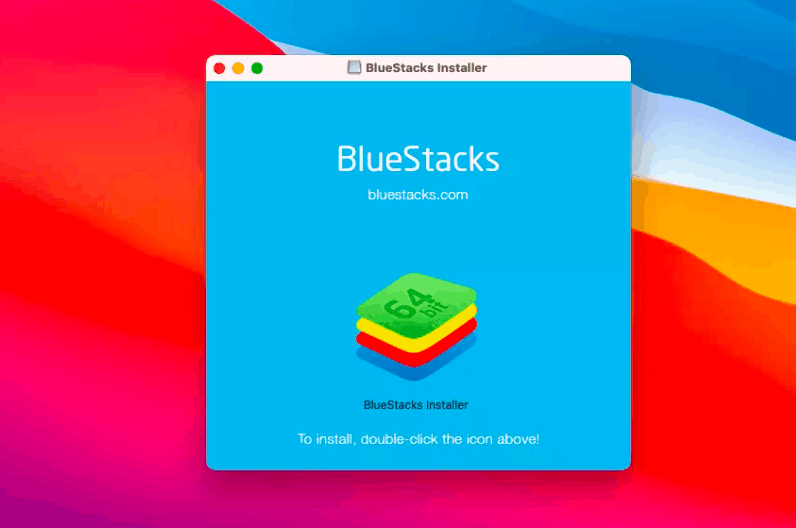
- Once download is finished, launch the installer which looks like the following.
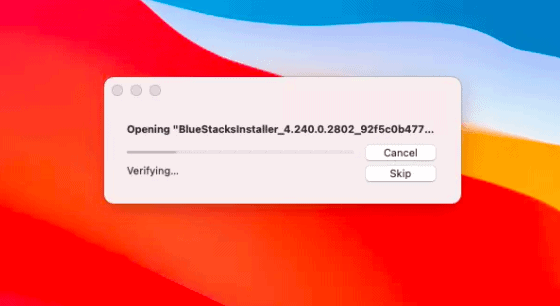
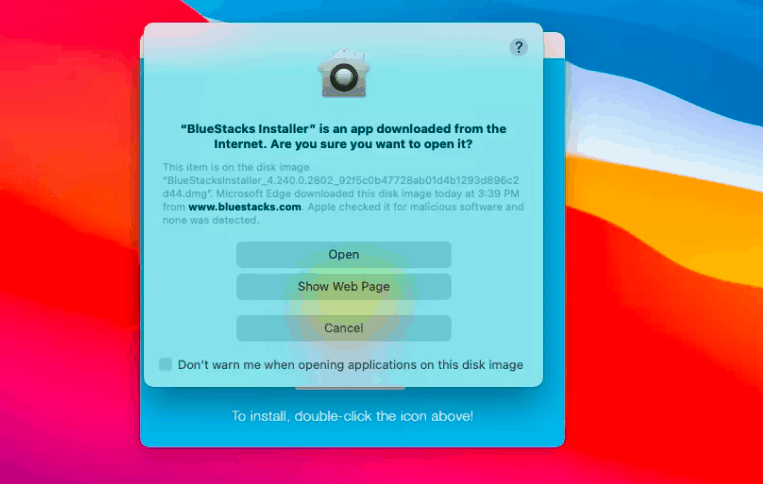
- An icon with the name “BlueStacks installer” will be displayed on the desktop. Double-tap it Which further takes you to the permissions page.
- Give all the required permissions after going through them.
- Accept terms and conditions and then click on “install now”.
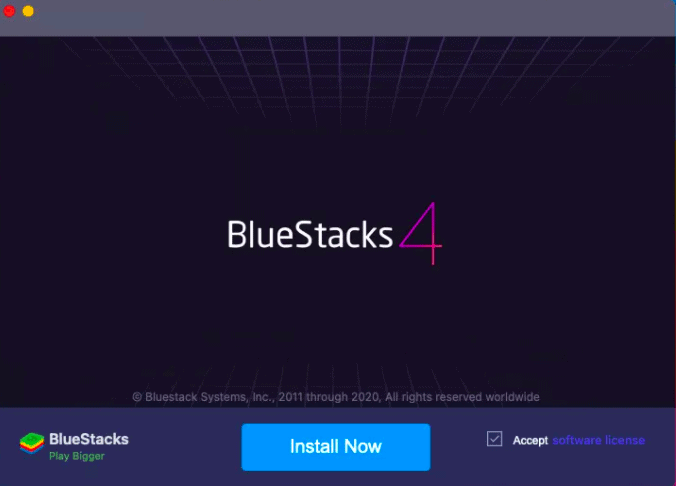
- Enter username and password if asked. Click on “Security and privacy” and allow it for loading. Alternatively, Go to system preferences and then open “Security and privacy”.
Wait for the mac to get restarted and once done, it will be ready for use.
Quick Guide to using BlueStacks on mac
Once the above procedure is done, the system will be ready to use this popular android emulator. One can use it as an android device with the trackpad. Loading time completely depends upon the performance of Mac as said above.
Total Time: 5 minutes
Launch application
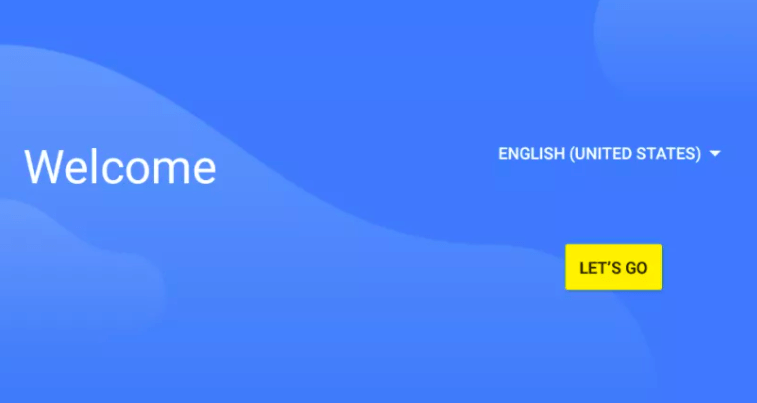
Launch the application from the home desktop and choose country. Click on Let’s go for further proceedings.
Sign in with your Google account
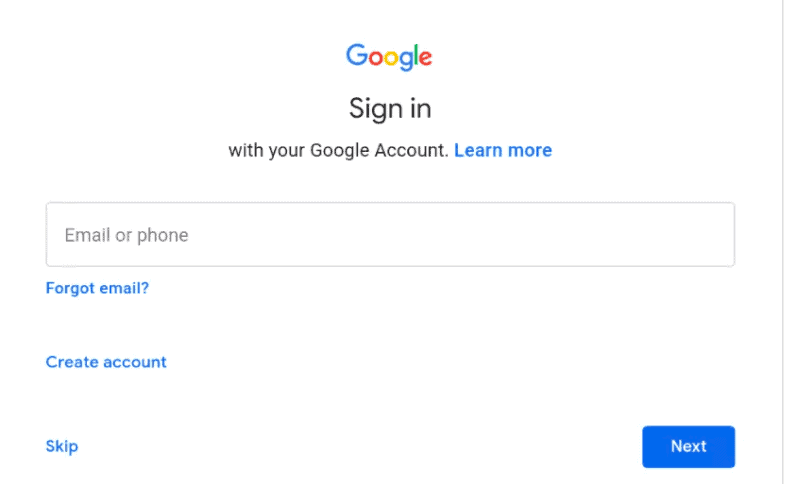
We usually use a Google account while starting with an android smartphone to make most of the play store. Similarly, we must log in with a Google account which gives access to the google play store on mac.
Access the Google play store
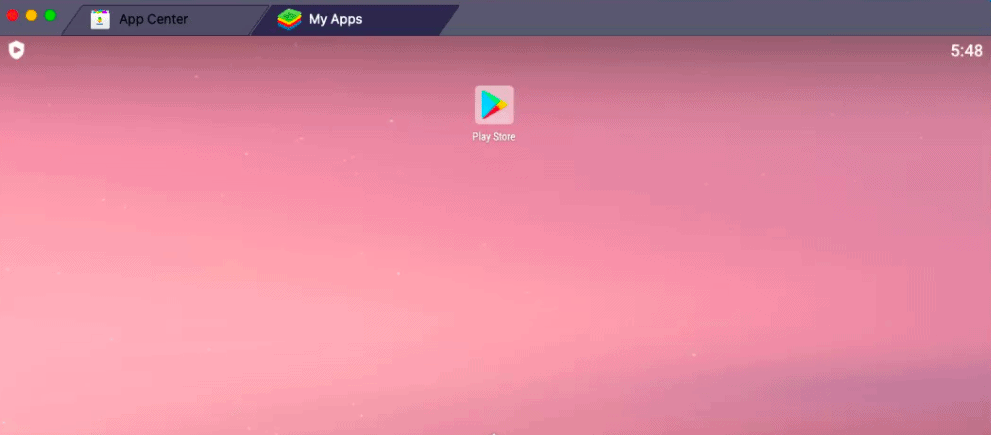
Post signing with a google account, you will be welcomed by will a popular google play store icon. Do remember one can discover apps using the play store(Which we are doing right now) or can use the App center tab on the same screen.
Search for applications you need

Interface which is the same as Google play store will be available for use. Search for the apps you need. Install them as you do on android mobile. Later, use the application as you use it on android. Tapping with hand on the screen will be replaced by gestures with the trackpad is the only difference. A number of applications can be launched as well which can be seen as tabs. It is the same as multitasking in android. However, performance completely depends upon configuration.
The access app drawer and system settings

Same as android, we are provided with navigation buttons at the bottom. Use center one which is usually a rounded icon to access the app drawer and all the installed applications.
System settings
From the app drawer, click on settings to access it. They are more similar to android settings. Chrome will be the default web browser. One can change as per their requirements. In short, BlueStacks provides system settings the same as android devices.
Access actions and audio from mac menu

Go to mac menu, which is usually on top. Click on actions and audio for more options such as screenshots, swaps between modes, and audio settings for BlueStacks.
BlueStacks display options and predefined profile
Some might be not comfortable with the view. But I can be adjusted as per our choice. Head on to system preferences and then to BlueStacks where you can rearrange display options.
We can suggest the emulator behave as termed phone. Click on advanced which is in the same menu and then choose mobile from “choose a redefined profile”. If you are familiar with Samsung mobiles, choose any Samsung mobile from the dropdown.
All these are basic steps to run BlueStacks without any issues. However, one can play around with other settings which are not required for the basic users. Do remember, all the changes done can be applied only after relaunching the application.
Why BlueStacks is not working properly on my Mac?
There are only 2 possible reasons.
- Issue with macOS
- You might have downloaded wrong installer
I am pretty sure OS is a big thing while using BlueStacks on mac. Update it to the latest version and then visit the official website to download the installer. Double-check the website before downloading. So try out by checking the source of the installer and then the version of your mac.
For example, currently, I am on Big Sur and so I have downloaded the version which works with Big Sur from the official website.
- Recommended reading: How to use WhatsApp on PC using BlueStacks
Best BlueStacks Alternatives
Video Tutorial
We Provided this article in the form of a Video Tutorial for our reader’s convenience. If you are interested in reading, skip the video for now and watch it after the completion of reading this article.
1. Nox Player
Nox Player is one of the Best alternatives to Bluestacks. Nox comes with an intuitive user interface and provides all the required features. It is a powerful Android Emulation application and the thing that makes Nox player better than Bluestacks is rooting access. This application works based on Android Nougat 7.0 and sports the material UI. In the present scenario, this application becoming a leading Android Emulator with its smooth and powerful performance.
Features of Nox Player
- New Android 7
- Superior Performance
- Ultimate Experience
- Easy Keyboard Mapping
- Supports Multi-Instances
- Macro recorder
Pricing
Nox Player is available for Windows and macOS and can be downloaded for free.
2. MEmu Play
MEmu play is another Android emulator that became the best alternative to Bluestacks. MEmu play comes with tons of features that make this competitive to Bluestacks. It supports up to Android 7.1. The main and best feature of MEmu play is, it supports both Intel and AMD CPUs. It provides smoother gameplay for the emulator players. With the built-in mouse and keyboard mappings and controls, it increases the gameplay and performance.
Features of MEmu Play
- Outstanding Performance
- Stunning Graphics
- Smart Controls
- Multiple Insane
- Enhanced OpenGL and DirectX 3D rendering effects
Pricing
MEmu Play is free to download and compatible only with Windows
3. LDPlayer
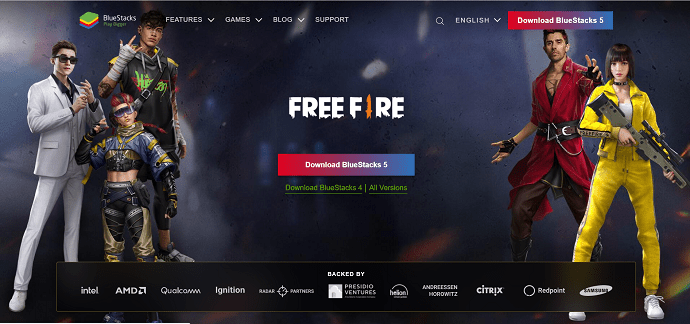
LD Player is one of the alternatives to Bluestacks. It is an Android Emulator especially designed for gaming. It gained a lot of popularity also being a new application. It is the best option to convert your Android gaming experience into your computer or Laptop. It supports a lot of games including Freefire and many more. One more reason to choose LD player is due to its lightweight.
Features of LDPlayer
- Custom Control
- Multi-instance
- Multi-instance Sync
- Macros/Scripts
- High FPS/Graphics
Pricing – Free
4. Gameloop
Gameloop is one of the topmost Android emulators in terms of gaming performance. Most of the games use this as their Android Emulator because of its intuitive interface and support. Gameloop supports almost all kinds of games like Pubg, Freefire, Call of Duty, and many more. From a common user point of view, It doesn’t provide all the features compared to Bluestacks, but when it comes to a gamer’s point of view, Gameloop is the best. Gameloop provides everything needed for a gamer.
Features of Gameloop
- Intuitive User Interface
- Supports all the major games
- Higher FPS
- Smoother Gameplay
Pricing – Free
5. Genymotion
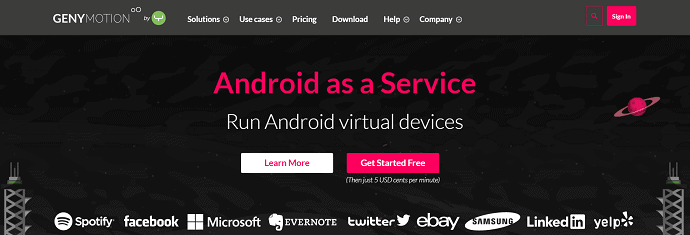
Genymotion is one of the Android emulator services that helps enables you to run android virtual devices. It is best to test apps on various android devices. It can be used on desktop and cloud through a web browser. So that, you can use it on various platforms like Windows, macOS, and Linux. You can also select the Android version from 4.1 to the latest version. As you can’t install any kind of games in Genymotion, this is not suitable for gaming.
Features of Genymotion
- Allows you to choose Android version 4.1 to the latest version
- Helps in developing and testing an app
- Compatible with Windows, macOS, and Linux
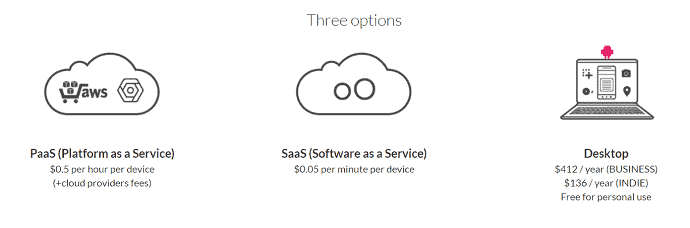
Pricing
Genymotion is available in 3 versions. The prices of all three versions are shown in the below screenshot.
Conclusion
In recent days, the demand and usage of Android Emulator have increased a lot. Everyone is willing to use their Pc as an Android mobile for various purposes like playing games etc., Most of the users recommend using Bluestacks for a better and powerful user experience. This is available for free and at less size. Moreover, it is available for both Windows and macOS. It supports more than 15 million applications to download and use. If you are a gamer and want to experience the best gaming performance with higher graphic FPS without frame drop, then Bluestacks will be the best option for you. Start downloading the Bluestacks 5 (Beta) and enjoy the best and powerful performance.
Some might be obsessed with mac which has very less options when compared to the google play store. Here come the BlueStacks which solves the problem most Mac users in using android applications on PC. Moreover, technical knowledge is not needed and is as simple as downloading an app on mobile. All you need to have is the right installer as per your versions of OS. Performance completely depends upon the configuration of that particular mac.
I hope this tutorial has given you complete details about Bluestacks. If you like this article, please share it and follow WhatVwant on Facebook, Twitter, and YouTube for more Technical tips.
BlueStacks – FAQs
Is BlueStacks Free or Paid?
BlueStacks is available for free to download and use for both Windows and macOS.
Is BlueStacks safe for your Computer?
BlueStacks is absolutely safe to use only if you download it from the official site.
Will BlueStacks get you banned?
No, using BlueStacks will never ban you. Only using a few apps or games that are developed only to use on Android Mobile.
Which version of BlueStacks is best?
Using the latest version is the best.
Is BlueStacks bad for Mac?
No. It is safe for both windows and mac. Lags in the system are completely due to the configuration of your laptop.
Is using BlueStacks illegal?
No. It is legal and safe.
Which version of BlueStacks is best for low-end PC?
BlueStacks lite version will be handy for low configuration PC’s.