Want to Disable secure boot in Windows 8, 8.1, or 10. Just follow this simple step by step procedure to enable or disable secure boot. The procedure is almost the same for Windows 8, Windows 8.1, and Windows 10.
What is Secure boot?
Windows 8 or later versions come with UEFI firmware instead of BIOS. Microsoft has included secure boot in these operating systems. Secure boot allows your PC to boot only from UEFI firmware. Because the secure boot is enabled in your OS, you can not boot your PC with other devices or other OS like Linux. It also stops booting two operating systems. It will give high security by stopping the boot from unauthorized devices.
When do I need to Disable Secure boot?
You must disable Secure boot when you see below situations.
- When you want to boot your PC from an external device like a USB or CD.
- When you want to boot your PC with Linux or any other OS.
- When you want to use a Boot device made by Windows password recovery tools like reset password pro.
- When you want to run previous Windows versions.
- When you want to run a Graphics card.
How to disable secure boot?
Disabling secure boot is a very simple process. Within 2 minutes you can disable secure boot. Just follow the below procedure. You can use the same procedure in Windows 8 or 8.1 or 10.
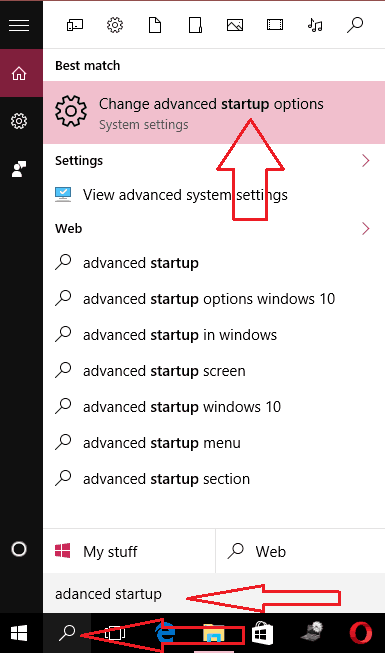
Use Cortana search to search with a keyword advanced startup. Select Change advanced Startup Options shows that in the below screenshot.
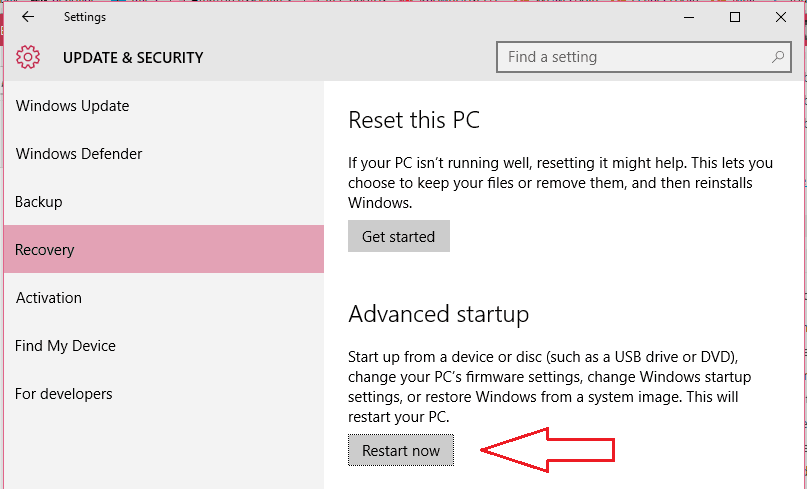
Now you will see the below screen. Just click on Restart Now under the Advanced Startup option.
Now your PC will restart in Advanced mode. You can follow another method to restart the PC in Advanced mode. Just restart the PC. You will see the login screen. Click on the Power symbol in the bottom right corner. Hold down the Shift key and click Restart. Now your PC will restart in Advanced mode. You will see the below screenshot.

Select Troubleshoot options. You will see two options shows that in the below screenshot.
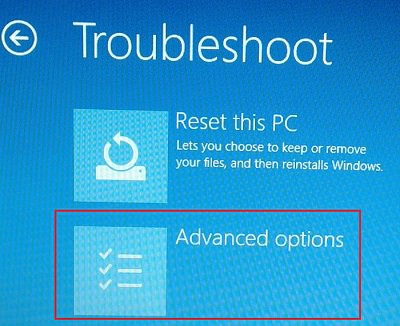
Select Advanced Options. You will see below screen.
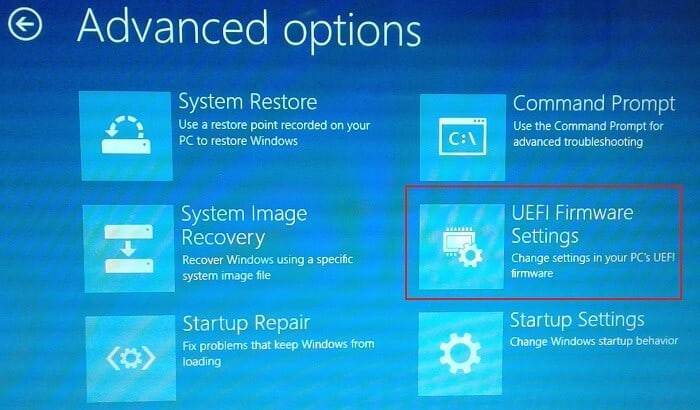
Select UEFI Firmware Settings. Click Restart on the next screen. It will restart in BIOS. If your PC does not restart in BIOS, you might have seen another screen where you need to press F2. You will see the BIOS setup shows that in the below screenshot.
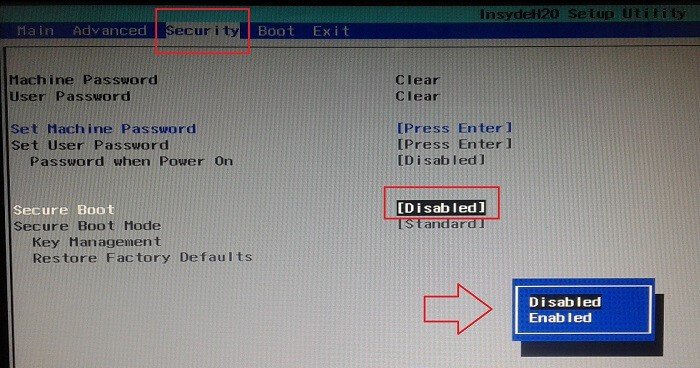
When you use Windows 8 or 8.1, you need to select the Boot option. When you use Windows 10, you need to select the Security option shows that in the above screenshot. You may see Enabled option near Secure Boot. Select that option using arrow keys. Press Enter. Select Disabled. Press Enter. Save changes and Exit. Now you can boot your device with other devices.
When you want to enable secure boot, you need to repeat the same procedure. Sometimes you may not be able to Enable Secure boot until you reset your PC to factory settings. You may also see this topic for details.
- You May also Like: How to create system restore point in Windows
- Windows 10 comparison with features
- How to schedule task in Windows with task scheduler
Thanks for reading my article. If you get benefits, just share it with your friends. If you want to add any other point, please do share it in the comment section. Follow WhatVwant on Facebook and Twitter for more tips. Subscribe to whatvwant channel on YouTube for regular updates.
