Want to deploy Windows 11 to multiple PCs for Office use at once? In this tutorial, you will find the best solutions to deploy Windows 11 to multiple PCs at one time.
There are several best ways to deploy Windows 11 on Multiple PCs. One is using the Media creation tool and another one is using third-party apps like “EaseUS Deploy Manager“, “AOMEI Image Deploy“, and many more professional tools. You can use the Deploy process for your personal use or Office use.
How to Deploy Windows 11 on multiple PCs at once
1. How to Deploy Windows 11 on multiple PCs using EaseUS Deploy Manager
1.1.Prepare for installing OS on several PCs at the same time
Before you start planting Windows 10/8/7 on side-by-side computers all at once, you must do three preparation jobs as below.
Step 1. Setup or gain a Microsoft DHCP (Dynamic Host Configuration Protocol) server on your network;
Step 2. Ensure that all computers which need to install or upgrade to new Windows OS are under the same LAN.
Step 3. Create a full system backup image with EaseUS Todo Backup and put the image on a network where you can access it from the master PC. (Detailed in Part 2)
1.2.Create a system image for installing or upgrading OS on multiple PCs simultaneously
In order to deploy the system on several different computers at the same time, a highly recommended method and must-be access to solving such a problem are to create a system backup image. EaseUS Windows backup and recovery software allows you to create a backup system image with simple clicks. Remember to put the system image on a network place where other PCs and your master computer can access it.
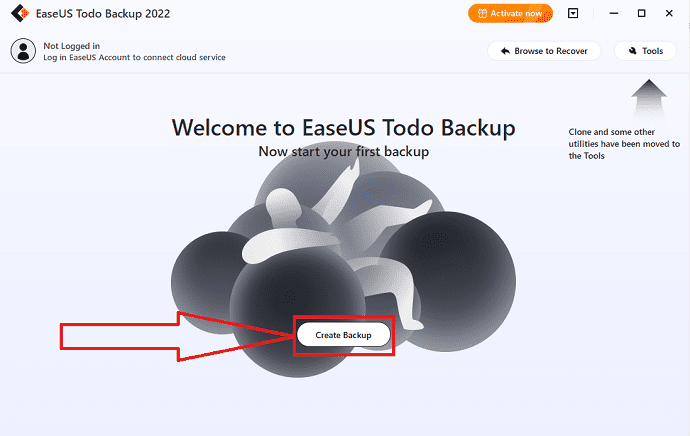
Step 1: Download and install the EaseUS Todo Backup application from its official site. Launch the application and click on create BackUp option on the main interface.
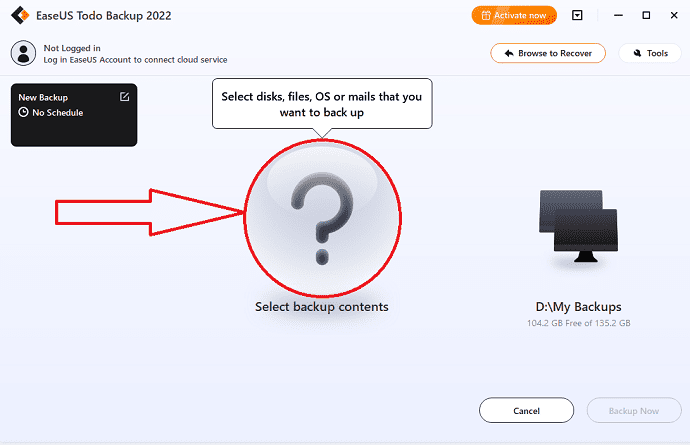
Step 2: You will redirect to the new interface. Click on the big question mark to select the backup contents.
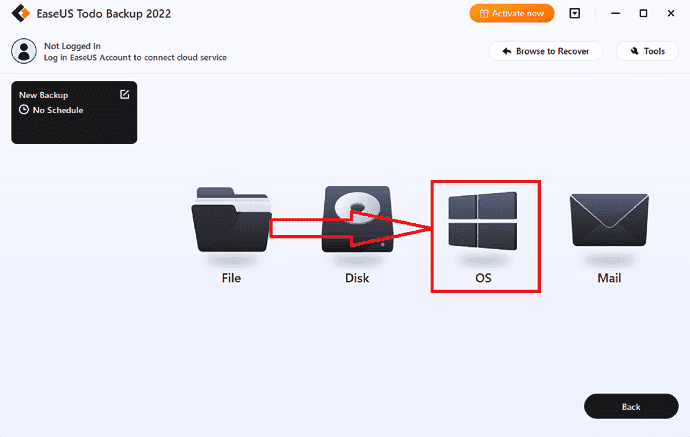
Step 3: You will find several options on the screen. Click on the “OS” icon to backup the Windows Operating system.
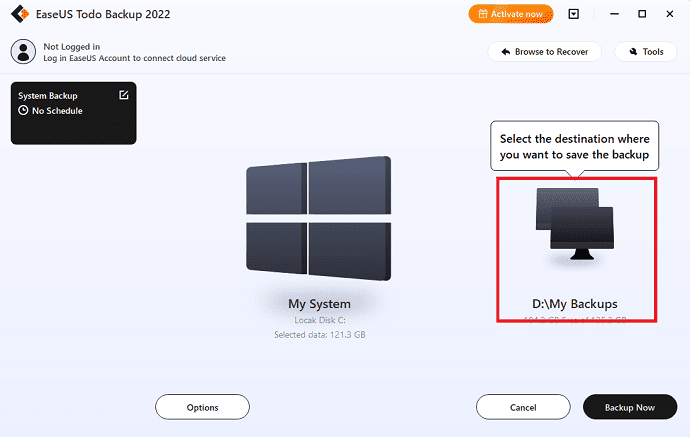
Step 4: All the Windows OS information and system-related files and partitions will be selected automatically. Don’t need to select the files and partitions manually. Next, select the destination where you want to save the backup data by clicking the “My backup” icon.
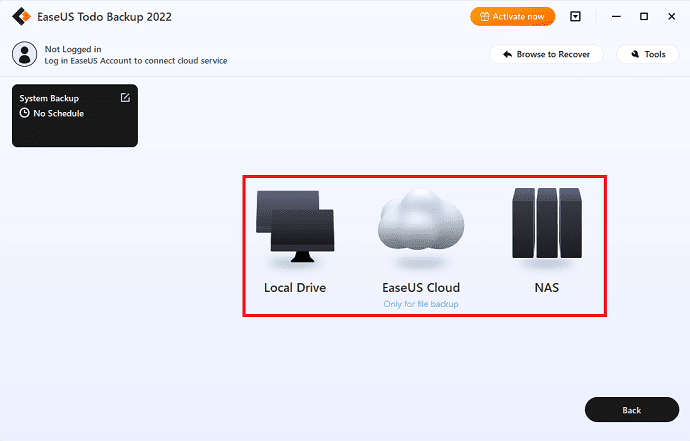
Step 5: The destination location can be another local drive on the device, an external hard drive, Clou, or NAS. Select the one you want. It’s always best to select the external drive or cloud to preserve the System Backup file, Select the one you want
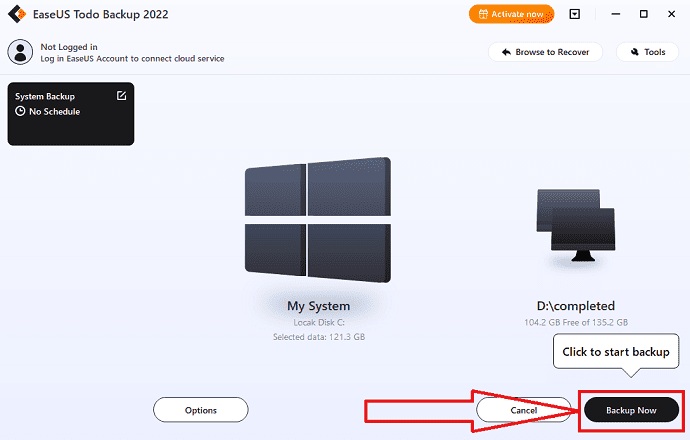
Step 6: If you’re interested, customization settings such as establishing an automated backup schedule in daily, weekly, monthly, or upon an event, and creating a differential and incremental backup can be found in the Options button. The Windows system backup process will begin after you click “Backup Now.” The completed backup task will appear as a card on the left side.
1.3.Install Windows 10/8/7 on multiple computers at one time
Now it’s the last step, how do you deploy or install the Windows 11 Operating system on several PCs at the same time? You need a specific system to install management tools in order to achieve your goals. Here, we offer EaseUS Deploy Manager, Which allows you to install Windows on several Pcs with just a few mouse clicks. Just follow the below steps for a detailed process.
Step 1: Download and install EaseUS Deploy Manager from its official site. Launch the EaseUS Deploy Manager application, Click on Create group option and create a new group with the name.

Otherwise, you can also add computers directly by going to “Add machines”. You will find two options in the drop-down menu. Select the From file option or By Mac address.
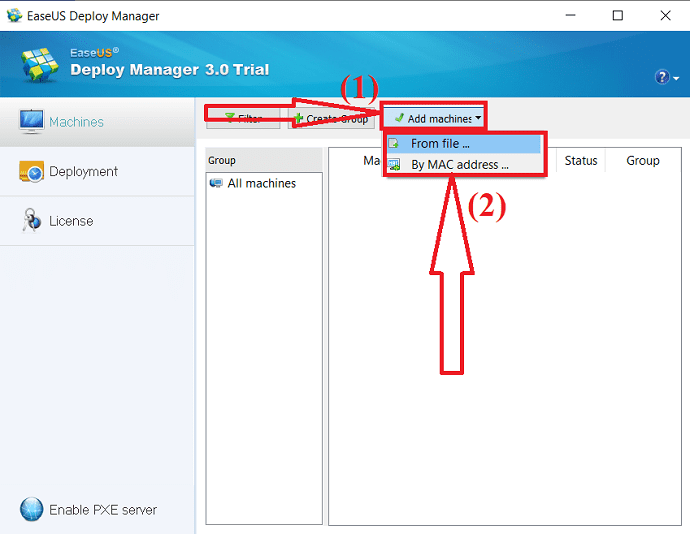
By Mac address: You can directly input the computer’s Mac address, Alias name into the group so as to add a machine for system deploying.
From file: This allows you to directly import a file into the software to add computers. The TXT file contains the computer’s information including Mac address and Alias with space or Tab.
Step 2: Create a system deployment. Click on “deployment” from the left side of Windows. Click on create option. A pop-up window will appear on the screen. Enter the task name in the task name box and select the machine that you have selected in the first state. Finally, click on “Next”.
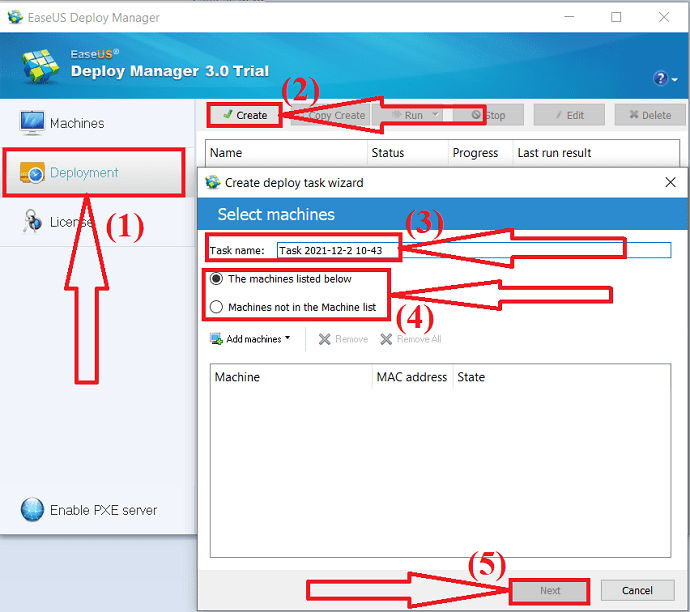
Step 3: Execute the deploying Windows 11 OS on target devices. Select the created task and click on Run to start the deployment task. Once the deployment task is completed, you will successfully install OS on all involved devices. You need to for some time while the software is processing the task.
2.How to Deploy Windows 11 on multiple PCs using Media creation Tool
The Windows Medis creation tool will be used to upgrade your current PC to Windows 11. It can also download the Windows 11 installation file on a flash drive. So you can quickly reinstall the operating system. You can use this method to create bootable media and clean install windows by following the steps given below. By the way, it only allows you to install the system one at a time.
Step 1: Download and install the Windows 11 Media creation tool from its official site. Launch the application.
Step 2: Select the “Create installation media from another PC” option. Please follow the instructions to finish the remaining stages.
Step 3: Connect the disk or USB drive that containing the Windows 11 installation file to your system. INstall the New SSD.
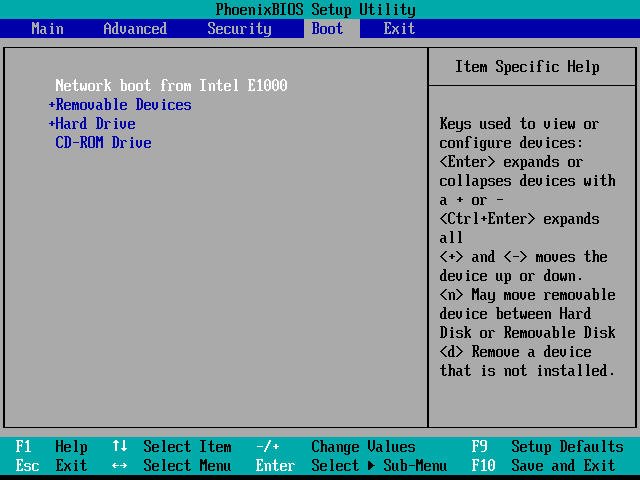
Step 4: Change the boot sequence. To enter the BIOS mode, start the computer and press F2 or F12, then pick the bootable disk as the first choice, then hit F10 or enter to exit and reboot from the installation CD or USB drive.
Step 5: Select the language and other preferences and click on the “Install Now” option.
Step 6: Enter the product key or else leave it empty.
Step 7: You will find two different options on the screen. Select the “Custom: Install Windows only (advanced)”.
Step 8: Several drive partitions will appear on the screen. Select the partition where you want to install the OS and click on Next.
Hint: You will need to buy a product key to activate Windows 11 unless your SSD currently has it installed.
The Media Creation Tool can help you install Windows 11 to multiple PCs at a time, but it might be tricky to use especially for inexperienced users. It also has a few features. Method two is the best one and can be used if you desire a software that is similar and more functional.
3. How to Deploy Windows 11 on multiple PCs using AOMEI Image Deploy
In this method, you need to use both the AOMEI Backupper standard and AOMEI Image Deploy applications. The backup program must back up the system of the source device, and then the deploy software must restore it to many computers.
AOMEI Image deeply is the best software that helps you to deploy images to several computers simultaneously. It is very easy to use without any technical knowledge. It will guide you to complete the tasks with the step-by-step wizard. It supports multiple oS like Windows 11/10/8.1/8/7/XP/Vista and many other servers.
Before going to deploy Windows 11 on Multiple systems, you need to create a System Image. Let’s see how to create a system image using AOMEI Backupper.
Create System Image using AOMEI Backupper
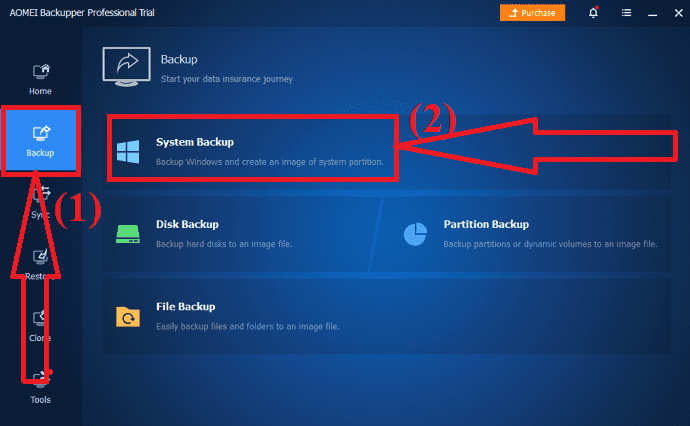
Step 1: Download and install the AOMEI Backupper application From its official site. Launch the AOMEI Backupper application. Click on the Backup option at the left side panel and select the “System Bacup” option.
Step 2: You will redirect to a new interface. Click on the down arrow beside the D drive box. You will find two different options. One is “select Local path” to back up the data and save that in the local device itself. Another one is “Select the Network location”. select the one you want. Choose the “Select a Network Location option for a better backup.
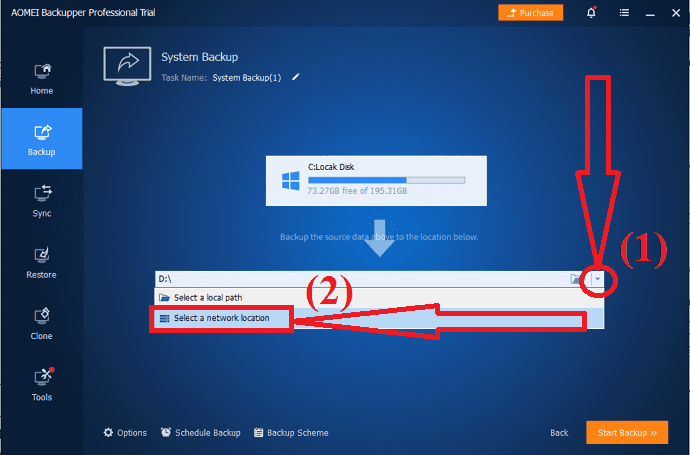
Step 3: A prompt will appear on the screen. From that, select the Share/NAS device or network shared locations as the backup paths. Finally, click on the “Start Backup” option at the top bottom of the screen.
Once the completion of creating a System Image using the AOMEI Backupper. Now, it’s time to install Windows 11 on several devices at a time using an amazing tool AOMEI Image Deploy.
Install Windows 11 to multiple device using AOMEI Image deploy
Step 1: Download and install AOMEI Image Deploy application from its official site. Open the application. Enable the “Create bootable WinPE manually” and Select the Make WinPE option.
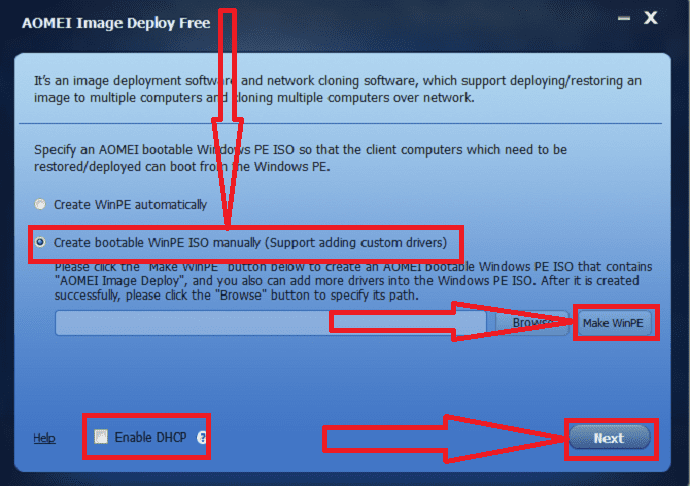
Create Bootable WinPE window will be displayed on the screen. Click on “Next”. If the program detects that there is no windows AIK/ADK, you have to install them first
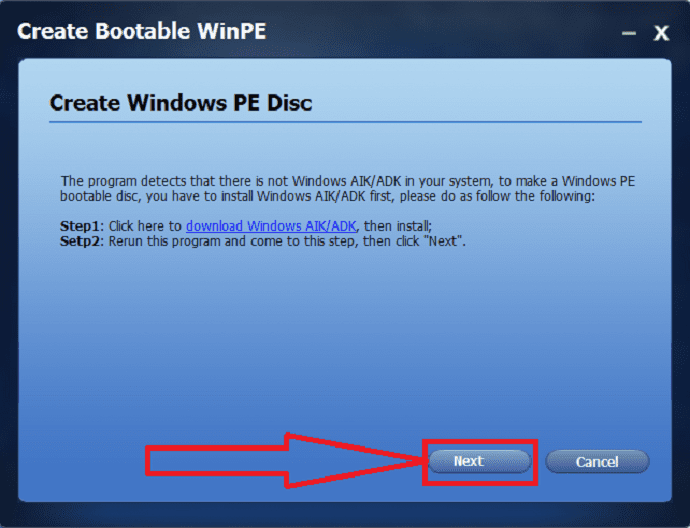
Note: You can use the first option if you don’t need to install any other devices. In order to deploy an image over the Network, Your LAN must have a DHCP server. If not, select the “Enabled DHCP” at the bottom
Step 2: The PE environment will be created automatically by the software, and you will see the message “The service has begun, waiting for connect….”
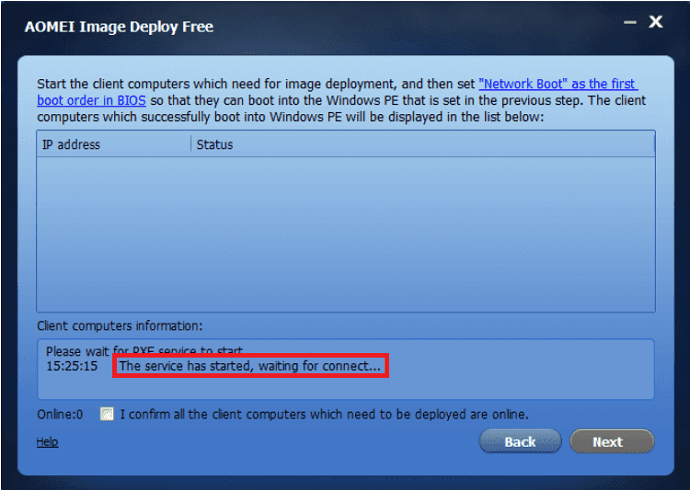
Step 3: Start the client computers and the boot priority of each client machine should be changed in BIOS. Check to see whether they boot from the network.
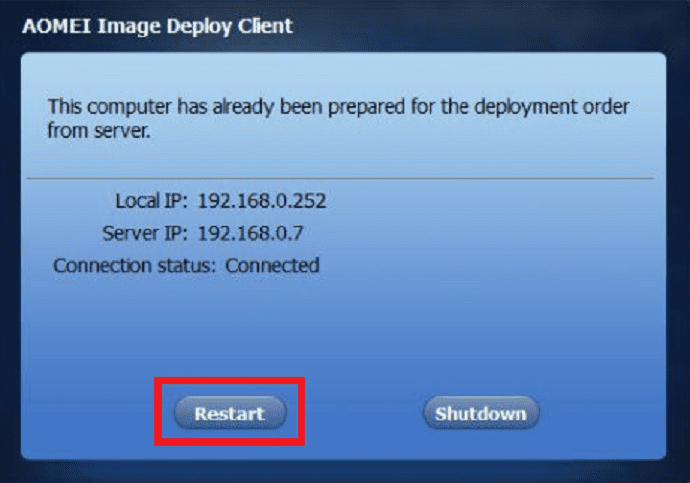
Step 4: If everything is set correctly, the computer will boot into the AOMEI Image Deploy recovery environment and display the booting progress.
Step 5: After the completion of the booting process, you will find the Local IP address, Server IP address, and Connection status on the client system. Click on the “Restart” option.
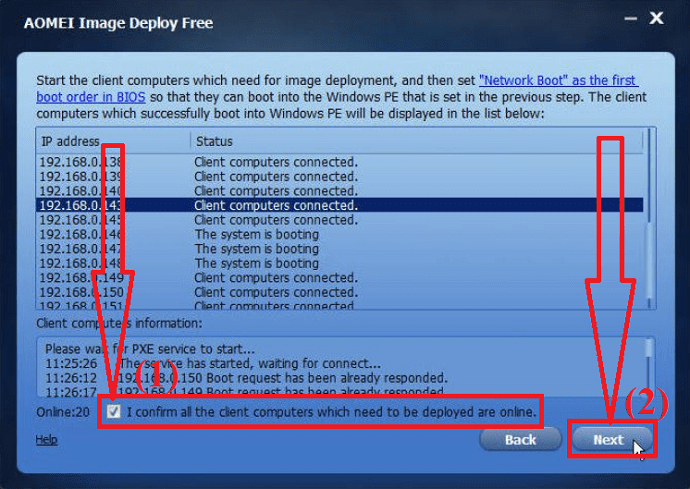
Step 6: The server detects that all of the client computers are connected via their IP address. You can observe the list of client computers on the screen. Check the box decide the message “I Confirm that all of the client computers that need to be deployed are online” and click on Next.
Step 7: Click on the “Browse” option to select the Backup image file from the network or NAS. Check the ALL box to select all the client computers or else select client computers manually by enabling the specific IP address boxes.
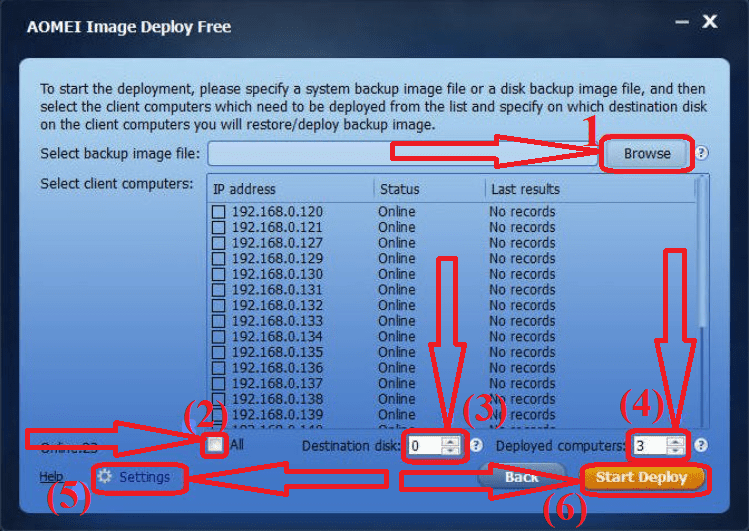
Choose the destination disk number to specify the disk for deploying the Windows 11 backup image and select the number of computers for each deployment. Click on Settings to set the name and IP address of the system.
Finally, click on the “Start Deploy” option at the right bottom. Wait for some time to complete the deployment process. You can upgrade to the higher edition so that you can use the universal restore feature to restore multiple computers easily.
Final Thought:
These are the three amazing ways to deploy Windows 11 on multiple PCs at a time. Among them, our best choice is the “EaseUS Deploy Manager”. It completes your tasks in a few simple clicks. EaseUS also offers the best backup tool named EaseUS Todo Backup to backup all your data and applications without any loss.
Offer: Our readers get a special 30% discount on all EaseUS Products. Visit our EaseUS discount Coupon page for the promo code.
I hope this tutorial helped you to know about how to Deploy Windows 11 on multiple PCs at one time. If you want to say anything, let us know through the comment sections. If you like this article, please share it and follow WhatVwant on Facebook, Twitter, and YouTube for more Technical tips.
How to Deploy Windows 11 on multiple PCs at one time – FAQ
Is it possible to deploy Windows 11 on multiple Pcs at a time?
Yes. It is possible to install Windows 11 on multiple PCs at a time.
Which is the best tool to install Windows 11 on multiple PCs?
Always EaseUS Deploy Manager is the best third-party tool that helps you to install WIndows 11 on multiple PCs.
How do I use EaseUS deploy manager?
First, Import a machine list file or enter the MAC address of the machine to add. Create machine groups and distribute the system to various machines. Make deployment tasks, choose the target machines, and deploy the system image.
Is there any other better tool other than EaseUS?
Other than EaseUS, AOMEI Image Deploy is the best one. Go through the article for a detailed process.

