Want to Speed up BlueStacks? BlueStacks is the most popular Android emulator for gaming for a reason. It offers incredibly high speeds, even faster than the Samsung Galaxy 9 smartphone. However, even fast software like BlueStacks can sometimes lag. If you wish to find more Android emulators for Windows check this post from BrowserCam.
So how to speed up BlueStacks? There are several things you can try to improve the speed of the emulator on your PC. With high speed, you’ll be able to enjoy your favorite games, no matter how high definition their graphics are.
Before improving BlueStacks speed, make sure that you have a PC with good speed.
How to Speed Up BlueStacks?
Video Tutorial
We Provided this article in the form of a Video Tutorial for our reader’s convenience. If you are interested in reading, you can skip the video for now and watch after the completion of reading this article.
Here are some of the methods you can try to make this Android emulator faster:
1. Update BlueStacks
The easiest solution which might just do the trick and fix the lagging is updating the software. You should install the latest version of BlueStacks available. Usually, newer versions are faster than the older versions, so you’ll most likely find much better speeds.
To check your Bluestacks version, go to Settings> About> Check for Updates.

Now, you’re probably thinking about my gaming data and progress? If you have version 3.52.66.1905 or above, then you’ll be able to update without losing that data. However, for versions older than that, you may not be able to save the apps you’ve downloaded.
As for the progress of certain games, if you’re logged in, your progress is probably saved. You’ll just need to log back in with the same account, and you’ll be able to continue the game from where you left off.
2. Enable Virtualization
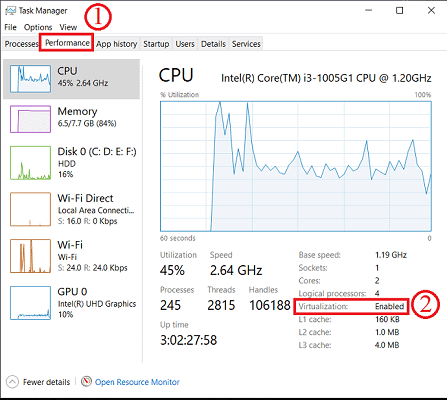
BlueStacks itself recommends enabling virtualization to speed up the software. Virtualization allows better resource allocation to the emulator, thus improving its speed. You can check in the Task Manager whether virtualization is enabled or not.
Open Task Manager by right-clicking the Taskbar and selecting Task Manager or Click Ctrl+Alt+Delete. Click on the Performance Tab and see on the right side of the task manager window whether virtualization is enabled or disabled.

If it’s disabled, you’ll have to enable it through BIOS settings. You’ll also need to find out whether your processor even allows virtualization.
3. Allocate More RAM and CPU
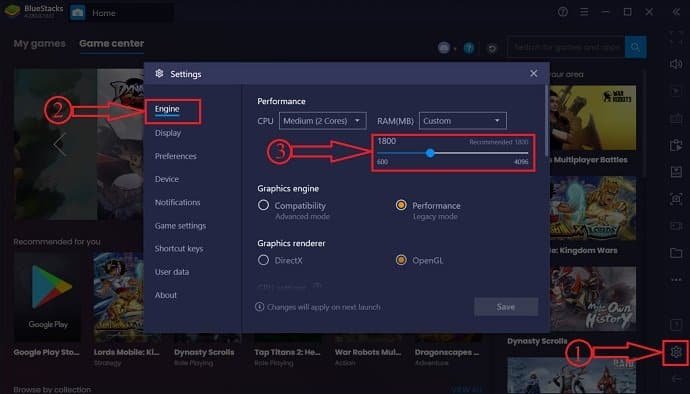
It’s pretty simple, the more RAM and CPU cores are dedicated to a particular application, the faster it runs. Thankfully, BlueStacks allows this type of configuration. The recent versions of BlueStacks have these settings available in the engine settings. Here’s how you do it:
I. Click Settings button on the top right corner of BlueStacks window
II. Click Engine on the left tab
III. Now, you’ll see a slider for RAM, which you can drag to increase allocated memory
IV. Bring it to 4 GB (if you have at least 8 GB overall)
Above steps are shown in the below screenshot

Similarly, you can also dedicate the maximum number of CPU cores to the emulator. Take the same steps as above, and you’ll find the option on the Engine menu. You can select the highest number available in the drop-down menu for CPU cores.
If you have the less RAM, you can increase your RAM after checking RAM compatability.
4. Update Graphics Driver
Make sure that your Graphics diver is up to date. If you have NVIDIA, you can use GeForce Experience to ensure the driver is always updated. Yes, it pretty much affects the display, but it could be the slow graphics driver that may be causing the lag, as gaming is pretty much about graphics.
The best thing to do is to set up Windows to update drivers automatically when they are available. This can be done by enabling automatic Windows updates. Of course, you can always do it manually too.
You can use IObit Driver booster to update all your drivers automatically.
5. Turn on High Performance
There’s a setting for power in Windows that may help improve speed slightly. This feature basically allows your PC to deliver optimal performance but uses up more power. You can always plug in the charger to supply ample power for high performance.
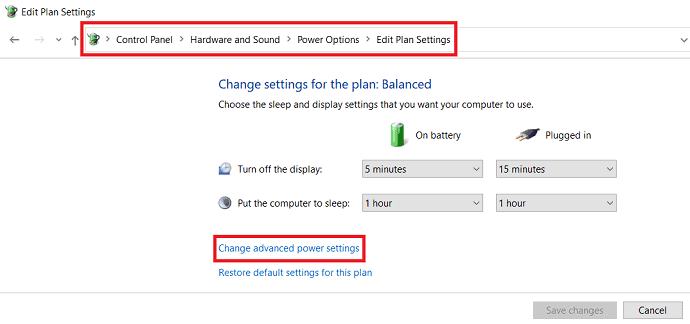
To enable this setting, launch Control Panel, then click Hardware and Sound, and then go to Power Options. Click on the Advanced Power Settings option. Then, a window will pop up.

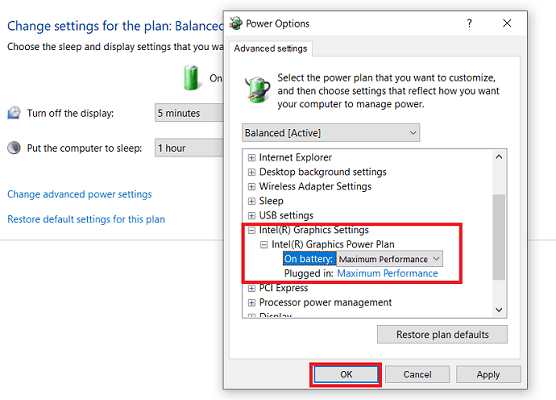
On that window, click on the Graphics settings and there you will find two options: balanced and high performance. Now, enable high performance.

6. Close All Other Programs
Sometimes simply closing all other third-party applications can free up enough memory and CPU to speed up the games running in BlueStacks. So make sure that all programs except for system programs are closed.
Chrome, in particular, eats up a lot of memory, so make sure no Chrome windows are open, or any other browser for that matter. Just open Task Manager and see which programs are using how much memory and CPU.
7. Temporarily Turn Off Antivirus
Your antivirus program may be running in the background, causing lags in the BlueStacks emulator. It may be running scans or sending notifications in the background. So temporarily disable antivirus while you’re playing mobile games on the emulator.
Bottom Line
Now that you know how to make BlueStacks faster for the faster gaming experience – more here, you’ll never want to play an Android game on the phone again. The high speed and high definition graphics, paired with the larger screen size, deliver a gaming experience that mobile just cannot compete with.
I hope this tutorial helped you to Speed up BlueStacks. If you like this article, please share it and follow WhatVwant on Facebook, Twitter, and YouTube for more tips.
How To Speed Up BlueStacks for Faster Gaming Experience?-FAQ
How can i make Bluestacks run faster?
You can make BlueStacks run faster by updating bluestacks, enabling virtualization, updating the graphics driver, allocating more RAM, etc.
Is bluestacks is virus?
Bluestack is not a virus. It is an emulater to run android apps and games on Windows and Mac.
What is the main use of enabling virtualization?
Virtualization allows better resource allocation to the emulator, thus improving its speed. You can check in the Task Manager whether virtualization is enabled or not.
How to allocate more RAM in bluestacks?
Click Settings button on the top right corner of BlueStacks window
Click Engine on the left tab
Now, you’ll see a slider for RAM, which you can drag to increase allocated memory
Bring it to 4 GB (if you have at least 8 GB overall)
