
Are you getting more noise while taking pictures? Want to reduce that noise from your photos on Mac? Do you know how to reduce noise from photos on your Mac? This article will show you How to Reduce Noise From Your Photos on Mac using Noiseless. We are going to give you a detail review of Macphun noiseless.
Before going to the procedure, let us see some details about noise, how it occurs, what is noiseless, etc.
What is Noise and How you get it?
If you’ve taken photographs during twilight scenes, indoor scenes, or action scenes you’ve more than likely come across the noise. It’s that grainy look in images that often makes the scene look messy or uneven.
Noise is essentially fields of colored pixels that incorrectly represent that beautifully clear scene your eyes see. It happens when photos are taken at a high ISO or when you shoot a long exposure image.
There are certain precautions to noise reduction that can be taken during your photo-shooting phase: you can shoot at a lower ISO, shoot in RAW, check your exposure settings and make sure to be careful when experimenting with long exposures.
But what about when you try those things, and you still end up with a noise-filled photo?
That is where post-processing comes into play. And where an app like Noiseless by Macphun(55% discounted Link) can fix your photo and render that amazing scene in a way more similar to how you perceived it.
What Is Noiseless?
When you shoot photos in low light situations, every smartphone, compact camera or DSLR camera creates the noise mentioned above those small grainy fields of randomly colored pixels that often make good photos, bad.
Noiseless uses revolutionary and innovative smart technology to rapidly clean up that messy digital noise and make your photo look incredible no matter what camera you’ve used.
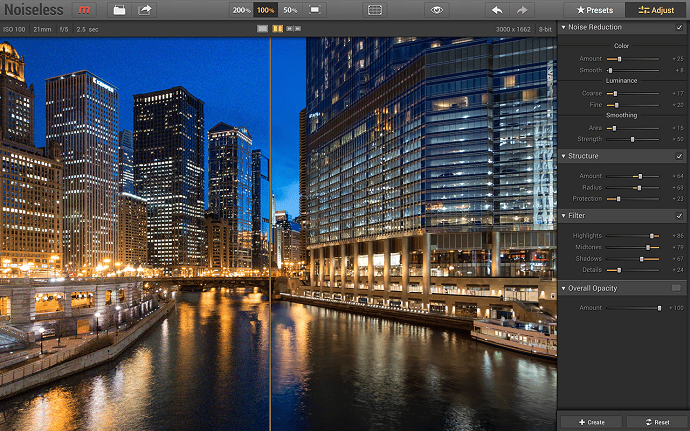
It analyzes your images and automatically selects the best noise reduction setting. But, should you choose to, you can also use the slider for each preset or adjustment to experiment with structure, detail and smoothing the amount of noise reduction. You can even inspect your photos further with multiple zoom options.
Adjust the level of denoise from Soft to Extreme (using the Extreme effect for night photos and the Soft effect for photos taken on a bright day). Get rid of the grain and recreate the true colors, sharpness and angles of your image.
Specific features of Noiseless that make it an advanced noise reduction software:
- Superior digital noise reduction
- Special algorithms for improving mobile & action cam photos.
- One-click presets from Lightest to Extreme, plus Balanced and Soft.
- Ability to export and import custom presets.
- Use the software as a standalone app, plugin and extension.
- Native RAW noise reduction.
- Native RAW support with 16-bit image processing.
- Support of all popular image formats (from JPEG to PSD).
- Unique tools: noise reduction, structure, details, and more.
- Full compatibility with the latest versions of Mac OS.
- Built-in social sharing
- Export to other Creative Kit applications
- Gets rid of grainy fields of colored pixels
- Side by side comparison available
- Recreates true colors of your photos
- Angles remain sharp
- Batch processing
Price & discount
Noiseless usual price is $59.99. WhatVwant readers get special 55% discount through this link.
Sometimes Macphun runs special promotional offer. Please check WhatVwants MacPhun discount coupon page for the latest offers.
How to Reduce Noise From Your Photos on Mac Using Noiseless?
When you first upload your image, Noiseless (55% Discounted Link) will check its EXIF data and apply the best preset.
You can also select from the other presets Light, Moderate, Medium, Intense and more which offer different levels of noise reduction.

Working with the presets will give you the quickest results, though Noiseless does offer additional powerful adjustment tools that work to alter an image’s noise reduction (color, luminance, and smoothing); structure (amount, radius and protection); filter (highlights, mid-tones, shadows, and details); and overall opacity.
Noiseless can adapt to what you want as the user — so when you find a combination of adjustments that work for you, simply save them as a favorite.
When the noise is reduced and your photo looks precisely how you want it (free of noise and distraction) export it and you’re good to go.
- You May Also Like: How to Resize Image on Mac with Preview Application
- 6 Ways to Convert PDF to Word on Mac
Conclusion
Noiseless is simple yet extremely powerful — it yields grain-free results with little to no work on your end and instantly gives you that stunning final shot you strive for.
With your image sharp and clean, proudly share it with your social outlets and rest assured that when grain sneaks its way back into your shots, you have an easy and straightforward way to eliminate it.
I hope you like my article about How to Reduce Noise From Your Photos on Mac using Noiseless. If you like it, do me a favor by sharing it with your friends. Please follow whatvwant on Facebook and Twitter. Subscribe to whatVwant channel on YouTube for regular updates.