
How to Add watermark to photo in Photoshop elements? This tutorial gives a simple answer to this question. Within 1 minute you can add a watermark to a photo with Photoshop elements. You can add text or images as a watermark. If you don’t have Photoshop elements, don’t worry, you add a watermark to the photo with PowerPoint. Read my article about how to add watermark to photo with PowerPoint.
Adobe has given instructions to add a watermark to the photo in their help section. But they did not cover it with screenshots. Here I am showing you the procedure with screenshots. In this procedure, I am going to cover how you can add text or images as a watermark.
- You must like: 2 simple methods to compress photo
- 2 ways to edit photo background in Photoshop elements
How to add Text and Image Watermark
Video Tutorial
We provided this article in the form of a video tutorial for our reader’s convenience. If you are interested in reading, you can skip the video and watch it after the completion of reading this article.
How To Add Watermark to Photo – Text Watermark
- Firstly, Visit the Official site of Adobe and Download the latest version of Adobe Photoshop Elements onto your computer.

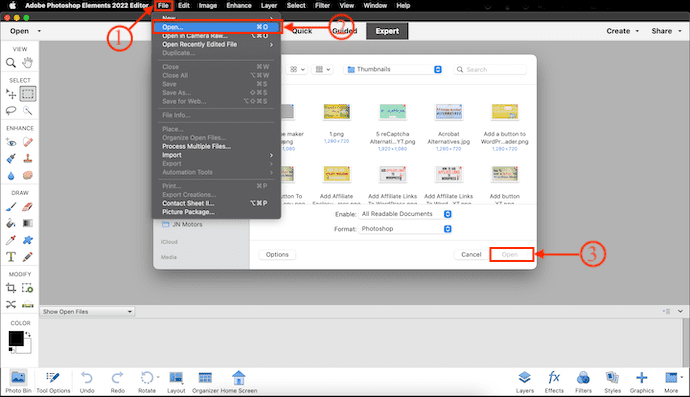
- Install and launch the application, then you will the interface exactly similar to Adobe Photoshop. Be in the “Expert” Mode. If not, Just click on it to move to Expert Mode. Import the file to which you want to add a watermark by following the path “File > Open”. A window will pop up and allows you to choose the Photo. Select the Photo and Click on the “Open” option.
- Select the “Type Tool” from the Toolbar available on the left side of the interface. Or else, use the keyboard shortcut “T” on your Keyboard to select Type. It provides various options related to the Type too. From those options, you can easily modify the Font, size, color, etc., You can also move the position of the text to anywhere on the Photo.

- Later, Turn the layers section to Visible by clicking on the layers option available at the bottom menu. Then you will find the photo and text layers. Select the Text layer by clicking on it. Click on the “Opacity” option, and a slider will open. Use the slider to increase and decrease the opacity. Set the opacity to the level at which you feel it is better.

- This is how you can add a text watermark to a Photo using Adobe Photoshop Elements.
Now you know how to add a text watermark to a photo. Let us see how to add an image as a watermark in Photoshop elements.
How To Add Watermark To Photo – Image Watermark
You can add your company logo or any image as a watermark.
- Download and Install the latest version of Adobe Photoshop Element onto your computer.
- Launch the application and import the image to which you want to add an Image Watermark. Similarly, import the image or logo that you want to use as a watermark.
- After importing the image or logo, Click on the “Select” option available at the top menu. An options list will open. Choose the “Subject” option from the list. Later, Click on the “Edit” option available at the top menu and Choose the “Copy” option from the options list.

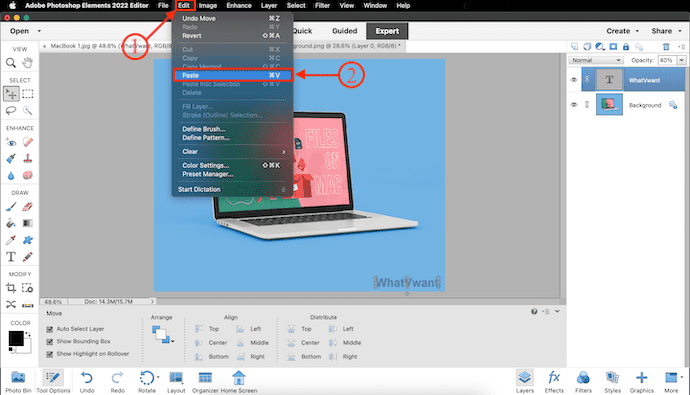
- Now, move to the main photo. Click on the “Edit” option and Choose the “Paste” option.
- Then the image or logo will be pasted into the main image. Make adjustments and modifications if needed. Later in the layers section, Choose the Logo layer and Adjust the opacity level using the slider. Set the opacity to a certain level at which you feel it looks best.

- This is how you can add an Image watermark to a Photo using Adobe Photoshop Elements.
Conclusion
With the methods discussed in this article, you can easily add watermarks to photos using Adobe Photoshop Element. Whether it is a Text watermark or image watermark, Photoshop element will help you. This is also available in a free trial version, which lasts for 30 days from the day of installation. Adding a watermark is possible in the free version also.
I hope this tutorial helped you to know about How to Add Watermark to Photo in Photoshop Element. If you want to say anything, let us know through the comment sections. If you like this article, please share it and follow WhatVwant on Facebook, Twitter, and YouTube for more Technical tips.
How To Add Watermark To Photo in Photoshop Element – FAQs
Do Photoshop Elements have a watermark?
In addition, opened images are automatically scanned for Digimarc watermarks. If a watermark is detected, Photoshop Elements displays a copyright symbol in the image window’s title bar and indicates the information in the Copyright Status, Copyright Notice, and Copyright info URL sections of the File info dialog box.
What is a watermark in Photography?
A Watermark is a logo, piece of text, or signature superimposed onto a photograph.
How can I Add a Watermark to my photos on my phone?
Open a Photo on your phone’s image editor tool and look for the “Add Text” option or Text option. Start typing your name and add it wherever you want to place it in the photo.
Should I watermark my product photos?
The main reason to watermark your product photos is to protect your hard work, so others won’t use your photography without paying.
What is the difference between a watermark and a logo?
The main difference is the watermark is a more similar translucent form to your logo. Typically only one color, White or black and is placed over your image to protect it from someone else using it as their own.
To be honest your article is informative. I saw your site and I read it. I got some new information from here. It is beneficial for many more like me. Thank you so very much for such informative and useful content.