Want to manage partition on your Windows PC? Does your C drive full? Want to Extend C drive? Want to create a new drive from the existing C drive? This tutorial will give you solutions for all your queries like partitioning Windows hard drive, shrinking drive, extending C Drive, creating new drive, etc., with Windows inbuilt feature and using Partition master tools.
Why should I use third-party disk extender softwares?
Windows has an inbuilt disk management feature to shrink or extend your disks. But the problem with the inbuilt feature is, you can extend the drive only when you have unallocated space right to your drive. You can create unallocated space from the existing drive by using the shrink feature. But it will create unallocated space right to drive. You need to delete one drive to extend the C drive.
For Ex:- you have C, D, E drives. You want to extend the C drive with some space from the D drive. You can shrink the D drive with the Windows disk management option. It will create C, D, Unallocated space, E. If you want to extend C drive, you must have unallocated space just right to C drive. So you will have to delete the D drive. So that you will lose your data. Or you need to spend some time transferring files from D drive to other drives. Still, there is a risk that you may lose some data.
If you are able to create Unallocated space left to D drive, you can easily extend C drive without deleting D drive. This is possible only with third-party disk management software.
There are many free and premium disk management software is out there.
How to manage partition on Windows 11,10,8,7 with inbuild Disk management
There are two ways to manage the hard drive partition on Windows. One is using Windows inbuilt Disk Management application and the second one is using partition master tool like EaseUS Partition Master.
1. How to Create a new hard drive partition With Disk Management
Video Tutorial:
We provided this method in the form of a video tutorial for our reader’s convenience. If you are more interested in reading, then watch it after the completion of reading.
The procedure is almost the same for all versions of Windows OS.
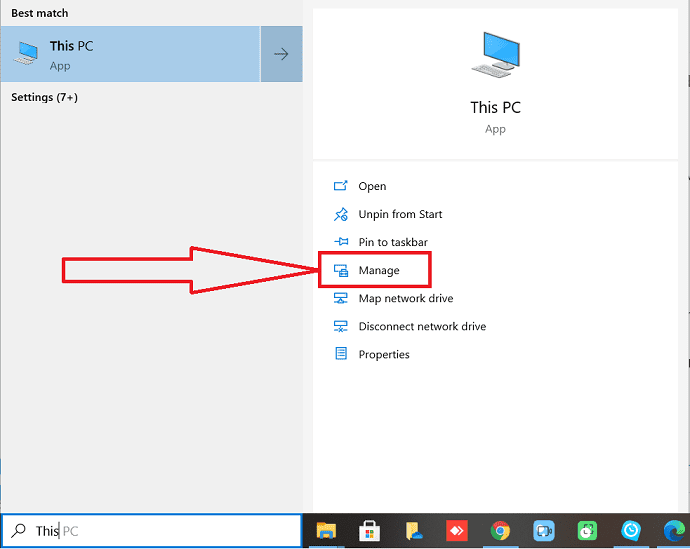
Step 1: Go to the search bar, enter “This PC” or ” My Computer” and select the manage option from the list.
Step 2: The computer management Window will appear on the screen. In that select the “Disk Management” option from the left side window.
Check the disk partitions, whether there is an unallocated space or not. If you don’t, then move to the next step. If you do, you can directly jump to step 4 and continue from there.
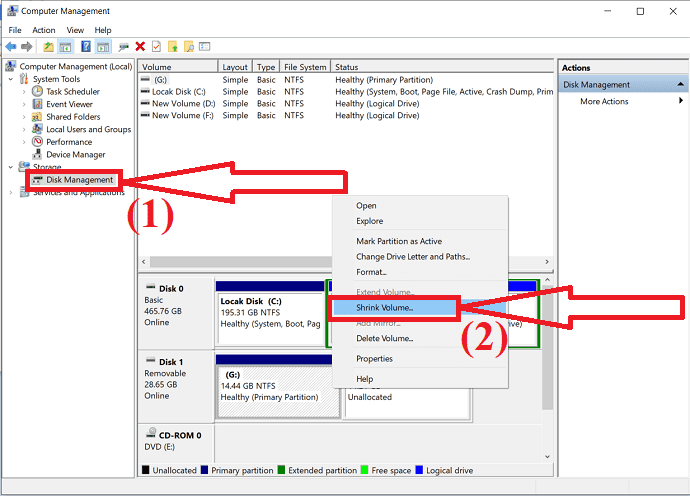
Select the partition that you want to shrink and give a right-click on it. Select the “Shrink Volume” option from the drop-down menu.
Step 3: A prompt will appear on the screen. Enter the amount of space that you want to shrink in MB and click on the “Shrink” button.
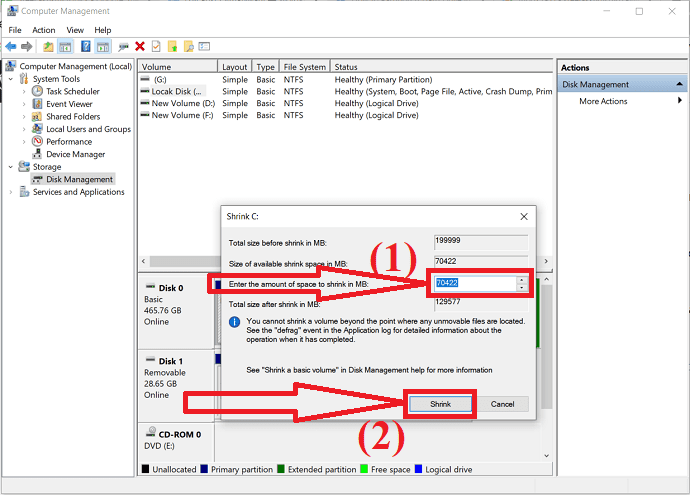
Wait for a few minutes to complete the allocation process. Once the completion of the process, you will get an unallocated volume.
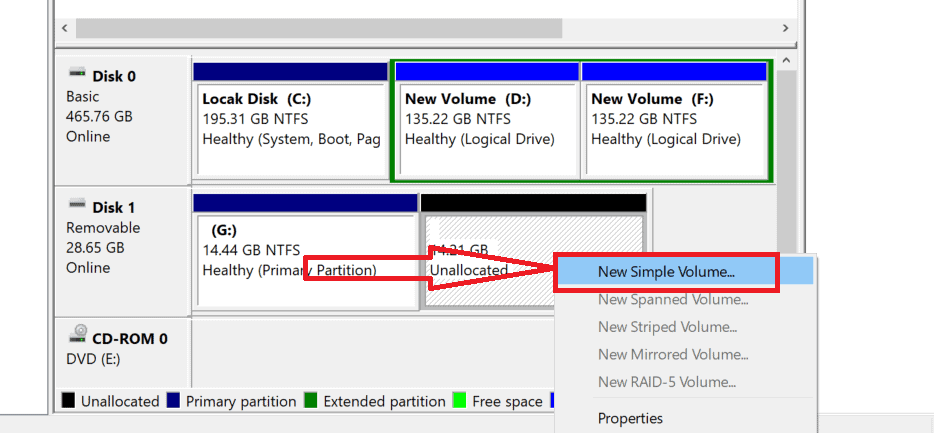
Step 4: Give Right-click on the unallocated volume of the hard disk and select the “New Simple Volume” option from the drop-down menu.
A new simple Volume Wizard window will appear on the screen. Click on “Next” to continue the process.
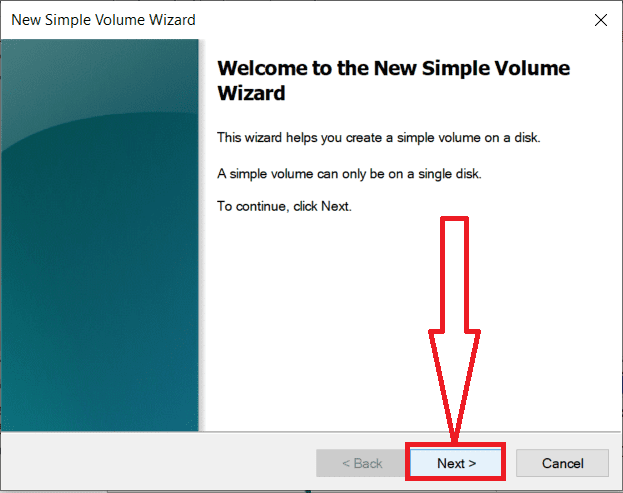
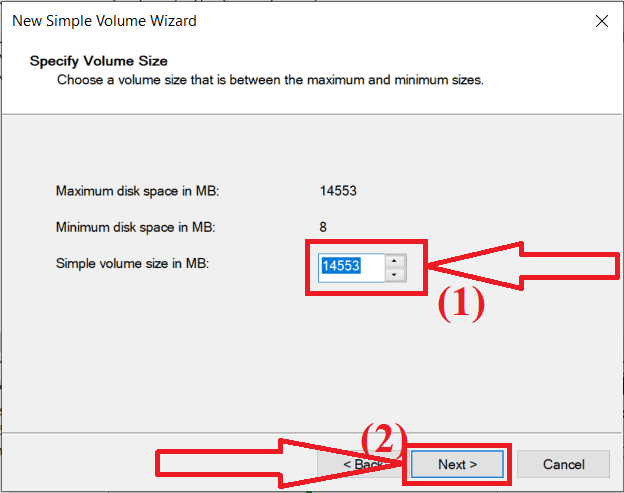
Step 5: Enter the size of the simple volume that you want to create or else accept the default size and click on the “Next”.
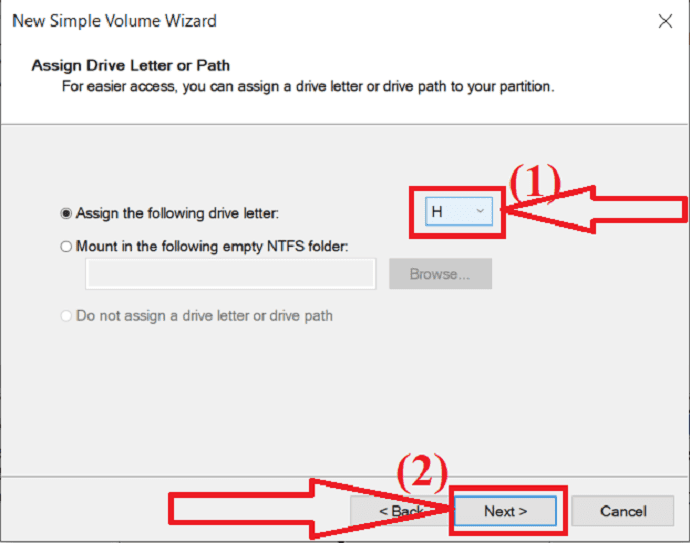
Step 6: Choose the Drive letter for the new partition or accept the default drive letter and click on “Next”.
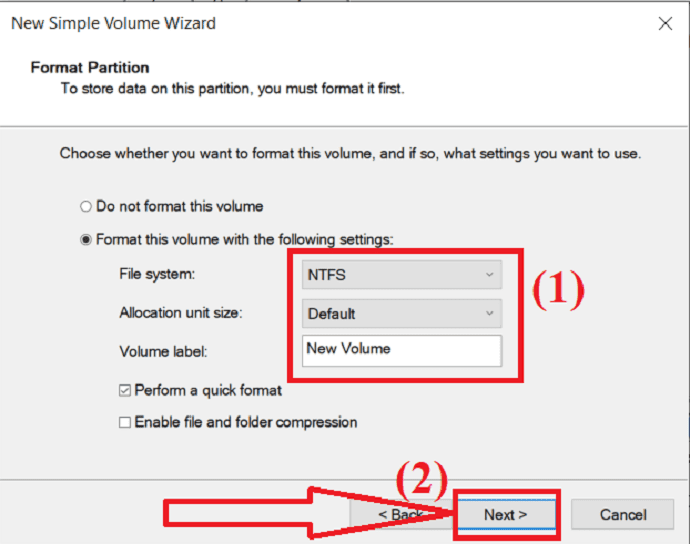
Step 7: New Window will appear on the screen. From that, choose the file system type as “NTFS”, Unit size, and Volume label as you want. Now, click on “Next”.
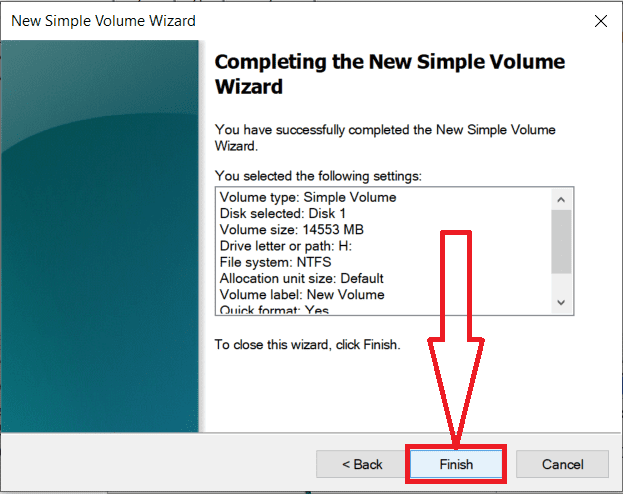
Step 8: Finally, click on the “Finish” option to create a partition.
2. How to Extend C drive Using Windows disk management feature
Video Tutorial:
It is a must to have enough free space on C Drive. Otherwise, your PC will work slow. Don’t worry you can increase your C drive space without losing data.
When you install any program, that will take some amount of space in your C drive. As time passes, one day it will get full. Even if it is not full, you will see some degradation in your PC speed. Your OS must have some free space in your C drive. When you don’t have enough space, your OS will not work properly.
Caution: If you don’t use this feature properly, there is a chance that you may lose your data. And the Windows disk management feature has limited functionality.
1.Open file explorer by pressing Windows + E.
2. Right click on This PC or My Computer depends on your OS version.
3. Select Manage option.
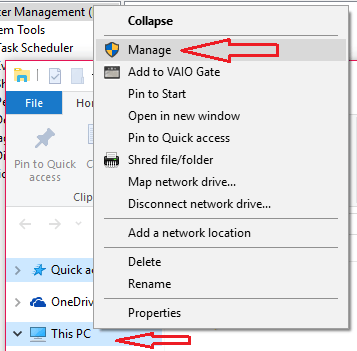
4. Select Disk management option in Computer Management window.
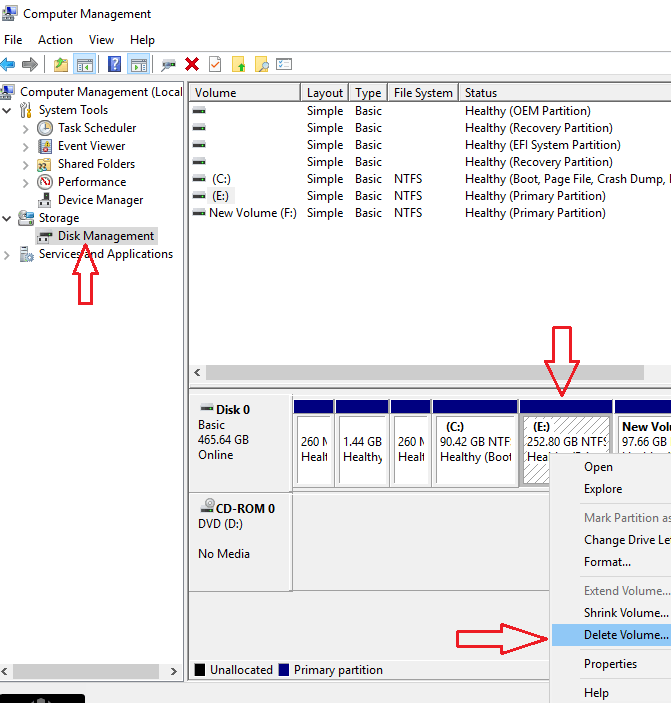
Look at the above screenshot. I have C, E & F drives in sequence. If you want to increase C drive space, you must have unallocated space right to C drive. So you need to delete the drive which is right to the C drive. Before deleting the drive, make sure you have transferred your data to another drive or to other external hard drives.
5. Right-click on E drive or any other drive which is just right to your C drive.
6. Select Delete Volume. If your drive is big, use the Shrink Volume option to shrink the volume of the E drive. For Example, your E drive volume is 150 GB, and you need only 50GB to add to the C drive. If you use the Delete volume option, you could add 150GB to the C drive. So shrink it to 50GB, you will get an unallocated 100GB drive right to E drive. Rename that drive with some other letter. Now delete this 50 GB E drive.
After deleting the E drive, you will see Unallocated space right to the C drive.
7. Right-click on C drive.
8. Select Extend Volume. Select Next and Finish.
By using the Disk management option, you must delete the volume next to the C drive. Because you can not create unallocated space left to any drive by using the Shrink Volume option. You can create unallocated space only to the right of any drive. To Extend C drive volume without deleting any drive, you need to go for third-party partition tools.
- Related: How to restore computer to earlier date in Windows
- How to enable / disable secure boot in Windows
How to Manage partition with partition master tools
Video Tutorial:
3.Using ManageEngine OS Deployer
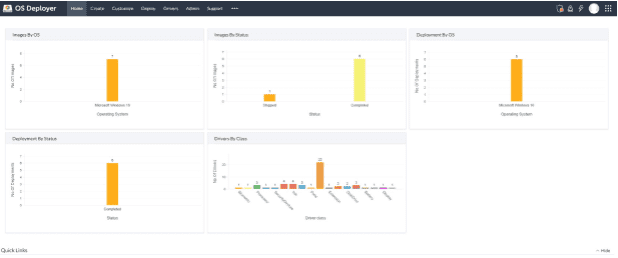
ManageEngine OS Deployer is a robust disk imaging solution that allows administrators to deploy operating systems efficiently, regardless of geographic location. The software simplifies the OS deployment process by enabling administrators to capture images of various operating system versions and store them in a network share. These images can then be used to create deployment templates, all managed from a centralized console, ensuring streamlined and consistent deployments across an organization.
With features designed for efficiency and minimal disruption, OS Deployer can image live machines on the network without affecting end-user productivity and deploy a single base image to multiple systems, regardless of hardware make or model. This capability is particularly useful for standardizing operating systems and pre-installed software across multiple offices.
Additionally, administrators can deploy OSs remotely without the need for physical access to the target machines, making it a time-saving and cost-effective solution for businesses with diverse IT infrastructures.
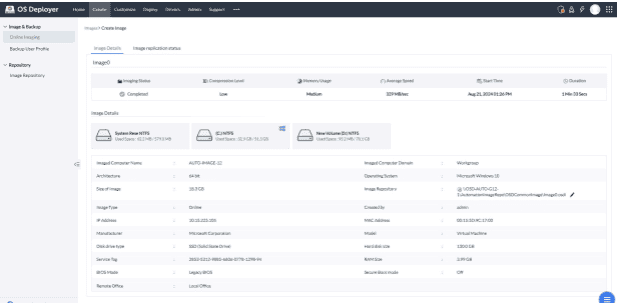
Pricing:
Flexible pricing options, starting at just $645 per year and includes a 30-day free trial.
4. Using EaseUS Partition Master
EaseUS Partition Master is one of the simple and amazing tools to manage disk partitions without data loss and file corruption. It works on different tasks like converting MBR to GPT, Migrating Windows 11 to New SSD, Partition Recovery, Format USB Drive, Adjust Disk Layout, and many more.
It is one of the best solutions for Windows 11 disk manager software for disk partitioning. You can use this application easily, Without any technical knowledge based on disk management, hard drive, and more. Just go through the below process to know about the Disk partitioning using the EaseUS Partition Master.
How to Shrink C Drive by creating new partition using EaseUS Partition Master
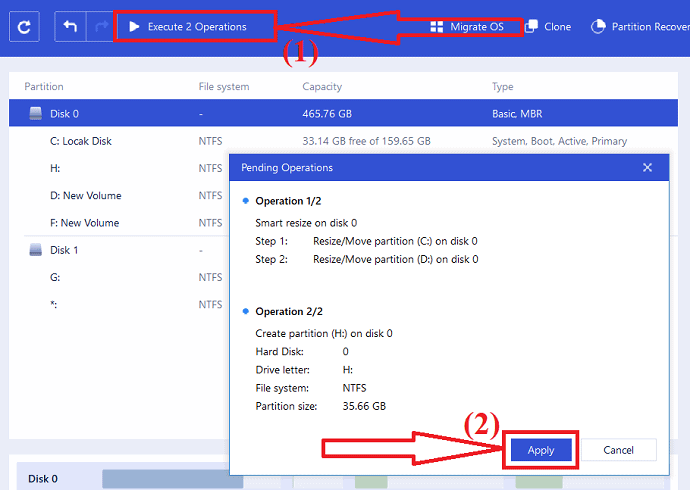
In this section, you get the detailed process of the partitioning of drive with ease and fast without any data loss and file corruptions using EaseUS Partition Master.
Total Time: 5 minutes
Step 1: Download EaseUS Partition Master
Download and install the EaseUS Partition Master from its official site. Launch the EaseUS Partition Master application.
Check for free space. To divide a disk partition master into multiple ones, you must ensure that there has adequate free space to be allocated.
Step 2: Shrink the drive
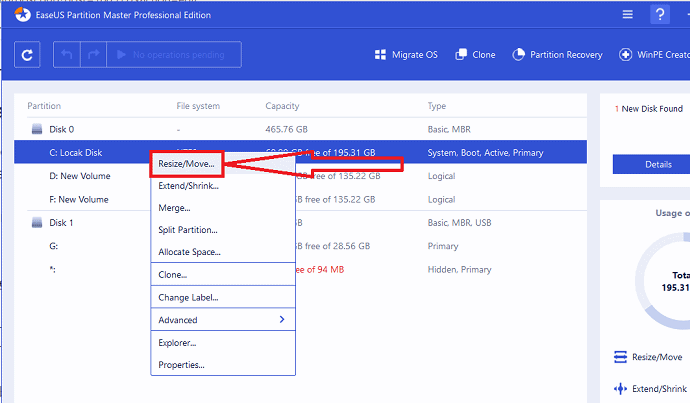
Just give a right-click on any one of the partitions. Select the “Resize/Move” option from the drop-down menu.
Step 3: Choose the partition size
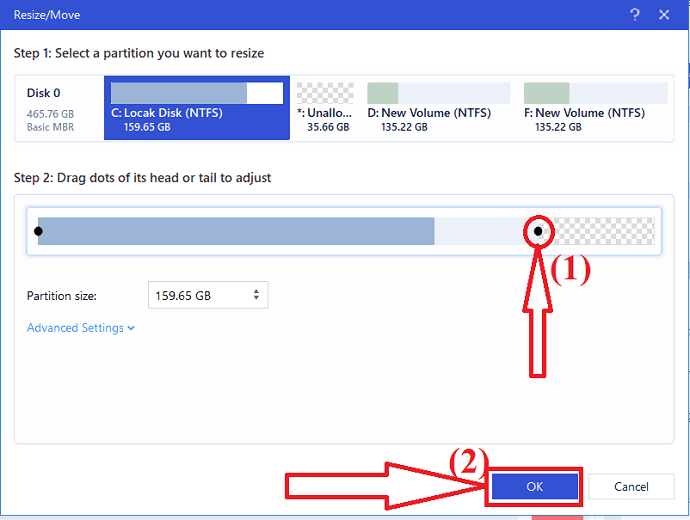
Drag the dots either rightwards or leftwards. So that you can reduce the size of the main drive and get a sample unallocated space. You can visually know how much space you have decreased in the “partition Size” box. Now click on “OK”.
Step 4: Execute the operation
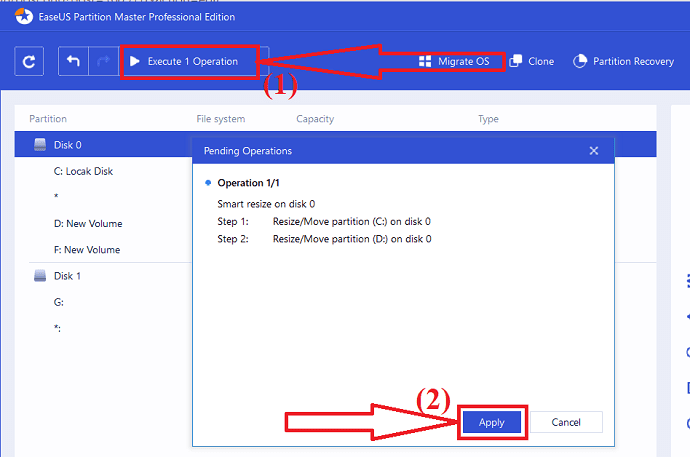
Now, click on the “Execute operation” at the top left. A prompt will appear on the screen. From that select the “Apply” Option. You will find unallocated space below the same disk of the shrink one.
Step 5: Convert unallocated space to usable partition
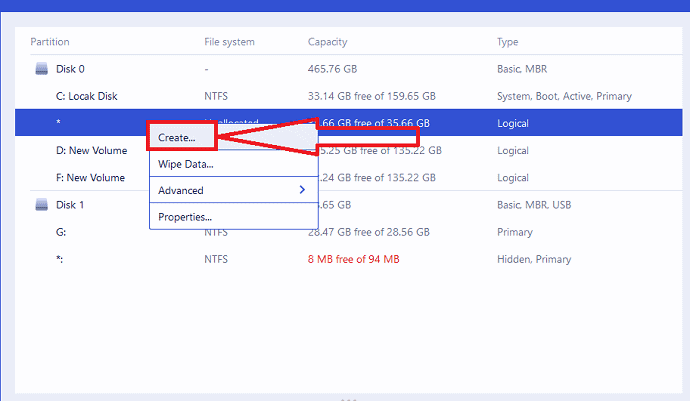
Now, it’s time to turn the unallocated space into a usable partition. Just give a right-click on the unallocated partition and select the “Create” option from the menu.
Step 6: customize the partition
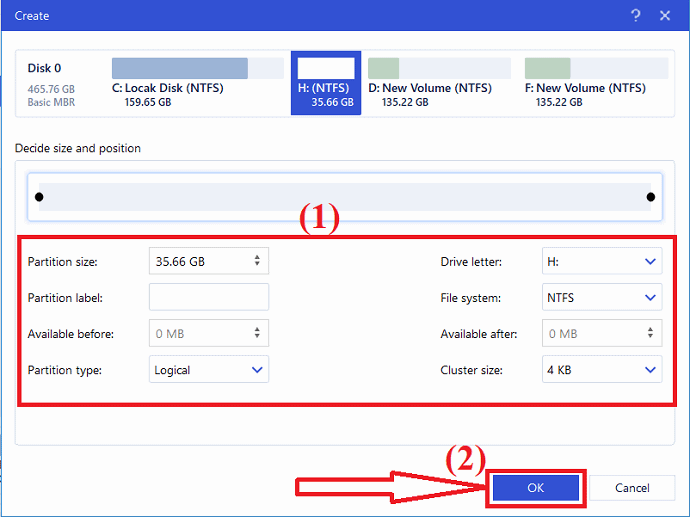
The create window will pop up on the screen. Choose the Drive letter, partition label, file system type as NTFS, and many more under Advance settings. Click on “OK”.
Step 7: Execute the operation

Again click on the “Execute partition” option at the top left. A window will appear on the screen. Finally, click on “Apply” to confirm the partition on the unallocated space. Repeat the whole process to partition a hard drive into many more partitions.
Once the completion of the process, the system will reboot automatically. Then the changes made using the EaseUS partition master will be applied and come into execution. That’s it…
Offer: Our readers get a special 30% discount on all EaseUS products. Visit our EaseUS discount coupon page for the promo code.
- Related: How to fix raw Drive and Recover Data
- How to recover deleted partition with free undelete tool for windows
5. Using Macrorit Partition Expert Pro
Macrorit partition expert Pro is the all-in-one disk management software. It has too many features. Every small business Windows computer must have this software. Even home users may need it. It will extend your C drive within 1 second. It will also extend your C drive without the need for booting. It really works very fast. You will also get its free version from Macrorit. The free version has limited features. The Pro version has many features.
Features
- Disk Management: You can easily Extend, Shrink, Resize, Move, Format, Create and delete partitions. It is very fast while doing these things. You can do them within seconds.
- 100% data safety: They use their own unique technology to protect your data. You will never lose your data while resizing your partitions.
- Fastest data partition moving speed: They use special data moving algorithm to move your partitions very quickly.
- Supports all Windows versions: You can use this software on Windows XP to Windows 10. You can also use it on 32 Bit or 64 Bit versions.
- Portable version: This software is available in a portable version. So that you need not to install it on your PC.
- Convert MBR to GPT disk without losing data.
- Wipe unallocated space.
- You can Convert the primary partition to Logical partition.
- You can resize the FAT partition and its clusters. You can also resize the FAT32 partition up to 2TB.
- You can convert NTFS to FAT32.
- You can also migrate your OS to new hard drive.
Price:
It has 30 days edition for $9.99. The full edition will cost you $29.95. Full edition with lifetime Updates will cost you $39.95. I recommend you to go with the lifetime upgrades version.
How to use Macrorit Partition expert Pro to extend volume of C Drive?
Now I am going to show you, how I have increased my C drive with this software.
Buy the software. Download, Install and register with your License Key. You will see the below screen. Its interface is very easy to use. You will see all the available options on the left menu.
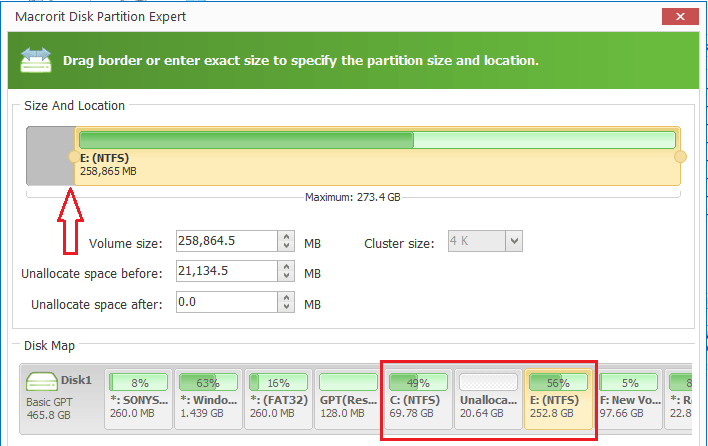
Just see at the bottom for the drive letter which is just right to C: drive. In my case I have E drive right to C drive.
- Click on E: drive in the middle.
2. Click Resize/Move Volume option in the left menu.
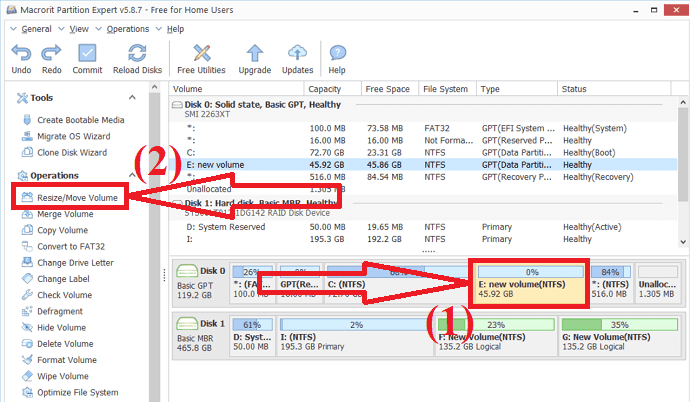
3. Drag from the left side. Because You need to create free space left to E: drive. If you want to create free space right to E: drive you can drag it from the right side. In this case, you need to extend C: drive, so you must have space right to C: drive which is left to E: drive. You can also see created unallocated space between C: and E: drive.
4. Just Click OK at the bottom.
5. Select C: drive.
6. Click Resize/Move Volume.
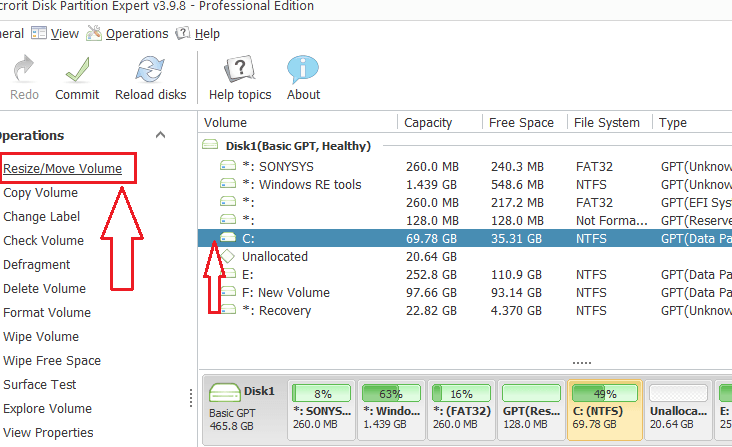
Now you will see another window where you need to drag towards the right side. Click OK. Now you can see an increase in C: drive size. It is not completed yet. You need to click the Commit option. It will reboot your device and increase your C: drive.
6. AOMEI Partition Assistant Professional
AOMEI Partition Assistant is available in the free and paid editions. AOMEI Partition Assistant is a full-scale partition software for Windows, it optimizes the partition, disk, and even the system. Obviously, Professional Edition has unlocked more features than the free edition – AOMEI Partition Assistant Standard. AOMEI Partition Assistant Professional has no free trial but only a demo.
If you need the following functions, you need to buy AOMEI Partition Assistant Professional:
- Allocate free space from one partition to another: it is convenient to expand your system partition.
- Migrate OS from a GPT disk to a GPT/MBR SSD or disk: when you want to transfer OS from a GPT HDD to a GPT/MBR SSD, Professional edition works for you.
- Convert system disk between MBR and GPT partition styles
- Convert primary partition to logical, and vice versa
- Convert dynamic disk to basic, and vice versa
- Dynamic disks and dynamic volumes management
- Change serial number
- Change partition type ID
You see, AOMEI Partition Assistant Professional has more amazing and practical functions than its free edition. Moreover, if your computer runs on Windows Server, you should choose the higher edition of AOMEI Partition Assistant Professional – Server, Unlimited, and Technician.
Price
I think the price is somewhat expensive compared to other competitors. The price of AOMEI Partition Assistant Professional is $49.95USD with Lifetime Free Upgrades. if you don’t like Lifetime Free Upgrades, the price is $39.95USD. But you can buy the upgrades service individually later.
How to Use AOMEI Partition Assistant Professional
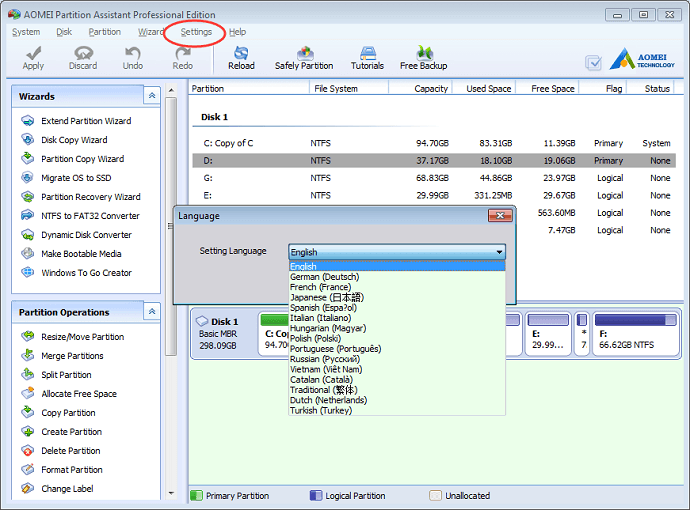
Launch the AOMEI partition Assistant application. Select the partition that you want and select the resize/move partition option or right-click on a partition and select that option from the list.
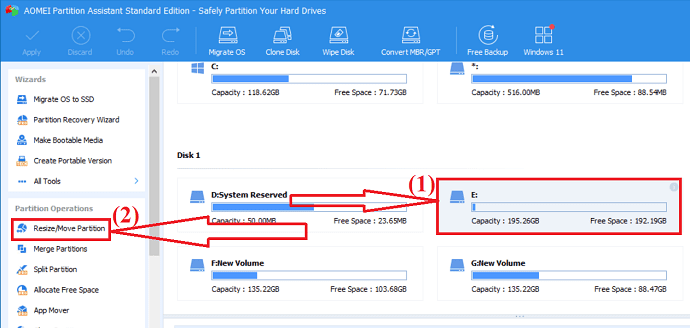
A Window will appear on the screen. Move the end of the partition to the left or right to resize the partition. Click on “OK”.
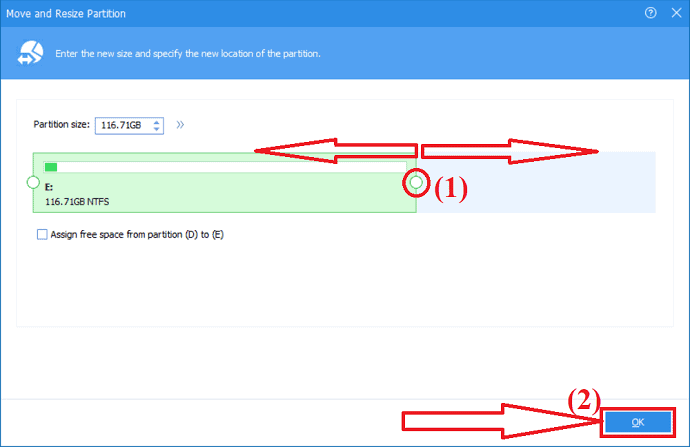
An unallocated partition will be created. Now, you need to turn that unallocated partition into a useful partition. Select that unallocated partition and click on Create partition option at the left side window.
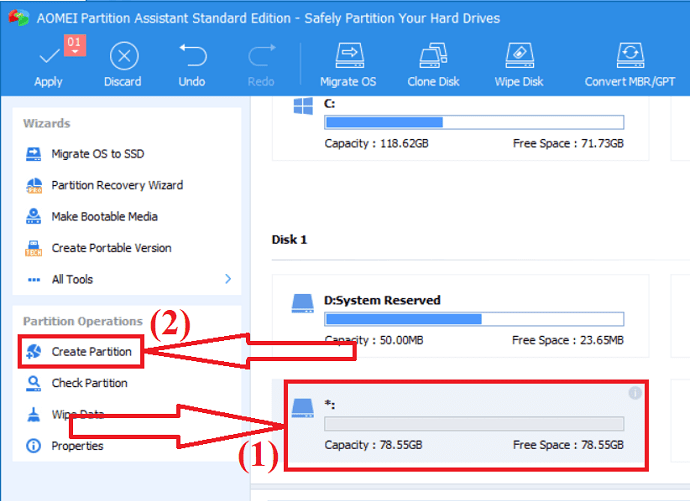
Customize with the Partition size, Drive letter, and File System. Click on “OK”. Finally, click on the “Apply” option to save all the changes that you have made.
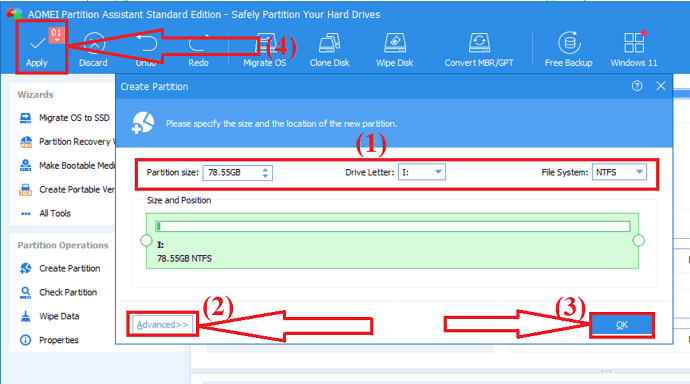
AOMEI Partition Assistant Professional supports multiple languages: English, German, French, Spanish, Italian, Japanese, Polish, Hungarian, Dutch, Turkish, and Chinese. You can choose a language when you install it or change the language from Settings.
7. Using MiniTool Partition Manager:
Minitool Partition wizard is one of the best all-in-one disk partition managers. It helps you to resize, move, format partitions easily. You can also convert the MBR disk to GPT, partitions between NTFS to FAT32, and the dynamic disk to basic without any loss. It offers a few more amazing operations like disk cloning, Data recovery, and many more. It is the best tool for personal use.
Features:
- Effective data recovery: It offers two different solutions for data recovery. One is partition recovery wizard, to recover the lost partition. And another one is Dara recovery wizard, that helps you to recover the lost data without any loss.
- Powerful Disk Clone Tool: Disk cloning is mostly used for upgrading disk. It works effectively when you want to make an instant backup or while migrating the OS from one disk to another.
- It measure the disk read/write speed with the help of comprehensive disk checker.
- Convert MBR disk to GPT without any partition or data loss.
- Convert the partitions between NTFS to FAT32.
- Convert the dynamic disk to basic disk.
- It fix the logical file system errors easily, and quickly detect if there is bad sectors on the drive.
Price & discount
The MiniTool Partition Wizard offers different plans for home and Business separately. Home – Pro version costs $59 1license for one PC, Pro Platinum Costs $109 1 license for 3 PCs, Pro Ultinalte costs $159 1 license for 5PCs.
Offer: Our readers get a special 20% discount on all MiniTool products. Visit our MiniTool discount coupon page for the promo code.
How to manage drive partition using the MiniTools Partitions Wizard?
Step 1: Download and install MiniTools Partition Wizard from its official site. Open the application. Select the partition that you want to resize or move. Give a right-click on it and select the “Move/Resize” option or select the “Move/Resize partition” option on the left side.
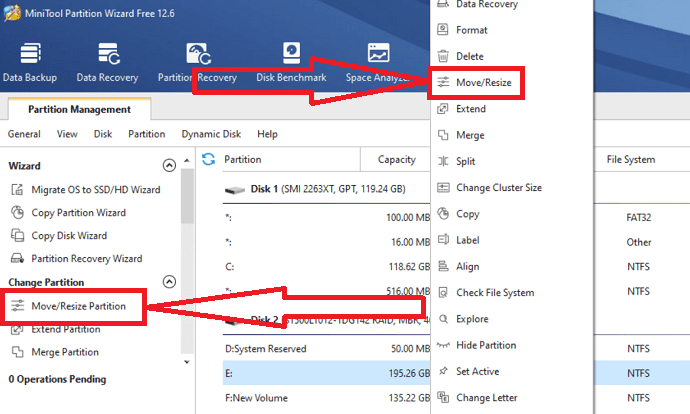
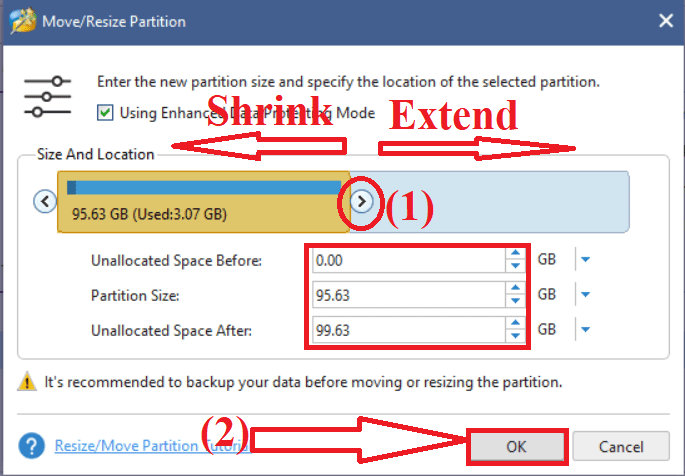
Step 2: Move/Resize partition will appear on the screen. Move the arrow left to shrink the partition and right to extend the partition. You can also choose the unallocated space before or after the Partition manually by entering the size in MB, GB, or TB in their specific box. Click on “OK”.
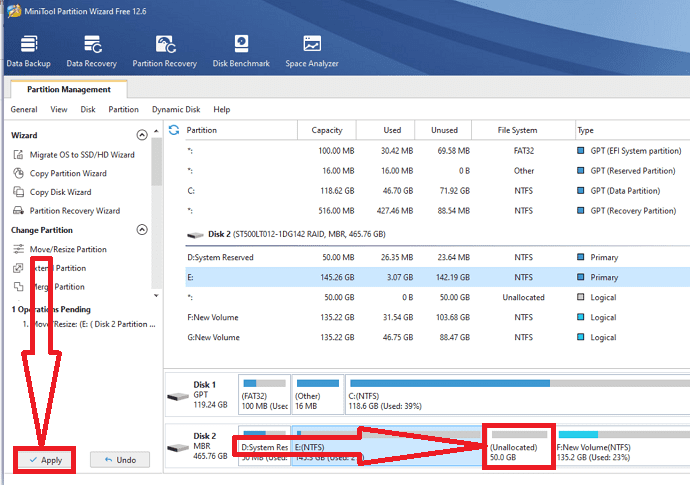
Step 3: Click on Apply option at the left bottom to save the changes. You will find the unallocated space just beside the selected partition.
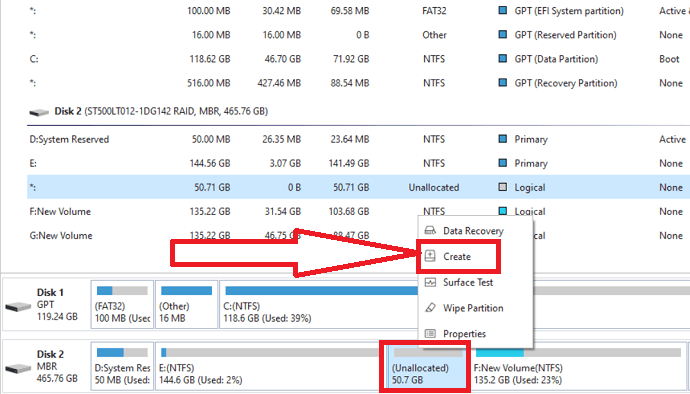
Step 4: To make the unallocated space useful, give a right-click on it and select the create option from the menu.
Step 5: Customize the partition with name, label, Create as, File system, and Cluster size. Now click on OK.

Finally, click on the “Apply” option to save all the changes that you have made. That’s it…

Closing Word:
These are the best solutions for windows disk management. Among them, always our best choice is the EaseUS Partition Master application. It completes the task in a few simple clicks. If you are a beginner and you don’t know anything about disk management, then EaseUS Partition Master is the first and best choice.
Don’t forget to visit our EaseUS promo page for the 30% special discount coupon code.
I hope this tutorial helped you to manage partition on your Windows PC. If you want to say anything, let us know through the comment sections. If you like this article, please share it and follow WhatVwant on Facebook, Twitter, and YouTube for more Technical tips.
- You May Also Like: 16 Must have softwares for Windows computer
- How to create system restore point in Windows
- How to change desktop icon size in Windows
Manage Partition on Windows – FAQ
Is it possible to partition a drive?
Yes. It is possible to partition a drive.
How do I manage drive partitions on Windows 11?
You can manage drive partitions on Windows 11 using two different methods. One is using Disk Management and another one is EaseUS Partition Master.
Which is the best tool for better partitions?
EaseUS Partition Master is the best and stunning tool for drive partition. It completes your task in just a few clicks.
Can I repartition my hard disk without losing data?
Yes. You can repartition your hard disk without losing data.
Can I recover the deleted partition?
Yes. You can recover the deleted partition effortlessly with a few clicks using the EaseUS Partition Master application.

Hi there! Sorry
but It seems that my extend volume is not working.
how do i fix this?
Extremely helpful post.
In Windows default method is there no way to extend without loosing data from E drive? Is it necessary to sacrifice 50GB to increase storage at c drive?
Please suggest any free tool for this purpose . If available 🙂
Thanks
Rishi Tiwari
Another entry on this blog suggests MiniTools free software. I have used it and it works as promised. I was VERY satisfied.
http://whatvwant.com/how-to-fix-the-error-low-disk-space/