Creating A WiFi Hotspot in your Windows laptop is very easy by using Command Prompt. Earlier I have written an article about How to create computer WiFi hot spot with free software. This time I am showing you how to create WiFi hot spot with a command prompt.
If you don’t mind about spending money and need better features, I strongly recommend you to use premium Wi-Fi hotspot software connectify(75% discounted link).
When you don’t like to spend money, then continue reading this article.
Microsoft provides Network sharing facility since Windows 7. If you have Windows 7 or a later version, you don’t need any software to create a WiFi hotspot.
Of course, if you have a WiFi router, you don’t need anyone of these procedures for Creating A WiFi Hotspot. When you have a normal broadband router without a WiFi facility, then you need to use your PC as a WiFi hot spot. And you can use the internet on all the other devices.
For Creating A WiFi Hotspot in your Windows laptop, you must use the command “netsh”(Net Shell). By using the netsh command, you can configure local or remote network devices. You can change the network adapter IP. You can set and change the SSID name and password. Read more details about netsh command in Wikipedia.
Procedure For Creating A WiFi Hotspot with CMD
1. Open Command Prompt with Administrator privileges
It is must to open CMD with admin privileges. To do that,
- Click the Start symbol.
- Type cmd in search.
- Right-click on Command Prompt.
- Select Run as administrator.
You May also read : How to Run Command Prompt as Admin in Windows 8
Now you have opened command prompt with admin privileges.
2.Check If your PC supports hosted network
To create a WiFi hotspot, you need to create a hosted network by using the command prompt. Before creation, you need to check whether your PC and its adapter drivers will support the hosted network or not. When PC supports the hosted network, then only you can go further.
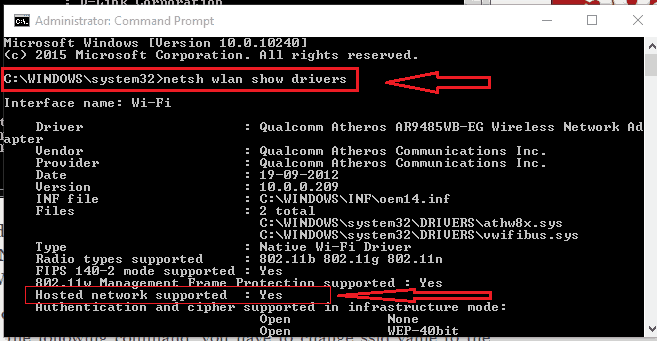
Type netsh wlan show drivers in command prompt and press enter. It will display results. You must see Yes near to Hosted network supported. If you see No, you can do nothing. When you see Yes shows that in the above screenshot, then continue to the next step.
3. Set Hosted network
You need to create a WiFi hotspot with a Network name and Password. For that, you need to set up a hosted network and allow it’s accessed.
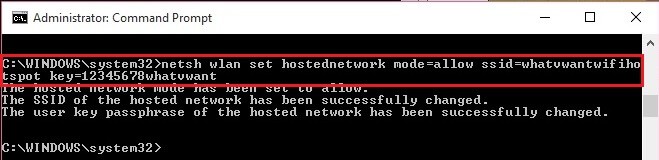
Type netsh wlan set hostednetwork mode=allow ssid=your-network-name key=your password and press enter.
You need to change only two things in above command.
- Replace your-network-name after ssid= with whatever you want. It is actually a network id which you can see on other devices. From the above screenshot, you can replace whatvwantwifihotspot with your own network name.
- Replace your password after key= with your own password. From the above screenshot replace 12345678whatvwant with any password you like.
Note :- Password must be within 8 to 63 characters length.
4. Turn On WiFi hotspot
You have set up a WiFi hotspot in the above step. Now you need to turn it ON, to detect it on other devices.

Type netsh wlan start hostednetwork and press enter.
Now you have turned ON WiFi. Immediately you will see a new network connection in your network connections.
5. Share Internet connection
You need to enable the sharing option for this connection to use it on other devices.
Go to Control Panel -> Network and Internet -> Network and Sharing center -> Change Adapter settings. Here you will see all your connections.
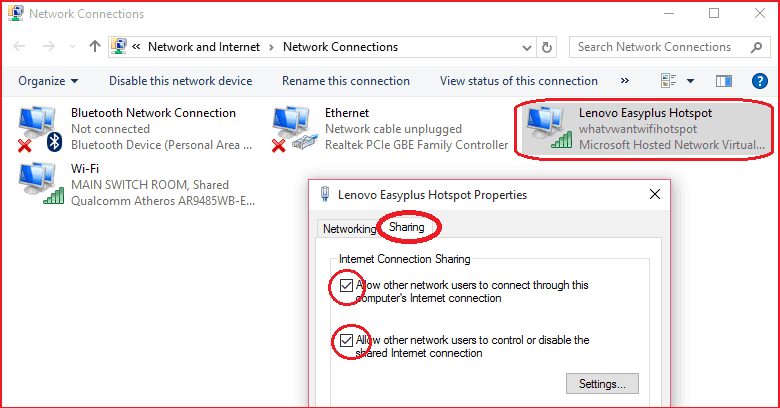
- Right-click on the newly created connection.
- Click Properties.
- Select the Sharing tab.
- Make sure two options are checked shows that in the above screenshot. Otherwise checks two options and select “Ok”.
Now you can use this WiFi in any other devices.
Bonus Tips :-
When you want to turn off WiFi, you need to use netsh wlan stop hostednetwork command.

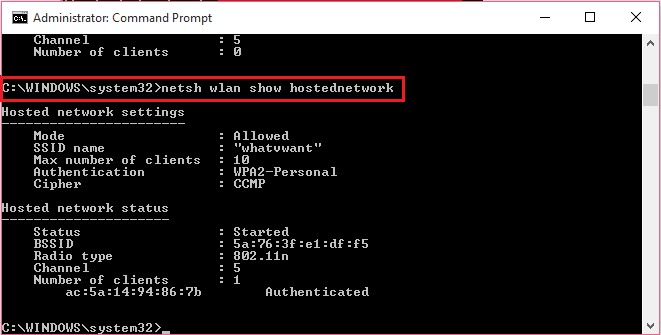
When you want to check your WiFi hotspot status, you need to use netsh wlan show hosted network command. You can see how many devices connected at that moment and their MAC address shows that in the below screenshot.
I hope you like my tutorial about Creating A WiFi Hotspot in Windows laptop. If you like it, do me favor by sharing it with your friends. You can also leave a comment in the comment section. You can also follow whatvwant on Facebook and Twitter.
Excuse me, do we need to pay? also, the hotspot is not in my wifis