
Want to edit videos on Android mobile phone? Want to know what are the best video editing apps for Android? Regularly we are watching a number of videos on our Android phone. Sometimes we need better vision, effects, transitions for video. Then we will try to edit videos as per our requirements. Most of the Android phone only supports cutting and filtering the video but those won’t edit completely as you wish.
In order to edit the video as per our requirements, we need some video editing apps. In this section, we will see what are the best video editing apps available for Android phones and what are their features, and How to edit videos on our Android phone itself.
How to edit video directly on an Android phone without any editing app?

We can see photos and videos on our Android using the Gallery app or Photos app. When you play the video then you can see some editing tools option under or above that video. Those options may be Cut video, Filter, etc. By using those inbuilt editing options for the video you can edit video but those may not make the best video since it does not have any themes, transitions, multi music, voice-over whenever needed. And quality also slightly decreases if you edit the video in this method. So it’s better to use video editing apps for editing the video.
In the below section we have provided best video editing apps to help you in getting the best video output.
Best Ways to Edit Videos on Android
1. VideoShow: Best Video editing app for Android

VideoShow is one of the quick and easily accessible video editing apps. It is the best video app having wonderful features in it. VideoShow is used for creating video or slideshow with photos, making memes, different types of music which are regularly updated, stickers and sound effects. People who are Newer to creating videos or editing videos will easily learn all the edits with this VideoShow to make the video more professional and attractive in less time.
With this VideoShow, you can make videos with texts (subtitles, introduction, conclusion, etc), effects (thunderstorm, rainy, rose petals, much more), GIFs, trendy filters, transitions or live dubbing in a creative and personalized way. I am personally using this app on my Android phone for the past 5 years because of easy and quick access.
Features:
- Over 80 elaborate themes were available to create an awesome music video or slideshow or funny videos or vlogs instantly.
- Easy-to-use
- Various background music, sounds, you can also add local songs from your device too. And you can give voiceover to your video.
- Easy to record video or cut videos, movies.
- A variety of text styles are available (more than 50 text styles available) and fonts to create creative subtitles.
- You can also add background as Blurred
- Voice enhancing and audio speed adjustment (Speed or slow-motion) features available.
- Possible to add Multiple pieces of music for specific clips or specific time periods.
- Add amazing filters to make your videos different. Now more than 30 filters are supported by this app
- Gif making: You can make your own funny gifs with selected pictures from your album.
- If you leave the app by mistake you don’t need to worry about changes, they will save and store in the Drafts section automatically.
- Once your video is finished you can export it with HD quality, no quality loss
- You can edit/merge/trim/split/reverse/rotate/blur/collage clips or videos
- Zoom in and Zoom-out options are available to focus on the particular portion.
- It offers Amazing material center with Themes/effects/filters/stickers/gif images/memes/emojis/fonts/sound effects/FX and much more.
- Video Trimmer: Turn the soundtrack of your video into an mp3 file.
- It supports more than 30 languages and almost all devices.
How to edit videos on an Android phone using the VideoShow app?
We have seen the features of the VideoShow app in the previous section. Now let us see how to edit videos using the VideoShow app.
Total Time: 3 minutes
Step 1: Install the VideoShow app
The first thing you need to do is, install the VideoShow app. Click here to install VideoShow from Google Play Store.
Step 2: Open the video and click on edit
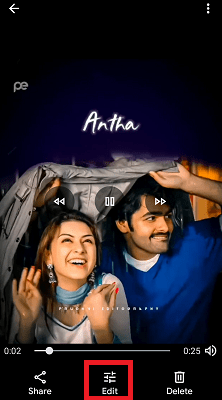
Once you open and the video you can see an Edit option below the screen. Click on that Edit option to edit the video according to your wish.
When you click on the edit option, you can see crop, filter, etc options. Click on the More option. Then you can see video editing apps available on your Android phone.
Click on the VideoShow app from available apps.
Note: This VideoShow option will available only when you have the VideoShow application on your Android phone.

Step 3: Select any theme as you wish
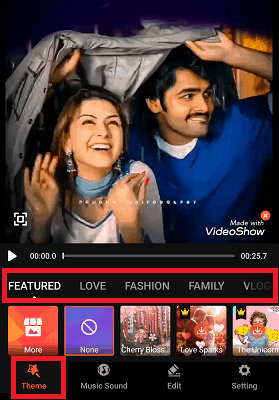
Now the video will open in the VideoShow app. In the Theme section, you can see different category themes such as Love, Fashion, Family, Vlog, Travel, Life, etc, to apply for your video. You can apply any theme as you wish or you can choose none option that doesn’t add any theme.
Step 4: Add Music and sound
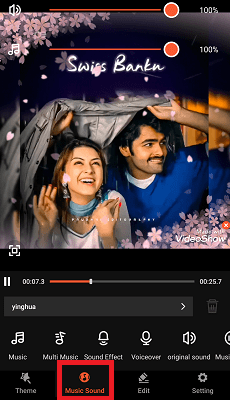
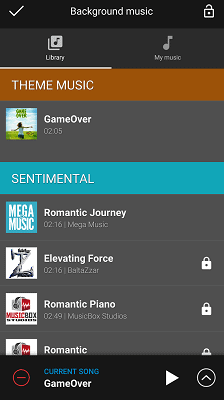
Now in the Music and Sound section, you can add any song, music, or sound as you wish. You can also add multiple pieces of music for certain time periods. And you can add your own voice to videos. A music fade option also available.
You can remove the original sound of that video and add a piece of new music to it.
Step 5: Edit section
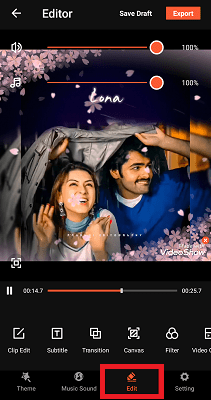
The Edit section is the most important section in video editing. It makes some edits that are needed within the video such as clip edit, sorting, etc.
In the Edit section, you can see many editing options such as Clip Edit, Subtitle, Add GIF, Transition, Filter, Effects, Stickers, Doodle, etc, options. You can apply any edit option as you wish.
Step 6: Export video when edits are finished
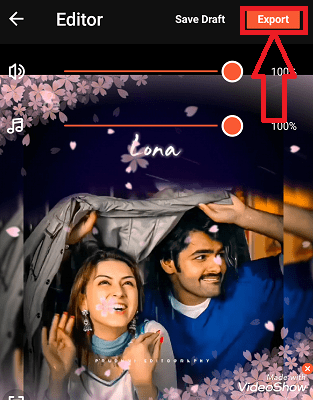
Click on the tick mark symbol which is placed at top of the screen. Once all the edits are made then click on the Export option at the top of the video.
You can select the quality of the video to export.
This is the procedure for editing the video on phone using the VideoShow app.
2. KineMaster: Best Free video editor for Android
KineMaster is one of easy to use video editing apps for Android. With KineMaster you can make incredible videos on your phone, tablet, or Chromebook. It is a full-featured video editor that consists of powerful tools. KineMaster and all of its editing tools like effects, filters, etc are free to use, if you want more editing options you can unlock them with KineMaster Premium.
Free version Features:
KineMaster as a video editing app has the below features.
- If your files have multiple layers then KineMaster will add and combine those multiple layers of video, images, stickers, special effects, text, and handwriting
- It has Color adjustment tools to correct and enhance your videos and images
- You can share videos directly from KineMaster to social media such as YouTube, Facebook Feed and Stories, Instagram Feed, Stories, and more
- You can Rotate, Reverse, and shift your video to any angle as you needed.
- It allows you to add voiceovers, songs, background music, voice changers, and sound effects whatever you wish
- Editing tools to make your video shorter by trim, splice, and crop actions
- Blending modes will create startling, beautiful effects
- The KineMaster Asset Store will provide music, fonts, stickers, transitions, and more to enhance your video, clip graphics, updated weekly
- You can control the speed by time-lapse and slow-motion effects
- EQ presets, ducking, and volume envelope tools for immersive audio
- Apply different color filters
- This KineMaster will export 4K 2160p video at 30FPS
Premium version features:
- The free version will have a watermark on every video which we create or edited using that app. The Premium version is free from Watermark, it could not add any such watermarks.
- A free version is suffered from Ads. The Premium version will remove all those irritating Ads.
- It will unlock professional tool presets
- You can get access to over a thousand premium assets in the KineMaster Asset Store.
How to edit videos using KineMaster app?
KineMaster as a powerful video editing app has the above mentioned features. Let us see how to edit videos using KineMaster app in this section.
Step 1: Install the KineMaster app and click on Plus
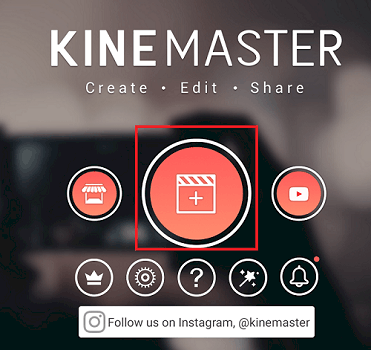
The first thing you need to do is, install the KineMaster app from the Google Play Store. Once installation is completed then click on the app to open it. When you open it first time, then it will ask you to give permissions to access the media files of your Android storage. Give all permissions.
Once you give permissions then you get the above screen, click on the Plus symbol to start video editing.
Step 2: Select the Aspect Ratio
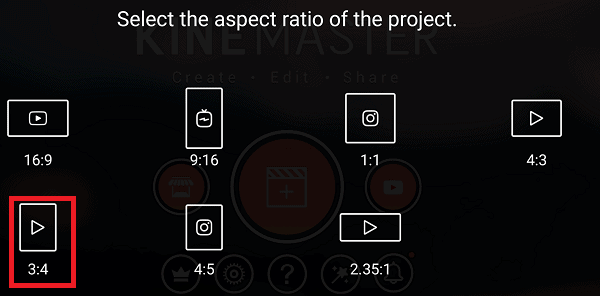
Once you click on the Plus symbol, then you will get a screen to select the Aspect Ratio. Select any Aspect ratio as per your requirement.
Step 3: Select any video to edit
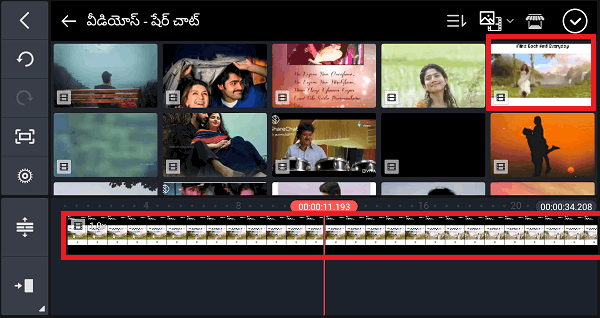
Once you select the Aspect Ratio, then the videos on your Android phone will open. You need to select a video in order to continue the process. So select a video then that video is added to the editing section as shown in the above image.
Step 4: Select any option to edit video then click Export option
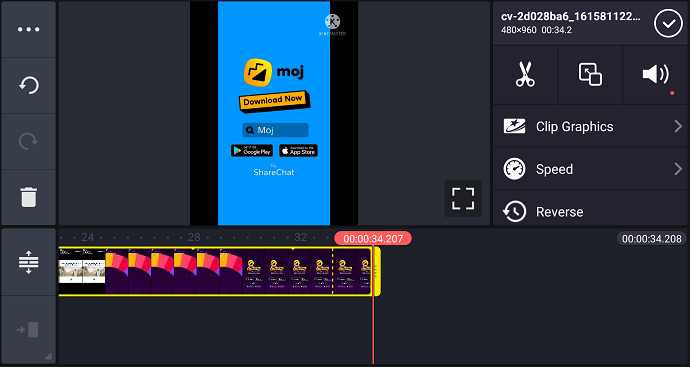
Once you selected the video then you can see different editing options as shown in the above image. You can edit the Clip Graphics, you can change the video speed, even you can reverse the video. Along with those options, you can see another list of editing options as shown in the below image.

Once all the editings are done, then click on the Export symbol at the top of the screen as shown in the above image.
Step 5: Select the Resolution, Frame Rate and quality for exporting video
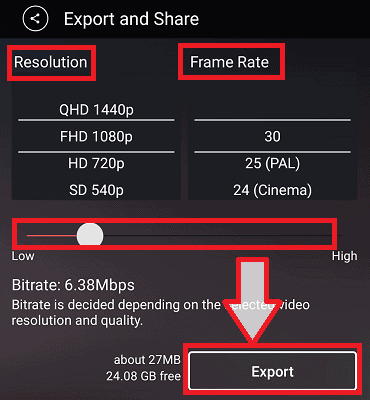
Once you click on the Export symbol then you can see a screen as shown in the above image. Here, you need to select the Resolution, Frame Rate and Quality of the video. High-quality video will be more clear but that made video file size large. Once you selected the above parameters then click on the Export option at the bottom of the screen.
With these steps, video is edited successfully and saved to gallery. This is the procedure for editing the video on mobile using the KineMaster video editing app.
3. Viva Video Editor

Viva Video Editor is a top free-to-use video, movie maker, that helps you to create, edit videos for your social media such as YouTube, Facebook, Instagram, Messenger, WhatsApp, Twitter, etc. It is one of the powerful Professional Video editors with all video editing features such as cut video, trim video, crop video, merge video, edit video with music and songs, edit video for YouTube, and it also adds stickers to your required video, also add text/title to video, and so on.
Features:
- If you are willing to make larger videos then you can edit videos with transitions, edit videos with music, combine video clips together, so that they become longer than usual.
- This provides a wide variety of video editing features to make your video more attractive and professional by cut, crop, merge, reverse, copy, paste, and much more features.
- Transitions will connect two clips in an attractive way. This Viva video will connect clips smoothly with transitions, and glitch video effects.
- Overlay the custom clips or photos to your video. Pro multi-layer editing app.
- Merges two or more videos and also merge photos with a single click
- Cuts the video with accurate seconds.
- This will allow you to Crop your video without losing its quality. Easy-to-use free video cutter and editor for YouTube, Facebook, Instagram, etc.
- Trim and the cut video, edit video with music, songs, sounds, and photos, merge videos with transition effects.
- Sometimes we need video in slow motion or speed motion. According to your requirement, it will adjust video speed to create an eye-catching video.
- Choose the music fade in or fade out option that matches your video. Not only music it will also add voiceover to video, even you can record your own voice and create your own custom videos as you wish.
- Some videos needed text as subtitles or heading or introduction before video and conclusion text. This will add multiple texts on video, various fonts for the text editing. It also adds animated stickers and emojis to your video.
- Export created or edited video or movie in different qualities 720p, Full HD 1080p, and 4K.
How to edit video using Viva Video Editor?
In the previous section, we have seen what are the features of the Viva video. Now let us see how to edit videos using the Viva video app on an Android phone.
Step 1: Install Viva Video Editor and click on Edit
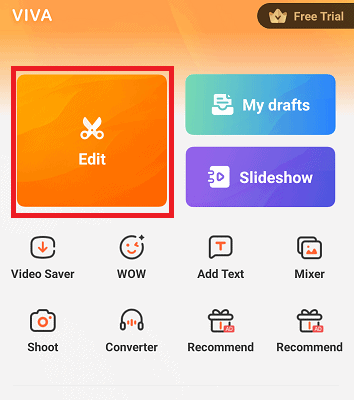
The first thing you need to do is, install the Viva Video Editor app. Once installation is completed, click on it to open and give permissions if it is asked. Now open the Viva Video Editor app and click on the Edit option.
Step 2: Select video and click on Edit option
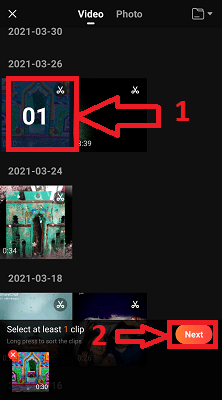
Now the videos and photos in your app will open to edit. Go to the video section and select the video then click on the Next option. Once you click the Next option then that video is loaded to the editing process.
Step 3: Apply any theme as you wish

Now you can see different sections of editing options such as Theme, Music, Clip Edit, etc. Here, in the Theme section, you can see many category themes such as Love, Birthday, festival, etc. You can apply any theme as you wish.
Step 4: Apply any music or voice to your video

By using Music section, you can see options for applying voiceover or music to your video. You can even download many music from the store and apply to your video.
Step 5: Clip Edit section
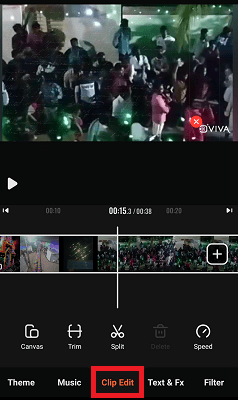
Now beside music section, you can see Clip Edit section. In Clip Edit section, you have options for Trimming the video, splitting the video, and canvas, etc. Apply any option as you wish.
Step 6: Text And Fx section

Viva Video Editor allows you to add text to the video. You can apply Text, Sticker, Fx, and Mosaic effects also using this Text & Fx. Apply any option as you wish.
Step 7: Apply filters using Filters section
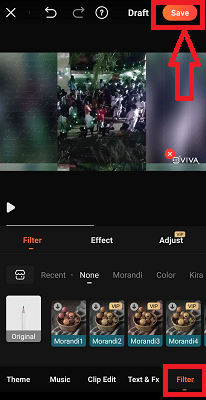
Filters are used to add some attractive colors, or animations to your video. Apply any Filter as you wish.
Once all the editings are done then click on the Save option at the top of the screen.
Step 8: Choose proper Export option
Once you click on the Save option, then you can see a screen to select the Export option. Select any Export option as you wish. With this, the edited video is saved to your Android phone.

This is the procedure for editing the video on your Android phone using the Viva Video Editor app.
- Also read: 6 Cheap & Best Video Editing Software For YouTube
- How to Transfer Facebook Photos and Videos to Google Photos
4. YouCut: best video editing app for android without watermark

YouCut is the best Video Editor app. By using this app you can edit and make videos as you wish for uploading on YouTube, Instagram, Facebook, Twitter, Tik Tok and other social media.
Features:
- YouCut has more useful features than another top pro YouTube video editors, or TikTok editors, Slideshow maker apps have, but YouCut is free to use app and has no irritating banner ads.
- It is Totally free video editor and video maker for your Android phone.
- You can merge multiple video clips into one video. It is a professional video maker for YouTube, also the pro video cutter and video joiner. It will help to rotate video and crop video, compress and combine many videos without losing quality.
- By using this YouCut, you can Cut and trim the video to the shorter length that you needed. You can edit videos with music, sound and rotate videos.
- Once the editing, creating is done it will Export the video in HD quality.
- This is an easy-to-use app
- Best video cutter and YouTube video editor.
- By using this app you can control the speed as you wish either you can make it slower or faster.
- This will merge photos to create a slide show and also enable you to add music for it, you can also add your own music.
- Slice and split video into two separate video clips.
- YouCut will never add a Watermark to your video as like other video editing, maker apps.
- This will allow you to add text to your video, with many fonts and styles
- You can adjust video brightness, contrast, saturation using YouCut, etc. And you can even Customize video filters and effects.
- You can select the Aspect video as you needed. This will fit your video in any Aspect Ratios like 1:1, 16:9, 3:2, etc.
- You can able to set Custom background as you need.
- Zoom in and Zoom out options are available to focus on the portion which you want to highlight.
- This will flip your video either Up to down or Left to Right, and also rotate the video.
How to edit videos using the YouCut editor app?
In the previous section, we have seen the features of the YouCut video editor app features. In this section, we are going to see how to edit videos using the YouCut video editing app.
Step 1: Install the YouCut app and click on the Plus symbol
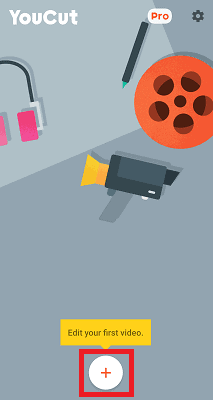
The first thing you need to do is, install the YouCut app into your device. Once the installation is completed, then give permissions to that app to access media files of your Android storage. Once everything is set up then you can see the screen as shown in the above image.
Click on the Plus symbol at the bottom of the screen as shown in the above screenshot.
Step 2: Select video and Click Arrow mark
Now videos on your Android phone will open and you need to select the video. Click on any video to select it as you wish. Once you selected the video then you can see a Forward arrow symbol as shown in the above image. Click on that arrow symbol.
Step 3: Use editing options to edit video
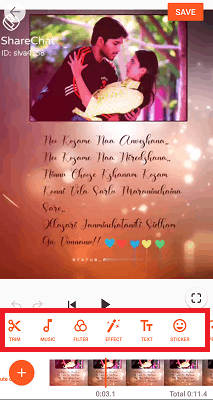
Now can see many editing options such as Trim, Music, Filters, Effects, etc for your video. Click on any option to apply it.
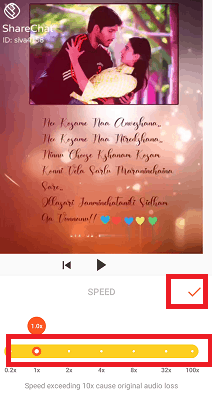
Once all the edits are made then click on the Tick mark symbol to save changes.
Step 4: Save the video
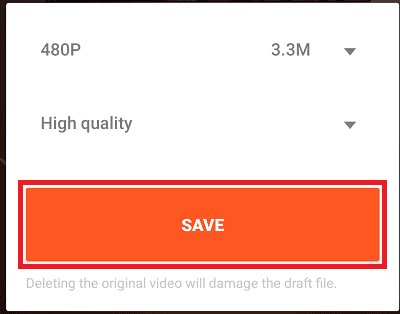
With the above step, you have applied the required edits to your video. After that, you can see a screen as shown in the above image.
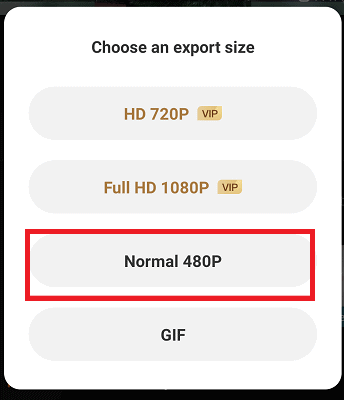
You need to select the resolution and the quality of the video and then click on the save symbol. With this, the video is saved to your gallery.
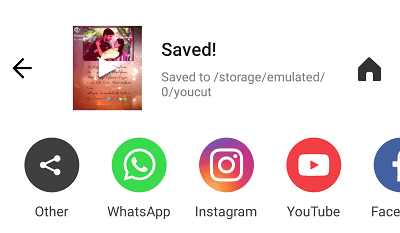
This is the procedure for editing the video on Android using YouCut video editing app.
5. WeVideo Editor: Best profession video editor for Android

WeVideo is the perfect video editing app for your professional life. If you are in a hurry or have less time to create or edit a video then Video Editor helps you a lot. This Video Editor for Android makes the video editing and making easy, fast and fun to create and share your amazing videos. You don’t need to be a pro to create some incredible videos for school, business and life. Just with simple and excellent editing tools, you can make your best ones. This WeVideo Editor has the following features.
Features:
- This app will Trim the video to the required size and arrange video clips
- Enables you to Edit photos and videos directly from your gallery or live from your device’s camera
- Add text elements: Add titles and captions with many fonts and styles
- Once the video editing is done, it will Export your video to 4K Ultra HD (with selected upgrades)
- Preview and trim music clips for your video, and even you can set the start time for background music
- If you upgrade to a premium plan then you can get access to Essentials stock content library, expanded music library and more.
- Many themes and filters are available to enhance your videos
- You can add music as you wish, or you can add music from your device storage, even you can give your own voice to your video.
- If you are making or editing vertical videos then it will add a blurred background to them.
- Integrates with Google Drive
- You can directly share your edited or created videos to social media such as YouTube, Facebook, Twitter, and Instagram, etc.
- No watermark will be added to your video
How to edit videos using WeVideo Editor?
To know how to edit videos using this WeVideo Editor app, follow the below steps carefully.
Step 1: Install the app and open it

Firstly, install the WeVideo Editor app from Google Play Store or from the official website. Once installation is completed then click on the app to open it. Once you open the app, then you can see the home screen of that app as shown in the above image. Here, our requirement is to edit the video. Go to Edit section, and click on the Plus (+) symbol at the bottom of the screen as shown in the above image.
Step 2: Select a way to insert video

Once you click on the plus symbol, then you need to select a way to insert the video. Here, I want to insert it from my Android phone. So clicking on On Device option.
You can also select any other way from those options as you wish.
Step 3: Select any video and click on Tick mark
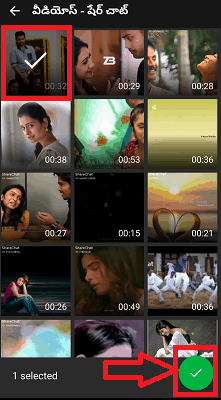
Once you select any method from above options then the videos from that storage will be shown on screen. Click on any video which you want to edit and then click on the Tick mark at the bottom of the screen as shown in the above image.
Step 4: Edit video by applying editing options
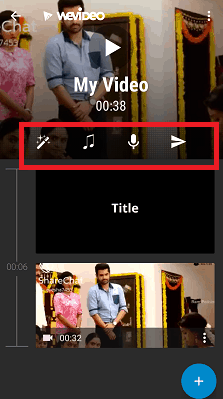
Once you click on the tick mark then that video is added to editing section. You can see different sections of the editing options such as Themes, Music, Voice over, etc. as shown in the above image. Click on any section and apply proper edits, or elements to your video.
Step 5: Save the video
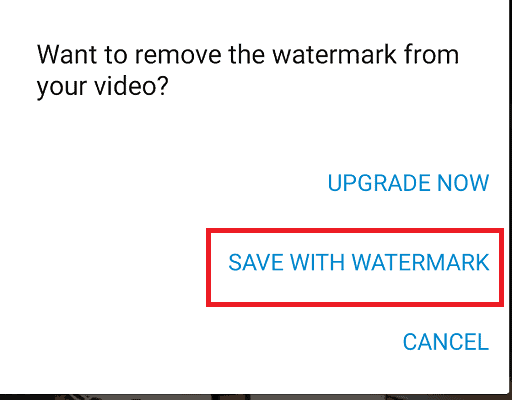
Once all the edits are made then you can click on the tick mark at the top of screen so you will be directed to saving option. Here, it will add Watermark to video if you use free version. You can remove Water mark by Upgrading app. If you don’t have any problem with watermark then click on the Save with watermark option. Otherwise, click on Upgrade Now option and upgrade the app by paying money to remove watermark then save the video.
In this procedure we will edit the videos using the WeVideo Editor on Android phone.
6. PowerDirector

PowerDirector is the perfect app when you are willing to make or edit cinematic style videos or movies, or your own adventure videos. It is a simple, intuitive app, with a simple interface that makes your video easy to edit. This will use the built-in stock library to add photos along with your images from the gallery, music, sound effects. You can also share them on YouTube, Instagram, TikTok, Facebook, and Snapchat.
Features:
- With the PowerDirector app, you can edit and export videos in up to 4K resolution
- With speed adjustment, it can make fast forward or slow-motion videos
- This will produce eye-catching intros with animated titles for video
- Chroma-key replace the background with a green screen editor
- Create spectacular double exposure effects from video overlays and blending-modes
- Upload straight to social media such as YouTube and Facebook and you can also share with your friends
- Control the brightness, color and saturation with the precision
- It combines pictures and video in one clip using the multi-timeline
- It not only adds music but also allows you to add voiceovers recorded on your mobile device a built-in editor
- This will create, edit videos and pictures collages with PiP overlays
- Premium version will allow accessing Stock media content even for commercial use (music, photos, stickers, stock video footage, sounds)
- Premium version will make and edit Ad-free and distraction-free videos
How to edit videos using Power Director?
Up to now, we have seen the features of the Power Director video editing app. Now let us see how to edit videos using this Power Director app on an Android phone.
Step 1: Install Power Director from Google Play Store
Firstly, install the Power Director app from Google Play Store or from the official site. Once installation is completed then click on it to open. When it opens, it asks you to give permissions to access media files of your Android storage. Click on Allow option to give permission to access the files of your Android.
Step 2: Click on New project option
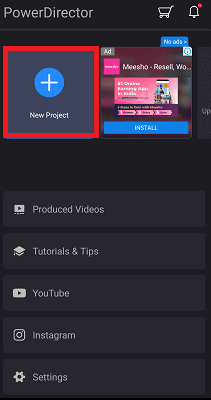
Once all the settings are made, you can see a screen as shown in the above image. Click on the New Project option. Since we are trying to edit the video which is not edited before using this Power Director app. If you have edited some videos before using Power Director and now you need to edit the same video again then you can see that in the Produced Videos section. You can access the video from that section.
Step 3: Give Project name and select Aspect Ratio
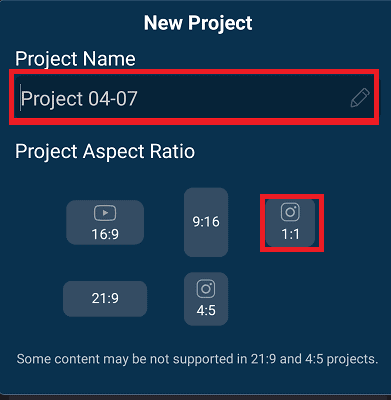
When you click on the New project then it asks you to enter the name for your new project. You can give any name as you wish for your video. Once you gave the name then you need to select the Aspect Ratio that you want to assign to your video.
Here I am selecting 1:1 Ratio for my requirement. You can select any Ratio according to your wish.
Step 4: Click on Plus symbol

Now you need to select any video which you want to edit. Click on that Video then a Plus (+) symbol will appear on that video. Click on that Plus symbol to add that video to the editing section.
Now you can see an Edit ( Pen) symbol on the left side of the screen. Click on it to open the list of editing options.
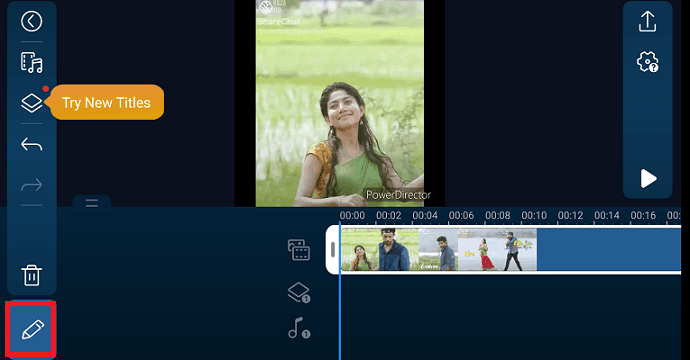
Step 5: Apply any editing option as you wish

When you click on the Edit symbol, then you can see many options to edit that video as shown in the above image. You can use templates, voice-related edits, filters, effects, using the editing section. You can apply any editing option to make your video more attractive.
Once all the edits are done then click on the Export symbol which is placed at the right top corner of the edit video section. That is shown in the above image clearly.
Step 6: Save the edited video
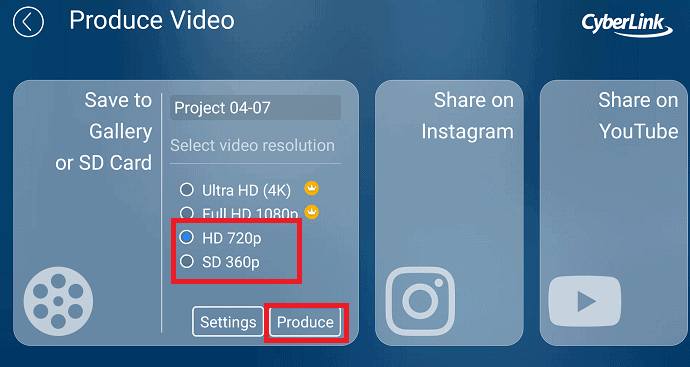
Once you click on the Export symbol then you see a screen with the name Produce Video as shown in the above image. Here, you can save the video to either your Gallery or SD card or you can share it on different social media like Instagram, Youtube, etc.
Once you select any save method, then you need to select the video resolution. Select any resolution as you wish and then click on the Produce option as shown in the above image.
With these steps, you have successfully edited the video and saved it successfully. This is the procedure for editing the video using the Power Director video editing app.
All the above discussed apps are focused for Android OS only since our requirement is to edit videos on the Android Phone.
Conclusion: Which is the Best way to edit videos on Android
These are the apps that enable you to edit video effectively using different effects, sounds, and themes. You can use any app to edit your video as you wish. According to my opinion, VideoShow is the best app among all those above apps. You also edit videos directly using the photos (Gallery) themselves. But that has only cut, filter editing tools, there are no further editing tools like effects, themes, background change, voice-over sound, etc. So I won’t recommend you to edit your video in that method. It is better to use any one of the above Video editing apps to get more editing tools.
- Also read: FilmoraPro Review – Ease of Your Video Editing Journey
- 6 Best Free Online Video Editor Websites on the Internet
- 4 Ways to Download Vimeo Videos to mp4
How to edit videos on Android – FAQ
What is Voiceover tool in Video editing apps?
Almost for every video, we need to add either music or voice. Voice over is one tool that is related to the sound of the video. If you click on the Voiceover option then you can able to add your own voice or voice clips from your device storage. This makes the video more understandable than the music.
How do I add multiple music tracks to same video?
Sometimes we need to add multiple tracks to the same video. That time, we need to know how to add multiple music tracks to the same video. To add multiple music tracks, click on the Multi music option. Then you can see a Plus symbol. Click on that, then music on your phone will be opened. You can also find the Download option to download more music from the internet or from the app store itself. You can choose any music as you wish and set the period or clips for which that music is needed. And after that period or clips, you can add one more piece of music.
Like that, in this way, we can add multiple pieces of music
May I compress the video using editing apps?
Yes, you can. You can compress the video to reduce size. Some times we need to compress the video to post it on social media like YouTube, Facebook, etc. That time you can compress it by using Compress option simply and then share it or export it.
Is it possible to get or retrieve audio from the video?
Yes, it is possible. You may like some random music in any video and you don’t know where you can get it. So you just want to get that audio or music through video directly. To retrieve audio ,click on the Video to Audio option. Then you can get that audio.
What are transitions in the video and how they make video more attractive?
Transitions are used to connect two photos or video clips. Those will add some pattern of movements (Circle, Rectangular, Cross, Wave, Shutter, Bubble, Flower, etc) between the photos or video clips so that those photos or videos looks more attractive. In this way transitions helps you to make best videos.