Most people use Google Docs to store their personal and professional documents. The ability to quickly insert and delete a page break in Google Docs to keep your documents organized is one of the features that make Google Docs so helpful. Although you can’t just delete a page break like you can other text, this may frustrate you if you need to. To make it simple for you to arrange your documents, we’ll show you how to insert and erase page breaks in Google Docs. We’ll also go over some of the various uses for page breaks in Google Docs.
What is a Page break and Its use in Google Docs
Page break is identified by the center of a dashed line within the document. Let me demonstrate some of the uses of page breaks in Google Docs.
- Page breaks are used to separate one page from another.
- Page breaks are used to determine where one page ends and another one begins.
- Page breaks are used to organize the data on different pages in a properly structured manner.
- Page breaks make us easy to identify the required data.
Before understanding the process to delete page breaks in Google docs, let us know how to insert Page breaks in Google Docs.
How to Insert a Page break in Google Docs
Video Tutorial
We Provided this article in the form of a Video Tutorial for our reader’s convenience. If you are interested in reading, skip the video for now and watch it after the completion of reading this article.
Below is the step-by-step procedure for inserting a Page break in Google Docs:
- Open Google Docs from your Gmail on your device.
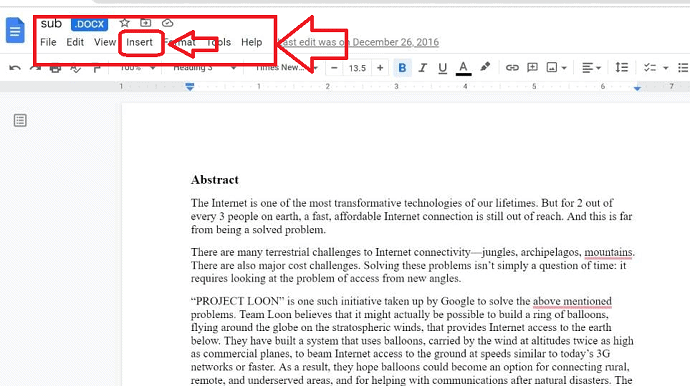
- Select the “Insert” option on the required document at the top left of the paper.
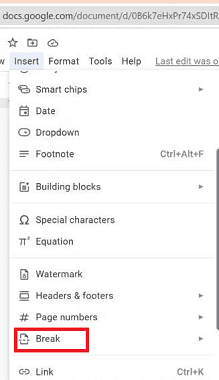
- A shortcut menu with multiple options will appear and select the “Break” option.
- Another Pop-up window will appear with multiple options select the “Page Break” option.
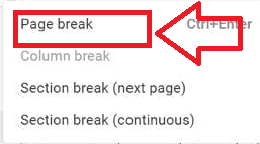
By following the above steps we can easily insert the Page Breaks in Google Docs.
How to Delete Page Breaks in Google Docs
Below is the step-by-step procedure to delete Page breaks in Google Docs:
In this section, we will understand the procedure for Delete Page Breaks in Google Docs.
Total Time: 5 minutes
STEP 1: Open Google Docs
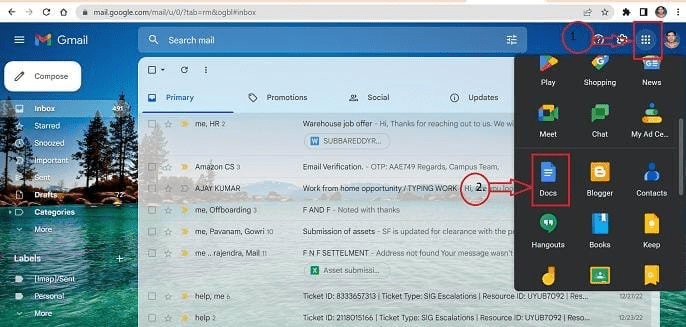
Use any browser on your computer to sign into your Gmail account. When you click the all apps button in the upper right corner, a list opens. Select the Google Docs app from the list of possibilities.
STEP 2: Find the Document
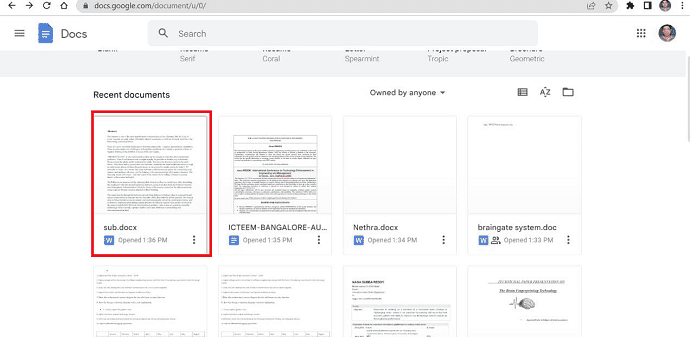
From the list of documents stored in Google Docs Identify the document in which you need to delete a Page Break and open the document.
STEP 3: Deleting Page Break
Go to the menu bar which is present on the top left side of the document and select the “File” icon on the menu bar.
STEP 4: Page Setup Icon
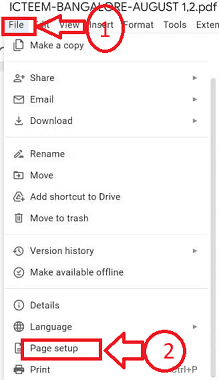
A shortcut menu will appear with multiple options. From the options in the Shortcut, menu clicks on the “Page Setup” option a new pop-up window will appear with a different setup of options.
STEP 5: Selecting Pageless Icon
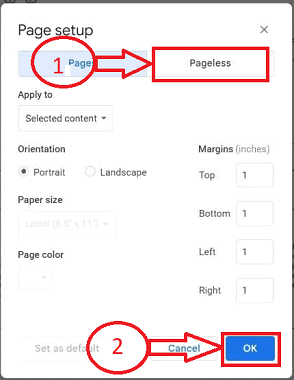
From the set of options Select the “Page less” option and click on the “OK” button, your document will convert into a single page.
STEP 6: Final Step of Deleting Page break

Click on the “fn” button and “delete” button on the keyboard of your computer at a time to delete the Page Break from the document. That’s it! this is how you can delete Page Breaks in Google Docs.
How to Delete Page Breaks in Google Docs on Mobile
Step-by-step instructions are provided below on how to delete Page Breaks in Google Docs for mobile:
- STEP 1: Open the Google Docs app on your Android or iOS phone by downloading it from the play store on your phone.

- STEP 2: You can find all your saved documents in Google Docs. Select the required document in which a Page break is to be inserted and open the document by tapping on it.
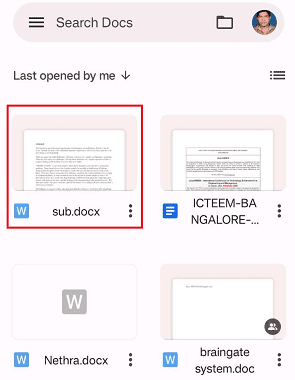
- STEP 3: A long tap on the page break of the document on your mobile screen, opens a set of icons with a shortcut menu pop-up. Click on the “More” icon demonstrated with the three vertical dots symbol.
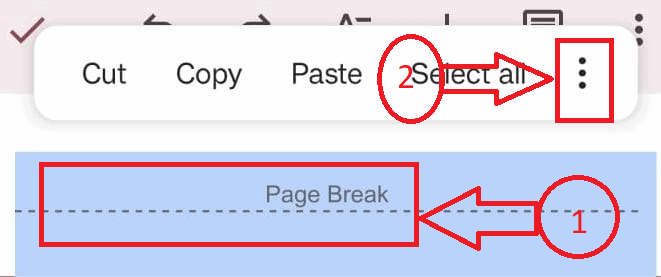
- STEP 4: A Pop-up menu will appear with multiple icons. From the list of Icons in the Pop-up window click on the “DELETE” option.
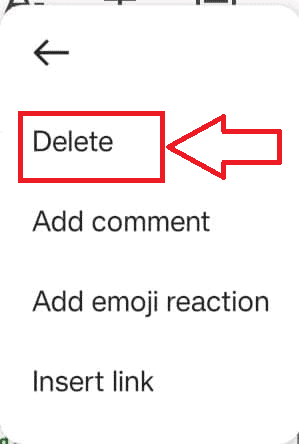
That’s it, by following the above procedure you can successfully Delete Page breaks in Google Docs in the mobile version.
Conclusion:
We sincerely hope you liked reading our blog post about removing page breaks from Google Docs. This is an excellent technique to give your paper a neater, more polished appearance. Our guide will assist you in doing just that because we are aware that there are situations when you may need to eliminate page breaks in order to fit more content on a page. Share this blog article with your colleagues.
I hope this tutorial helped you to Delete Page Breaks In Google Docs. If you want to say anything, let us know through the comment sections. If you like this article, please share it and follow WhatVwant on Facebook, Twitter, and YouTube for more Technical tips.
- Related: 2 Ways to Delete A Page In Google Docs
- 9 Ways to Convert PDF To Editable Word (Free Online & Offline)
- 7 Super Useful Tips To Shrink Or Compress Pdf Files
Page Breaks in Google Docs – FAQs
In which view is a section break deleted?
Make sure the section breaks are visible before you begin by selecting the Home then go to Show/Hide option as previously mentioned. Scroll until you locate the section break you want to manually delete. When you’ve done that, choose the section break by moving your cursor all the way from the left to the right edge, then press the Delete key.
In M.S.Word, how can I get rid of a page break?
Click Show/Hide in the Paragraph group on the Home tab to display all formatting marks, including page breaks.
Select the page break by double-clicking it, then hit Delete.
To conceal the document’s remaining formatting marks, click Show/Hide once more.
How can a page break border be removed?
Select Page Borders under the Page Background group on the Page Layout tab.
Select None from the Page Border tab’s Setting option in the Borders and Shading dialogue box.
Choose OK.
How do I edit a section break?
To modify a section break, click or tap on it.
Select the Page Setup launcher button under Layout.
Choosing the Layout tab.
From the Section Start drop-down menu, choose a different section type.
Choose OK.
