
When you hear about the new version of Windows, several questions will arise in your mind. “What are the minimum system requirements?”, “How to install Windows 11?”, “how to prepare a hard drive for Windows 11?”, “How to run Windows 11 on an unsupported PC“, and many more. If all these questions are in your mind, stop blasting your mind. We are here to answer all your question.
In this tutorial, you will find the solution for How to run Windows 11 on an unsupported PC. For that first, you need to create a portable USB drive With Windows 11 OS. To create Windows 11 portable USB drive, you need a creator tool. EaseUS OS2Go is the best and amazing Windows creator tool for Windows 11/10/8/7 offered by the EaseUS family. Let’s see how to create a portable drive and use it on an unsupported PC.
Can I run Windows 11 on an unsupported PC
Unfortunately, most consumers will discover that their machines are not compatible with Windows 11. TPM 2.0 chips are missing in some of their devices, and storage capacity is limited in others. As a result, some customers may ask if they may install Windows 11 on a PC that is no longer supported. Is the only way to get Windows 11 is to buy a new computer? We have amazing technologies that enable folks with unsupported PCs to run Windows 11.
How to run Windows 11 on an unsupported PC
How to Create Windows 11 Portable USB drive
EaseUS OS2GO is a popular Windows creator for Windows 11/10/8.1/8/7 that is clean and lightweight. It goes fully compatible with the Windows 11 operating system, making it simple and fast to create a bootable USB drive for Windows 11. You can take the WIndows 11 portable USB drive everywhere for use.
- Migrate Windows 11 to a portable drive, along with programs, backgrounds, programs, games and files in the system drive
- Restore the cloned Windows operating system to a different computer anytime and anywhere
- Play Windows 11 on some old computers which lack UEFI secure boot or TPM 2.0 configuration
- Run Windows 11 on a Windows 10 or Windows 7 computer without the booting issue
- Run Windows 11 on a macOS device without creating dual boot systems
Ceate a bootable Drive using EaseUS OS2Go:
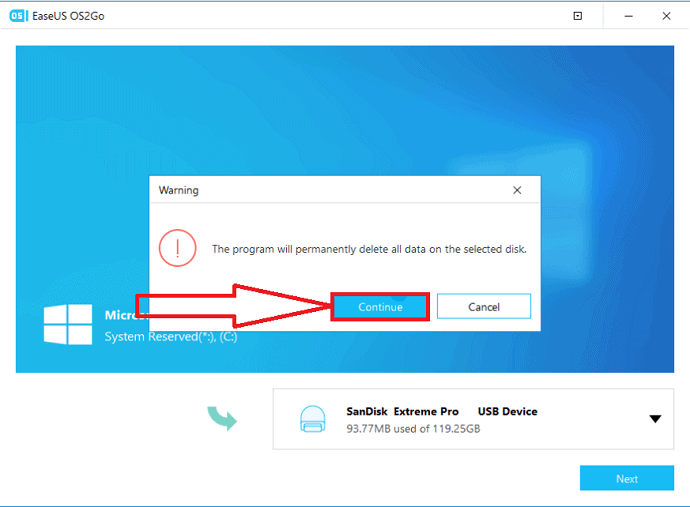
Step 1: Download and install EaseUS OS2GO on your Windows PC. Open the application. Plugin the USB driver in the drive slot. Make sure that the target drive space is more than the system Drive use space. Choose the target USB drive and click on the “Next” option at the right bottom.

Step 2: A warning message will be prompt on the screen. That says “The program will permanently delete all data on the selected disk”. Before going to proceed, make sure that you have backed up all the important data. Click on the “Continue” option to move to the next step.
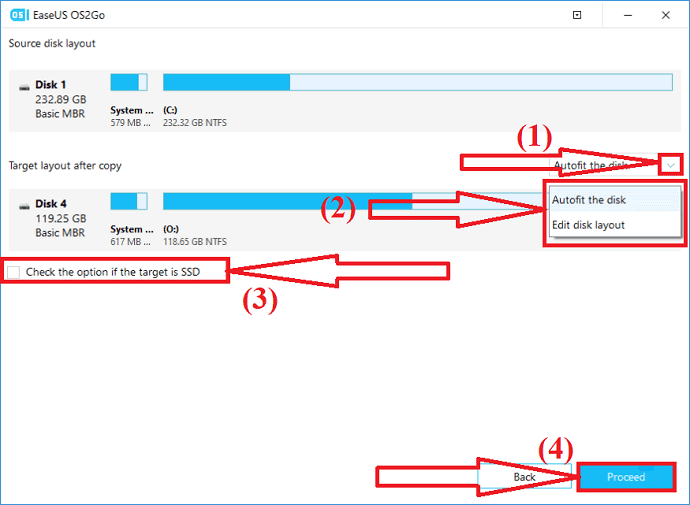
Step 3: The source and target disk information will appear on the screen. The target drive’s default disk layout will be similar to the source drive’s. You can also change the layout that suits your needs. If you are using an SSD as your Windows bootable drive, Enable the box below the target drive. Then, click on the “Proceed” option at the bottom.
Step 4: EaseUS OS2Go will start to create the portable USB drive. It takes some time depending upon the network connection and size of the OS. Once the process is completed, the USB drive should be bootable now.
Step 5: Insert the portable USB drive in the device where you want to run Windows 11 and restart the device. Press F2, F12, Del, or Esc to access BIOS mode. Choose the boot from the USB disk.
Note: Make sure that the boot mode of the portable USB flash drive and the target device are the same. Otherwise, it doesn’t allow you to boot mode.
If you have a supported PC for windows 11 but don’t know how to download Windows 11 and from where. You have a stunning tool – Windows 11 Builder offered by EaseUS. First, you need to download EaseUS Win11 Builder download Windows 11 iOS.
Step 1: Download and install Windows 11 on your device from its official site. Once the installation is completed, launch the application.
Step 2: Change the WinToGo Creator to Windows Install Drive Creator. The obtained system information is available on the screen. Win11 Builder also allows you to install windows 10/8.1.

Step 3: Now, insert the USB drive in the USB slot. It automatically detects the USB drive. Click on Create button.
Step 4: The application deletes all the data in USB if it is a used one. Once the downloading process begins, wait for some time until it is completed.
Step 5: After the completion of the downloading process, start to install Windows 11 from the bootable USB drive on your device by following the steps that display on the screen.
Using AOMEI:
AOMEI is another professional tool that offers different tools like AOMEI Backupper, AOMEI partition, and many more. To run Windows 11 on an unsupported PC, create a system backup from the device that has successfully installed Windows 11, and run it on the device that you want to upgrade. For that, you need the AOMEI Backupper tool. Let’s see the process:
Step 1: System Backup
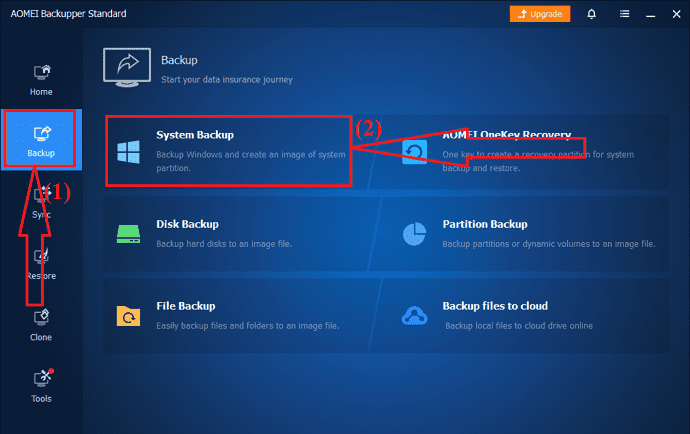
Download and install the AOMEI Backupper tool from its official site on the device running Windows 11. Once the installation is completed, launch the application. Select the Backup icon at the left side panel and click on the system Back up option on the interface.
Step 2: Start Back Up
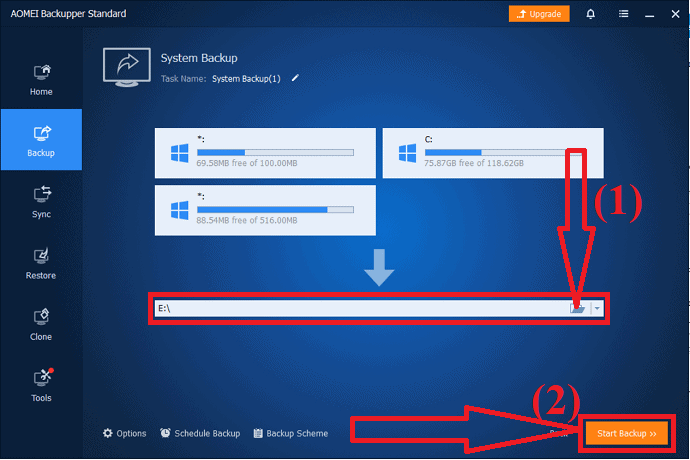
Choose the destination path for the system image of Windows 11. It’s always better to select the removable USB drive as the destination for easy migration. Finally, click on the “System Back-up” option. That’s it… Wait for some to create a system image of Windows 11 in the destination path. Once the completed process moves to the next step.
Restore Windows 11 on an unsupported device:
Now, install the AOMEI Backupper tool on the PC that you want to upgrade and connect the device to the PC. It’s better to back up Windows 10 before going to update Windows 11, because if the operation fails or else you are not satisfied with the new OS it is very easy to downgrade from it.
Step 1: Launch the AOMEI application on the device that you want to upgrade. Select the “Restore” icon from the left side panel and click on the system image file.

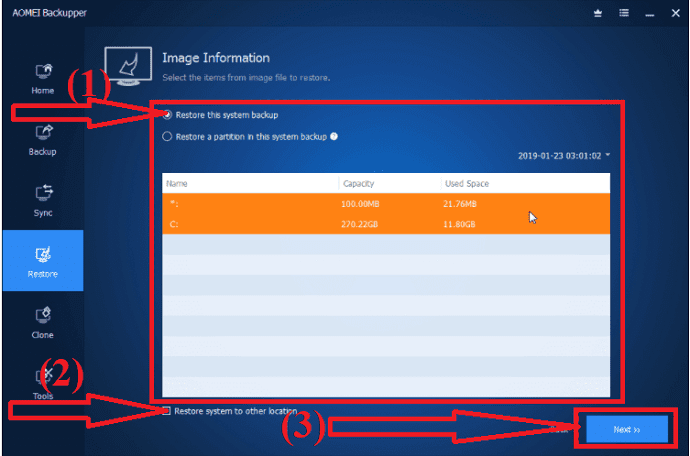
Step 2: You will redirect to the image information Window. Enable the “restore the system backup” option, check the “Restore system to other location” box, and click on “NEXT”.
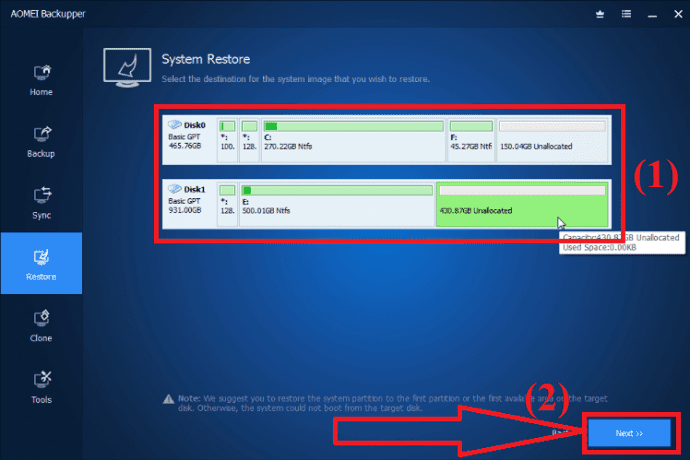
Step 3: Choose the destination drive where you want to store the system image and click on the “NEXT” option.
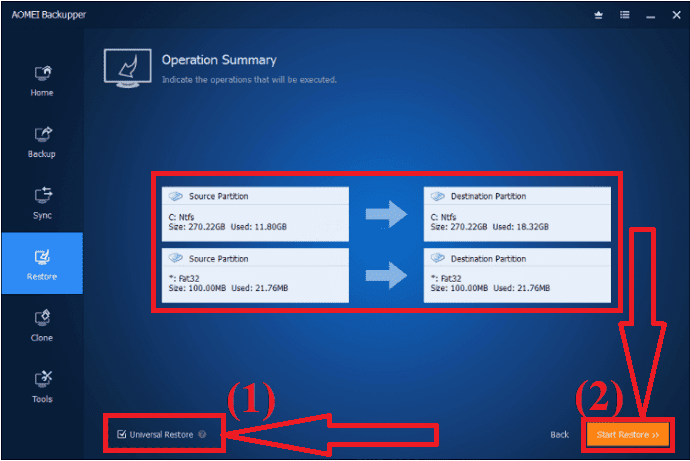
Step 4: All the operation summaries will be displayed on the screen. Check it once, enable the Universal Restore option and click on the “Start Restore”.
The Windows 11 system image should have been restored successfully after the completion of the restoration process. You can try rebooting the computer to see if it will start up with Windows 11 or not. If you don’t like the new OS’s interface or performance, you can revert to Windows 10 using the previously created system image.
Edit Registary
If you don’t mind fiddling with the Windows Registry, this is the most straightforward option that doesn’t include the use of any other third-party tools. You can make an item in the Registry to prohibit Windows 11 from verifying various requirements, depending on your PC.
Depending on what characteristics your PC already has, you will need to create different entries. Just follow the below steps for a more detailed process:
Caution: Be careful while creating an entry in the register. If you make any wrong entry, it will lead to hurting your PC including the OS and data corruption. So, Backup the registry or use a registry cleaner to automatically backup and restore it before going to make any changes.
ByPass TMP 2.0
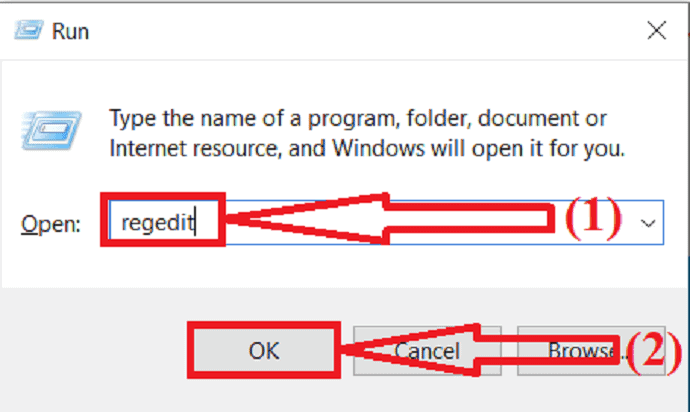
Open the Registry Editor with the help of the Search bar or else press Windows+R on your keyboard and enter “regedit” in the dialog box. Click on “OK”.
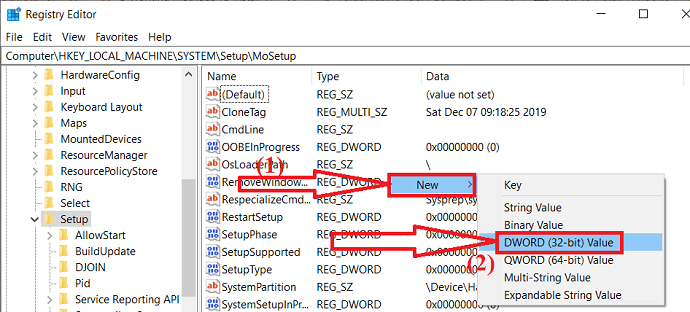
Registry Editor Windows will appear on the screen. Go to the address “HKEY_LOCAL_MACHINE\SYSTEM\Setup\MoSetup” by navigating at the left side panel of Registry Editor or else enter that address in the search bar.

Give a right-click on the right-side panel. Select the New and click on “DOWRD(32-bit) Value”.
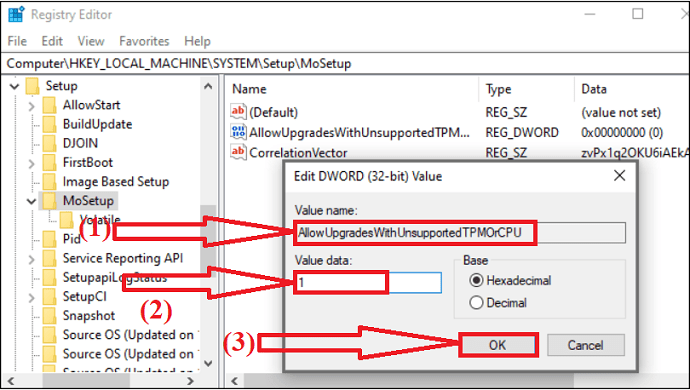
A new entry will be created in the right-side panel of the MoSetup folder. Double click on the created entry. Change the value name and set the value data as 1 and click OK.
Finally, go to the Microsoft official page and install Windows 11 on your device or else with the help of a bootable USB drive.
Enable secure Boot:
Secure boot is also one of the main system requirements to install Windows 11 on your device. So, you need to check the secure boot option while the system shows “This PC can’t run Windows 11”. You need to enable the Secure Boot and BIOS mode to UEFI. If the system supports UEFI but it shows the error, then enable the secure boot manually.
Before going to make any changes, check the status of secure Boot on your device. Just follow the steps to know-how:
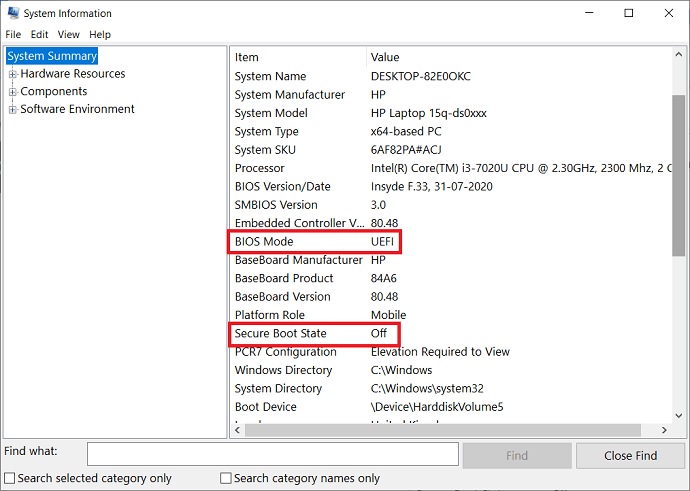
Go to the search bar, type “system information” in it, and press Enter. A system information window will appear on the screen. Check the BIOS and Secure boot options under the system summary.
IF the BIOS mode is UEFI, then you can enable the Secure Boot manually. If the BIOS mode is Legacy, you need to change it to UEFI first then you can enable the Secure Boot.
If you have the BIOS mode as UEFI, then enable the Secure Boot state. Just go through the below steps to enable the secure boot manually.
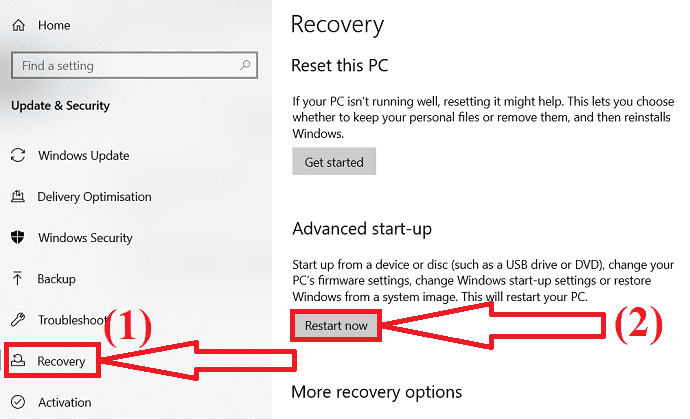
Step 1: Open Settings Windows. Select the “Updates & Security” options. Updates & Security windows will be opened. Select the Recovery options from the left side window and click on “Restart Now” under Advanced settings.
Step 2: The PC will restart in the advanced mode which comes with lots of advanced options. Click on the Troubleshoot icon.
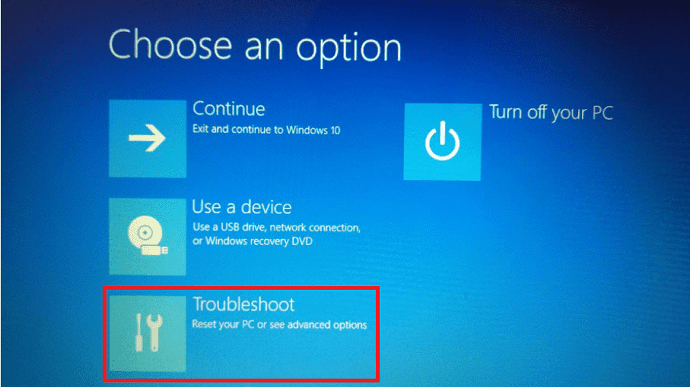
Step 3: The troubleshooting window will be opened. You will find three different options on the screen. Select the “Advanced options”.
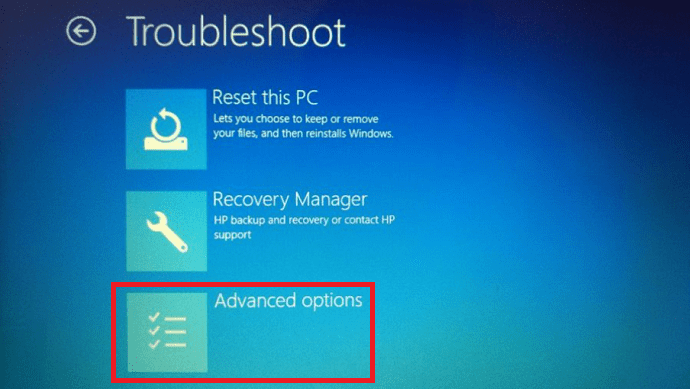
Step 4: The advanced options will be opened on the screen. Select the “UEFI Firmware settings” options.
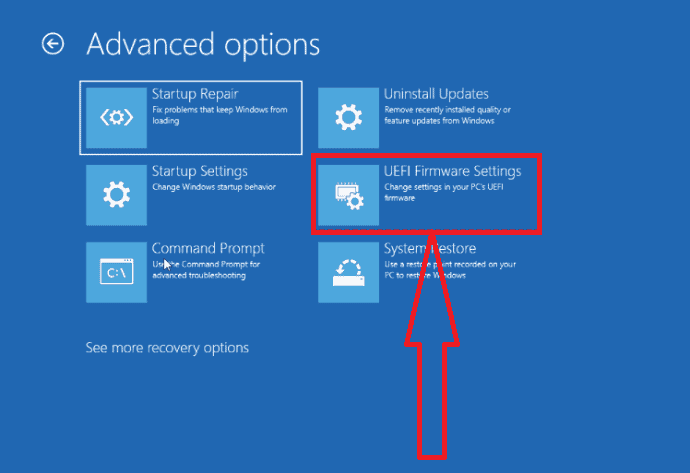
Step 5: In the UEFI settings Window, Select the Security tab. Go to the Secure Boot state and enable it. Finally, press F10 to save the changes and exit the mode. Then the computer should reboot With secure boot enabled. That’s it…
Closing Words:
Many users are interested in learning more about Windows 11 because it is a fresh new and drastically different Operating System. Even it has the minimum system requirements, many of you receive “This PC can’t run Windows” prompts, and the most common prevalent reason for this is the lack of secure boot or TMP2.0.
This article explains how to resolve or avoid these issues so that Windows 11 can be installed effectively. You can use the EaseUS OS2GO tools to create a bootable drive and use it to install Windows 11 on the device that you want. It saves a lot of your time.
Offer: Our readers get a special 30% discount on all EaseUS products. Visit our EaseUS discount coupon page for the promo code.
I hope this tutorial helped you to know about How to run Windows 11 on an unsupported PC. If you want to say anything, let us know through the comment sections. If you like this article, please share it and follow WhatVwant on Facebook, Twitter, and YouTube for more Technical tips.
How to run Windows 11 on an unsupported PC – FAQ
Can I install Windows 11 on an unsupported device?
Yes. You can install Windows 11 on an unsupported device.
Is Windows 11 update free?
Yes. As of now, it is completely free and everyone can Update from Windows 10 to Windows 11.
Is there any third-party tool to run Windows 11 on an unsupported device?
EaseUS OS2Go is the best and good tool to create a portable drive and use it to run Windows 11 on an unsupported device.
Can I install Windows 11 without TMP and secure boot?
No, It is not possible to install Windows 11 without TMP and secure boot. It shows an error message”This PC can’t run Windows 11″.