Want to find and Delete duplicate photos? There are many software apps available which you can download and remove duplicate photos from your devices. In this article, it was explained clearly the best ways to find and Delete duplicate photos on Mac, Windows, iPhone, and Android.
Why should we delete the duplicate photos/pictures?
Sometimes your device (computer or mobile) gets slow or seems to be running slow and cannot perform operations properly which will make our work not productive and not smoothen. The first check you have to do is to verify the space in your device and it is very advisable to have some 10% to 20% of your space available on your machine.
Duplicate photos in your machine are the photos that look quite similar among one another and use the excess memory of your device by which less storage capacity is available and you can not store a good amount of pictures, music, and much more. Duplicate Photos slow down your device speed due to more storage of unnecessary Duplicate Photos.
So it is time to remove or declutter unnecessary photos, documents, and other files. So you must properly check and remove or delete the photos from your drive accumulated a large collection of junk files and improve the speed.
How to delete the duplicate photos on Mac?
Below are the best methods to find and remove duplicate photos from your Mac machine.
Though many apps are available, Some of the best apps are Gemini – Duplicate Finder, CleanMyMac, and Duplicate FileFinder. These Apps are effective and are very easy to use. Now let us see how to find and Delete duplicate photos on Mac using these most powerful and effective apps.
1) Manually deleting the duplicate photos using Finder.
It is much possible to find duplicate photos using the Smart Folder feature available in the Finder window.
- Open the Finder window
- Click on the File tab available on the menu at the top.
- You can find the option “New Smart Folder”.
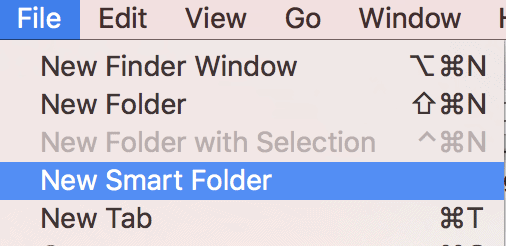
- Select the option
- Click on the button “+” at the upper right corner.
- Now you can see the photos or any other files and search for them to see if they are duplicated.

- Sort them by Name and find to check the date and delete those which are duplicated. In this way, you have searched, find, and delete if you think those are duplicate.
2) Using CleanMyMac
CleanMyMac is one of the best software used to cleanse your Mac machine. It is used to find and identify the background applications which will consume more space, junk files. It also finds the hidden large data & folders, more memory consumable applications. After identifying, it will remove them and tune your Mac to increase to maximum speed.
CleanMyMac X version provides a lot number of tools that can make your Mac much faster by acting like a malware remover, performance monitoring tool, and what more than as mac cleaner.
Its Smart Scan feature does the three most powerful jobs. it cleans your Mac, protects your mac, and makes your mac much faster.
3) Using some powerful dedicated Third-Party tools.
There are several finders available in the Mac App Store.
These are used to find and automatically search for the photos that are doubled or duplicated and are useful to remove them.
Some of the best are:
Duplicate File Finder
Duplicates Cleaner
To delete duplicate photos from your Mac machine by using Duplicate File Finder, then follow the below steps:
- Firstly Launch the Duplicate File Finder. free Duplicate File Finder app
- Please click on the “Choose Folder” button, then you have to select Photos Library from the menu that appears there.
- Now click on the “Scan” button to search for duplicate photos.
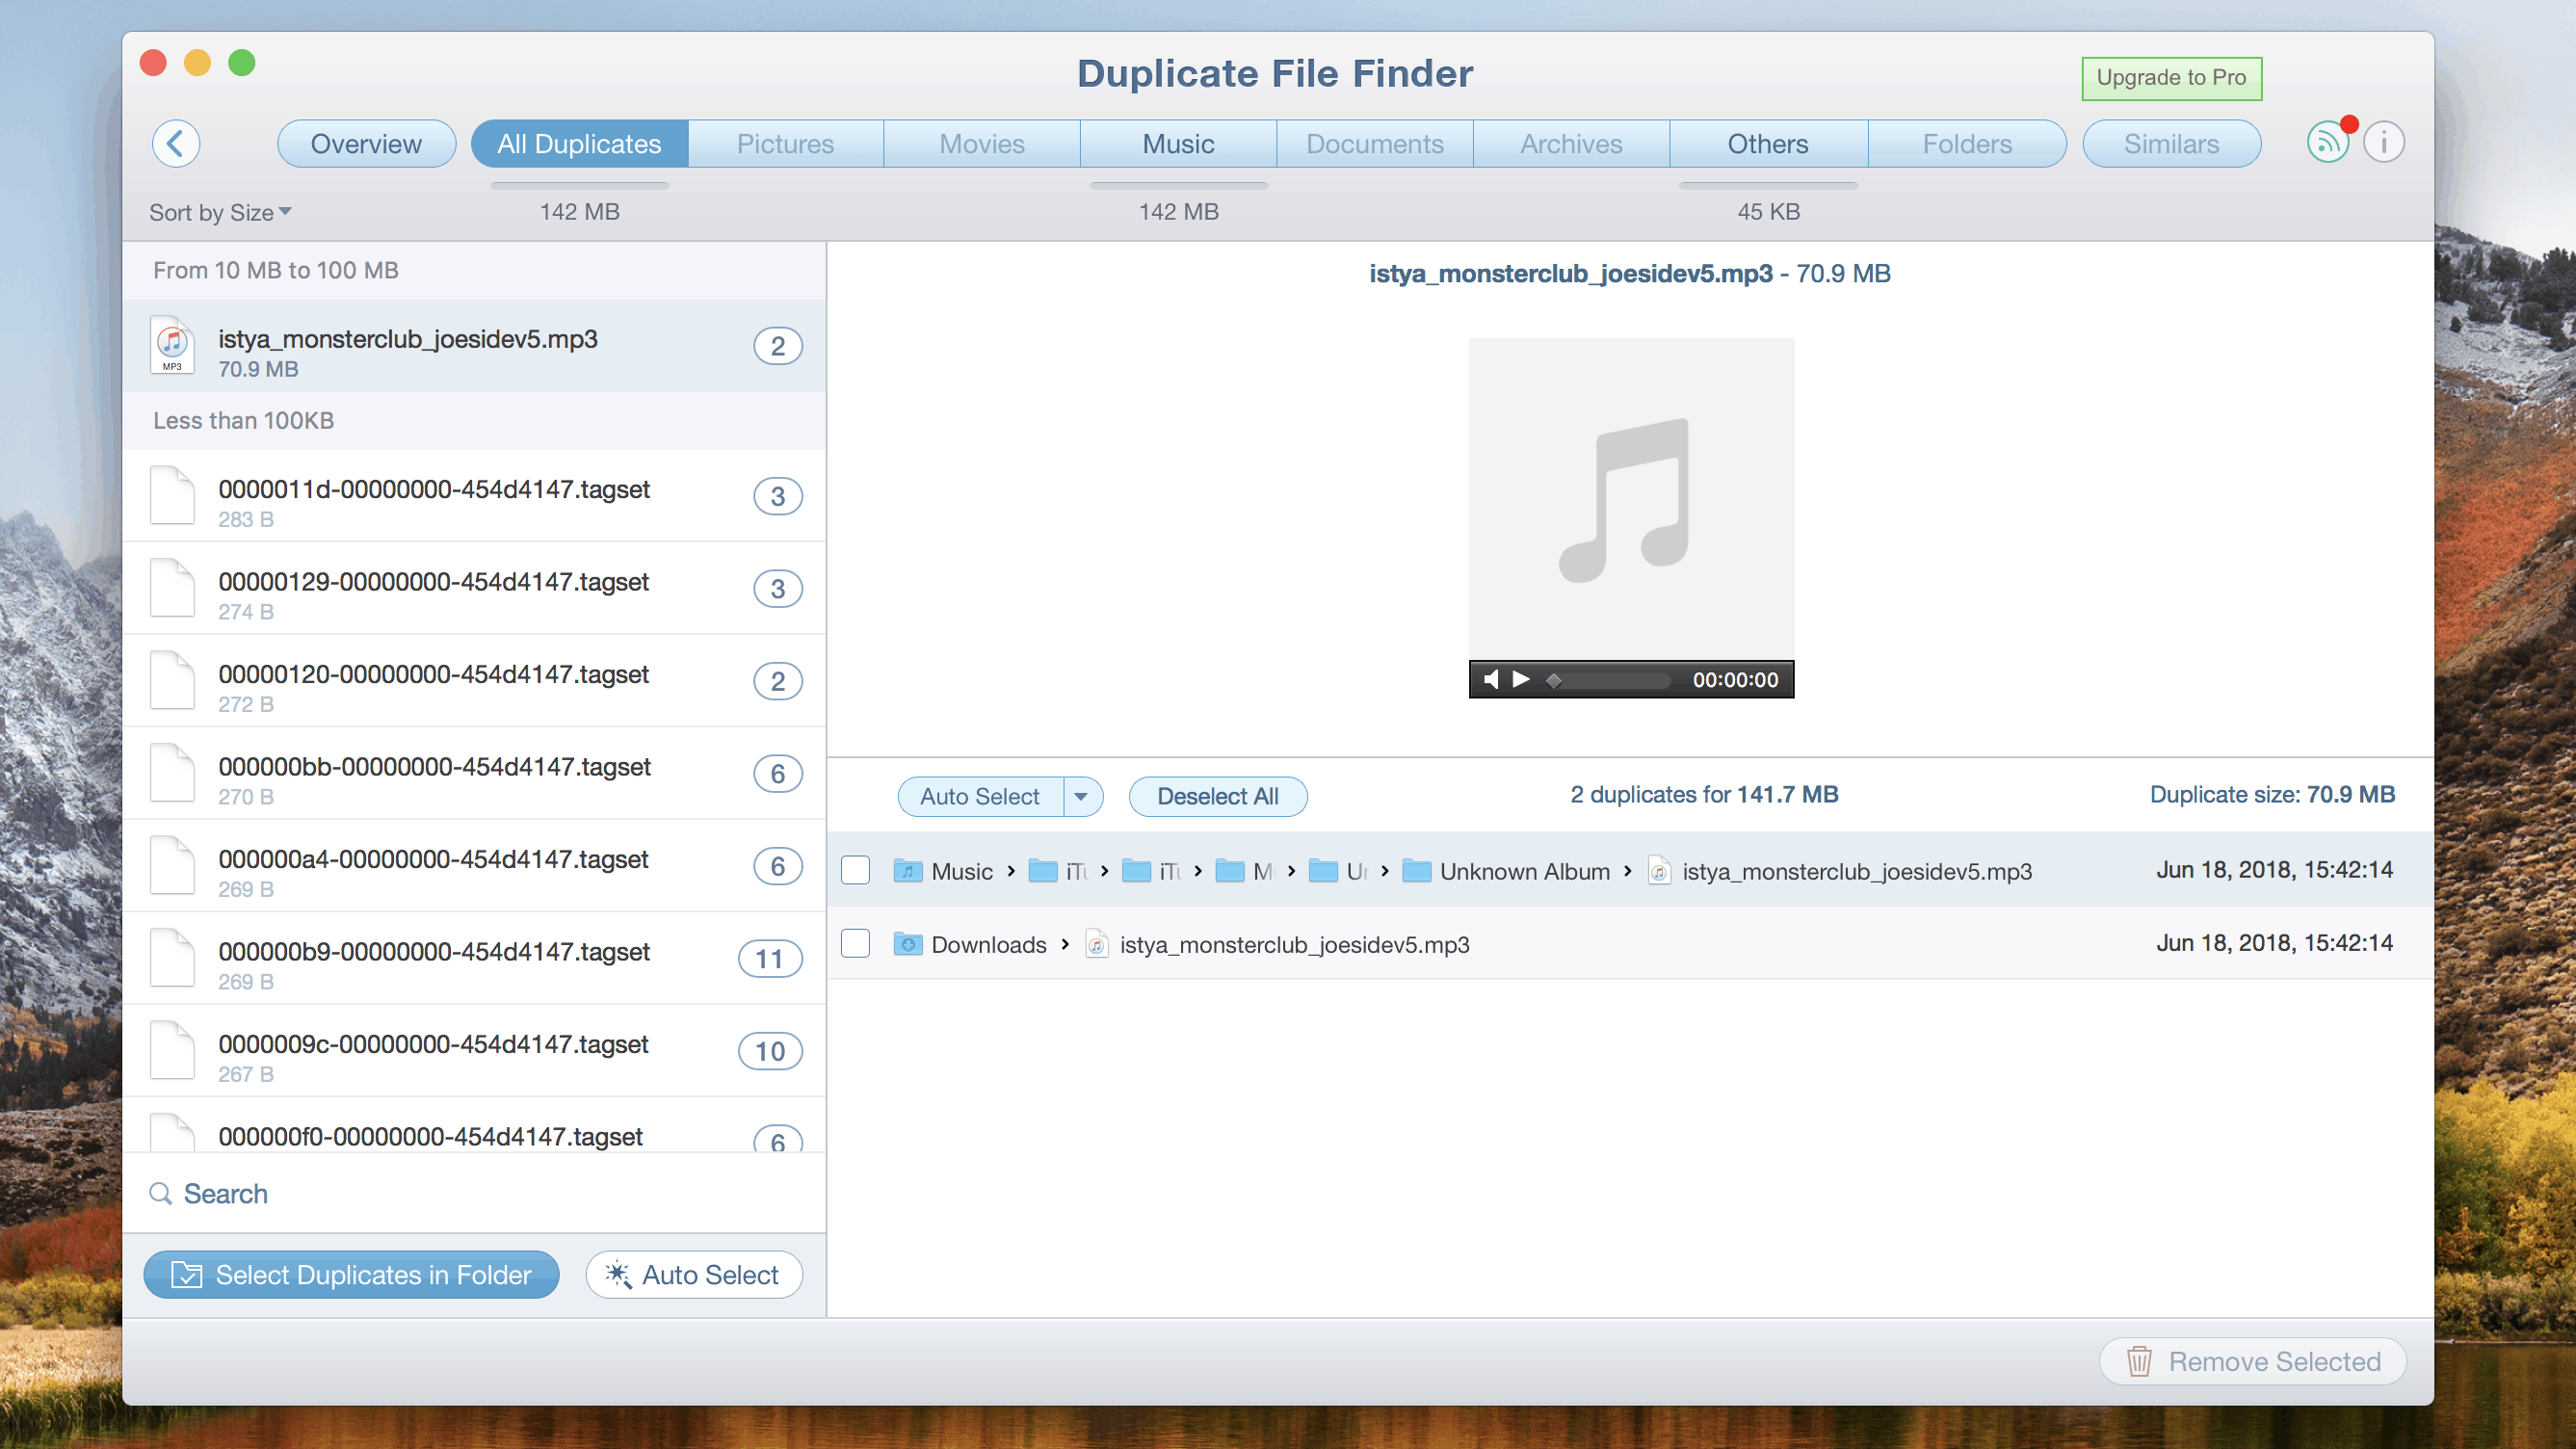
- You can now able to view a list of photos which are arranged in groups.
- On the right side, you can preview the image, and the left side is the photos arranged in groups.
- When we place the pointer, then you can see the Trash Icon on the pointer paced photo to delete it.
- You can choose the Auto-Select option also which is used to select automatically by the Finder the unneeded photos or pictures.
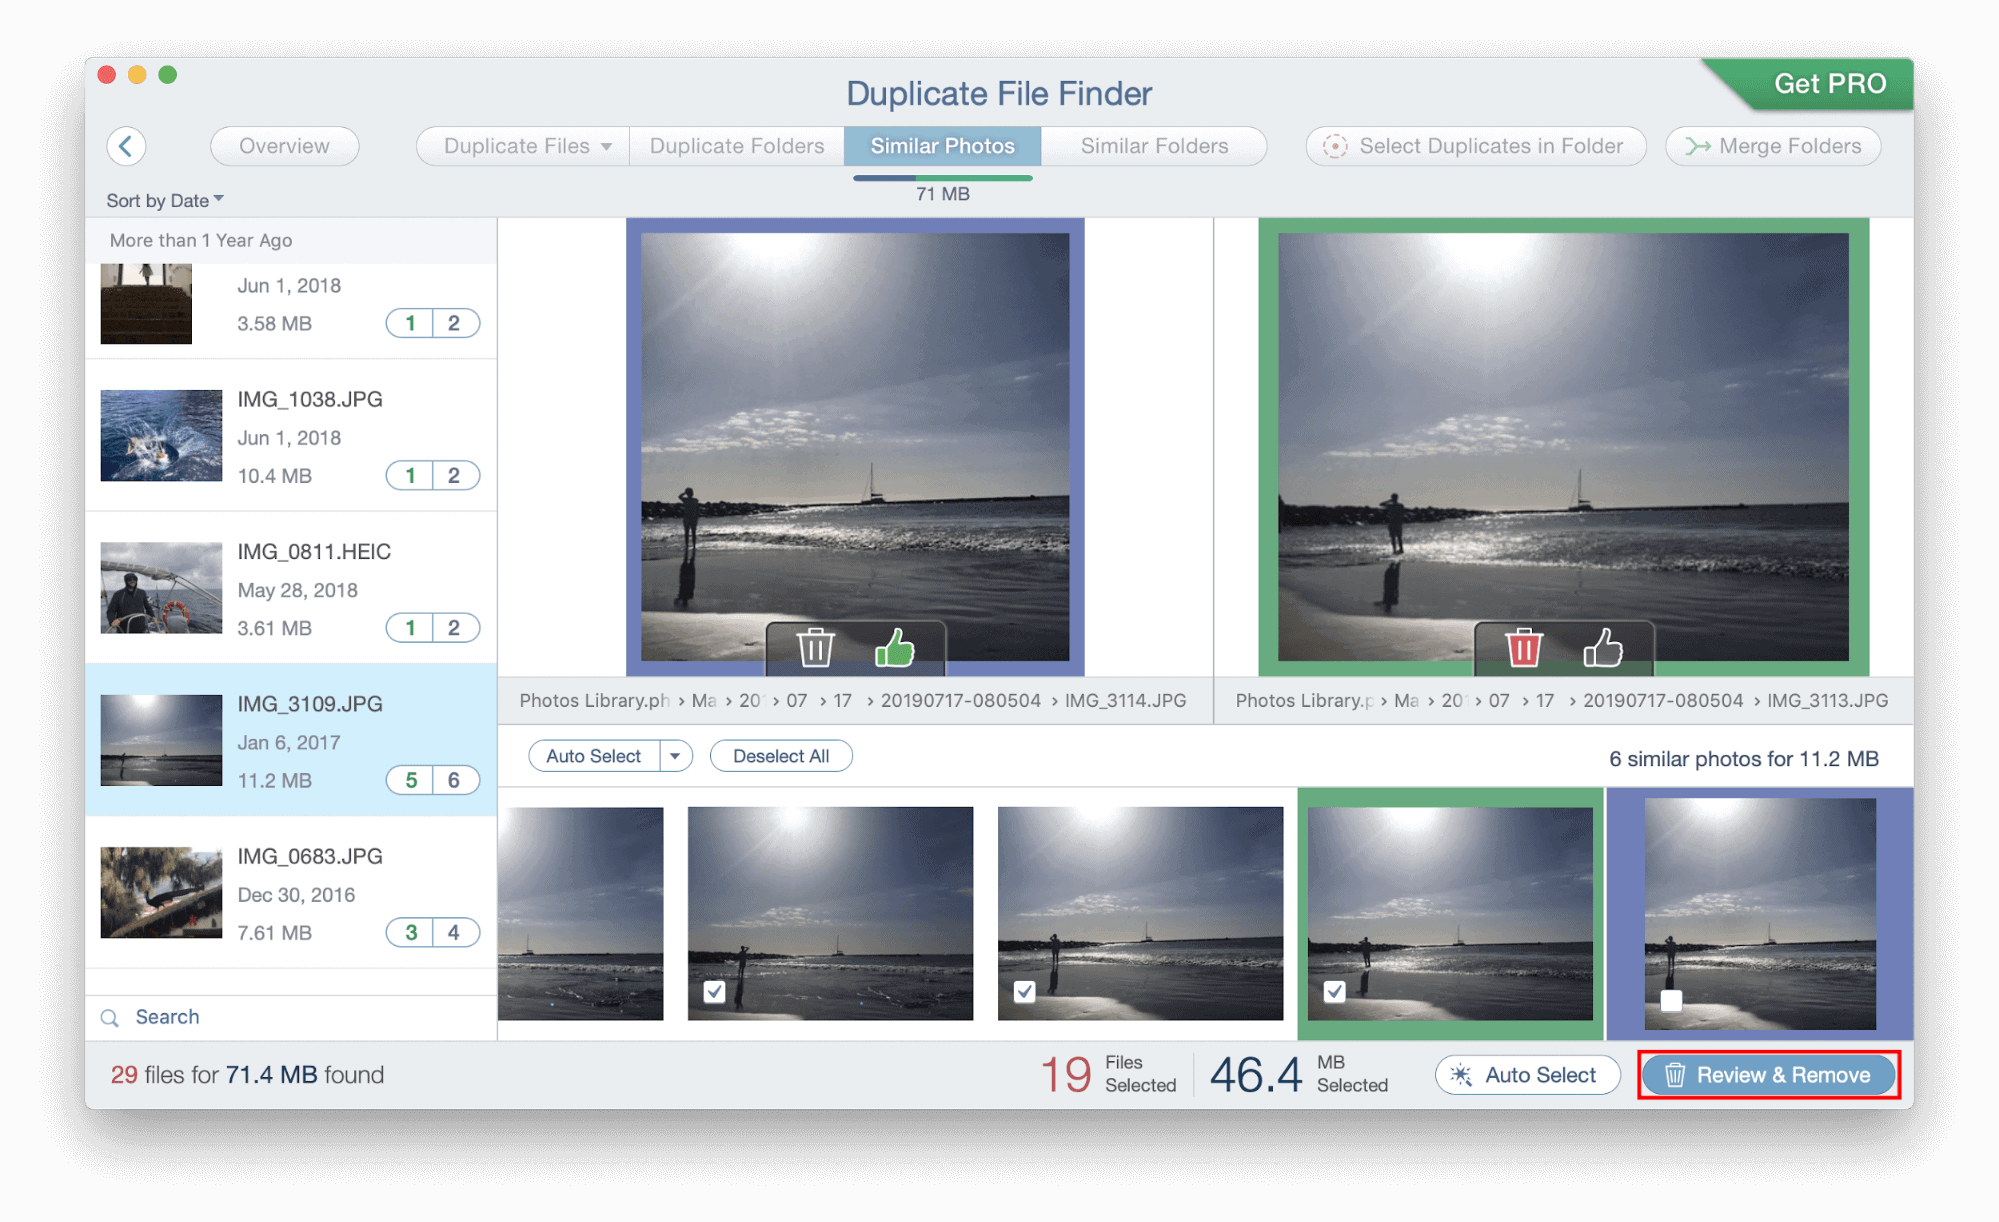
- Click on “Review & Remove button”, then the alert message will be displayed to grand the access to remove them.
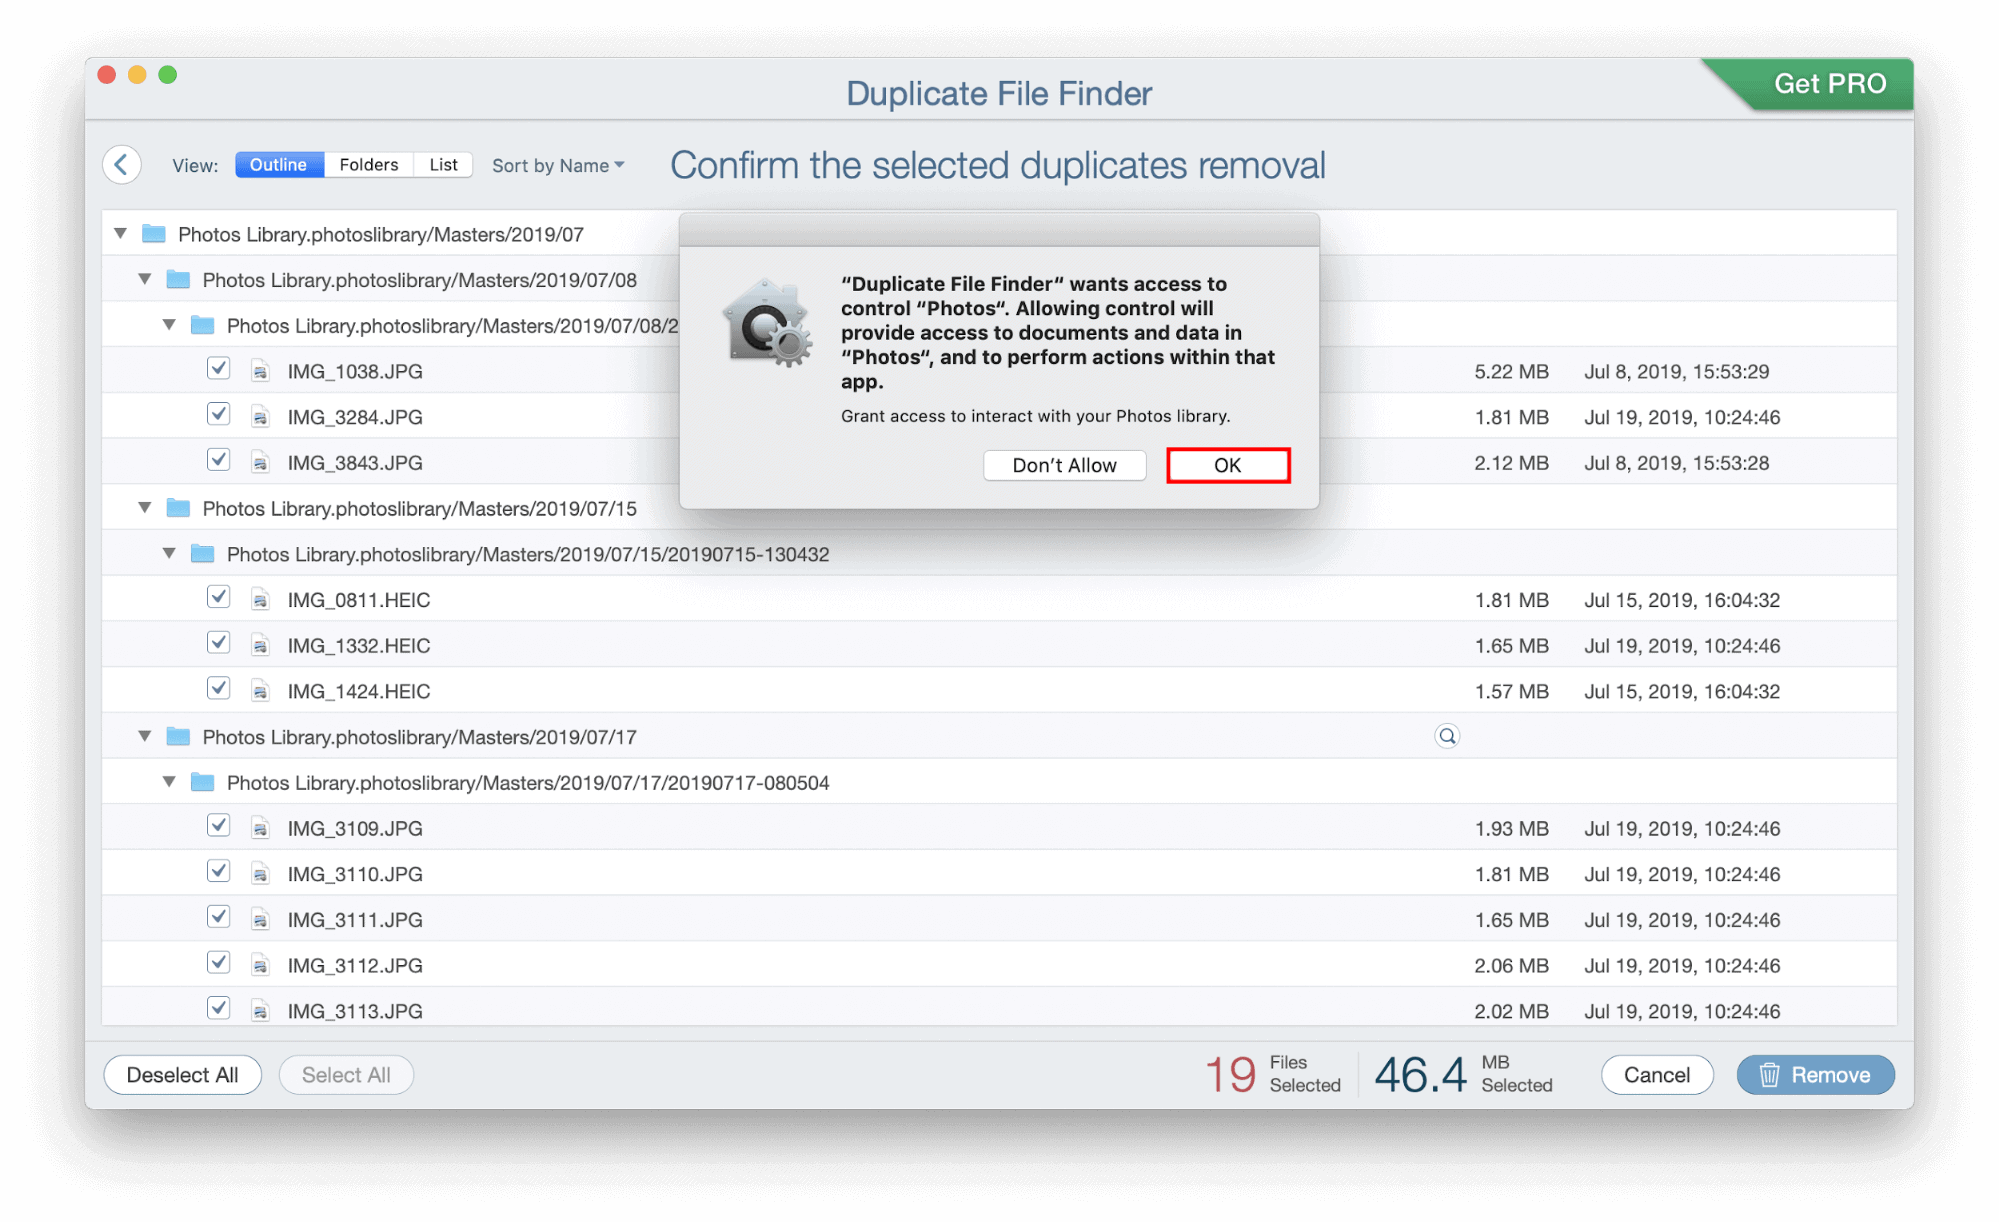
- Click on OK and that is it. your job of removing duplicate photos is done.
The Duplicate File Finder app helps you to remove unwanted duplicate photos and those will be saved in the Photos app. This Photos app will securely store your data and prevent them from accidental removal.
Now you have to delete the duplicate or unwanted photos from the Photos app which will be visible in the Finder.
- Launch the Finder window.
- Choose Applications and you can see the Photos app.
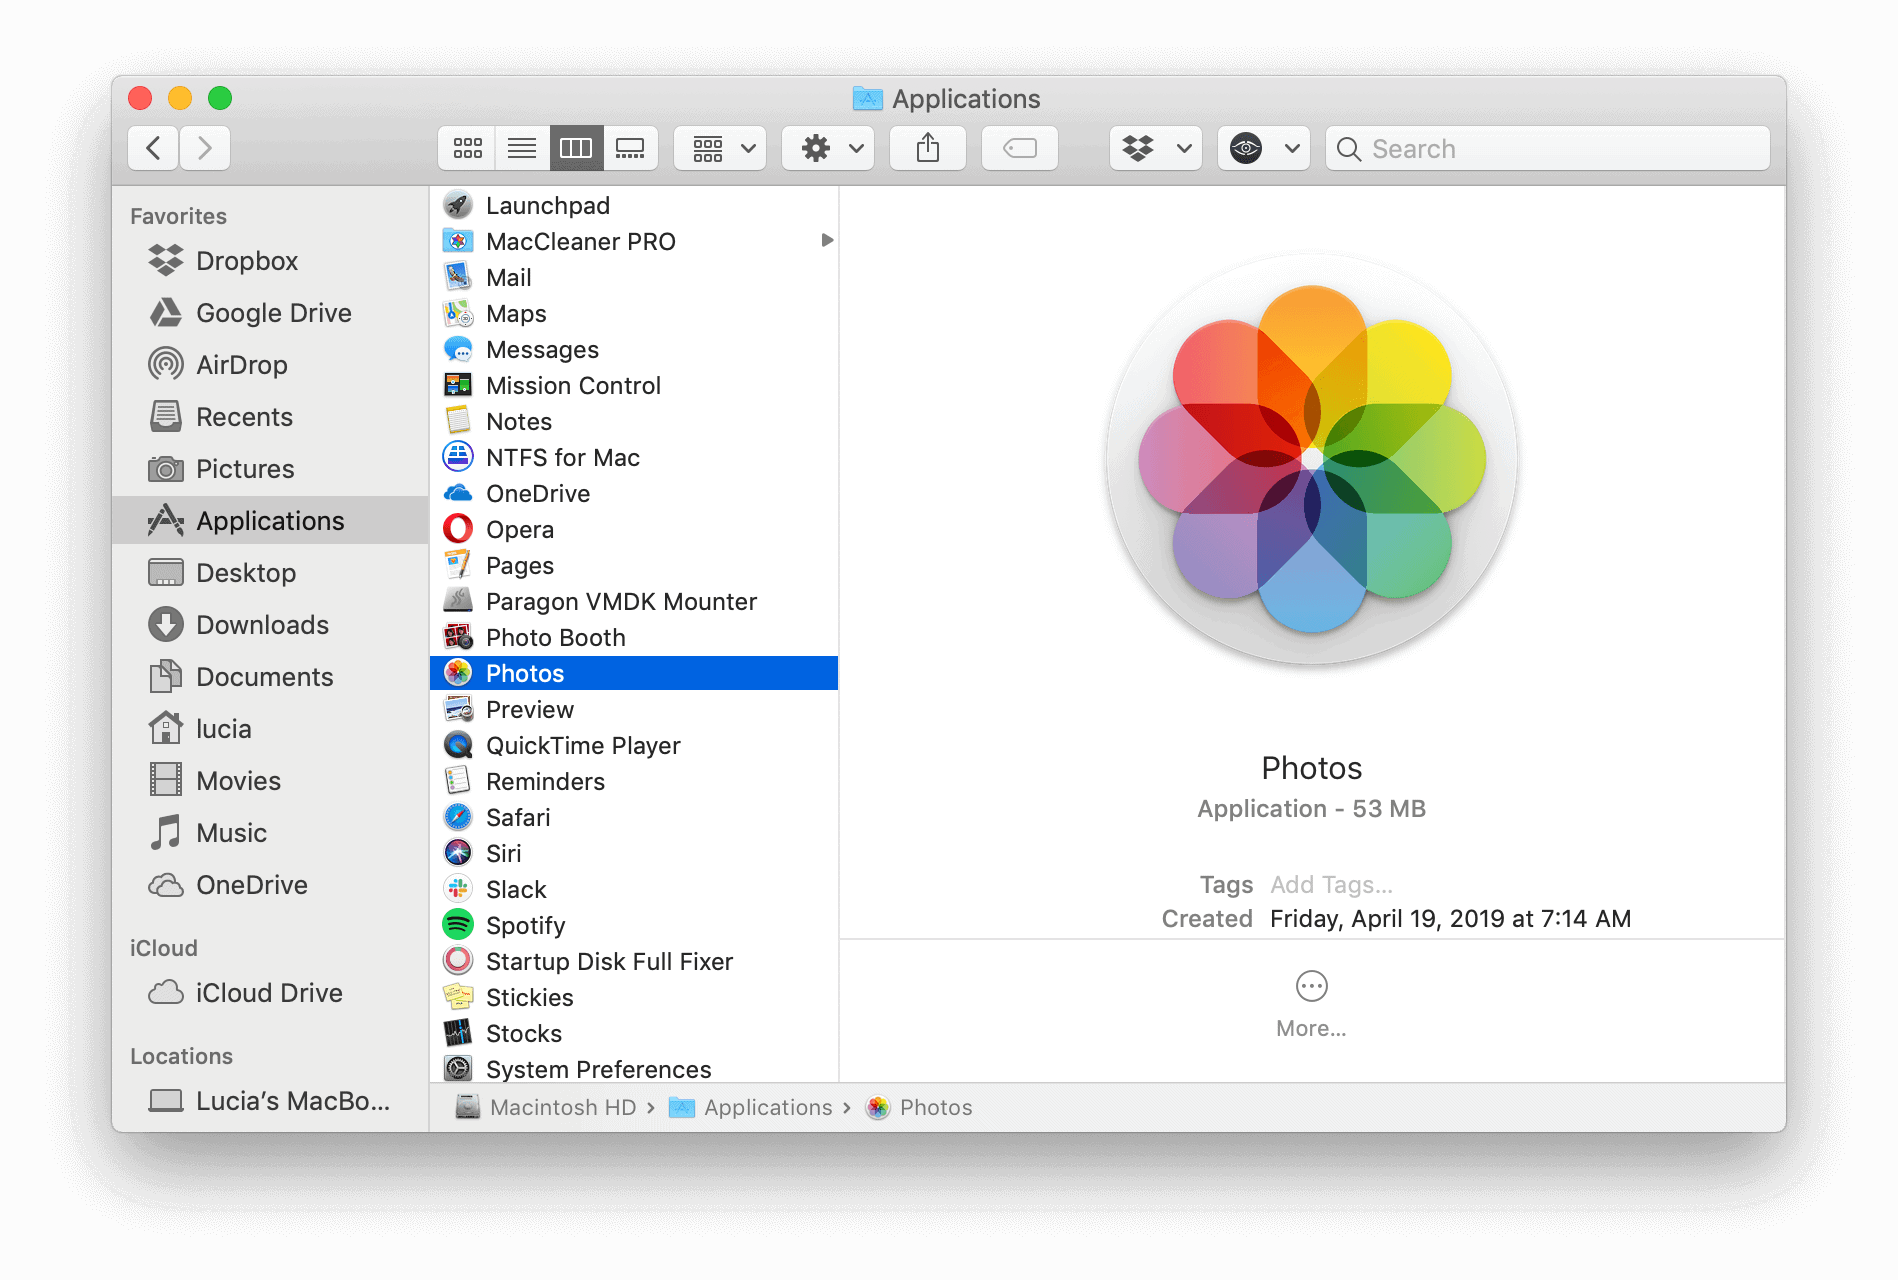
- Then you can see My Albums folder on the sidebar Menu.
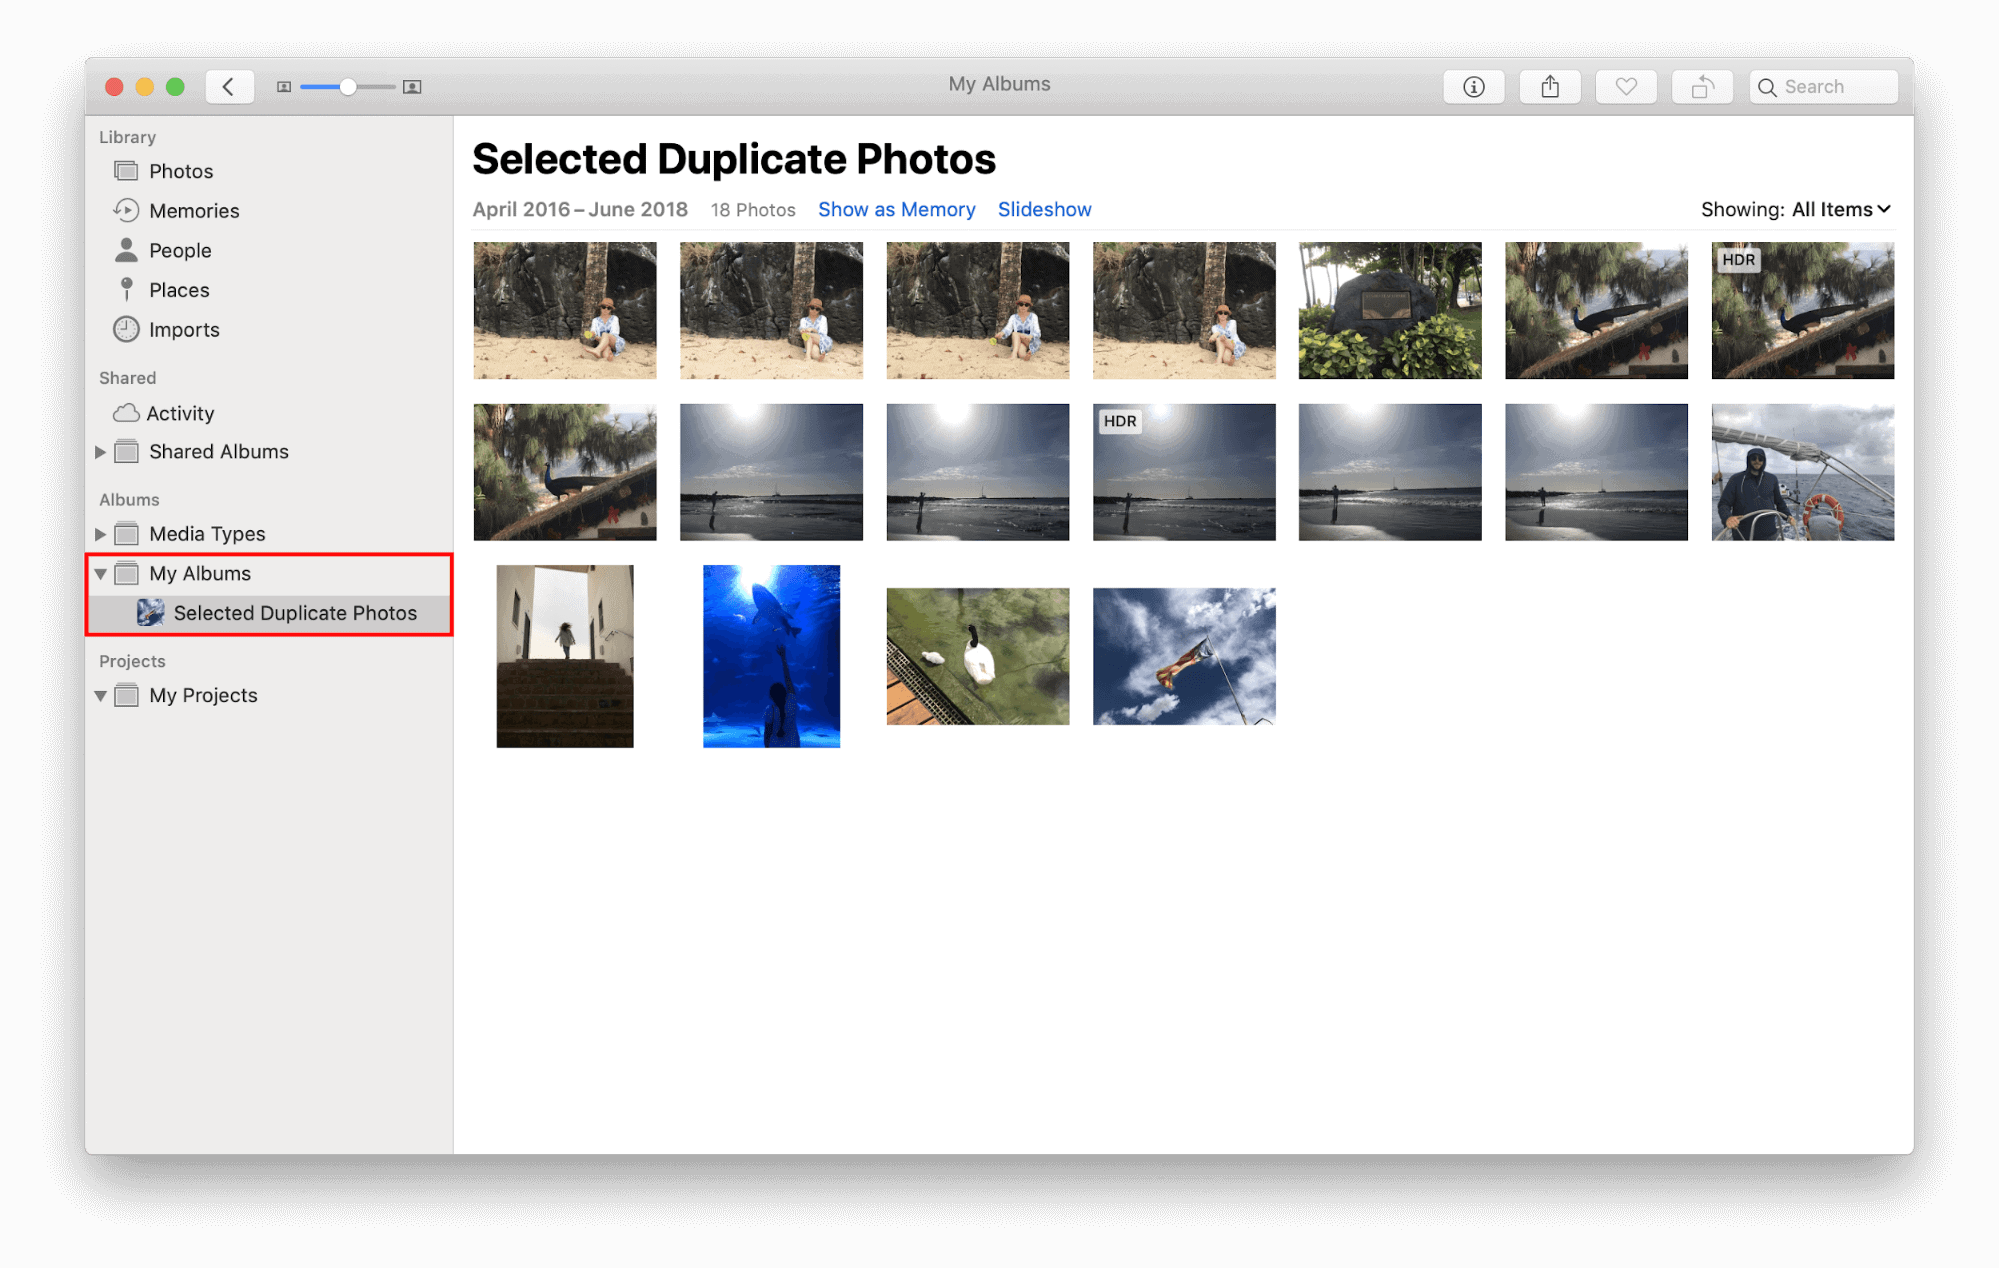
- Expand it and choose the option “Selected Duplicate Photos” album.
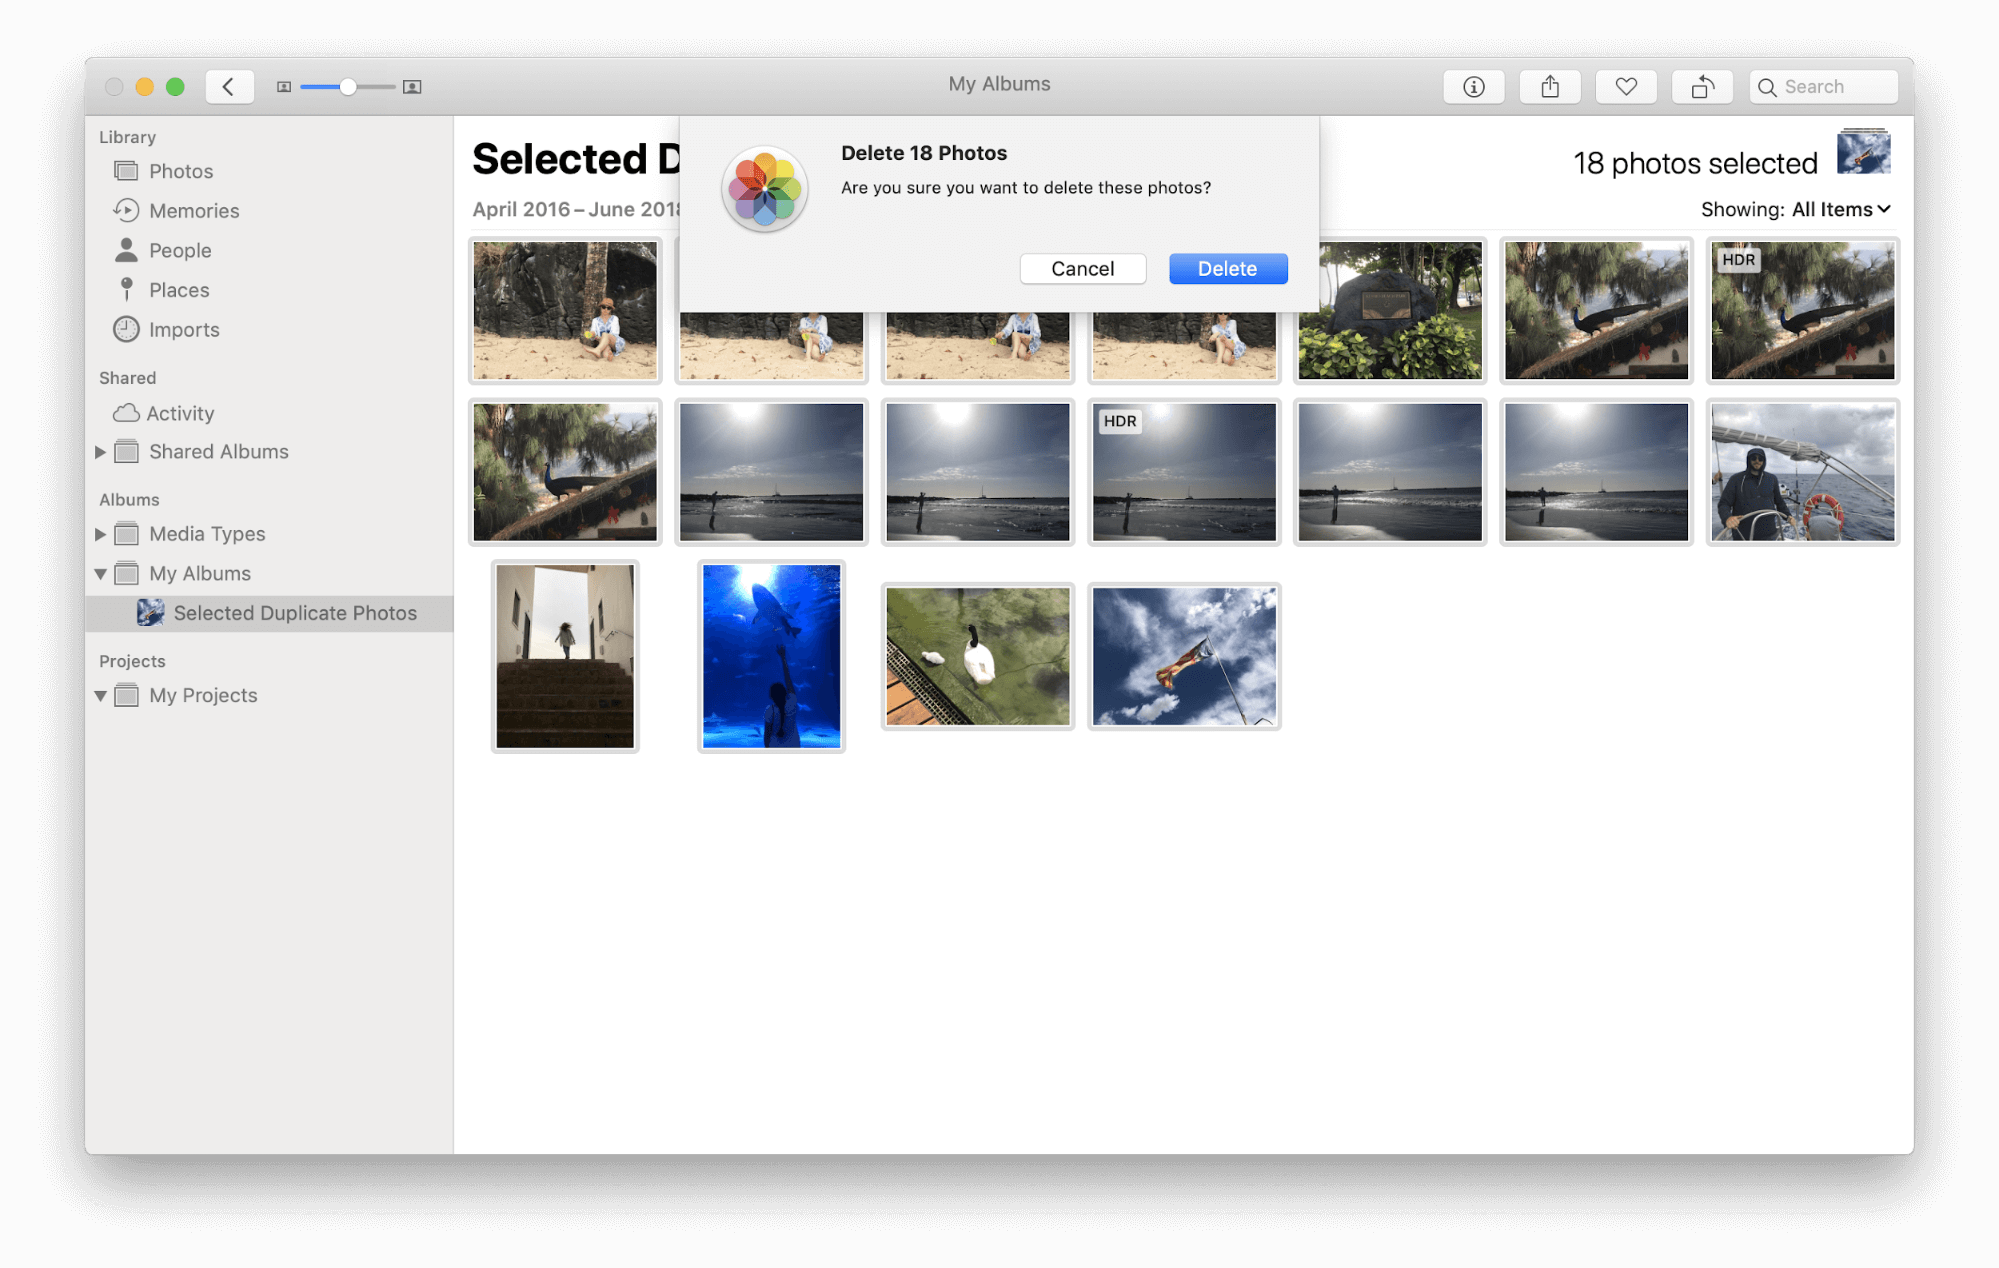
- Now choose the photos as you wish and right-click on the Mouse.
- You can see Delete Photos option which will delete the photos.
- Delete by clicking on the OK button on the alert message.
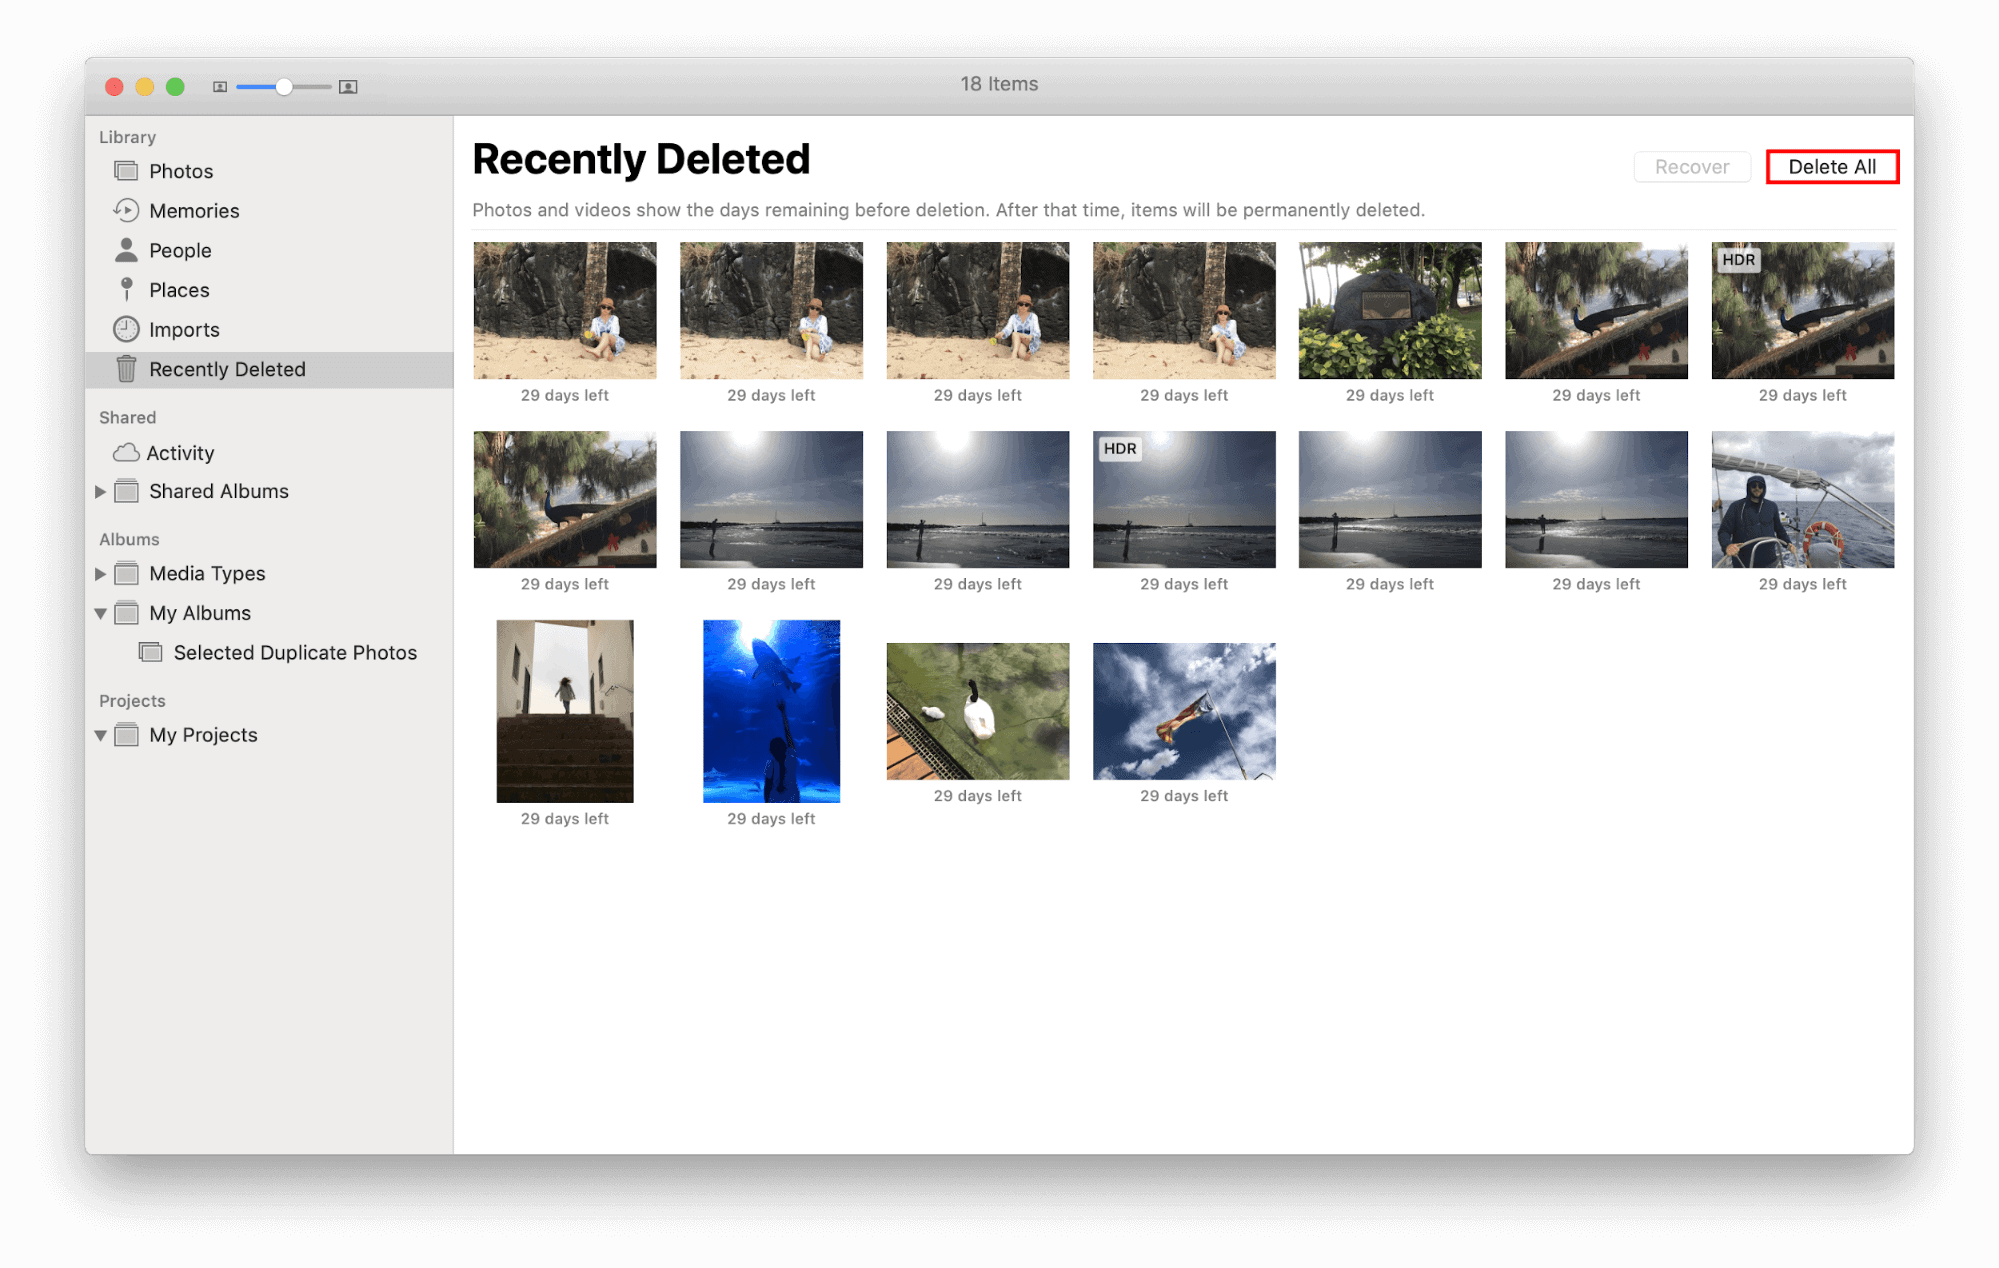
- The photos delete from here will be moved to the “Recently Deleted” folder which will be be removed within 30 days by default.
- If you wish to delete them at the same moment, then choose all images from the “Recently Deleted” folder and click on Delete All button to remove all of them.
Most of them do similar functionality and have the same features as scanning the files or photos from your hard drive and a list of duplicates will be presented before you along with the Original file.
Then it’s you to find the safe one to keep and delete the duplicate ones.
4) Using Gemini – The Duplicate Finder – Recommended
The most recommended and got good feedback is MacPaw Gemini: The Duplicate Finder.
Duplicate Finder is the safest to scan and find duplicate files in every corner of your Mac machine, including photos, pictures, and any other files. The smart scan and selection algorithms used in it will remove the duplicates with full accuracy and safety.
Removing or deleting the unused clutters and recovering the disk space are the specialties behind it.
Gigabytes of storage space will be freed up:
- Find duplicate photos
- Finds the duplicate folders also
- On external drives also it will find duplicates
- Removes duplicates on cloud storage also
- It will identify the duplicate photos from Photos Library also
- It will detect similar pictures
Saves you valuable time: - It will save your time by its auto-selection of duplicates
- You can set some rules also like detect the very older photos
No loss of important photos: - Even if any photo was deleted, then it can be recovered by a click
- Instead of deleting the copies, you can replace those with hard links to save much space. Much faster also in doing the process.
How to delete duplicate photos on Windows
In this section, we are going to show the different methods to identify and delete duplicate photos on your windows device.
Video Tutorial
We Provided this Article in the form of a Video Tutorial for our reader’s convenience. If you are interested in reading, you can skip the video for now and watch it after the completion of reading this article.
1. How to delete duplicate photos on Windows by using Duplicate Photo Cleaner?
Let us see how to delete duplicate photos on your Windows Device in a stepwise manner using a duplicate photo cleaner.
Total Time: 11 minutes
STEP-1: Visit the website and download the software
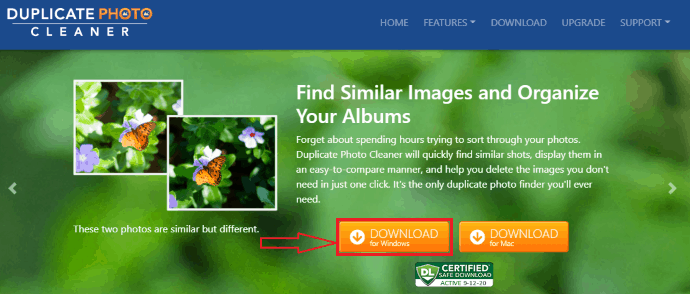
The first thing you need to do is download the duplicate photo cleaner software from the Internet.
Go to duplicate photo cleaner Official site. Then the options will show as shown in the above figure. You can see the software for Windows and Mac devices. We need to clean duplicate photos on Windows devices, so click on the “Download for Windows option”. Then the software will start downloading into your system.
STEP-2: Run the software and install it into your device
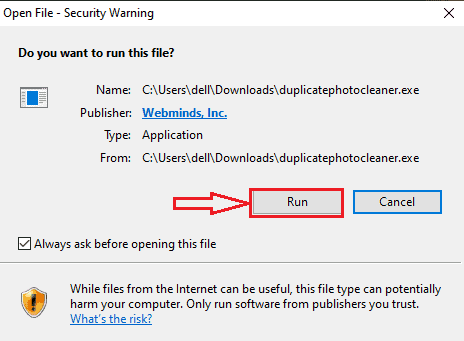
Once the software is downloaded into your device then click on that software file to open it. Then it shows a window that asks you to “Run this file on your device?”. Now click on the “Run” option as shown in the above image.
When you run the software on your device, then it asks you to install it on your device. So click on the install option.

With this step, You can successfully download the duplicate photo cleaner app to your Windows device for identifying, removing duplicate photos.
STEP-3: Set the file types and threshold value for recognizing duplicate photos
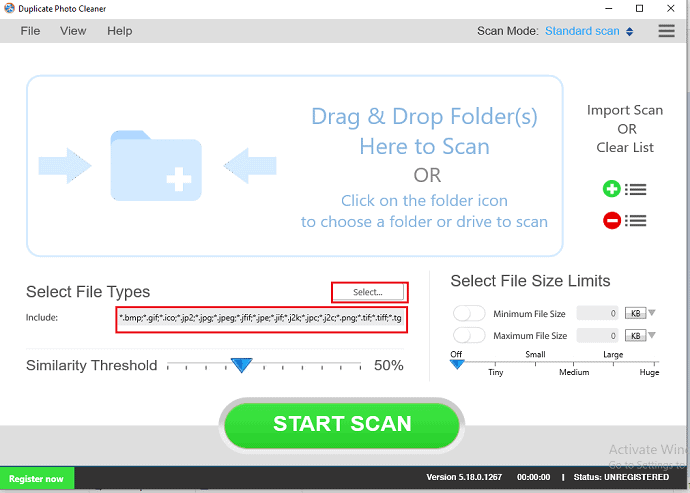
Once the software is successfully installed on your device then it opens its home screen as shown in the above figure. In that, you can see mainly two options for setting the prerequisites for identifying duplicates.
The first thing you need to do is select the file types that include “.bmp”, “.gif”, “.jpg”, “.jpeg”, etc.
And the second requirement is to set the similarity threshold. You need to set it for similar photos identification. Here you need to set it to at least 50% by moving the arrow on the scale to right and left directions for effective identification.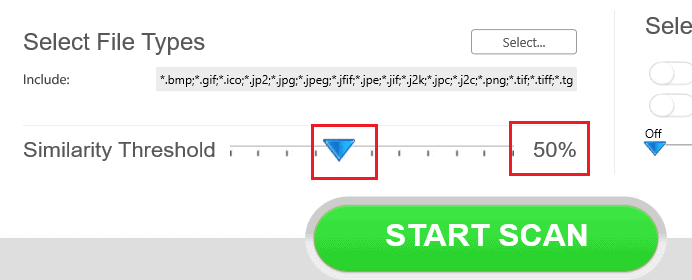
STEP-4: Select the folders to scan
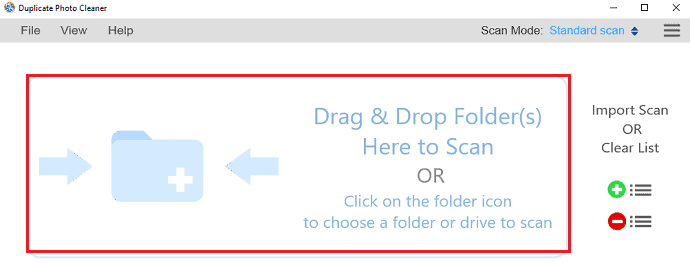
Once you set the pre-requisites for the identification of similar photos or duplicate photos, then you need to place the folder to scan for duplicate photos. Click on the place that I showed in the red color rectangular box. There you need to place the folders to scan.
Once you click on it, then it opens the storage of your device where all the photos are stored. 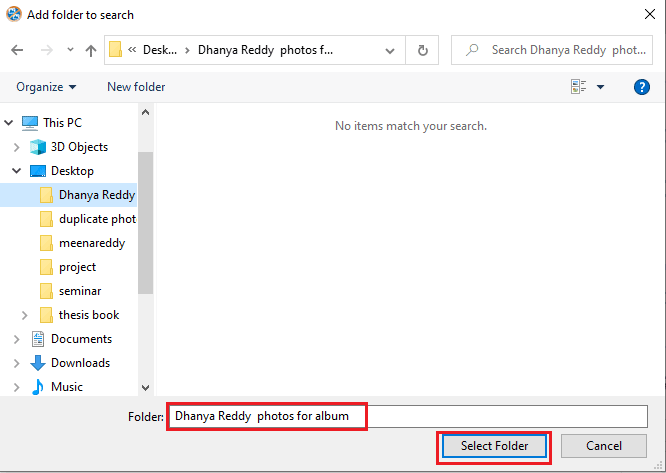
Select any folder from the available folders and then click on the “Select folder” option at the bottom of the screen. Once you select the folder, it will be added to the folders list which is to be scan.
STEP-5: Set Threshold and start scanning
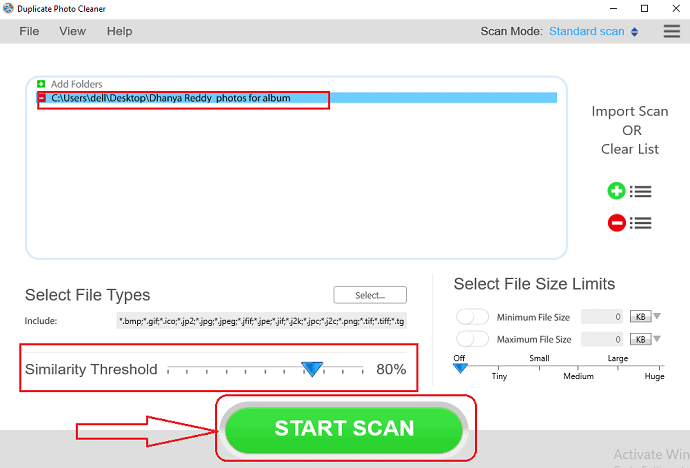
Here I am setting the similarity threshold to 80% instead of 50% for better duplicate photos identification. Once you set the similarity threshold as per your requirement then click on the “Start Scan” option at the bottom of the screen as shown in the above figure. This is the procedure to scan the duplicate photos and your Windows device.
STEP-6: Fix the duplicate and delete those
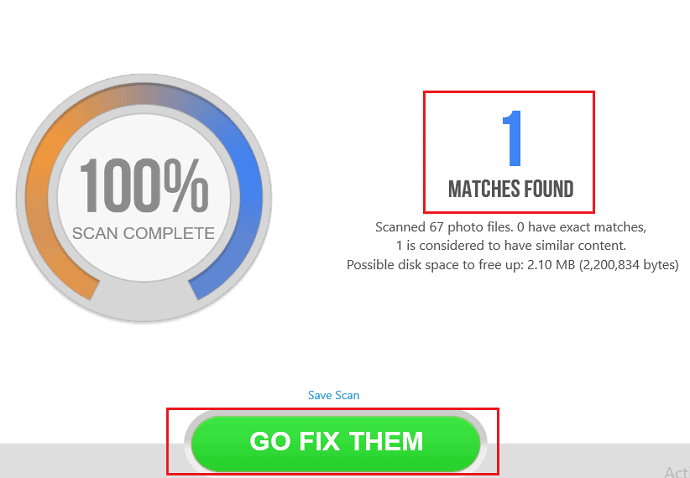
Once the scan is completed, then It will show the number of duplicate photos or similar photos that match as shown in the above image. Now click on the “Go fix them” option at the bottom of the screen.
Once you click on the go fix them the option, then the matches detected will be shown on the screen, keep the original safely and remove the duplicate photo by selecting it. When you select it you can see seven options at the bottom of the screen. Click on the delete option to delete that duplicate photo.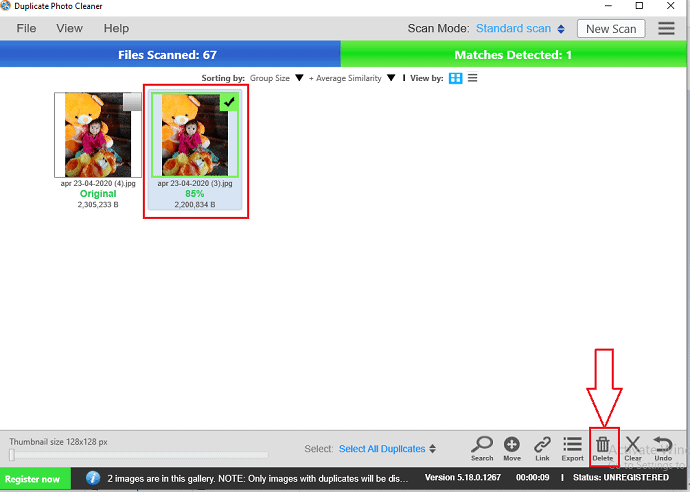
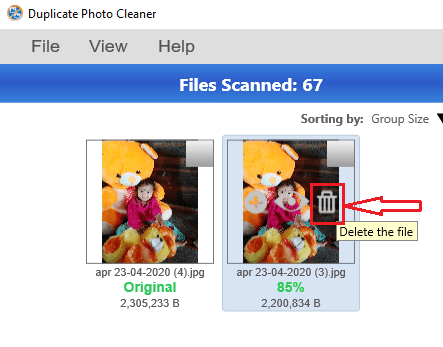
You can also delete the duplicate very easily by placing the cursor on the duplicate photo then it will show you three options, One is the plus symbol, the second is the eye symbol and the third is the bin symbol. When you place the cursor on the bin symbol it shows you the “delete the file” option as shown in the below image. So click on the Bin symbol to delete it in a fast way.

This is the procedure to identify and remove the duplicates photos by using the Duplicate Photo Cleaner app.
2. Remo Duplicate Photos Remover

Remo Duplicate Photo Remover is one more app that facilitates the process of identifying and deleting duplicate photos from your Windows device in an easy way.
Remo Duplicate Photos Remover will minimize the tedious efforts that you used for searching duplicates photos on your Windows so that a lot of space will be saved on your device for other purposes. It will find the photos that you are taken in the burst mode, resized or HDR photos, similar photos send by multiple contacts, groups via WhatsApp, Messenger, or any other instant messaging application.
When you click on the start search option then it will automatically find all the annoying duplicates that might be clogging the storage space, it will remove exact duplicates from your device. So that it can save GBs of space on your device.
Follow the steps below to delete duplicate photos by using Remo Duplicate Photos Remover:
- Launch the Remo Duplicate Photos Remover app on your device.
- After launching, click on “Select Location and Start Scan” option.
- Choose the locations from which you want to identify duplicates like Desktop, Pictures, etc. By default the software will search images for Exact match, in case you need to remove even the pics that are similar(Same photos sent by different people via WhatsApp, Messenger, etc, or downloaded, captured photos) then select the “Scan for Similar Photos” option and click on the “Start Scan” option.
- The software then starts scanning for the duplicate images in your device storage and displays them in different Sets
- Choose the Sets you want to remove or you can filter the ones you don’t need from the Sets and then click on the “Finish” option
- With this step, you have deleted and freed up your device memory using this Remo duplicate Photos Remover software.
3. How to remove duplicate photos by using the Duplicate Cleaner app?
Let us see how to delete duplicate photos by using the Duplicate Cleaner app stepwise.
STEP-1: Install and launch the Duplicate Cleaner

The first and foremost thing that you need to do is, install the duplicate cleaner app from the Microsoft store. To install click on the get option as shown in the above image.
Once the download is completed then you will see the launch option and wish list option as shown in the below image. Click on the launch option to launch the installed app on your Windows device.

STEP-2: Set the language for the app
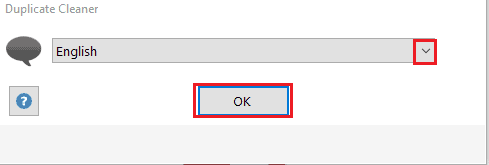
Now, it shows the language to be selected for your duplicate cleaner app. Select the language as your wish by clicking on the drop-down menu as shown in the image. Once the language is selected then click on the OK option at the bottom of the screen.
STEP-3: Set the prerequisites for duplicate identification
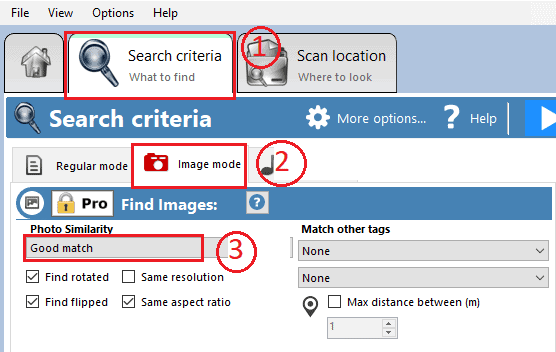
Now, the app is successfully installed and launched on your Windows device. Here you need to set the pre-requisites for identifying the duplicate photos or similar photos on your Windows device. To set the prerequisite click on the “Search criteria what to find” section on the screen.
When you click on it, you can see mainly three modes as shown in the image. Those are regular mode, image mode, and music mode. Here our requirement is to identify and delete the images so click on the “Image mode”.
Now you need to select the photo similarity for duplicate photos. Here I am selecting a good match from the drop-down menu. These are the three steps that you need to set for identifying duplicates on your windows by using a duplicate cleaner app.
STEP-4: Select a folder to be scan for duplicate photos
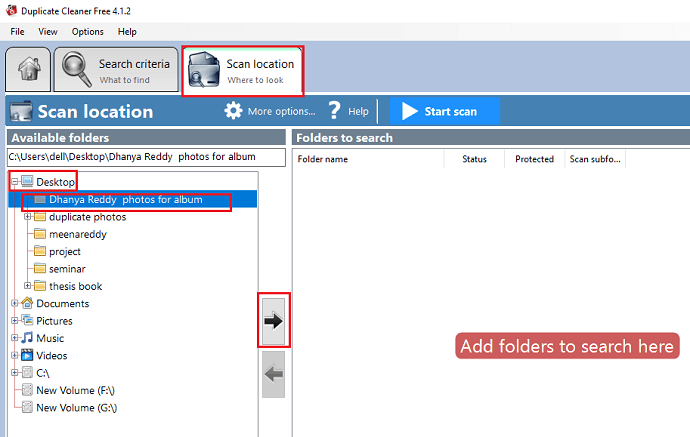
Once the search criteria are set then you need to drag and place a folder to scan.
To add folders to scan, click on the “scan location where to look” section. In that, you can see available folders in different places like desktops, documents, pictures, music Etc. Here I am selecting a folder from the desktop. Select the folder and then click on the Arrow symbol, which is directed towards the left side of the screen as shown in the above image.
STEP-5: Start scan for identifying duplicates in your folder
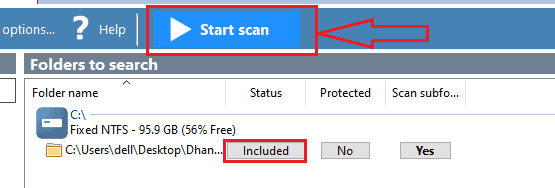
When you click on the Arrow symbol, then the folder will be added to the search list. The screen will show the folder which is added to the scan list as shown in the image. You can see the three options for your folder along with the name here. The status is shown as included, now click on the “Start Scan” option at the top of the screen as shown with the help of an arrow symbol in the above image.
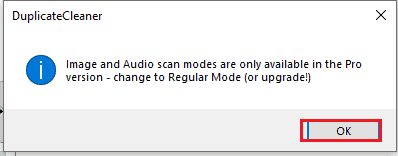
Up to now, I have only a free version. So only regular mode can be supported but for our requirement of deleting duplicate photos, we need to upgrade it to the pro version. So buy the pro version by clicking on the ok option at the bottom of the dialogue box.
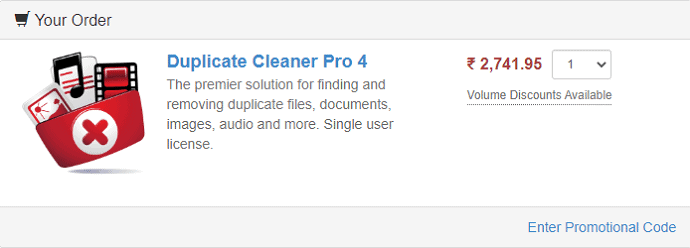
You can see the duplicate cleaner Pro 4 available at the cost of ₹2741.95. There will be some discounts available based on volume. Once you purchase the pro version of the duplicate cleaner app, then you can successfully identify and delete the duplicate images and music duplicates also.
These are the steps to be followed to delete duplicates photos on your Windows device by using the Duplicate Cleaner Pro app.
Up to now, we have discussed two methods of identifying, deleting duplicate photos from the Windows device. There are some other methods also available for that purpose. One such method is Awesome Duplicate Photo Finder.
4. Awesome Duplicate photo finder
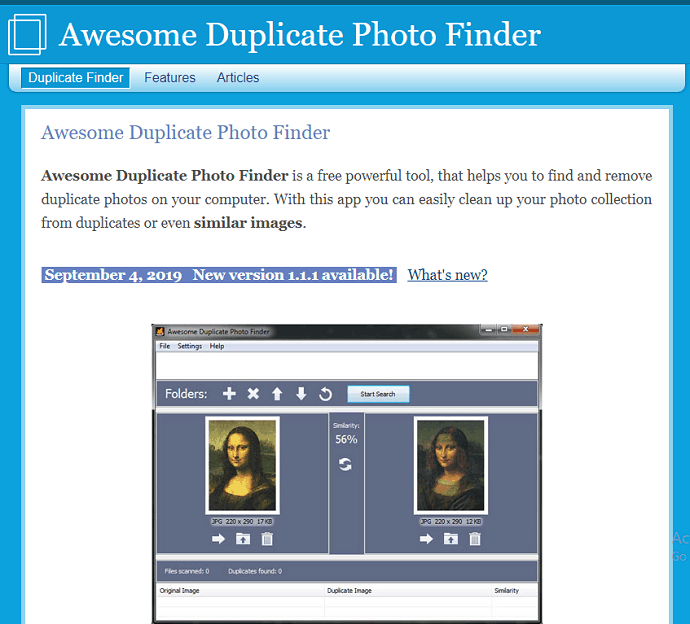
Awesome Duplicate Photo Finder is one of the best duplicate photos finders for Windows Device. We have seen the procedure for identifying duplicate photos in the two previous methods, so the process is almost the same for all kinds of software. So here I am not going to highlighting the total step-wise process once again. Here I will list the pros and cons of this software.
Once you install the software into your Windows device, just place the folder in which you want to scan for duplicate photos and then click on the Start Search option. Then the photos will start the scan and the result list will be shown at the bottom of the interface. Then you check each and every photo in that list by preview option, then you can have a decision aspect on which need to delete and which you need to keep. You can also replace the duplicate from one folder to another folder.
Pros:
- Fast scanning will perform.
- Most easy to use than other kinds of software.
- Options to either delete or keep or move the duplicates.
- Shows the degree of similarity for the same photos.
- It supports all major image types such as JPG, BMP, GIF, PNG, TIFF, etc.
- Simple user interface.
- supports adding of multiple folders or drives for scanning, there is no limitation for the number of files.
- It will work well with network drives and removable devices (USB flash drives etc.)
- Completely free software for identifying and deleting the duplicate photos.
- Option to check for program updates automatically.
- Option to turn off the annoying confirmation of deleting files.
- Available in Both Installable and Portable Versions.
- Support for CR2 – Canon RAW files.
- Acceleration of displaying large pictures by reducing the resolution.
Cons:
- No advanced configuration options
- Fails if the threshold value false below 50%
- The help menu is not included in this software
- No multiple file selection options
- It does not show the location of the file
5. Duplicate Files Fixer
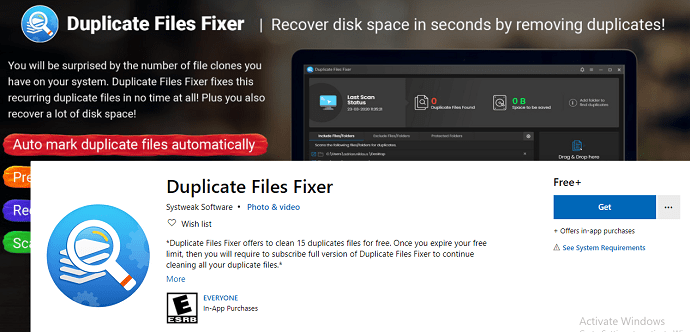
Duplicate Files Fixer will identify and remove the duplicate files present in your Windows computer. It will recover the space by deleting all the duplicates or similar files found on the system. It uses the simplest method of scanning the system or specified folders for all.
Features:
- Exact Duplicate identification: This software will show all the exact duplicates found in the result of files scanning
- It will add files or folders easily in the software tool with the drag and drop feature.
- Auto Mark: It will automatically mark all the duplicates, leaving the original file as the same
- Similar files: Exact duplicates files or photos along with the similar files are selected for removing from the Windows device.
- Unmark All: Remove all the marked duplicates on the files at once with the unmarked button
Up to now, we have discussed the methods of identifying and deleting duplicate photos on the Windows device.
How to Find And Delete Duplicate Photos on iPhone
Existing duplicate photos will also cause a shortage of storage. There are many software apps in AppStore which you can download on your iPhone and remove duplicate photos from your iPhone. In this section, I am going to show you 2 ways to Find and Delete duplicate photos on iPhone.
Now let us see how to find and Delete duplicate photos on iPhone using Scanguard and Power clean apps which are free apps.
1. Find & delete duplicate photos Using Scanguard App
Scanguard is basically an antivirus product that provides you tune-up features also. But it is free for iOS. It will not give you an antivirus feature for iOS. It gives you a duplicate photos removal option and battery monitor option for iOS.
It is a completely free app. It will not show ads.
STEP-1: The first and foremost thing that you need to do is Download the Scanguard app from your iPhone’s AppStore.
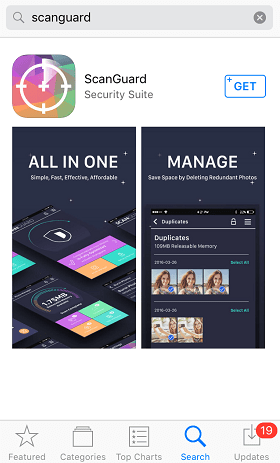
STEP-2: Once the download is completed, Install it on your iPhone and Open it.
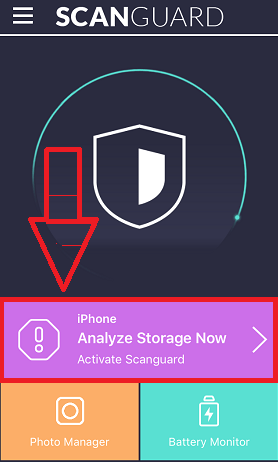
STEP-3: Now you will see different options. Go to Analyze Storage Now and it will automatically start analyzing your stored photos.
STEP-4: After few seconds of analyzing you will see some recommended deletable photos by Scan Guard and also the usage of delectable photos. Here you can check different options.
- Burst Photos
- Screenshots
- Filtered Photos
- Duplicate Photos
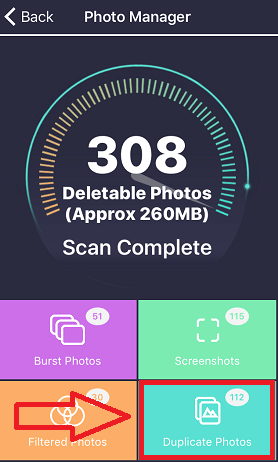
After selecting the individual section above you can easily delete the duplicate photos.
- Related: How to Erase an iPhone to permanently delete files
- How to recover delete files from iPhone with or without backup
2. Find & delete duplicate photos Using Power Clean App
Power Clean is a powerful cleaner app that can detect duplicate photos and even large videos. It will also monitor your data usage, tests your internet speed, cleans junk files, and boost your iPhone speed.
It is a free app with ads. Ads free version cost you only $0.9.
STEP-1: You need to Download Power Clean from the App store.
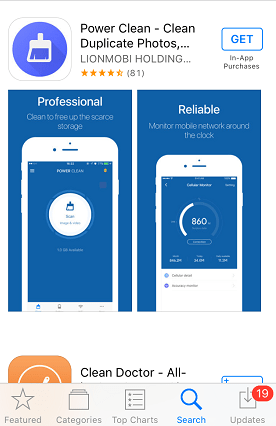
STEP-2: Once the download is completed, you need to install it on your device (iPhone). To install simply click on the “open” option after installation.
STEP-3: Here you can see your total storage and below these three icons you want to select (here we selected images).

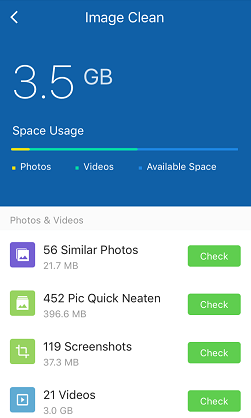
STEP-4: After the process of few seconds it will display different photo categories like Similar Photos, Screenshots, Selfies, Panorama, Burst Mode, and much more.
STEP-5: Go to the individual section and delete the photos which are quite similar to one another.
How to delete duplicate photos on Android
Want to delete duplicate photos on Android? There are so many apps available for removing duplicate photos on your android phone. Let us see some of them.
Video Tutorial
We Provided this article in the form of a video Tutorial for our reader’s convenience. If you are interested in reading, you can skip the video for now and watch it after the completion of reading this article.
1. How to delete duplicate photos on Android by using the Duplicate Photo Remover app?
STEP-1: Install the Duplicate Photo Remover app from Google Play Store

Duplicate photo remover app is an Android app that is available freely in the Google Play Store. The first and foremost thing that you need to do is install the duplicate photo remover app from the Google Play Store and launch it on your Android phone.
STEP-2: Give permissions to the app
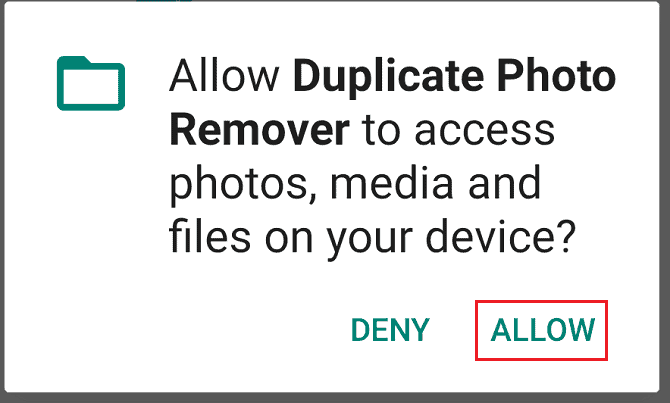
Once you install and launch the duplicate photo remover app on your Android phone, then it will ask you to give permissions to access media, other files of your Android storage. Click on the allow option, which is placed at the bottom of the screen to give permissions to the app as shown in the above image.
STEP-3: Click on the Scan duplicate photos option
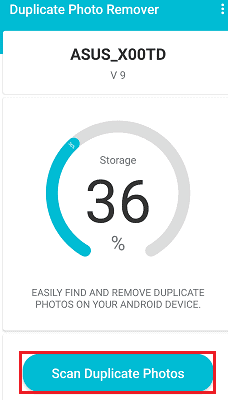
Once you give permissions to the app, then it shows how much percentage of your Android storage is filled up with media files and other files.
At the bottom of the screen, you can see the option to scan duplicate photos. Click on that option. Once you click on the scan duplicate photos option then the scanning process will start, wait for a while until scanning is completed.
STEP-4: Click on the show duplicate photos option
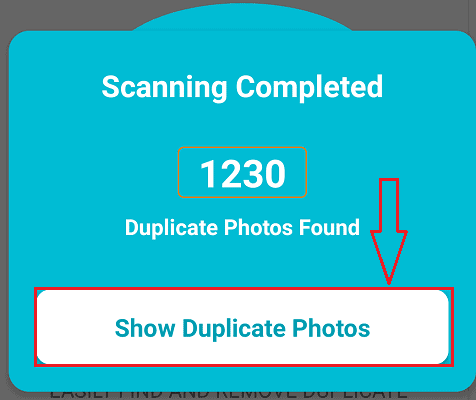
Once the scanning process is completed, then it shows the number of duplicate photos and your Android storage. You can see the “Show duplicate photos” option at the bottom of the dialogue box as shown in the image. Click on the Show duplicate photos option.
STEP-5: Select duplicate photos, which you want to delete
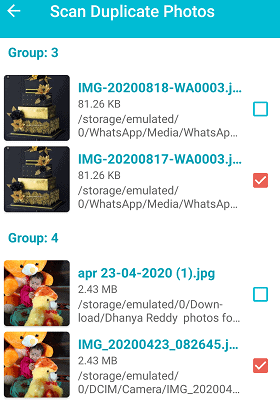
When you click on the show duplicate photos option, then the scanned duplicate photos will be shown in groups. You can select the duplicate photos, which you want to keep in storage, which you want to delete from your android phone.
STEP-6: Click on the delete now option
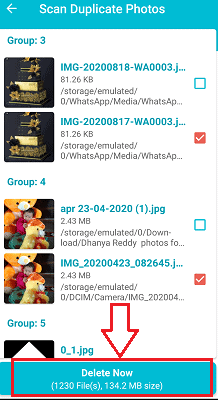
Once you select the photos, which you want to delete then you can see the option “Delete now” at the bottom of the screen. Click on that option as shown in the above image.
This is the stepwise procedure to delete duplicate photos on your android phones using the Duplicate Photos Remover app.
2. How to delete duplicates photos by using the Remo Duplicate Photos Remover app?
Remo Duplicate Photos Remover is an excellent app that easily identifies the duplicates photos on your Android and deletes those detected duplicates effectively. Let’s see what are the steps to be followed to delete duplicate photos using this app.
STEP-1: Install the Remo Duplicate Photos Remover app

The first thing you need to do is, install the Remo Duplicate Photos Remover app from the Google Play Store. It is a free Android app so you don’t need to pay any money for installing this app.
STEP-2: Launch the app and give permissions
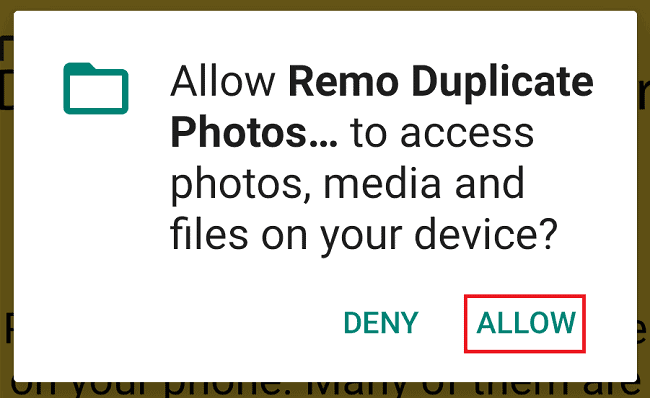
Once the installation is completed, click on it to launch on your android. When you launch it asks you to give permission to access your media files and other files of your Android. Click on the “Allow” option as shown in the above image.
STEP-3: Click on the Scan option and then OK
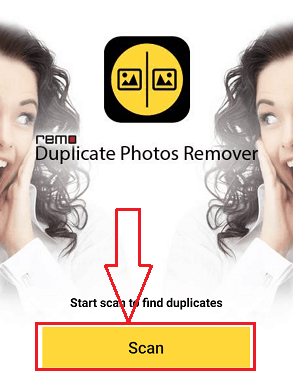
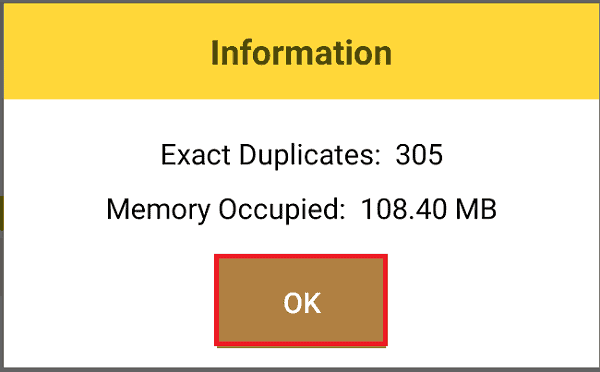
When you give access to the app, it shows a screen with a start scan option. Click on that Start Scan option to start the duplicate photos scanning process. Wait for a while until the scanning is completed.
When the scanning is completed, it shows the information regarding the number of duplicates along with the size that they occupied in your Android phone storage. Check that information and then click on the OK option.
STEP-4: Look into the instructions that the app shows for duplicates photos
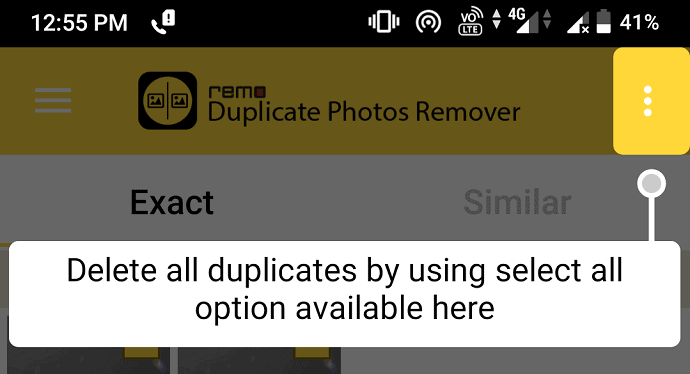
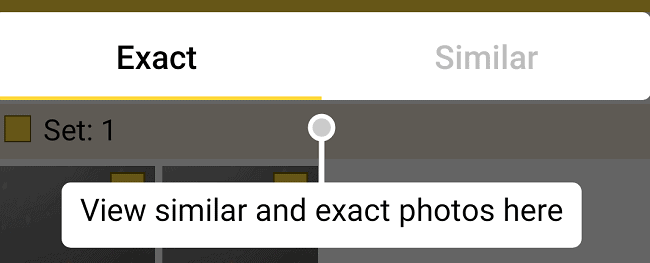
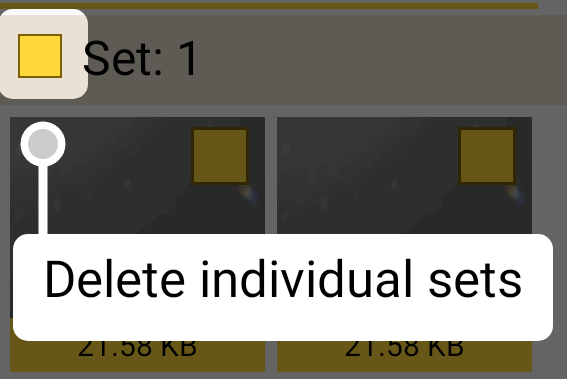
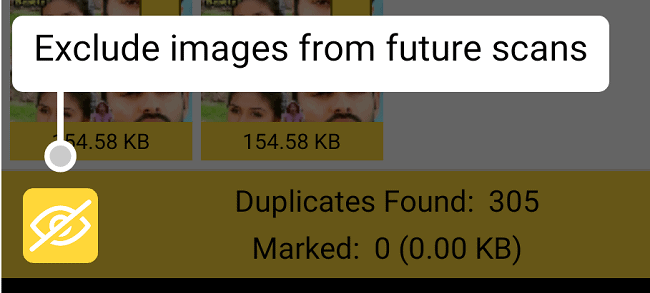
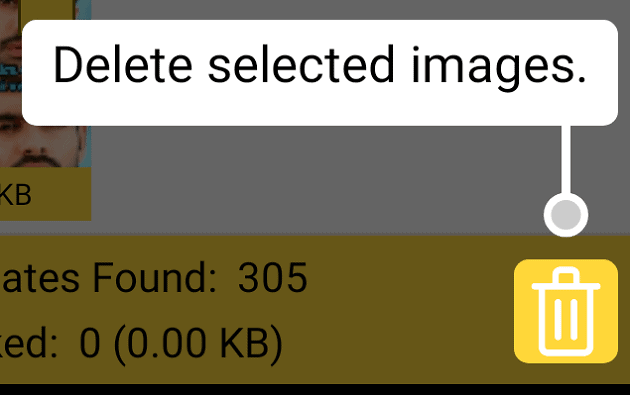
When all the duplicates photos are found then it shows some of the instructions that you can use for duplicate photos. Read and follow those for effective duplicate photos deleting as shown in the images.
STEP-5: Decide which you want to keep and then click on the Delete option
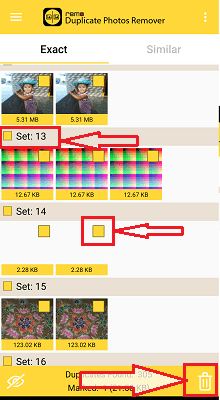
This Remo Duplicate Photos Remover app will show the duplicates in sets. You can select the duplicates in sets and then delete those.
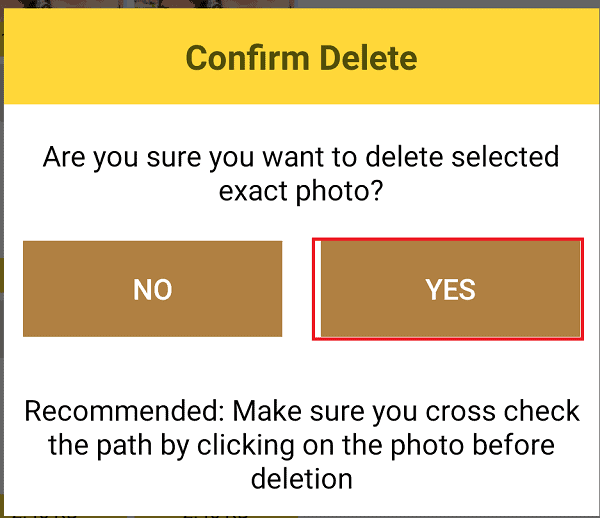
When you click on the “delete” option ( bin symbol), it asks you confirmation that “Are you sure want to delete the selected exact photo?”. Click on the “Yes” option at the bottom of the screen.
Finally, the Results dialogue box will be shown with the number of exact duplicates cleaned and space regained as shown in the below image.

This is the stepwise procedure to delete duplicate photos on your android phones using the Remo Duplicate Photos Remover app.
3. How to delete duplicates photos by using the Duplicate Files Fixer app?
Duplicate Files Fixer is an app that easily identifies and deletes duplicate photos on your Android phone. Let us see what are the steps to be followed to delete duplicates using this Duplicate Files Fixer app.
STEP-1: Install and launch the Duplicate Files Fixer app
First of all, you need to install the Duplicate Files Fixer app from the Google Play Store. It’s a free app so don’t need to bother about the money for installing it.
STEP-2: Give permission to access media files
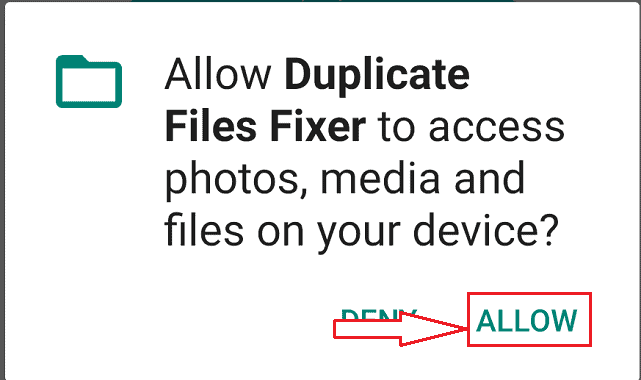
When you launch the app, it asks permission to access media and other files of your Android. Click on the “Allow” option as shown in the above image.
STEP-3: Click on the “Scan Pictures” option and then the “Scan Now” option
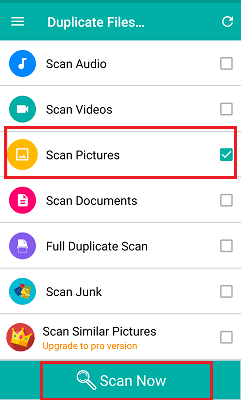
When the app is launched on your phone, then it shows what duplicate files that you want to delete using this app. Our requirement is to delete duplicate photos so select the “Scan Pictures” option.
After selecting the files, click on the “Scan Now” option.
STEP-4: Delete the duplicate photos
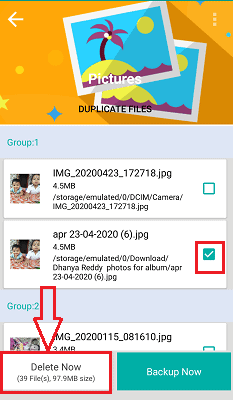
When the scanning process is completed, it shows the duplicates pictures in groups. Now click on the “Delete Now” option which is placed at the bottom of the screen. When you click on the delete option, it asks you confirmation about your decision of deleting duplicate pictures. Click on the “OK” option.

With this step, the duplicate photos on your android phone have been deleted successfully.
This is the step-wise procedure to delete the duplicate photos on your Android phone using the Duplicate Files Fixer app.
4. How to delete Duplicate Photos using the Duplicate Photos Remover – Recover storage space app?
Duplicate Photos Remover – Recover storage space app is also another method that will remove duplicate photos and then saves your Android storage. Let us see how to remove duplicates using this app.
STEP-1: Install the Duplicate Photos Remover – Recover storage space app

The first thing you need to do is install the Duplicate Photos Remover-Recover Storage Space app from the Google Play Store. It is a free Android app so you don’t need to pay any money for installing it.
STEP-2: Launch the app and give permissions
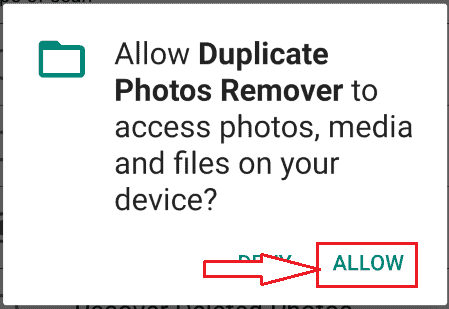
After the successful installation of the Duplicate remover app, you need to launch it on your Android phone by clicking on it. When you launch the app it asks permission to access your photos media and other files of your device. Click on the “allow” option that is placed on the bottom of the screen.
STEP-3: Select the option to scan
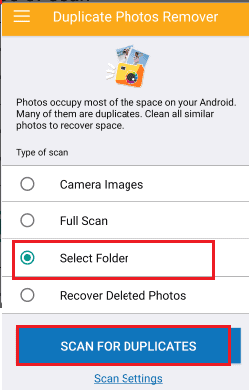
When you give access to the app, then it shows the screen as shown in the above image, there you can see the type of scan is of four types those are camera images, full scan, select folder, and recover deleted photos. Here our requirement is to scan images in a particular folder so click on the “Select folder” and then click on the “Scan For Duplicates” option.
STEP-4: Select the folder path, which you need to scan for duplicates
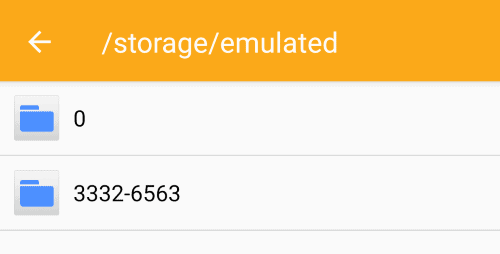
Select any folder from your Android storage then the scanning process will start automatically.
After the scanning, the duplicate photos will be shown in groups. You can view the file information by clicking on it, then the preview will be open. After checking click on the “Bin” symbol ( Delete ) option as shown in the image.
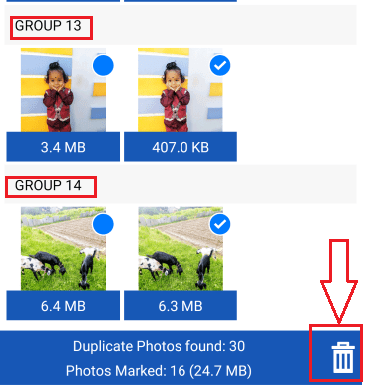
This is the method of deleting duplicate photos on your android by using the Duplicate Photo Remover- recover Storage Space app.
I hope you like my tutorial about methods to delete duplicate photos. If you Like it!! then please Share it. If you want to add anything to it, please let us know through the comments section.
Want regular updates, follow WhatVwant on Facebook, Twitter, and YouTube.
How To Delete Duplicate Photos on Mac, Windows, iPhone & Android – FAQs
Why did my pictures duplicate?
The Biggest reason why you have unwanted things on your phone is the replication of photos. When not cleaned often, it accumulates in the phone, which makes it run slowly.
Does iCloud recognize duplicate photos?
If you have multiple devices trying to sync the same picture, iCloud will recognize it as a duplicate.
Is there a free Duplicate Photo Finder?
VisiPics is a free and easy-to-use duplicate photo-finding software. It can identify duplicate images easily.
Is CleanMyMac bad for my Mac?
CleanMyMac is safe to download, install, and use. It’s a product built by a well-known Ukrainian company.
