
Do you want to Create a Group on Facebook? Don’t know how to create a group on Facebook? When you want to send bulk posts or messages to many people with a single click, you need to create a group. This tutorial will give you steps to create a group on Facebook. If you want to start a group on Facebook, you must have a Facebook account. Don’t have one, Create a Facebook account now.
The Groups are meant to be created to share the posts, messages, pictures and videos in a closure circle. It will be time-consuming to send the same post or message to individuals separately. So if the Group is created and members are added to the specific group, then with a single click the post can be sent to all members of the group. Ideas can be shared, important messages can be posted, and moreover, security will be created for the group that only particular members of the group can view the posts.
How to Create a group on Facebook?
1. Login into Facebook. On the Facebook homepage, check the left side menu to find the Create section. Usually, you will find it at the bottom of the left menu.
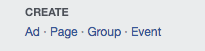
2. Click on ‘Group’ under the CREATE section.
3. Click on the ‘Create New Group’ option to create the new group. Along with the new group creation, you can see the groups already created. Suggested groups will be displayed for you and you can join if you wish.

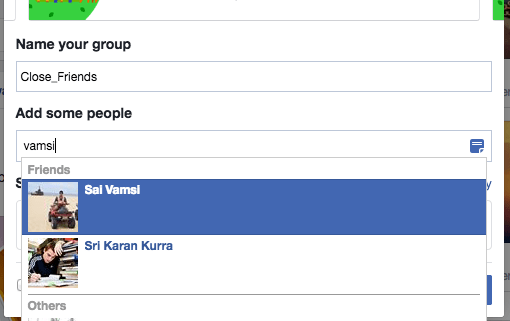
4. Enter the best name for your Group that will be suitable for the members and the topic you discuss. It can be changed later also at any time.
5. Now you should add members to the group created.
6. Next thing is you should set Privacy settings for your group. This is the most important step as it decides the privacy of the group and members in it. The chat messages, photos, and videos shared in the group can be viewed by the privacy settings that are set for the group.
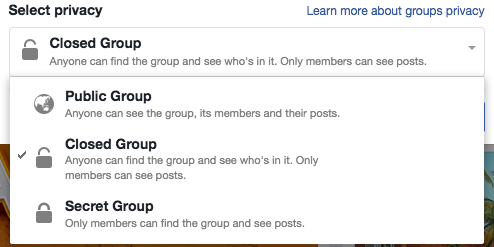
You will see three options.
Open: Anyone can see the group, who is there in it and the messages posted
Closed: Anyone can see the group, who is there in it and only members in the specific group can see the posts.
Secret: Only members of the specific group can see who is there in it and the posts.
7. Once the name is entered, privacy settings are chosen, then click on the ‘Create’ button to create the group and the group will be created successfully.
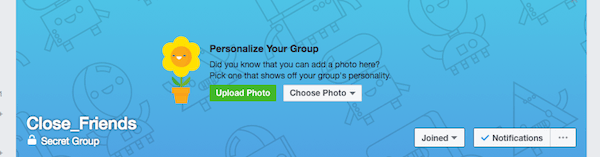
8. The icon can be chosen that will best suit your group from a variety of icons available on Facebook.
9. You can even add some description of the group, like why this group is created and its perspective, etc. In the About section, the description can be added.
10. The Group Image also can be set to your group.
11. The settings can be changed at any time by selecting ‘Edit Group Settings’ option.
Finally below are the items that can be changed/updated through Edit Group Settings option.
- Change your Description
- Change Posting Permissions
- Group Icon
- Group Name
- Membership Approval
- Privacy Settings
- Post Approval
- Set a Group Address
- You May Like: How to send large files through Gmail using Google Drive
- How to Create Contact Group in Gmail to Send Bulk Emails to Mailing List
- How to get Gmail notification on Desktop
I hope you got the solution on How to Create a Group on Facebook and why it is important to do this. If you feel good, please share it and follow us on social media please like us on Facebook or Twitter. Subscribe to whatVwant channel on YouTube for regular updates.
Video Tutorial:
We provided this article in the video format for our reader’s convenience. If you are interested to read, then you can skip the video and start reading.