
Go through this article to know how to use Zoom to schedule, start, join, edit, and control a Zoom Meeting on any of your devices like Windows, Mac, iOS, and Android.
Do you want a free, easy, and world’s leading video and audio conferencing tool to conduct online meetings, classes, or training? Then Zoom video and audio conferencing software is the ultimate option for you.
And this article is a dedicated article for Zoom users like you. Further, if you thoroughly follow this article, you can learn, how to use Zoom to conduct online meetings, in less than five minutes.
What is Zoom?
Zoom is a free, easy to use, and world’s leading video and audio conferencing platform designed exclusively for conducting online meetings, training, webinars, classes to students, teachers, employees, industrialists, customers, doctors, patients, and everyone.
Further, it is also a reliable cloud platform for video and audio conferencing that operates effectively across mobile devices, desktops, telephones, and room systems.
Zoom is an American remote conferencing services company, founded in the year 2011, has headquarters in San Jose, California, United States.
- Related: What is Zoom? The Complete details
Why should I use Zoom?
Ultimate Video And Audio Conferencing Platform Needed For Any Type of Organization:
Zoom is a great video and audio conferencing platform required for any type of organization to conduct online meetings, learning classes, training classes, webinars, and more.
Zoom Free Account Permits Unlimited 40-minutes Meetings For Up To 100 Participants:
- With Zoom free account, you can conduct online meetings, training, and learning classes for up to 100 participants with a 40-minutes time-limit.
- Suppose, if a 40-minute time limit is exhausted, then your meeting is halted. But immediately you can start the same meeting by hitting the start button. So that you can extend your meeting for another 40-minutes. Likewise, you can do as many times as you require. This is a prominent feature of Zoom loved by most of the people around the world.
- Besides, if you want to increase the time limit and the number of participants, then you have to choose its paid subscriptions.
Temporarily lifting the 40-minute time limit on free basic accounts for K-12 Schools:
- Due to the COVID-19 pandemic, Zoom is decided to lift a 40-minute time limit on free basic accounts for K-12 schools hit by COVID-19 in India, Australia, and New Zealand.
- This is a great and easy way for staff to educate students from their homes.
HD video and audio with 1000 video participants and 49 videos on screen:
- Zoom offers excellent video and audio quality for conducting online meetings, training, and learning classes.
- And Zoom supports up to 1000 video participants and 49 videos on the screen.
Share Your Device Screen Wirelessly:
- Zoom permits you to share your device screen wirelessly with your participants.
- Via Screen Share option on your Zoom, you can share the following with your participants.
- Photos, documents in your phone, Google Drive, and more.
- Whiteboard with a pen, eraser, highlighter, and other tools.
- You Might Like: Top 5 Free Online Video Chat Sites To Video Chat With Strangers
- 5 Top Video Sharing Sites: Best Video Hosting OR Upload Sites
How To Use Zoom Video Conferencing For Meetings, Classes and Training On Desktop and Mobile: A Quick Guide
Zoom is becoming an essential video and audio conferencing software for every organization for conducting online meetings, training, and learning classes. Its free account offers anyone to conduct the online meetings for up to 100 participants with a 40-minute limit. And it is offering a reliable price for its paid subscriptions. That’s why everyone is attracting and using Zoom Video and audio conferencing software.
Now you can see how to use Zoom Video and conferencing software on Windows, Mac, iOS, and Android.
1. How To Use Zoom Video Conferencing On Windows or Mac
Zoom video conferencing is a great way for any organization to conduct online meetings, training, and classes straight from Windows and Mac. In this section, you can learn how to use Zoom video conferencing on your Windows or Mac in a step by step manner as listed below.
- Download and install the Zoom Desktop Client (Windows or Mac).
- Signup To Create Zoom Free Account.
- Purchase Any of The Zoom Meetings plans like Pro, Business, and Enterprise (Optional but recommended for better features).
- Schedule Your Zoom Meetings Via Zoom Desktop Client.
- Invite Participants To Your Zoom Meetings.
- Start Your Zoom Meetings.
- Host controls in an ongoing Zoom meeting
- Join Meeting.
- Edit a scheduled Zoom meeting.
1.1 Download and install the Zoom Desktop Client (Windows or Mac):
- Click here to download the Zoom Desktop Client for Windows or Mac.
- Next, open the downloaded Zoom_launch.exe file and click on the Run button.
- Next, the Zoom Desktop Client launches.
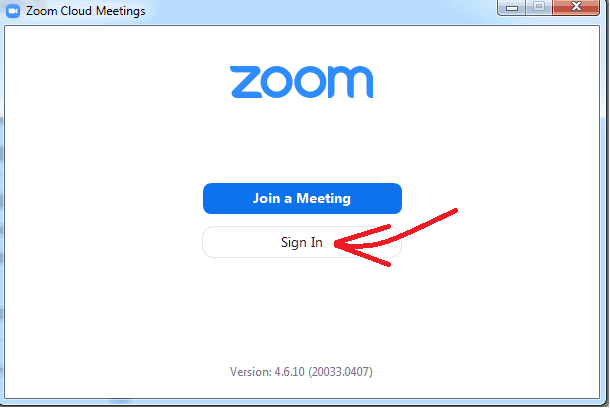
1.2 Signup To Create Zoom Free Account
- After launching the Zoom desktop client, click on Sign In.
- Next, you have to sign in to Zoom. Here, you have various options to sign in like:
- Sign In with SSO.
- Sign In with Google.
- Sign In with Facebook.
- Suppose, if you don’t have an account, then click on Sign Up Free to create Zoom free account.

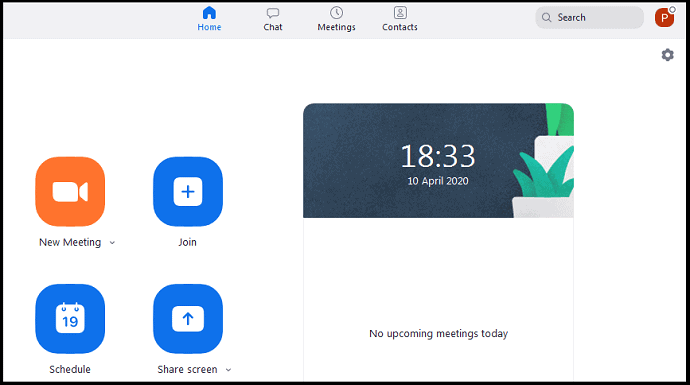
- After creating a Zoom free account, then Zoom desktop client redirects to the Home page.
1.3 Purchase Any of The Zoom Meetings plans like Pro, Business, and Enterprise (Optional but recommended for better features)
- With Zoom free account, you can conduct online meetings, classes, or training at great HD video and audio quality for up to 100 participants with a 40-minutes time limit.
- That is, after 40 minutes, the online meeting ends automatically. But you can start the meeting immediately for another 40-minutes. Likewise, you can conduct unlimited meetings for up to 100 participants with a 40-minutes timelimit.
- However, if you want to increase the number of participants, time limit, and require advanced options like transcription, cloud storage, user management, admin feature controls, and more, then you have to go upgrade to Zoom Pro or higher plan.
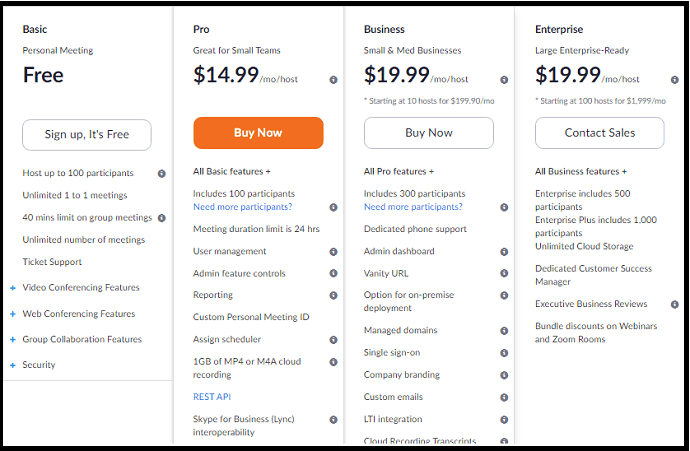
- Zoom Meetings offers three plans for its customers to buy.
- Suppose if you need more than 300 participants, then you need to choose its Enterprise plan. And you have to contact its Contact Sales for price details.
| Basic | Pro | Business | |
|---|---|---|---|
| Price | Free | $14.99/month/host | $19.99/month/host |
| Number of Participants | 100 | 100 | 300 |
| Time limit | 40 minutes | 24hrs | 24hrs |
| Unlimited 1:1 Meetings | Allowed | Allowed | Allowed |
| Auto-generated cloud transcripts | Not Included | Not Included | Included |
1.4 Schedule Your Zoom Meetings via Desktop Client
Step1: Open Zoom desktop client on your Mac or PC. And sign in.
Step2: Next, on the home page, click on Schedule.
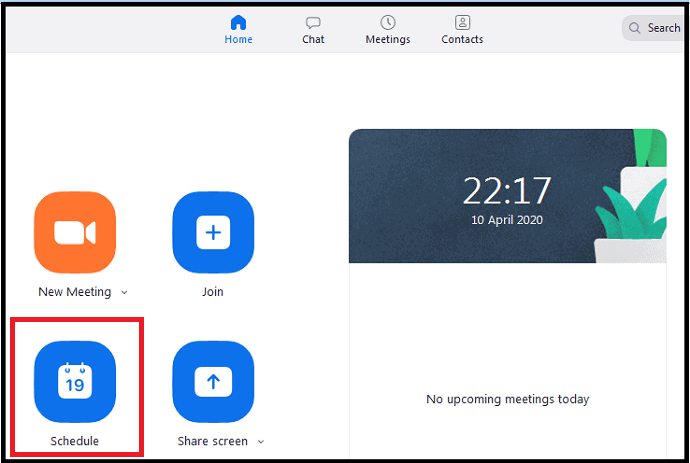
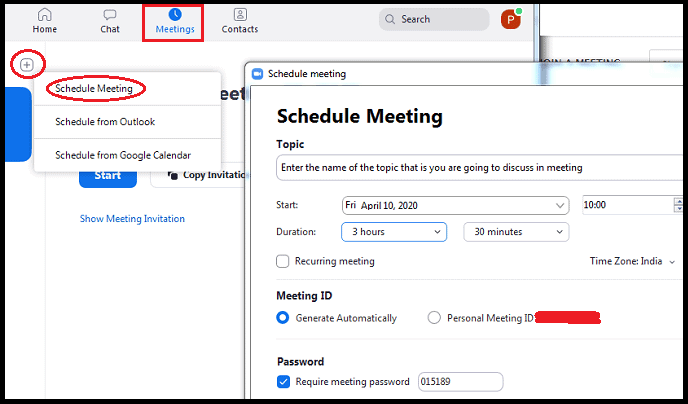
Step3: Next, Schedule Meeting page opens.
- Topic: Enter the name of the topic that is you are going to discuss in meeting under the Topic field.
- Start: Set the start date and time.
- Duration: Choose the duration of your meeting.
- Time Zone: Use this to set the time zone. A default time zone is already set based on your phone location.
- Recurring meeting: Use this, if you want to repeat the meeting every day, every week, every 2 weeks, every month, and every year.
- Generate Automatically: Choose this option instead of Personal Meeting ID under the Meeting ID section.
- Require meeting password: Click the checkbox of this option.
- Video:
- Host: Enables or disables the host video when the meeting starts.
- Participant: Enables or disables the participants’ videos when the meeting starts.
- Audio: Choose whether to permit users to call in via:
- Telephone only,
- Computer Audio only,
- Both.
- Calendar: Choose a calendar service to add your meetings and send out invites to your participants.
- Advanced Options:
- Enable waiting room: Disable this option.
- Enable join before host: Disable this option, if you don’t want to allow participants to join meetings before the host joins.
- Mute participants on entry: If ‘join before host’ is not enabled, then this will mute participants while they join the meeting. However, participants can unmute themselves after joining the meeting.
- ‘Automatically record meeting on the local computer: Click the checkbox of this option to record your meeting automatically on your local computer when the meeting starts.
- At last, click on the Schedule button.

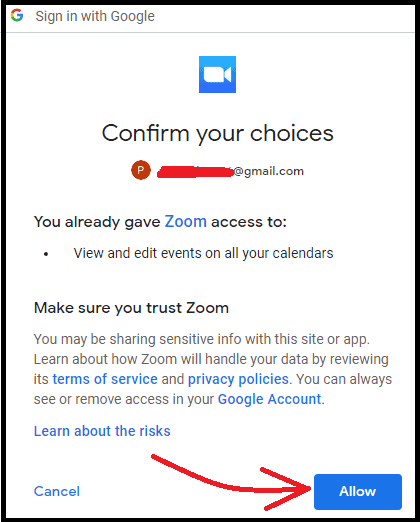
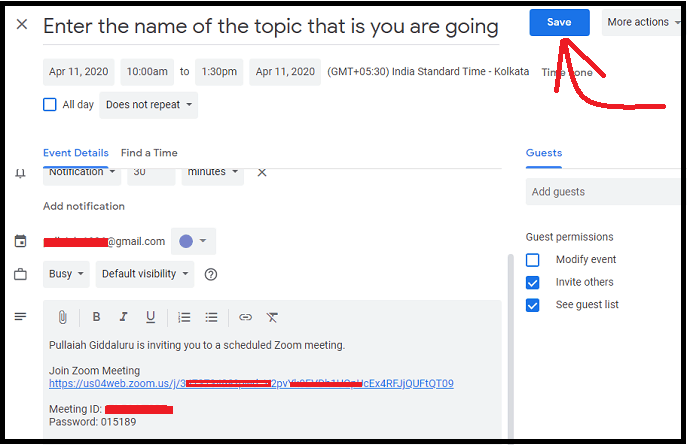
Step4: Next, it redirects you to your Google Calendar. Here you have to first select your Gmail account and then click on the Allow button.
Step5: Now you will be redirected to your Google Calendar. Then click on the Save button. Then your meeting schedule is added to your Google Calendar. Now Zoom accesses your Google Calendar and synchronizes your Zoom meetings. So that you can check or follow your Google Calendar for any upcoming meetings.
Step6: Alternatively, you can also schedule your meeting on desktop client by clicking on Meetings and then on + (plus) button and Schedule Meeting.
1.5 Invite Participants To Your Zoom Meetings
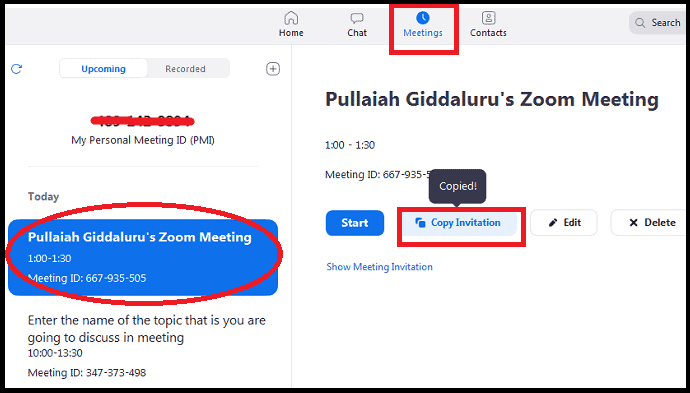
- Open Zoom desktop client, and click on Meetings.
- Next, on the left side of the page, click on the meeting for which you have to invite participants. And then on Copy Invitation.
- Now your device clipboard copies the invitation link, meeting id, password and topic name of your Zoom meeting.
- Next, you can send these details via email or WebWhatsApp or messenger to your participants.
- Then your participants can simply click on the provided link or use the meeting id and password details to join your meeting.
1.6 Start Your Zoom Meetings
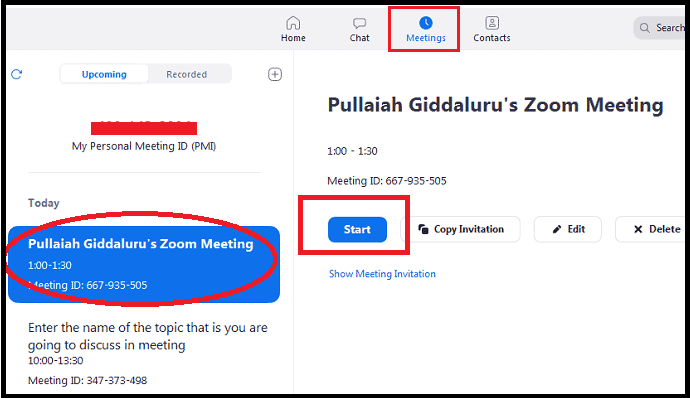
- Open Zoom desktop client, and click on Meetings.
- Next, on the left side of the page, click on the meeting that you want to start. And then on Start.
- Then your meeting window opens.
1.7 Host Controls in an Ongoing Zoom Meeting
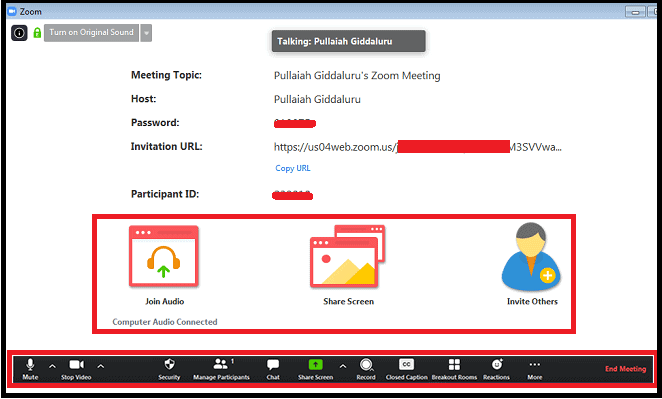
- Once you have started or joined a meeting, then you can view the following meeting controls located at the bottom of the meeting window (just move your mouse on the Zoom window to display meeting controls).
- Mute/Unmute: Click this to mute or unmute your microphone.
- Click ^ next to Mute/Unmute to control audio: Here, you can change the microphone and speaker that Zoom is currently using on your computer, leave computer audio, and access the full audio options in the Zoom settings.
- Start/Stop Video: Click this to start or stop your own video.
- Click ^ next to Start/Stop Video to control video: If you have multiple cameras on your computer, then you can choose which Zoom is using, access the full video controls, and choose a Virtual Background.
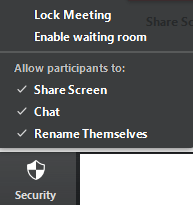
- Security: Click this to enable or disable the following options to your participants while the meeting is started.
- Lock Meeting
- Enable waiting room (Disable this option so that participants can attend the meeting directly. And you no need to admit each participant to join your meeting)
- Share Screen
- Chat
- Rename Themselves
- Manage Participants: Click this to manage participants and invite others to join your meeting.
- Polling: Click this to create, edit, and launch your polls. The options to create or launch polls open up the Zoom web portal in your default browser.
- Share Screen: Click this to share your computer screen with your participants. Via Screen Share you can access and share the following to your participants.
- Files, Documents, and more on your device.
- Whiteboard with pen, eraser, and other tools.
- Dropbox, Microsoft OneDrive, Google Drive, Box, and more.
- Click ^ next to Share Screen to select who can share in your meeting. For example, you want only the host or any participant to be able to start a new share when someone is sharing.
- Chat: Click this to chat with the participants.
- Record: Click this to start or stop a cloud or local recording.
- Closed Caption (only available to the host): If you have allowed closed captioning for your account, then click here to access the closed caption options.
- Breakout Rooms (only available to the host): Click this to start breakout rooms.
- More: Click this to access the additional options.
- Live on Workplace by Facebook: Broadcasts your meeting live on Workplace by Facebook.
- Live on Custom Live Streaming Service: Broadcasts your meeting live on a custom streaming platform.
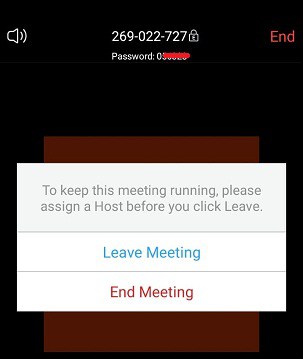
- End Meeting (only available to the host): Click this to end the meeting for all participants. Suppose if you want to continue the meeting without you, then you have to give host control to another participant before you leave the meeting.
1.8 Join a Zoom Meeting Via Zoom Desktop Client
Step1: Open Zoom desktop client on your Windows or Mac.
Step2: Next, you can join a Zoom Meeting without and with sign in.
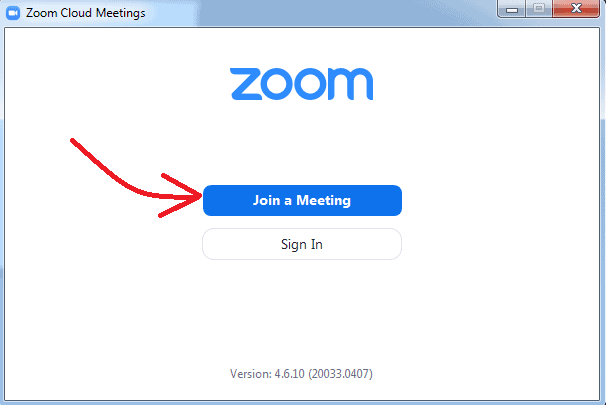
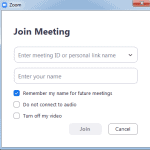
Step3: If you want to join a Zoom meeting without sign in, click on Join a Meeting.
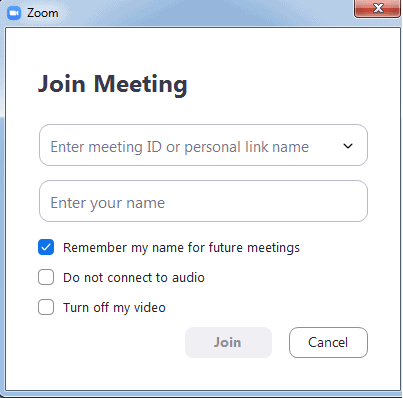
Step4: Next, type in meeting id and your display name in the respective fields. Then choose if you would like to connect your audio and/or video. And click Join.
Step5: If you want to join a Zoom meeting with sign in, then you have sign in on your Zoom desktop client. After sign in, click on Join.

Step6: Next, type in meeting id and your display name in the respective fields. Then choose if you would like to connect your audio and/or video. And click Join.
1.9 Edit And Update A Scheduled Zoom Meeting
How do I update a scheduled meeting in Zoom?
- Whenever you schedule a meeting on Zoom Desktop Client, then a meeting ID generates.
- If this is a non-recurring meeting ID, then it will expire 30 days after the meeting is scheduled or started. And you can re-start the meeting with the same ID within 30 days.
- If this is a recurring meeting ID, then it will expire 365 days after the meeting is started. And you can re-start the meeting with the same ID within 365 days.
- Now, you can see how to edit and update a scheduled meeting in Zoom.
Step1: Open Zoom Desktop Client on your computer. And sign in.
Step2: Next, click on Meetings. And then on a meeting which you want to edit, present on the left side.
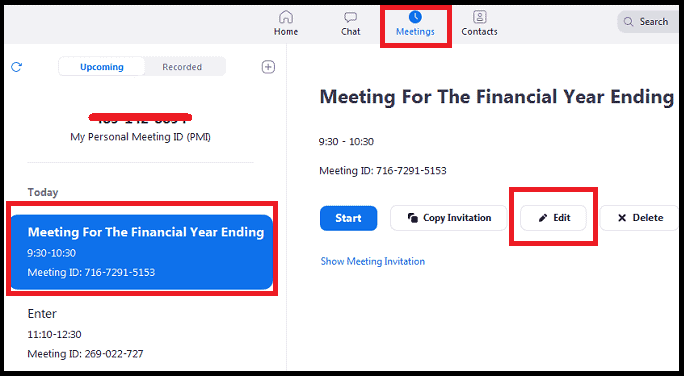
Step3: Next click on Edit. Then the meeting opens. Now you can change the date, time, topic name, and more.
That’s it! You have now seen how to schedule, start, join, edit, and control Zoom Meetings on Windows and Mac.
Recommended: Top 5 Alternatives to Teamviewer for Remote Desktop sharing
2. How To Use Zoom App Android and iOS

In this section, you can view how to use Zoom to schedule, start, join, and control Zoom Meetings on your Android and iOS devices.
Total Time: 5 minutes
Step1: Install Zoom Cloud Meetings app on Android and iOS
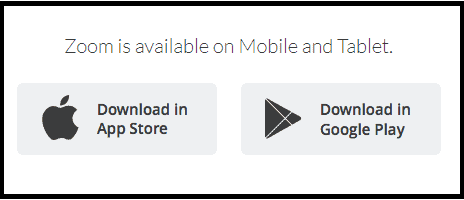
Zoom Cloud Meetings App is now available for Android and iOS devices. If you are an Android user, download from Google Play Store. If you are an iOS user, download from Apple Store.
Step2: Sign in to your Zoom account

If you already have a Zoom account, then sign in to your Zoom account. Otherwise, sign up to create a free Zoom account.
Step3: Purchase Any of The Zoom Meetings plans like Pro, Business, and Enterprise (Optional but recommended for better features)
With Zoom free account, you can conduct online meetings, classes, or training at great HD video and audio quality for up to 100 participants with a 40-minutes time limit.
If you want to increase the number of participants, time limit, and require advanced options like transcription, cloud storage, user management, admin feature controls, and more, then you have to go upgrade to Zoom Pro or higher plan.
Currently, Zoom Meetings offers three plans for its customers to buy.
Step4: Schedule Your Zoom Meetings
Open the Zooms Cloud Meetings app on your mobile device.
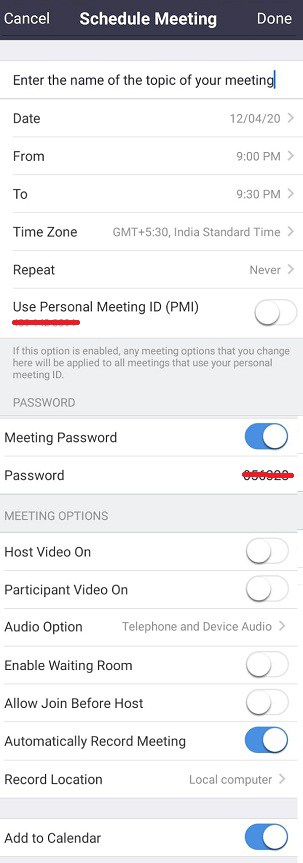
Next, tap on Schedule. Then the Schedule Meeting page opens.
Topic: Enter the name of the topic that is you are going to discuss in the meeting.
‘Date, From, To’: Set date, from time, and to time.
Time Zone: Use this to set the time zone. A default time zone is already set based on your phone location.
Repeat: Use this, if you want to repeat the meeting every day, every week, every 2 weeks, every month, and every year.
Use Personal Meeting ID (PMI): Disable this option.
Meeting Password: Enable if you want to create a password for your meeting so that participants have to enter this password to join your meeting.
Host Video On: Enables or disables your video.
Participant Video On: Enables or disables your participants’ video
Audio Option: Choose Telephone and Device Audio.
Advanced Options:
Enable Waiting Room: Disable this option.
Allow Join Before Host: Disable this option.
Automatically Record Meeting: Enable this option to record your meeting video automatically when it starts.
Add to Calendar: Enable this option. So that calendar on your mobile reminds you about your meetings.
Next, tap on Done.
Step5: Invite Participants To Your Zoom Meetings
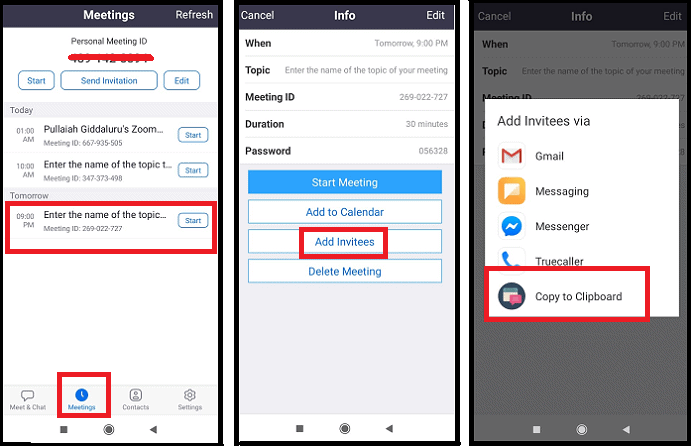
Open the Zooms Cloud Meetings app on your mobile device.
Next, click on Meetings located at the bottom of the page. And then on a meeting for which you want to invite participants.
Next, click on Add Invitees. And tap on Copy to Clipboard.
Now your device clipboard copies the invitation link, meeting id, password and topic name of your Zoom meeting.
Next, you can send these details via email or WebWhatsApp or messenger to your participants.
Then your participants can simply click on the provided link or use the meeting id and password details to join your meeting.
Step6: Start Your Zoom Meetings
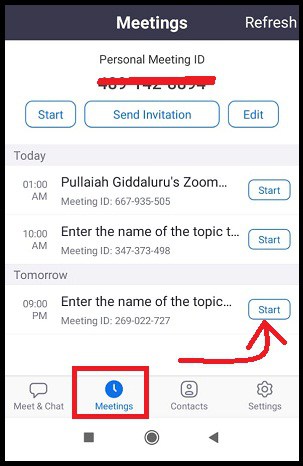
Open the Zoom Cloud Meetings app on your mobile device. And click on Meetings located at the bottom.
Next, tap on Start corresponding to the meeting that you want to start.
Step7: Host controls in an ongoing Zoom meeting
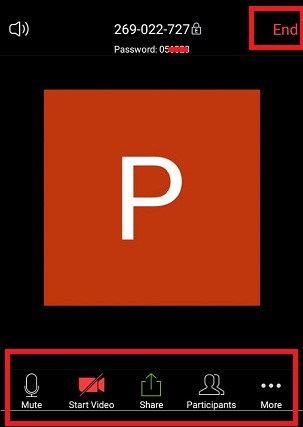
When you start a meeting, then host controls appear at the bottom of the page except End Meeting (Just tap on the Zoom App window to display the host controls).
Mute/Unmute: Click this to mute or unmute your microphone.
Start/Stop Video: Click this to start or stop your own video.
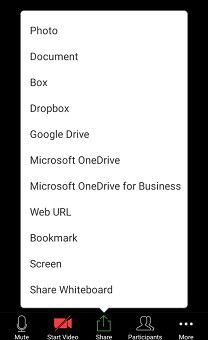
Share: Click this to share your device screen. Via share, you can share photos, documents in your phone, whiteboard, and more with
your participants.
Participants: Click this to manage participants and invite others to join your meeting.
More: There are more Meeting Settings available under More.
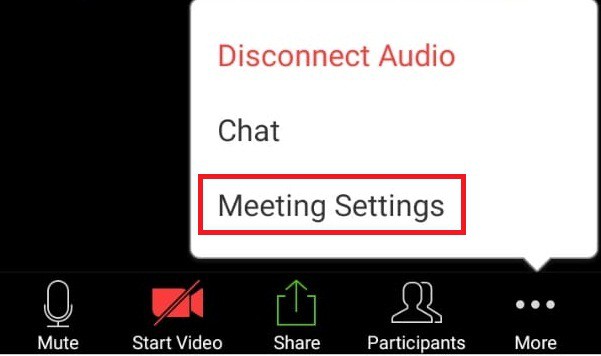
Lock Meeting: Enable this to prevent any new participants from joining your meeting.
Enable Waiting Room: Disable this option so that participants can attend the meeting directly. And you no need to admit each participant to join your meeting.
Share Screen: Disable this, so that only the host can share the content.
Chat with: Click this to enable participants to chat with the host only, everyone publicly, everyone, or no one.
Rename Themselves: Enables participants to rename themselves.
Meeting Topic: Enter the name of the topic that is you are going to discuss in the meeting.
Play Chime for Enter/Exit: You can enable this if you would like to play a chime while new participants join.
Mute on Entry: Click this to mute all participants when they join.
Show Non-Video Participants: Enable this to view non-video participants.
Show Name when Participants Join: Enable this to view the name of the participants when they join.
End (only available to the host): Click this to end the meeting for
all participants.
Step8: Join Zoom Meeting
Using the Zoom Cloud Meeting app, you can join a Zoom meeting without and with sign in.
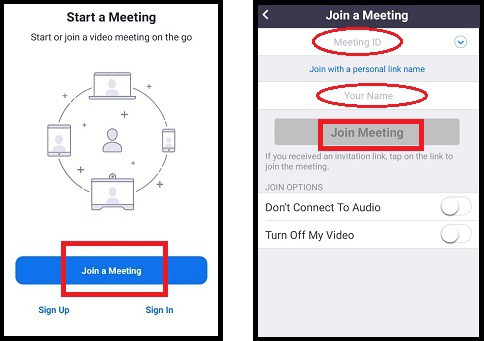
To join without sign in, click on Join a Meeting.
Next, type in meeting id and your display name in the respective fields. Then choose if you would like to connect your audio and/or video. And click Join Meeting.
If you want to join a Zoom meeting with sign in, then you have sign-in on your Zoom cloud meeting app. After sign in, click on Join.
Next, type in meeting id and your display name in the respective fields. Then choose if you would like to connect your audio and/or video. And click Join Meeting.
Step9: Experience video and audio conferencing at great HD quality
Once you have started or joined a Zoom meeting, then you can enjoy the meeting without any video and audio quality issues. And you can observe no buffer in the video while the meeting is going on. And Zoom is only the software that is offering video and audio conferencing at great HD quality even for free account users.
Final Thoughts on How To Use Zoom
You can now use Zoom easily to schedule, start, join, edit, and control Zoom Meetings on any device like Windows, Mac, iOS, and Android. And you now became a master in using Zoom.
Then why wait? Download the Zoom Desktop Client and Zoom Cloud Meetings app and start using Zoom to conduct online meetings, training, and classes at a great HD video and audio quality.
And Zoom is boon to all educational institutions to conduct online classes to their students from any remote places.
- Read Next: Facebook Dark Mode – A New Facebook With Fresh Look Comfortable For Your Eyes
- How to Enable WhatsApp Dark Mode: A Most Awaited Feature From WhatsApp For Billion of Its Users
I hope that this article can definitely aid you to use Zoom easily to schedule, start, and join Zoom Meetings from anywhere and any device. If you like this article, please share it and follow WhatVwant on Facebook, Twitter, and YouTube for more tips.
How To Use Zoom: FAQs
Do you need a zoom account to join a zoom meeting?
No. Because the Zoom account is not needed to join Zoom meetings.
Can you use zoom on your phone?
Yes. Just install the Zoom Cloud Meetings app from Google Play Store or Apple Store on your mobile device. And start using Zoom.
How do I download zoom on my phone?
Go to Zoom’s download center webpage. And click on the download button under Zoom Mobile Apps. Alternatively, you can also download the Zoom Cloud Meetings app from Google Play Store or Apple Store.
Is there a free version of Zoom?
Yes. Zoom offers a free account for anyone. With this free account, you can conduct unlimited 40-minutes online meetings and classes for up to 100 participants.
Can I use zoom on my laptop?
Yes. Just download and install the Zoom Desktop Client on your laptop. And start using Zoom on your laptop.
How many people can be in a free Zoom meeting?
In a free Zoom online meeting, a maximum of 100 people can participate.
How do I join a zoom Meeting on my computer?
Download and install Zoom Desktop Client on your computer.
If you want to join a Zoom meeting without sign in, click on Join a Meeting.
Next, type in meeting id and your display name in the respective fields. Then choose if you would like to connect your audio and/or video. And click Join.
Does Zoom have a desktop app?
Yes. Zoom Desktop Client is the desktop app.
Can I join a zoom meeting without the app?
No. You must have Zoom app to join a Zoom meeting.
What does enable waiting room mean in zoom?
The Waiting Room feature in Zoom permits the meeting host to control (admit or remove) when a participant joins the meeting.
If the host enables the option ‘Enable Waiting Room‘, then the participants have to wait until the host admits them to join.
If the host disables the option ‘Enable Waiting Room‘, then the participants can join the meeting directly.
Even after joining the meeting, the host has the power to remove or put the participants in a waiting room.
is it safe to use zoom for conducting online classes
Nothing is safe on the Internet. Zoom was also been hacked. Zoom will not steal your information. Of course, some hackers might hack Zoom to steal your information. It is common on the Internet. Every day hackers try to find new ways to hack and companies try to find new ways to secure their product and their user information.