
Want to update from Old HDD to new SSD for Windows 11? Want to make the SSD a bootable disk? When you want to update your old drive to a new SSD, many questions like “Why do we need to update?, “How to update from old HDD to SSD?”, and “What are the Best software to update HDD to SSD?” will arise in your mind.
In this article, you will find the solution for all the quires. You can easily update your old HDD to a new SSD using the best third-party applications without any data loss. One of the best applications for that is – EaseUS Partition Master and EaseUS Todo Backup.
Why do we need to update from HDD to SSD?
When you think about “update the old HDD to new SSD”, the question raised in your mind is “Why?”. The response for it is, SSD is lightweight and the fastest drive when compared to HDD. The durability and reliability of an SSD are higher than HDD. One of the major reasons for damaging the hard drives easily is heat. Because of the continuous motion of and HDD’s moving parts, it generates enough heat which leads it to break down over time. When it comes to SSD, it maintains low temperature with high performance. SSD is also more resistant to drops, rattles, shocks, and general wear and tear, making it less likely to lose data.
SSD consumes less power to operate without any compromise in energy. It is very less in weight and also SSDs are infinitely quieter than HDDs, which may be quite annoying to their noise and vibrations. It also offers more practical form factors. So, it’s better to use the HDD instead of SSD for better performance for Windows 11. But one of the main drawbacks of SSD is it costs more than HDD.
How to Update from Old HDD to new SSD for Windows 11
Before going to update to the new SSD you need to confirm that your SSD is attached to your PC, whether it’s via a USB to SATA converter or if it’s in a second drive bay within your case. Once it has been successfully linked, you should be able to view the drive and drive letter in Windows Explorer.
If possible make a backup of all your important file using any one of the best backup tools just in case any corruption takes place in the cloning process. We recommend you use the EaseUS Todo Backup application for better backup.
Now, let’s move into updating that old HDD to a new SSD for Windows 11. Make a trial on all the methods and find your best one.
1.EaseUS Partition Master
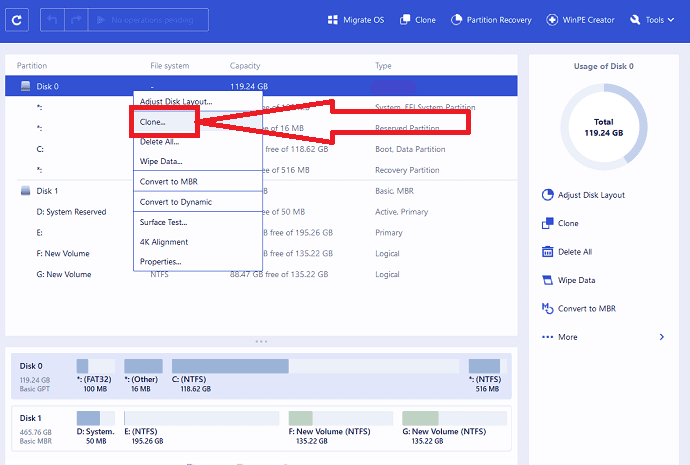
Download and install EaseUS Partition Master from its official site. Place the new SSD in the device. Launch the application. It displays all the disks information. Select the HDD and give a right-click on it. Choose the Clone option from the drop-down menu.
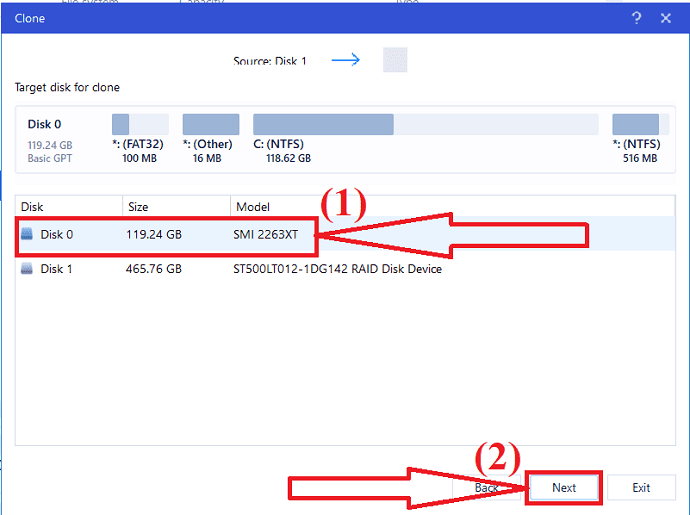
Clone Window will appear on the screen. Select the target SSD from the list and click on “Next”.
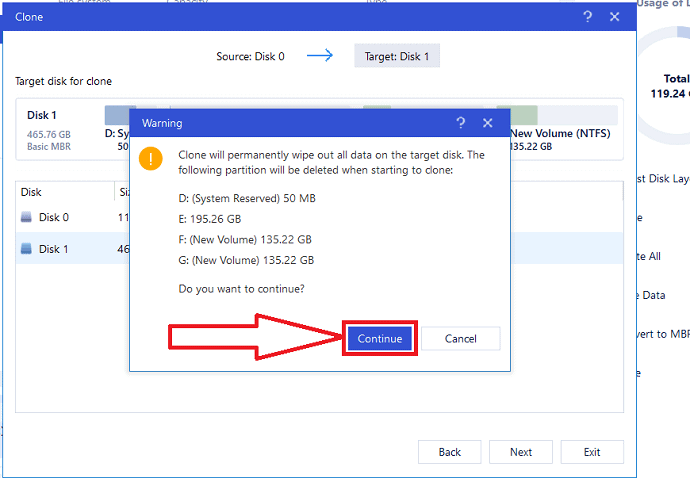
A warning message will prompt on the screen. It warns you that it erases all the data in the target disk. Click on “Continue”.
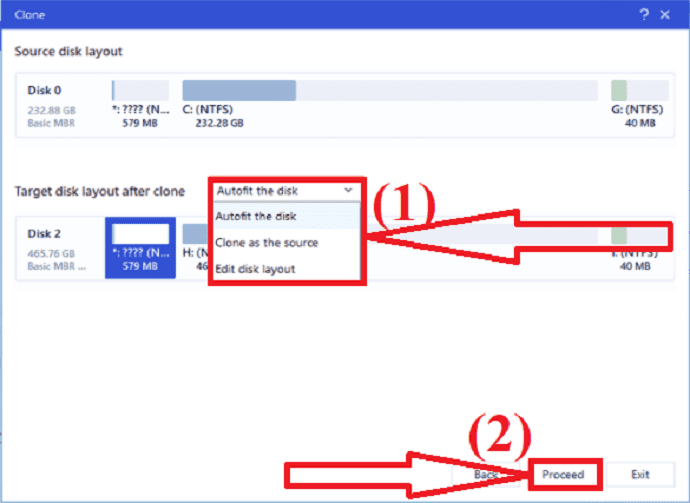
Click on the down arrow beside the “target disk layout after clone”. You will find different options like “Autofit the disk”, “Clone as the source”, and “Edit disk layout”. select the one you want to customize the disk layout. Finally, click on Proceed to continue the cloning process.
Upto now you have seen how to clone the HDD to SSD. Now, it’s time to make cloned SSD bootable in Windows 11. Just follow the below steps:
- To enter BIOS mode, restart the PC/laptop and press the F2/F10/Del buttons on your keyboard.
- Set the new SSD as the boot disc in the boot priority section of the Boot menu.
- Finally, hit F10 to save all of your modifications before restarting your computer.
- SSD.
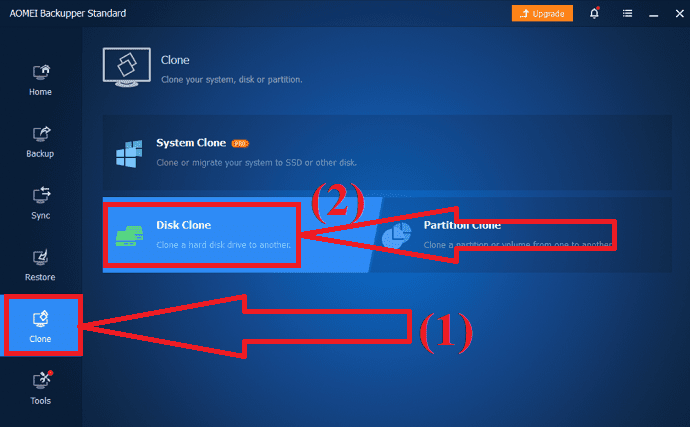
2. AOMEI Backupper
Download and install the AOMEI Backupper application from its official site. Open the application. Click on the clone button at the left window and select the Disk clone option. If you want to update the System, then select the system clone option.
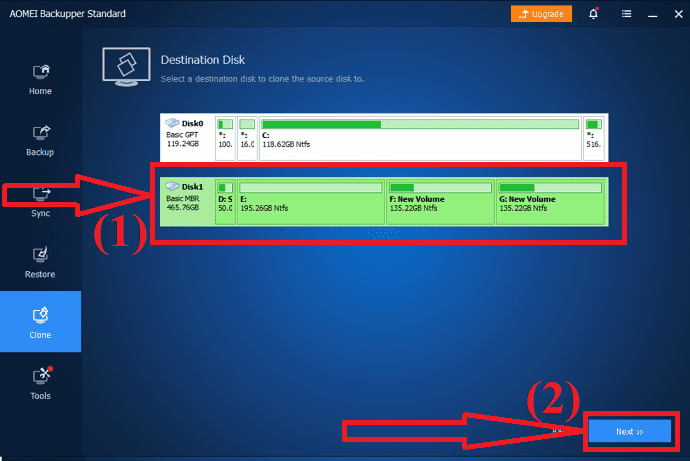
Select the desired HDD as the source disk and click on the Next option.

Again select the destination disk and click on Next. Make sure that the target disk has more space than the source disk. And also backup the important data before going to proceed with this process.
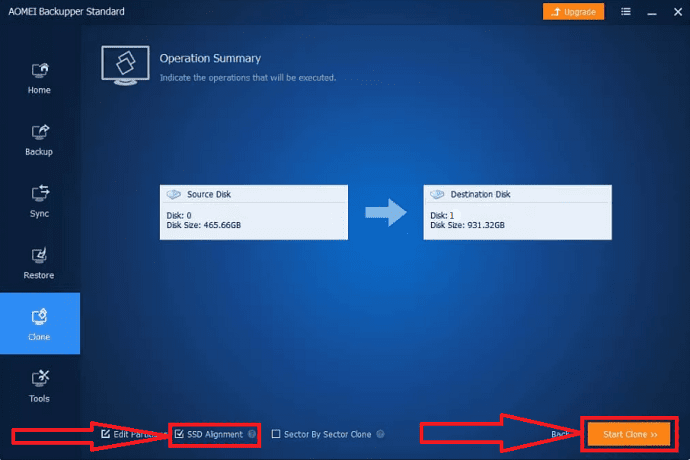
Now, enable the SSD Alignment option for better performance and click on “Start Clone”. That’s it
3.MiniTool Shadow maker
MiniTool Shadow Maker is also one of the amazing tools from the MiniTool family. It helps you to clone the disk without any data loss. The name itself says that it creates a shadow of the disk that you want to update. It also allows you to backup data, create a boot menu, Media builder, and many more. You can also use the MiniTool Partition Wizard to clone all the data from one drive to another. Here is the process to clone the disk using MiniTool shadow maker.
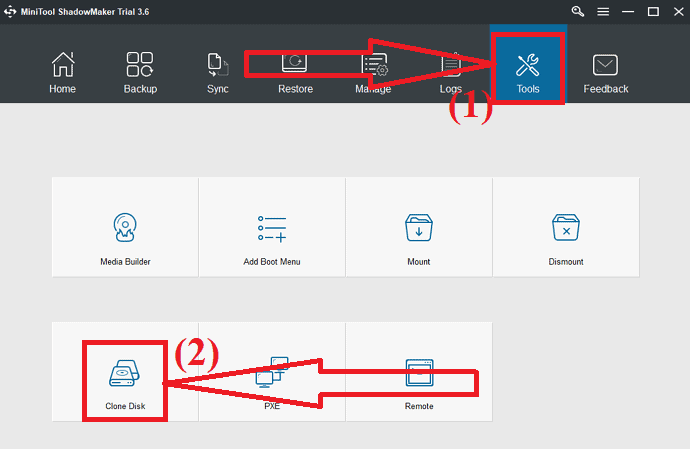
Step 1: Download and install the MiniTool Shadow Maker from its official site. Once the completion of installation, launch the application. Click on Tools and select the clone disk option.
Step 2: Select the source disk that you want to clone and the target disk that you want to save the cloned data. Now, click on OK.
Wait for some time to complete the cloning process. Once the process is completed successfully, a pop-up window will appear on the screen with a message whether you want to shut down your computer now or not. You can Shutdown later.
If you choose to shut down now, make sure that the device is connected to only one drive before you boot the computer for the first time after the clone. If you connect more than one drive at boot time, any one of those disks may be considered offline by the Windows OS. So it’s better to connect only one disk that you want to use at that moment.
4. Macrorit Partition Expert
Download and install Macrorit Partition Expert from its official site. Launch the application. You will all the disk information on the screen.
Select the source disk and click on the Clone disk option on the left side. A new window will appear on the screen. Select the destination disk and click on Next.
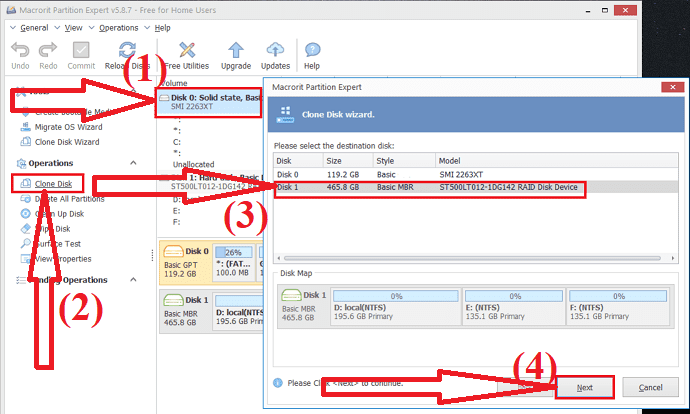
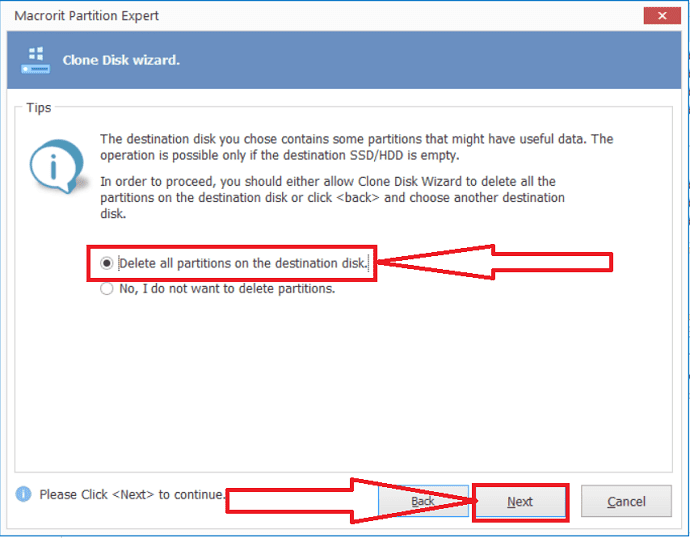
A warning message will appear on the screen. Enable the “Delete all partitions on the destination disk” and click on “Next”. Make sure that you have backed-up all the important data from the destination disk before going to clone the disk.
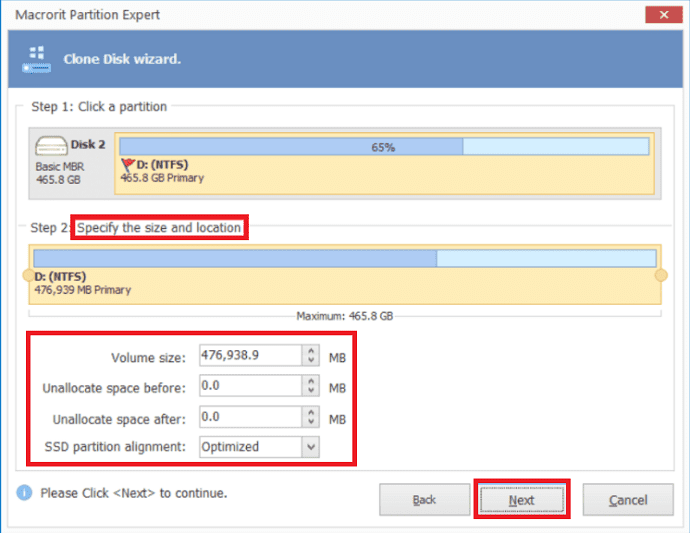
Clone disk wizard will appear on the screen. customize the disk with the specific size and location as your wish. And click on “Next”.
Finally, click on the finish and commit option to complete the cloning process.
- Realted: Windows 11: The complete details you need to know
- How to manage partitions on Windows 11/10/8/7
Final thought:
This tutorial gives you the complete guide on how to update from old HDD to new SSD without data. You can clone both system and disk with the help of the above process. The main thing that you have to consider before cloning the disk is that the target disk size is always greater than the source disk.
There are several tools to upgrade the disk. Few of the best tools are listed in the article. Among them, I strongly recommend you to go with the EaseUS Todo Backup or EaseUS Partition Master.
Offer: Our readers get a special 30% discount on all EaseUS products. Visit our EaseUS Discount Coupon page for the promo code.
I hope this tutorial helped you to know about the How to update from the old HDD to New SSD for Windows 11. If you want to say anything, let us know through the comment sections. If you like this article, please share it and follow WhatVwant on Facebook, Twitter, and YouTube for more Technical tips.
Update from old HDD to new SSD for Windows 11 – FAQ
Can I transfer everything from HDD to SDD?
Yes. You can transfer everything from HDD to SSD. You can use the “Copy & Paste” process or else clone the disk with the best tool.
Do you have to reinstall everything with a new SSD?
It is not necessary to reinstall everything with a new SSD.
Which is the best tool to update the drive?
Always our best choice is EaseUS Partition Master and EaseUS Todo Backup. These tools will be made a miracle while updating the old HDD to the new SSD.