
Do you know that adding simple text to your video will make it look more professional and get wider reach? But most video editors won’t add text to video in their initial learning days. It might be because of a lack of knowledge of the usage of text tools in their editing software. So, to help those video editors in adding text to their videos, we made this article.
We tried various popular and most-used video editing software to provide the keen information to add text to videos. So, read this article till the end and start editing your videos by adding text to them like a Pro.
How to Add Text to Video Online and Offline
Video Tutorial
We Provided this Article in the form of a Video Tutorial for our reader’s convenience. If you are interested in reading, skip the video for now and watch it after the completion of reading this article.
1. Adobe Premiere Pro
Adobe Premiere Pro is an advanced video editing software used by professional video editors across the globe. It has a very huge user base with extraordinary reviews. It comes with a professional interface or workspace which needs some time to understand it. Once you become familiar with Premiere Pro, then you can excel in it and edit videos creatively. Premiere Pro is used to edit movies also. You can use the available Text styles or templates to add text to videos. This is available for both Windows and Mac Operating Systems.
Highlights of Adobe Premiere Pro
- Professional Workspace
- Wide range of Editing options
- Handle large files
- Advanced Color grading technology
- Compatible with Windows and Mac Operating systems
Pricing
Adobe Premiere Pro is available for both Windows and Mac Operating systems. It can be purchased in two methods. One is by purchasing the Creative Cloud and the second method is purchasing a single software ie., Adobe Premiere Pro. The prices are as follows.
- The price of Creative Cloud(All Apps with 100GB Storage) is $54.99/month
- The price of Adobe Premiere Pro is $20.99 per month
How to Add text to Video using Adobe Premiere Pro
In This section, we will show you the step-by-step procedure to add text to videos using Adobe Premiere Pro.
STEP-1: Download Adobe Premiere Pro
Visit the Official site of Adobe Premiere Pro. Purchase and download the latest version of the application into your computer according to your Operating system. This is available for both Windows and Mac Operating systems.
STEP-2: Create or Open a Project

Launch the application after the successful installation. Choose “New Project or Open Project” from the homepage. Later, Import the files and drag them into the timeline.
STEP-3: Add Text
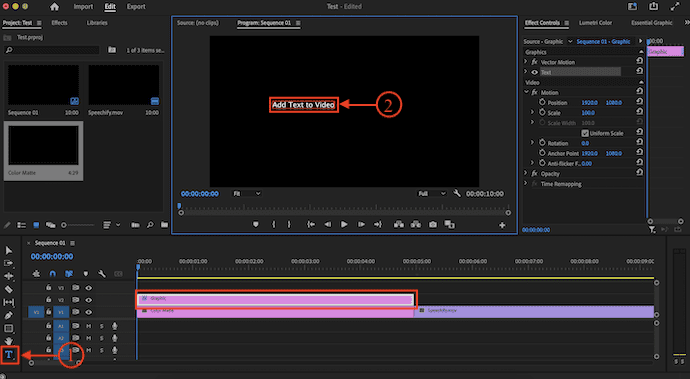
As the workspace of Premiere Pro can be modified as per our requirements, it looks different for different users. Select the “Text” tool from the toolbar and click on the display monitor. Then a red color rectangle will be seen. Type the text that you want to add to your video.
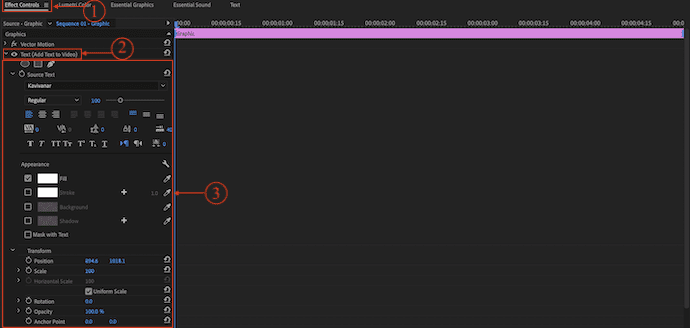
STEP-4: Effects Control Panel
To make modifications to the added text, move to the “Effects Control” panel and Click on the Dropdown option of the “Text” section. Then it shows various options like Transform, Masking, Font, Alignments, etc., For your convenience, we maximized the Effects control panel and provided in the screenshot.
STEP-5: Edit Text in Premiere Pro
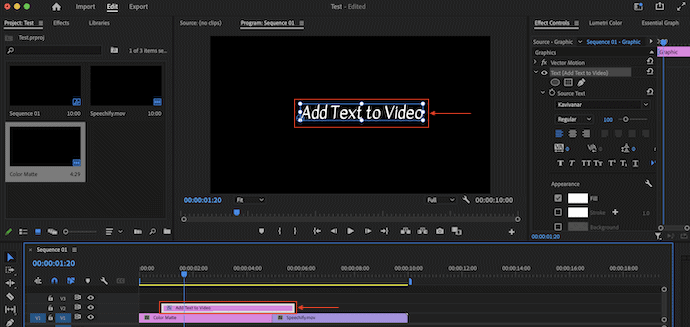
You can adjust the position of the text from the display monitor by using the mouse. Even you can also move the text layer in the timeline just by clicking and dragging that text layer.
STEP-6: Export Settings in Premiere Pro

After the completion of your editing process, Move to the “Export” section by clicking on the option available on the top left of the window. Else, you can use the Keyboard shortcut “CMD+M for Mac and CTRL+M for Windows” to move to the export section. Modify the export settings if needed, else click on the “Export” option to start the export process. That’s it, this is how you can easily add Text to videos in Adobe Premiere Pro.
- RELATED: VideoProc Review – One stop video editing software
- TunesKit AceMovi Video Editor Review: Everything you need to know about it
2. Movavi Video Editor

Movavi is one of the best and most popular video editing software that suits everyone irrespective of their video editing experience. This has a very clean and easily understandable interface with a well-organized workspace. It provides lots of text formats and styles to add text to videos with ease which are absolutely free to use. You can also get more text styles from its official site. Movavi has a bundle pack as Movavi Studio that comes with both video editing and Screen recording software in it. This is compatible with the latest versions of Windows and Mac Operating Systems.
Highlights of Movavi Video Editor
- Easy-to-use
- Supports importing various video and audio formats
- You can render videos in various formats at 4K resolution
- Slideshows can be created easily
- 30-day Money Back Guarantee
- Compatible with both Windows and Mac Operating Systems
Pricing
Movavi Video Editor is available in Individual software and Video Suites(Movavi Video Suite, Movavi Suite Business). All three versions are compatible with Windows and Mac Operating Systems. Each version is available in free trial and premium plans. The prices of the premium plans are as listed below.
- The pricing of Movavi Video Editor is $74.95
- The pricing of Movavi Video Suite is $94.95
- The pricing of Movavi Video Suite Business is $236.95
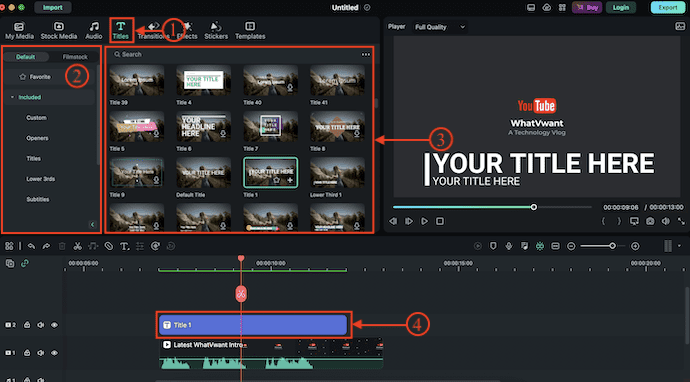
How to Add Text to Video using Movavi Video Editor
- STEP-1: Visit the official site of Movavi and download the latest version of the Movavi Video editor onto your Computer. This is available for both Windows and Mac Operating systems.
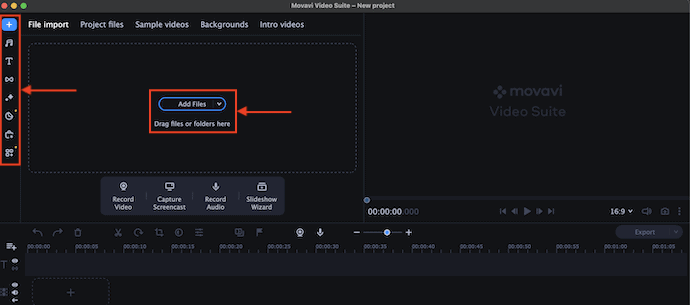
- STEP-2: Install and launch the Movavi Video Editor on your computer. Then you will find the interface as shown in the screenshot. Click on the “Add Files” option to Import the files(Videos, Images, and Audio) that you want to edit, and on the left side, it provides the tools required to edit the video.
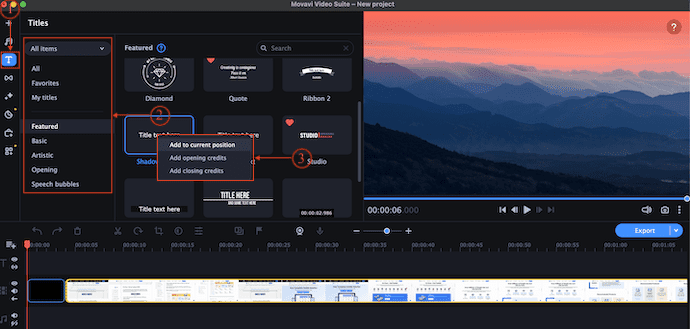
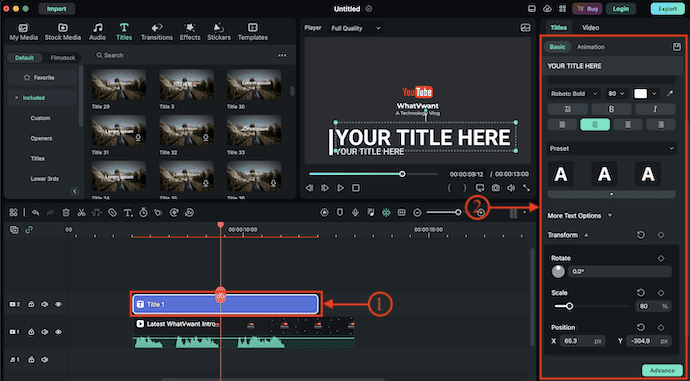
- STEP-3: Drag the clips onto the timeline and later click on the “Text” tool. Then it shows all the available text styles. Right-click on the text style that you want to add to the video. An options list will open with three options, “Add to Current Position, Add Opening Credits, and Add Closing Credits”. Choose the option according to your requirement to add text to videos. Then the text style is added to the video.
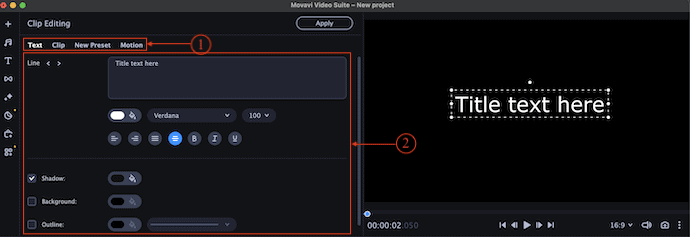
- STEP-4: Double-click on the text on the timeline to view the text editing options like Text, Clip, New Preset, and Motion. From the Text section, you can modify the text, color, Font, Alignment, Font Color, Shadow, Background, and Outline options. And from the Clip section, you can adjust the Speed and duration of the text.
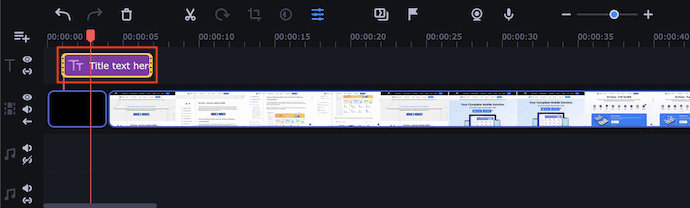
- STEP-5: You can drag the text layer across the timeline to change its position. Likewise, you can adjust the size and move the text placement from the view monitor(Player) itself.
That’s it, this is how you can easily add text to videos using Movavi Video Editor.
3. iMovie
iMovie is an amazing video editing software from Apple that comes with an intuitive user interface and advanced editing tools. This is a free application and can download it directly from the Apple App store. It is very easy to use video editing software and most apple user prefer to use this. It has different types of inbuilt features, effects, etc., to add to your videos. This is available as inbuilt in Apple devices like MacBooks.
Highlights of iMovie
- Free to Download
- Easy-to-use
- Clean and simple user interface
- Compatible with macOS and iOS
How to Add Text to Videos using iMovie
- STEP-1: You can download the iMovie software in two ways. One is from its Official website and the other one is from the App store available on Mac and iPhone.
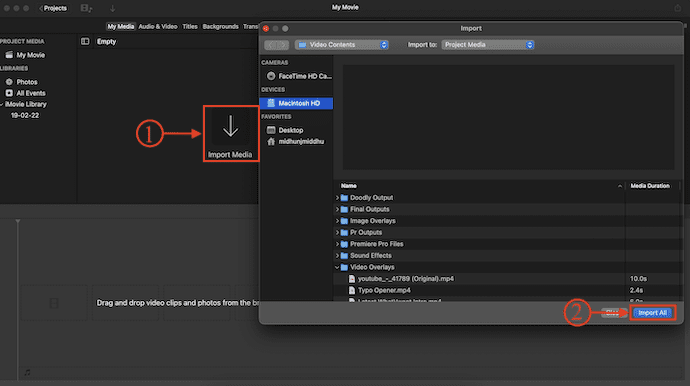
- STEP-2: Launch the application after successful installation. Then you will find the interface as shown in the screenshot. Click on the “Add Media” option to import the files like Videos, Images, and Music.
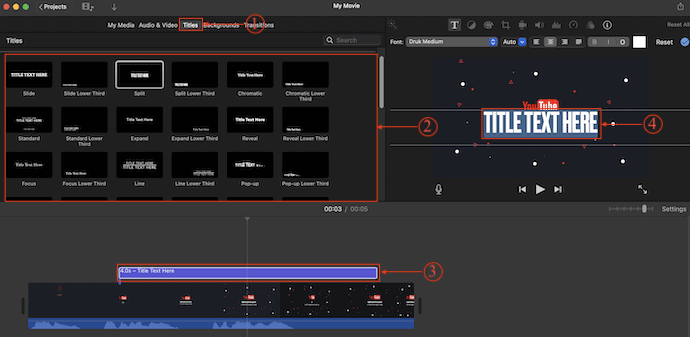
- STEP-3: Drag and drop the video clippings onto the timeline to edit. Move to the “Titles” section available on the top menu. Then it shows all the available text styles. Choose one and drag and drop it onto the timeline where you want to add text to the video.
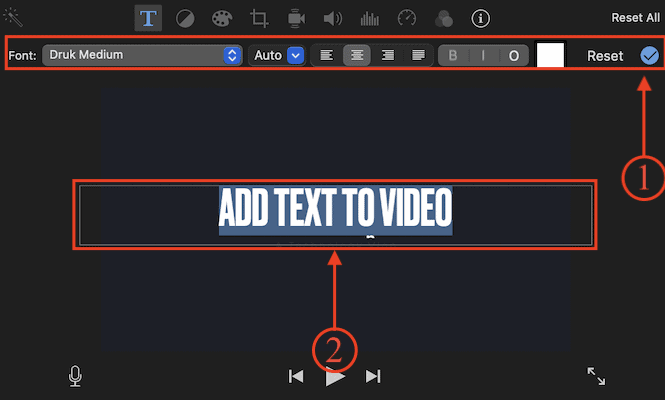
- STEP-4: Double-click on the text layer to open the text edit options. From there, you can easily change the Font, Size, Alignment, color, etc., of the text.
4. Camtasia
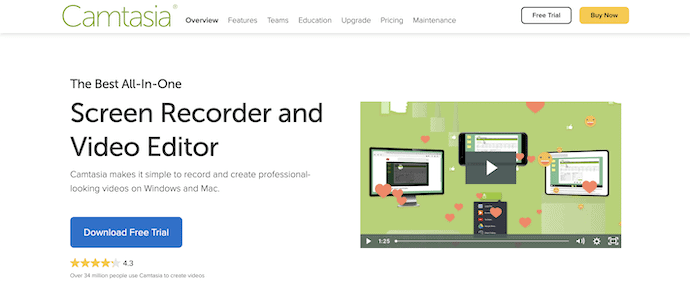
Camtasia is an easy-to-use video editing software that comes with an intuitive and simple interface. This is very useful software for beginners to start their video editing career. This provides all the required tools at a very affordable price range. This is available in free trial and premium versions. Camtasia is compatible with all the latest versions of Windows and Mac Operating systems.
Highlights of Camtasia
- Easy-to-use
- Best for Beginners
- Built-in screen recorder
- Provides tutorial regarding the editing process
- 30-day free trial version
Pricing
The pricing of the latest version of Camtasia is $299.99
How to add Text to Video using Camtasia
- STEP-1: Visit the Official site of Camtasia and download the latest version of the application onto your computer. This is available for both Windows and Mac Operating systems.
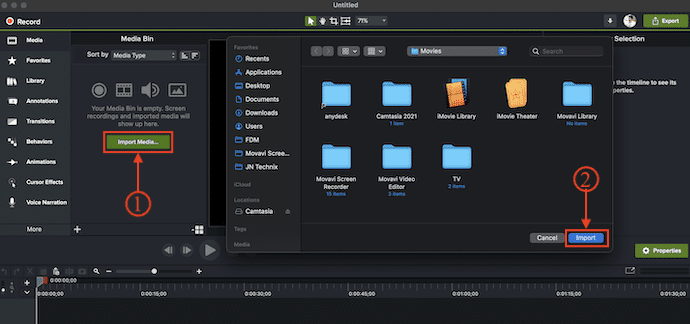
- STEP-2: Install and launch the application. Then you will find the workspace of the application in an organized way. Click on the “Import Media” option and import the files.
- STEP-3: Add the importing clippings onto the timeline. Click on the “Annotate” option available on the left side of the interface. Then it shows various types of text annotation options. Choose a text style and drag it onto the timeline to add text to the video. Click on the text and enter the text you want to add to the video.

- STEP-4: Click on the text layer to select and then it shows the text-related options like Font, Size, Color, Alignment, etc., Move to the clipping settings option and from there you can modify the Scale, Position, and Rotation of the text layer on video.

- RELATED: 8 Best Free Online Video Editor Websites on the Internet
- FilmoraPro Review – Ease of Your Video Editing Journey
5. Vidclipper
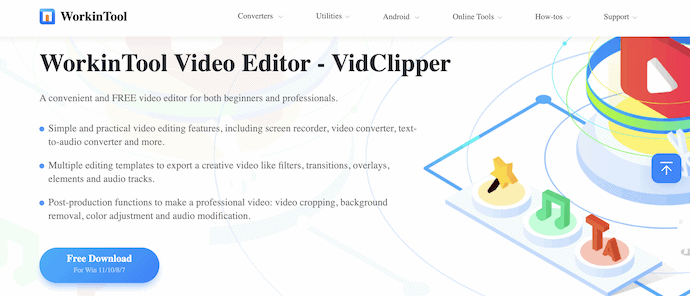
VidClipper is a free and easy-to-use video editing software that suits both beginners and professional video editors. It is a simple software that comes with many useful tools like a screen recorder, video converter, text-to-audio converter, and much more. Even though Vidclipper is free software, it provides all the required features that are available in the premium paid video editing software. You can add transitions, effects, Text annotations, overlays, audio effects, etc., This is compatible with windows 11/10/8/7.
Highlights of VidClipper
- Free software
- Provides a built-in Screen recorder, Video compressor, and Text-to-audio converter
- Simple and optimized Interface
- Compatible with Windows 11/10/8/7
How to Add Text to Video using VidClipper
- STEP-1: Visit the Official site of VidClipper and download the latest version of the application onto your Windows computer.
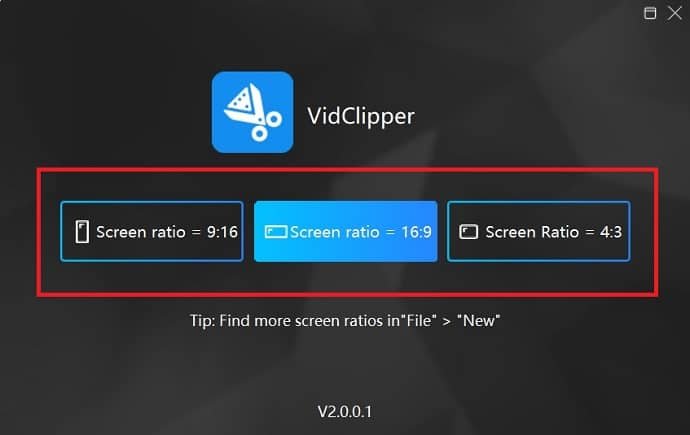
- STEP-2: Launch the application after successful installation. Then it asks you to choose the resolution of the video that you want to edit.
- STEP-3: Click on the “+” icon, then a window will pop up and allows you to choose the files to import. Choose the files and click on “Open” to import the files.
- STEP-4: Add the imported media files onto the timeline and Click on the “Titles” section available on the left menu. Then it shows various text styles to choose from. Double-click on the selected title or drag it onto the time to add text to the video.
- STEP-5: Click on the added text layer to open the text editing panel. From there you can modify the text, Font, color, etc., This is how you can add text to videos using VidClipper.
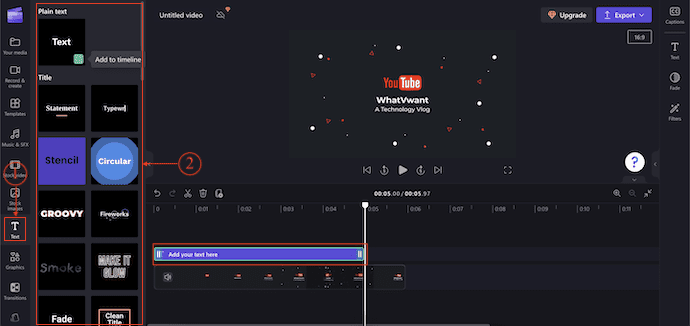
6. VEED.io
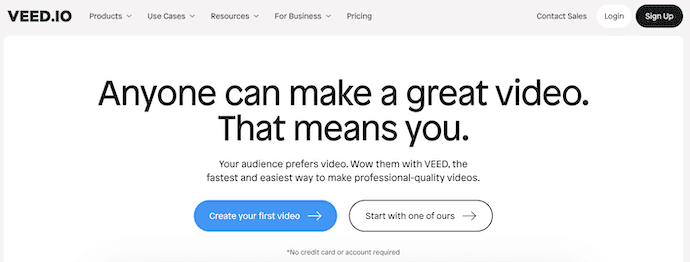
VEED.io is an online video editing software that allows you to edit videos with minimal effort. As this is an online tool, you need not worry about the storage and your system configuration. It has a very simple and easily understandable workspace. VEED.io is available in free and premium versions. It allows you to add effects, transitions, text, subtitles, and many more. From the video maker section, you can create intros and lyric videos easily and fast.
Highlights of VEED.io
- Easy-to-use
- No download is required
- provides How-to guides for easy usage of VEED.io
- Maintain quality output
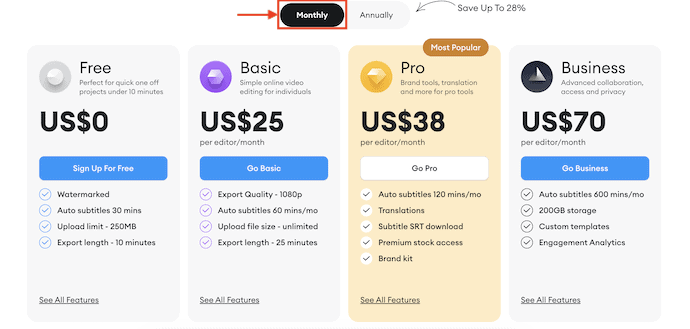
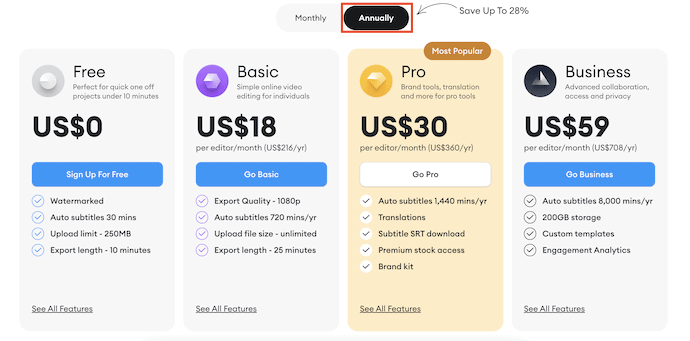
Pricing
VEED.io is available in four plans, such as Free, Basic, Pro, and Business. The prices of all four plans can be purchased in Monthly and Yearly billings. The prices are as listed below.
- Monthly Billing
- Annual Billing
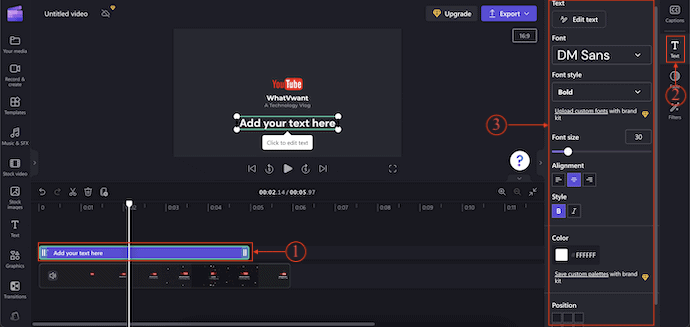
How to Add Text to Video using VEED.io
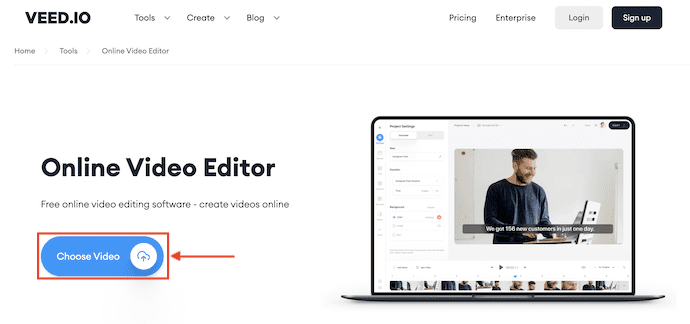
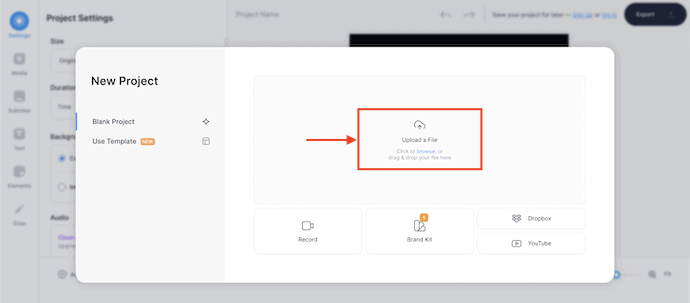
- STEP-1: Open any browser on your computer and visit the “VEED.io” website. Click on the “Choose Video” option.
- STEP-2: Then it shows you various options to import media files. It allows you to upload files from your computer, Dropbox, etc.,
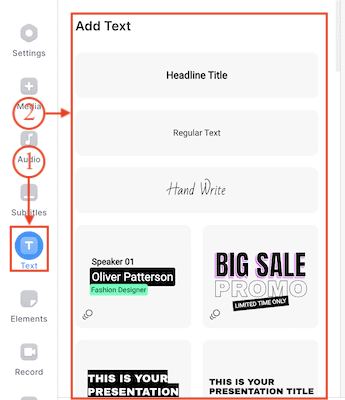
- STEP-3: After importing the files, Click on the “Text” option available on the left side toolbar. Then it shows you various text styles and templates. You can create your own text style or else add the available template by clicking on it.
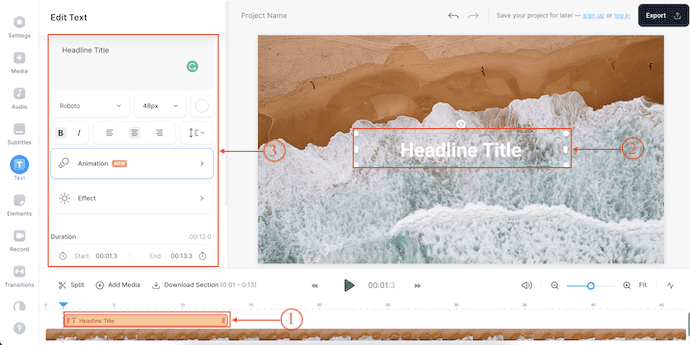
- STEP-4: The Text layer will be seen on the timeline. To edit the Text layer, just click on it and it shows you the options to edit it. You can modify the text, font, alignment, color, effect, animation, and duration of the text.
- That’s it, this is how you can easily add text to a video using VEED.io
- RELATED – 6 Cheap & Best Video Editing Software For YouTube
- 7 Best professional video editing software (Free & Premium)
7. Clipchamp

Clipchamp is one of the top online video editing tools that allow users to edit and export high-quality videos for free. It provides predefined templates and resolutions to create videos easily for various platforms like YouTube, TikTok, Instagram, etc., Clipchamp comes with amazing built-in features like a Screen recorder, Cam recorder, Text-to-speech, Stock Libray, and much more. Even though this is available in both free and Essential plans, it provides the best features in the free plan too.
Highlights of Clipchamp
- Clean workspace
- No download is required
- Huge stock library of Images, Videos, and Audio
- Provides tutorial to edit videos easily
- Available in Free and Premium Plans
Pricing
Clipchamp is available in Free and Essential(Paid) Plans. The Premium plan can be purchased in Monthly and Yearly Billing. The pricing of the premium versions is listed according to the billing.
- Monthly
- Free
- Essentials – $11.99
- Yearly
- Free
- Essentials – $119.99
How to Add Text to Video using Clipchamp
- STEP-1: Open any browser on your computer and Visit the “Clipchamp“ website. Click on the “Log in” option available in the top right corner of the interface. You can log in using Google or Microsoft accounts.

- STEP-2: Click on the “Create a new Video” option and it will take you to the editing workspace.

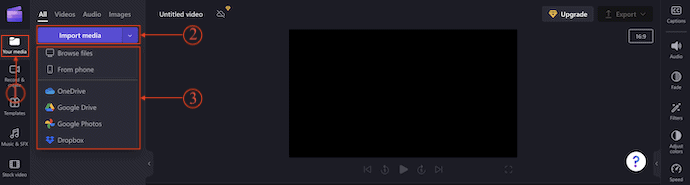
- STEP-3: Make sure that you are in the “Your Media” section and there you will find an option to import files. Click on the “Import Media” option and a drop-down list will open. It allows you to import media from local storage, OneDrive, Google Drive, Google Photos, and Dropbox. Choose a source and import the media.
- STEP-4: Drag the imported video onto the timeline and click on the “Text” option available on the left side toolbar. Then it shows various text formats as shown in the screenshot. Mouse over the text and a “Plus(+)” icon will be seen. Click on it.
- STEP-5: Click on the text layer on the timeline to select and click on the “Text” option available on the right-side toolbar. Then it shows options to edit/modify the added text. This is how you can easily add text to videos using Clipchamp.
8. Final Cut Pro
Final Cut Pro is one of the most famous professional video editing software used by Mac users. This is an official video editing software from Apple with professional tools and workspace. This is preferred by most Video editors as it provides a super smooth and convenient editing workspace. This allows you to create magic in your videos with its advanced features like Object tracking, Cinematic mode, Color grading, plugins, and much more. This is available in free trial and Premium versions.
Highlights of Final Cut Pro
- Provides Advanced and Professional tools
- Cinematic Mode, Object Tracking, and much more advanced features
- Clean User Interface
- Third-Party apps
- First-class integration
Pricing
Final Cut Pro is available in Free trial and Premium versions. The pricing of the premium version is $299.99
How to Add text to Video using Final Cut Pro
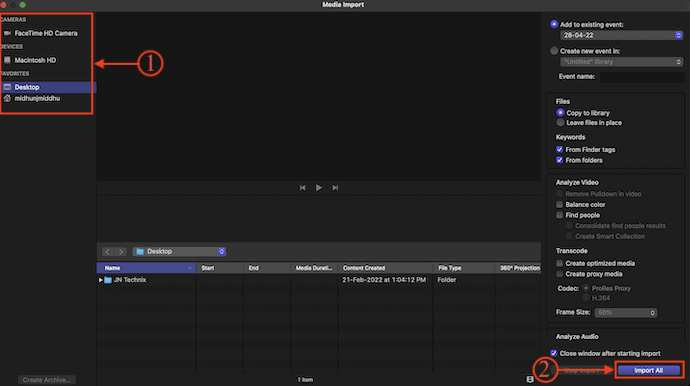
- STEP-1: Visit the Official site of Final Cut Pro and Download the application onto your Mac. You can also download it from Appstore by purchasing.
- STEP-2: Launch the application after successful installation. Then you will find the interface as shown in the below screenshot. Click on the “Import Media” option to import the files.
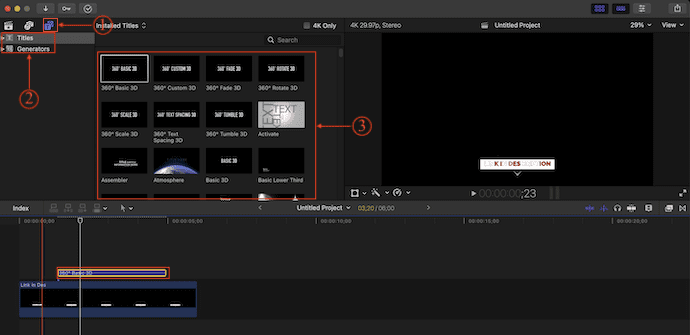
- STEP-3: Drag the imported media onto the Timeline and Click on the “Text” icon available on the top menu. Then it shows different types of text styles. Choose one and double-click on it to add it to the timeline.
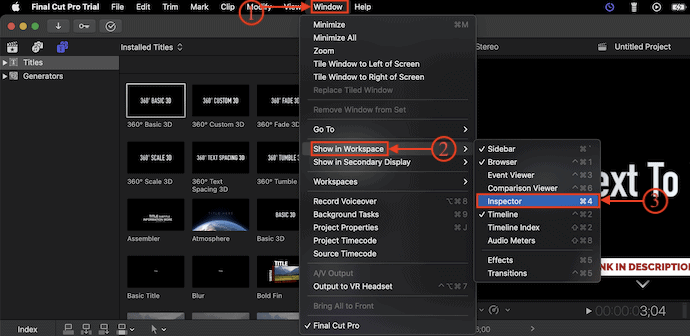
- STEP-4: Later, double-click on the text layer to enter the editing panel. If you didn’t find the text editing panel, Head towards “Window>Show in Workspace” and enable the “Inspector” option.
- STEP-5: From that editing panel, you can modify the text and add basic, 3D Text, Lighting, Material, Glow, and Drop shadow effects.

- This is how you can easily add text to Video using Final Cut Pro.
9. Wondershare Filmora
Filmora is a famous video editing software from a reputed company Wondershare. This allows you to edit and render videos in a cinematic range. It provides advanced features and built-in AI tools to edit videos fast and creatively. You can save your project files by signing into the Wondershare account. This helps to work from anywhere. By using Filmora Workspace, you can easily share output videos for real-time reviews and remarks. Filmora is available in both free trial and Premium versions. It is compatible with both Windows and Mac Operating systems.
Highlights of Wondershare Filmora
- Easy to handle
- Built-in AI tools
- Renders at a faster speed
- Compatible with Windows and Mac Operating systems
- Edit Green screen videos
Pricing
Wondershare Filmora is available in a free trial and Premium versions, such as Individual, Team & Business, Educational, and Bundles. The prices are as listed below.
- Individuals
- Monthly – $19.99/month
- Annual – $49.99/year
- Cross-platform plan – $69.99/year
- Perpetual Plan – $79.99
- Team & Business
- For Team
- 1 user – $155.88
- 2 users – $280.56
- 3 users – $420.84
- 4 users – $561.12
- 5 users – $701.4
- For Business – Contact sales
- For Team
- Education – Contact Sales
- Bundles – Contact Sales
How to Add Text to Videos using Wondershare Filmora
- STEP-1: Visit the Official site of Wondershare Filmora and Download the application onto your computer according to your operating system. This is available for Windows and Mac Operating systems.
- STEP-2: Launch the application after successful installation. Then you will find the interface as shown in the screenshot. From there, choose the resolution(Aspect Ratio) and click on the “New Project” option to launch the workspace.

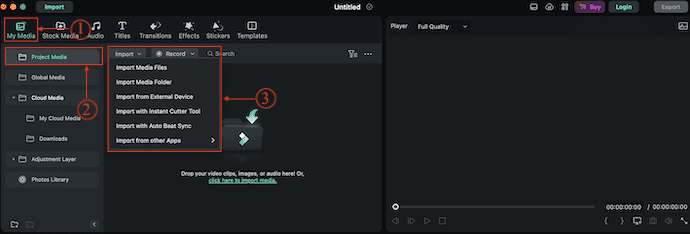
- STEP-3: Make sure that you are in the “My Media” section and click on the “Import” option. An options list will open. Choose an option and Import the files.
- STEP-4: Drag the imported media file onto the timeline. Move to the “Text” section by clicking on the Text option available on the top menu. Then it shows all the available text styles. Choose one and click on the “Plus(+)“ icon to add the text layer.
- STEP-5: Select the text layer and the options tab will open. From there, you can easily modify the text options like Font, Size, Color, Alignment, Position, Transform, etc.,
Conclusion
Adding text to videos is a great idea to make videos more effective and get more reach. Every video editing software provides different text styles and templates to add text to videos. So, follow the steps discussed in this article and start adding text to videos today!
I hope this tutorial helped you to know How to Add Text to Videos Online and Offline. If you want to say anything, let us know through the comment sections. If you like this article, please share it and follow WhatVwant on Facebook, Twitter, and YouTube for more Technical tips.
How to Add Text to Videos Online and Offline – FAQs
How do I add text to the video for free?
VEED is a free online video editor that lets you easily add text to your videos. You can add text, and change its font, color, style, and more in just a few clicks.
What is text on a video called?
Text overlay or video overlay refers to adding a text element over a video file so that users see text appear on their screen while watching a video. Text overlay is one of the most important components of social video, a growing trend in social media content.
How do I edit the text in Premiere Pro 2023?
Right-click the title in the Program Monitor and select Edit Properties from the context menu to open the Essential Graphics Panel where you can customize your title with fonts, color, and styling options.
Is Final Cut Pro free?
Final Cut Pro is paid software, but to make the users aware of its features, interface, and working of the software, a 30 days trial version of Final Cut Pro is available.
Which video editor is mostly used by YouTubers?
Adobe Premiere Pro is one of the most popular video editing software on the market. It’s used by everyone from professional filmmakers to YouTubers, as it allows you to edit and create videos with ease.