
Are you a video editor? Then You must have heard about the Transitions and their impact on your videos. So, In this article, we have included the process to add Transitions to video using online and offline video editing software.
Transitions play a most prominent role while editing videos and help to jump between the clips smoothly. There will be a lot of transition types available in each and every video editing software. Whether it is a free trial or premium version, transitions are commonly available.
- READ MORE – VideoProc Review – One stop video editing software
- FilmoraPro Review – Ease of Your Video Editing Journey
What is Transition in Video
Transition is a technique used in video editing to shift from one clip to another smoothly. These are mostly used to create connectivity of multiple footages or scenes. By adding the transitions, the viewer won’t feel the discontinuity of the scene with the next scene. Transitions are available in every video editing software as this is a basic thing to provide. Adding the right transition between the right scenes will create more impact on the viewers. Also, adding many transitions might ruin the footage. So, make sure to add limited and best-suited transitions to your videos.
How To Add Transitions To Video
Video Tutorial
We provided this article in the form of a video tutorial for our reader’s convenience. If you are interested in reading, skip the video for now and watch it after the completion of reading this article.
1. Adobe Premiere Pro

Adobe Premiere Pro is a premium video editing software preferred and used by professional video editors across the globe. As this is from the family of Adobe, it never compromises in providing the best tools and features for the users. Adobe Premiere Pro is also preferred in the film industry to edit the movies. This product is available in the creative cloud, else you can also purchase it as an individual product. It is available on both Windows and macOS platforms.
Features
- Professional Interface
- Advanced tools and functions
- Supports many video formats to edit
- Best rendering technology
- High-level Colour grading
Pricing
Adobe Premiere Pro can be purchased in two ways. One is through the creative cloud and the other one is purchasing the only Adobe Premiere Pro. The prices of both are provided below.
- Creative Cloud All Apps with 100GB – $54.99/Month
- Adobe Premiere Pro – $ 20.99/Month
How To Add Transitions to videos using Adobe Premiere Pro
In This section, I will show you the step-by-step procedure to add transitions to videos on Adobe Premiere Pro.
STEP-1: Download Adobe Premiere Pro
Visit the official site of Adobe and download the creative cloud or else download only the Adobe Premiere Pro application. This is available for both Windows and macOS.
STEP-2: Interface
Install and launch the application on your computer. Then you will find the starting interface of Adobe Premiere Pro. Click on the “New Project” option available in the top left corner of the window.
STEP-3: Import clips
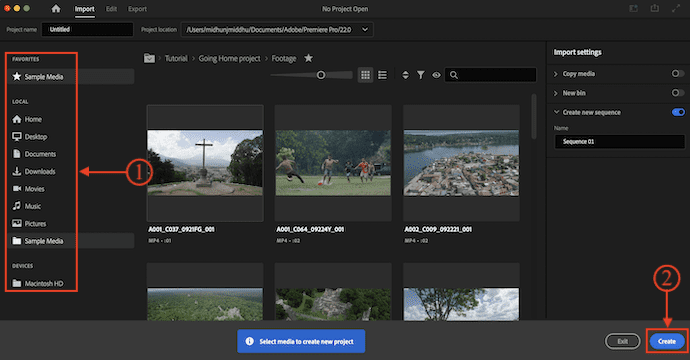
Then it takes you to an interface where you will find a lot of sample videos to import. Else, you can also import the required files from your local storage from there itself. Later, Click on “Create”.
STEP-4: Editing Workspace
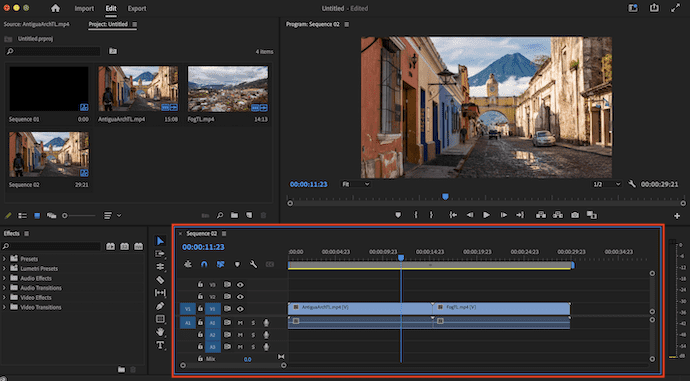
Now you are redirected to the workspace and there you will various panels. As I have chosen two sample clips, there are automatically imported to the timeline.
STEP-5: Add Transition
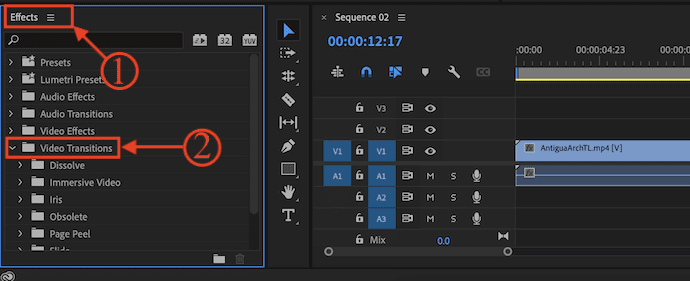
Click on the “Video Transitions” folder available in the Effects panel. Then it shows all the available video transitions. Drag and drop the video transition between the clips to add.
STEP-6: Render the transition
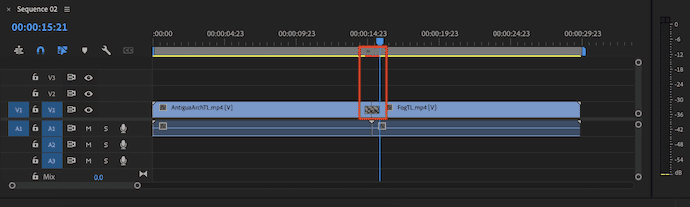
If you find a red line in the timeline at the transition part, it is an indication of a transition not rendered. Just hit enter to render the transition and the red mark will be changed to another color.
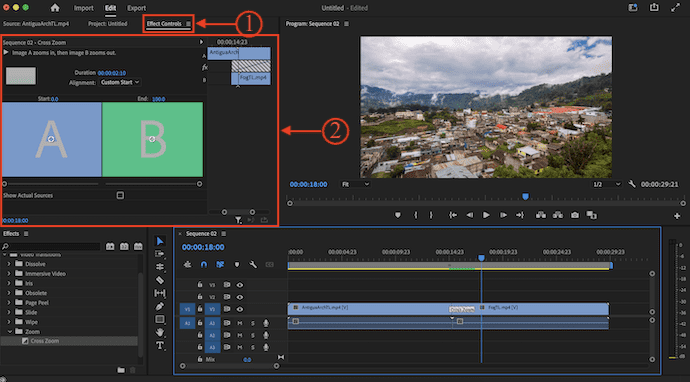
STEP-7: Modify the transition
To modify the transition effect, click on the added transition effect and move to the effects control panel. From there you can adjust and modify the effect.
That’s it, this is how you can add transitions to videos on Adobe Premiere Pro video editing software.
- READ MORE – 6 Cheap & Best Video Editing Software For YouTube
- 7 Best professional video editing software (Free & Premium)
2. Movavi Video Suite
Movavi video suite is the best video editing software in its price range. It comes with all the professional features and tools required to edit the videos. This is best for both learners and experts. It has an intuitive user interface which makes the users feel easy to use.
Features
- Simple User Interface
- In-built screen recorder
- You can create slideshows
- It comes with a lifetime license
- 30-days money-back guarantee
Pricing
How To Add Transitions To Videos using Movavi Video Suite
- STEP-1: Visit the Official Site of Movavi and download the Movavi Video Suite or Movavi Video Editor according to your operating system. This is available for both Windows and macOS.
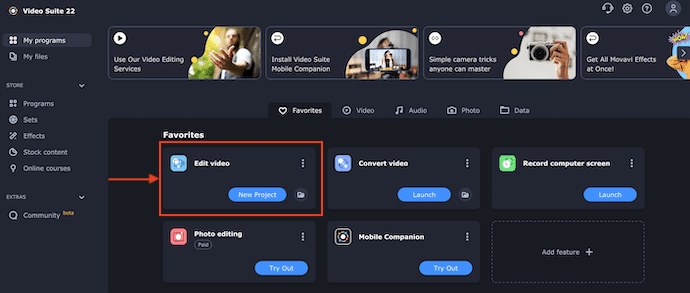
- STEP-2: Install and launch the application. Here, I’m using the Movavi Video Suite and the starting page will be seen as shown in the below screenshot. Choose the “Edit Video” module from the available modules.
- STEP-3: Then you will be redirected to the editing interface as shown in the screenshot. Move to the “File Import” section and click on the “Add Files” option. Then a window will pop up and choose the video clips through that window.
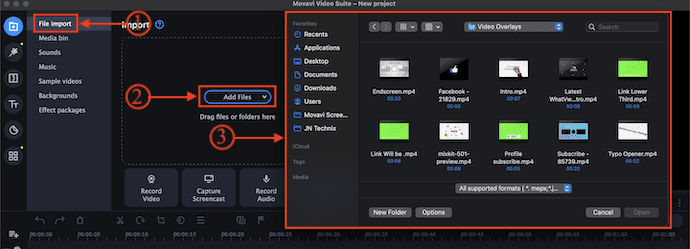
- STEP-4: Then the selected clips are imported to the Media Bin. Drag and Drop the clips onto the timeline to add clips.

- STEP-5: Later, Move to the “Transitions” section by clicking on the Transition option available on the left side and bottom list. There you will find all the available transitions that can be added to your videos.
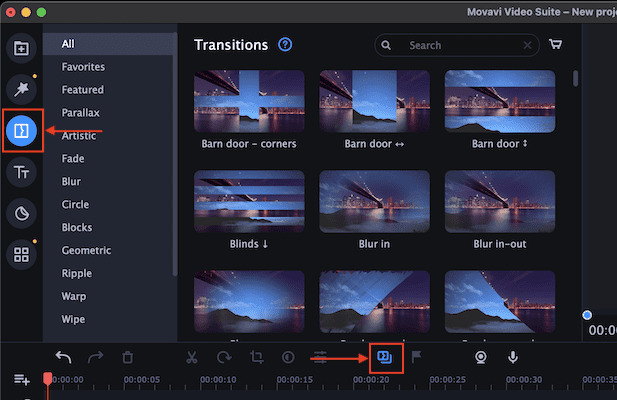
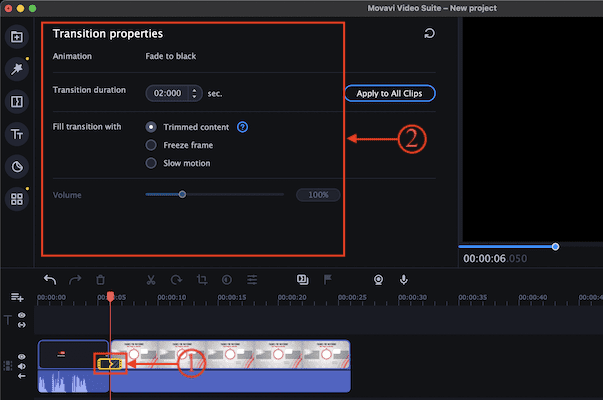
- STEP-6: Just drag and drop the transition between two clips to add the transition. You will find a small icon in between the clips which confirms that the transition is added successfully. Double-click on the transition icon which is in between the two clips. Then it opens the Transition Properties panel and shows all the settings regarding that transition. From there, you can customize the transition with the options like Transition Duration, Fill Transition With, Volume(For Audio Transition).
- That’s it, this is how you can add Transition to Video on Movavi Video Suite.
Offer: Our readers get a special 15% discount on all Movavi products. Visit our Movavi discount coupon page for the promo code.
3. iMovie
iMovie is a built-in video editing software available in the Apple MacBooks for free. It is a powerful video editing software with a lot of interesting tools and effects. It will be very helpful for Apple users to learn video editing without spending even a single penny.
Features
- Free to use
- Simple Editing Workspace
- Title effects
- Supports a lot of video formats to import and edit
How To Add Transitions To Videos using iMovie
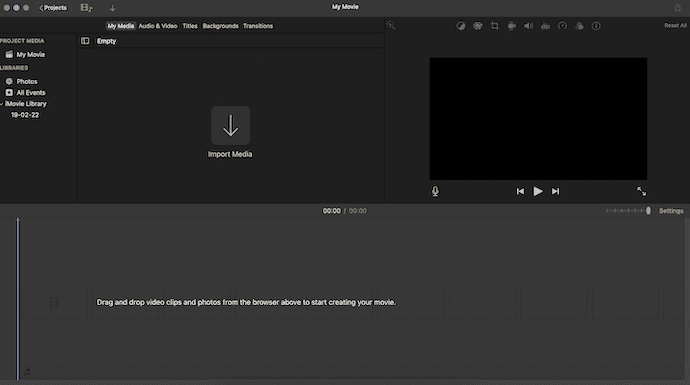
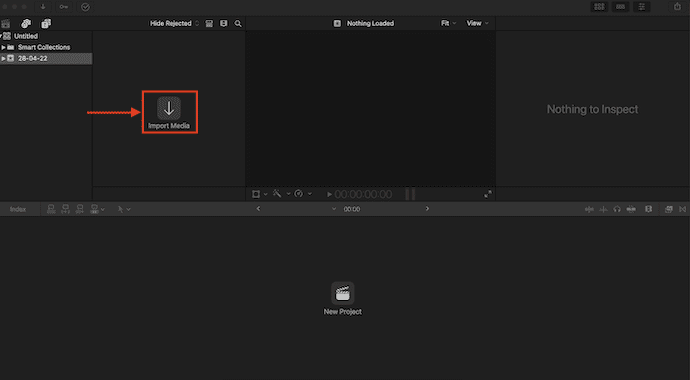
- Launch the iMovie application on your Mac. Then you will find the interface as shown in the below screenshot.
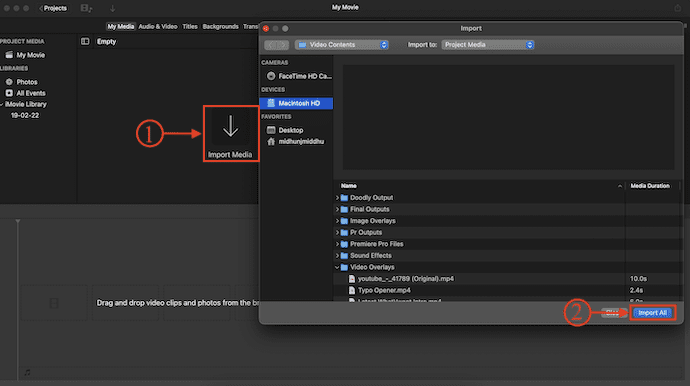
- Click on the “Import Media” option, then a window will pop up. Choose the video clips from that window and click on “Import”.
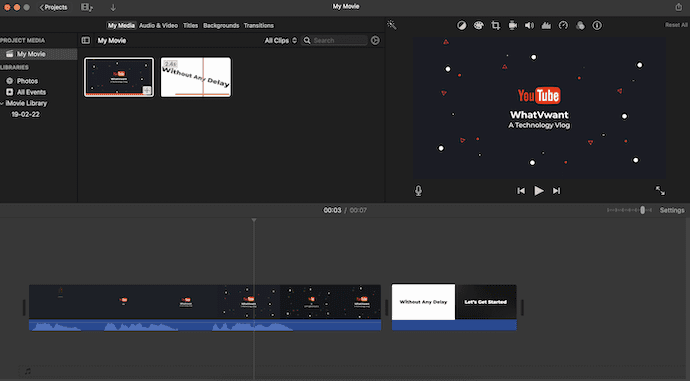
- After importing the files, you will find all the clips on the media bin panel. Drag and drop the clips from the media bin to the timeline.
- Move to the Transition section and there you will find a lot of transitions. Drag and drop the transition between the clips to add.
- Double-click on the transition and then a small window will pop up. From there, you can modify the time duration of the transition. Later, click on “Apply” to apply the modification for a particular transition. Else, click on “Apply All” to apply the modification for all the transitions used in the project.

This is how you can add transitions to videos using iMovie Video editing software.
4. Camtasia
Camtasia is the perfect video editing software for those who don’t have much knowledge of editing. It is available in free trial and premium versions. In both versions, it includes the screen recorder in the video editor. It has a user-friendly interface and also a learning section. From that learning section, you can get information regarding the editing process.
Features
- Easy-to-use
- Provides in-built screen recorder
- Available in 30 days free trial version
- Learning section
Pricing
The latest version of Camtasia is available at a price range of $299.99
How To Add Transitions To Videos using Camtasia
- Visit the official site of Camtasia and download the latest version to your computer.
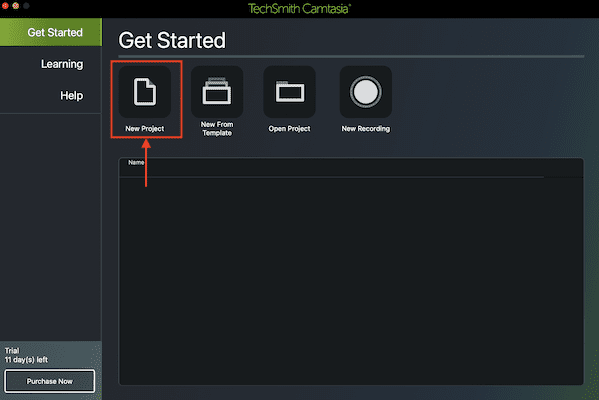
- Install and launch the application on your computer. Then you will find the interface as shown in the screenshot. Choose the “New Project” option from the available options.
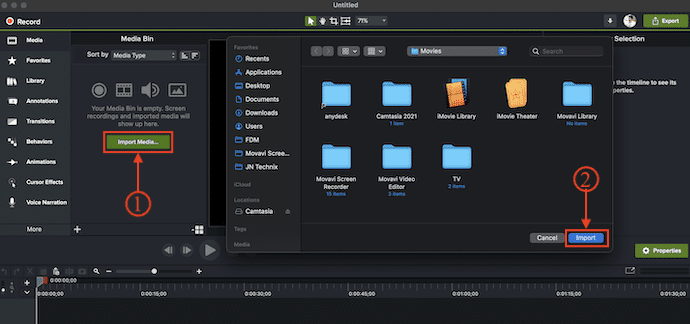
- Then it takes you to the workspace of Camtasia. Click on the “Import Media” option. Then a window will pop up. Choose the media file from that window and click on “Import”.
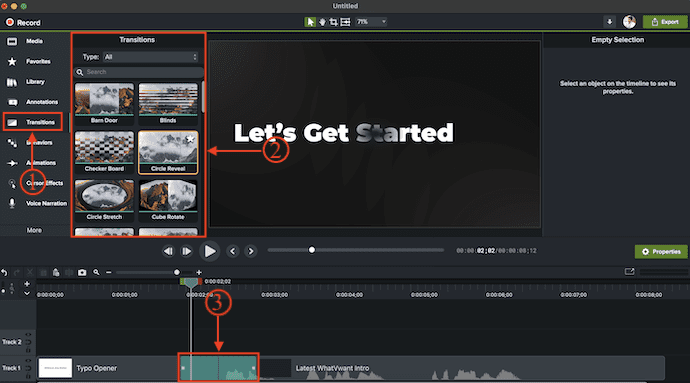
- Drag and drop the media files from the media bin to the timeline. Later, move to the “Transitions” section available in the left menu. There you will find a lot of transitions to use. Drag and drop the selected transition in between the clips to add the transition.
- READ MORE – 5 Best free video editing apps for android
- CyberLink director suite: Complete Video, Audio & Photo Editing Software
5. Filmora
Wondershare Filmora is a very popular video editing software available for both Windows and macOS users. It has a very professional editing workspace and provides all the tools handy. It supports almost all video formats to edit and export the videos at a higher quality output. You can also create the vertical videos by changing the project aspect ratio.
Features
- Professional Workspace
- In-built screen recorder
- Easy to change the project aspect ratio
- Availability of Stock Media
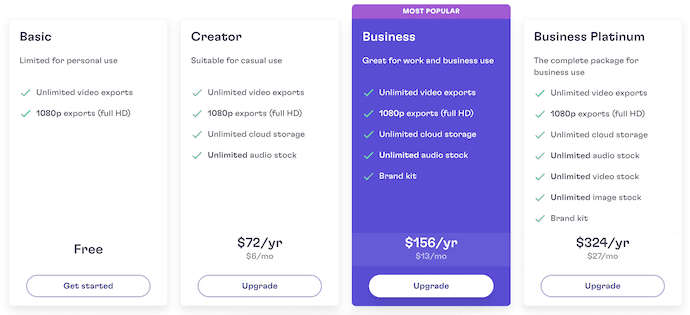
Pricing
Wondershare Filmora is available in three different plans, such as Month Plan, Annual Plan, and Perpetual Plan. The prices of all three plans are listed below.
- Month Plan – $28.98/Month
- Annual Plan – $68.98
- Perpetual Plan – $98.98
How To Add Transitions To Videos using Filmora
- Visit the official site of Filmora and download the latest version of the application according to your operating system. Filmora is available for both Windows and macOS operating systems.
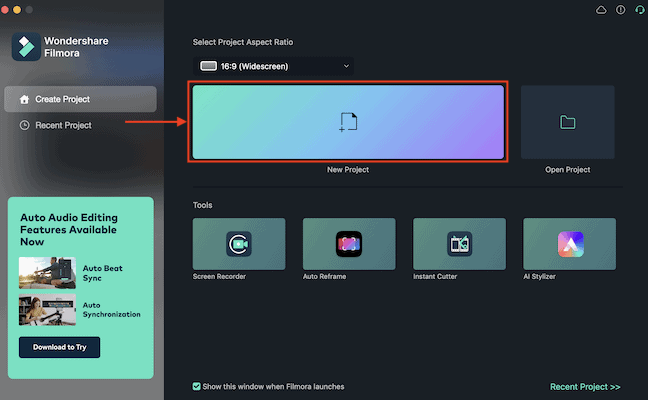
- Install and launch the application on your computer. Then it shows various Tools and Project options. Choose the “New Project” option.
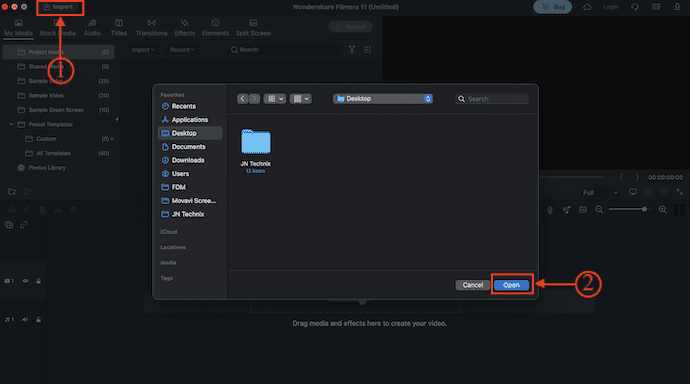
- Then you are redirected to the editing workspace. Click on the “Import” option and then a window will pop up. Choose the media from that window and click on “Import”. Drag and drop the video clips from the media bin to the timeline.
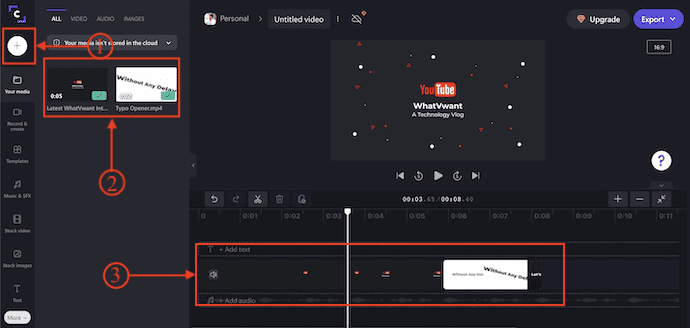
- Later, move to the Transitions section by clicking on the option available in the top menu. There you will find a lot of transitions to use. Drag and drop the transition in between the two clips to add the transition.
- By double-clicking on the added transition, a properties panel will open. From there, you can modify the transition.
6. Clipchamp

Clipchamp is an online video editing site with a good-looking editing workspace. As the video editing software occupies huge storage and consumes most of the RAM, online video editing sites are pretty cool and handy to use. You can log in to the site and make your editing from anywhere without installing any kind of software or application on your computer.
Features
- No download is required
- Professional looking workspace
- Easy-to-use
- Provides all the basic effects and filters
Pricing
- Visit the official site of Clipchamp and there you will find the “Log in” option. Click on it and log in using Google or Microsoft accounts.
- After logging in, it takes you to the welcome page. There, click on the “Create Video” option available in the top right corner.

- Then you will be redirected to the editing workspace. Click on the Plus + icon available in the left menu bar. Then a window will pop up and asks you to choose the media clips to import. After importing, drag and drop the files onto the timeline.
- Now, scroll down the menu available on left to find the transitions option. Click on it and there you will find a lot of transitions. Drag and drop the transition in between the clips to add the transition.
- READ MORE – How to Edit Videos on Android: 6 Free Ways
- TunesKit AceMovi Video Editor Review: Everything you need to know about it
7. VEED.IO
Veed.io is the best video editing site for beginners to edit their videos with a single click. This provides a lot of interesting tools and features to add to your videos. From this site, you can add subtitles to your videos, transcribe videos, record, convert videos from one format to another, and much more. It also has a video maker section and from there you can easily create intro videos, lyric videos, meme makers, stock videos, and much more.
Features
- Easy to Create or edit videos with a single click
- Provides How-to guides
- Subtitles and Transcription
- Allows to create Social Media and Marketing videos
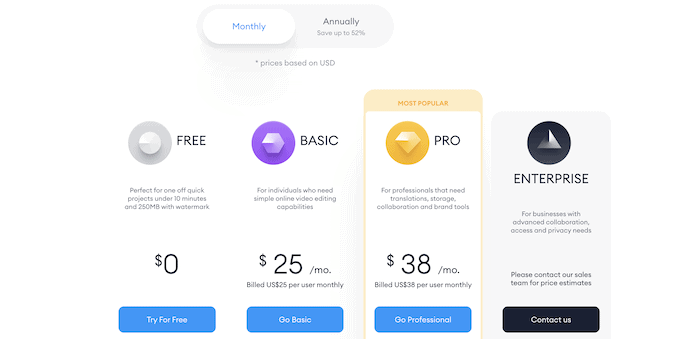
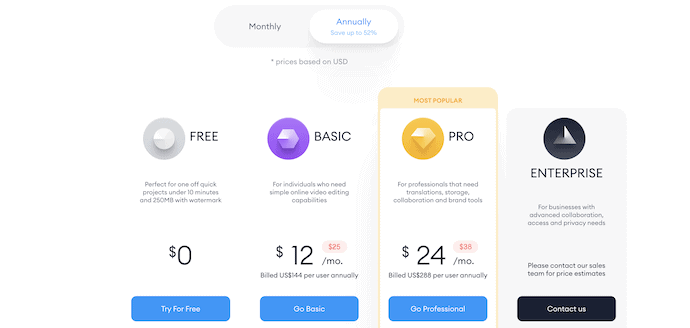
Pricing
Veed.io provides its services in four different plans, such as Free, Basic, Pro, and Enterprise. All the plans are billed Monthly and Annually. The prices are shown in the below screenshot.
- Monthly Billing
- Annual Billing
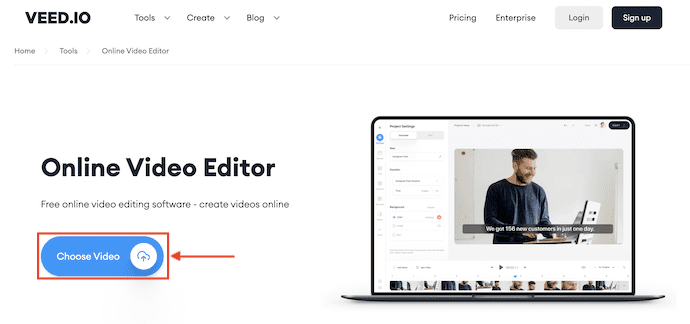
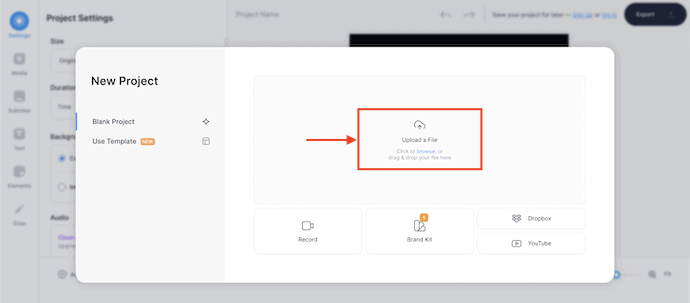
- Visit the official site of VEED.IO and click on the “Choose Video” option.
- Then a New Project window will pop up. Click on the “Upload Files” option and then it allows you to choose the media files from your computer.
- After importing the media files, the video clips will be automatically placed on the timeline as shown in the below screenshot.
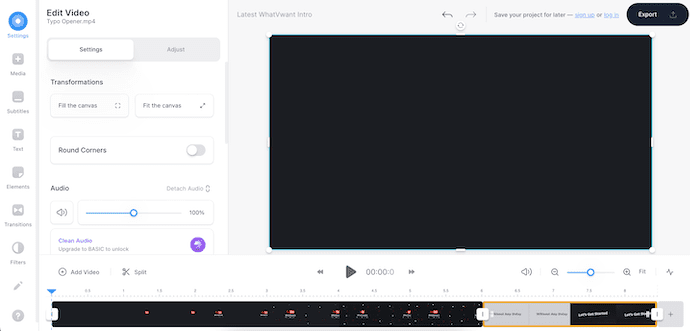
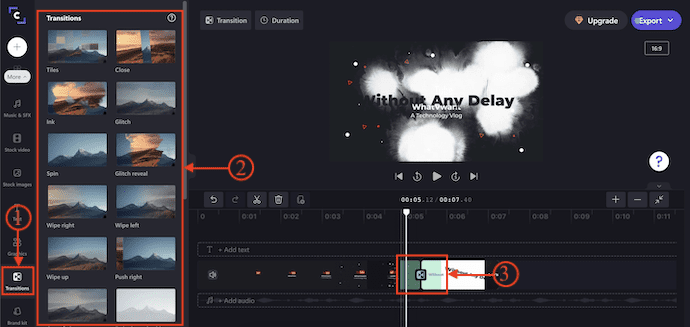
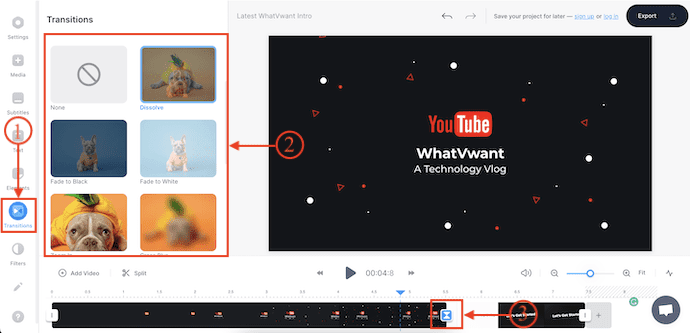
- Click on the transitions option available on the left and then you will find all the available video transitions. Drag and drop the chosen transition in between the videos to add.
8. Final Cut Pro
Final Cut Pro is the finest video editing software from Apple. This is the most used video editing software across the globe. It is a bit costly compared to other video editing software and comes with a lot of best effects and tools. If you are looking for the best professional video editing software irrespective of price, then you can go with Final Cut Pro.
Features
- Premium Video editing software
- Support various video formats
- Clean and professional Workspace
- Available in a free trial version
Pricing

- Firstly, Download the latest version of Final Cut Pro from its official site.
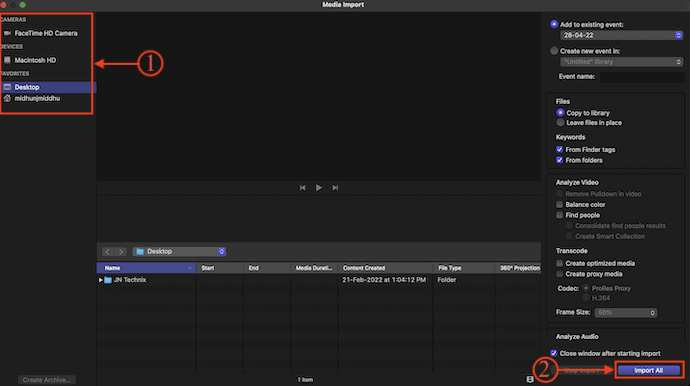
- Install and launch the application and you will find the interface as shown in the below screenshot. Click on the “Import Media” option.
- Then a window will pop up and allows you to choose the media files. After the completion of choosing the media, click on “Import”.
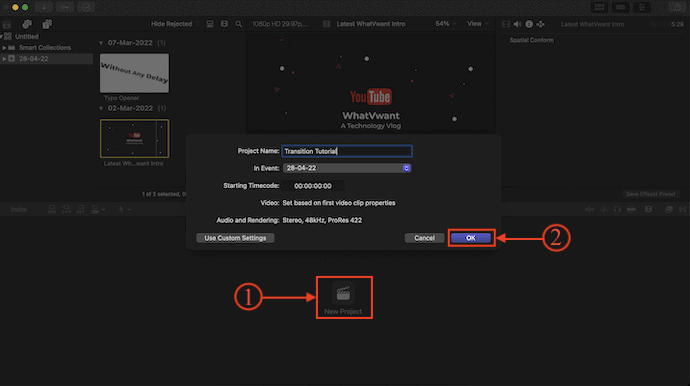
- Then you will find all the imported data in the media bin. Click on the “New Project” option available in the bottom section. Then a small window will pop up. Provide the project details and click on “OK” to create the project. Later, drag and drop the media files onto the timeline.
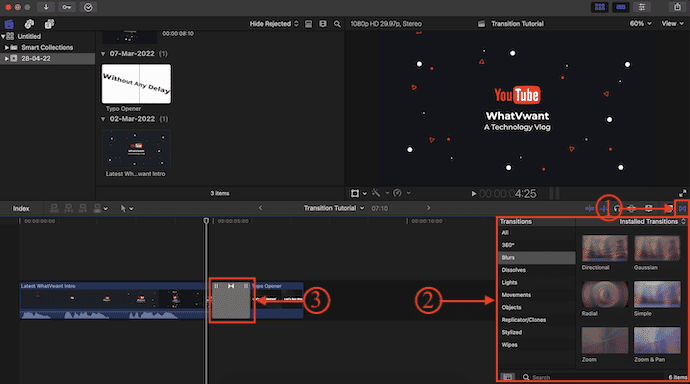
- Click on the “Transition browser” option available at the right top of the timeline to open the transitions panel. You can also use the keyboard shortcut “Control + Command + 5” to open the transition panel. Just drag and drop the transitions onto the clips to add.
9. Wondershare Democreator

Demo Creator is a video editing software from the popular company Wondershare. As Wondershare is a company that produces multimedia applications, they haven’t compromised in providing the required features. It comes with a very clean user interface which helps the users to edit videos very easily. This video editing software helps learners, educators, freelancers, and gamers to take idea-sharing to the next level.
Features
- Easy-to-use
- Best for learners, educators, freelancers, and gamers
- In-built Screen recorder
- Schedule recording
- AI feature
Pricing
Wondershare Democreator is available in three different plans, such as Standard, Premium, and Perpetual. All three plans can be billed Monthly and Annually. The prices of all three plans according to the billing are listed below.
- Monthly Billing
- Standard – $9/Month
- Premium – $15/Month
- Perpetual – $69/one-time fee
- Annual Billing
- Standard – $45/Year
- Premium – $65/Year
- Perpetual – $69/one-time fee
How To Add Transitions To Videos using Wondershare Democreator
- Visit the official site of Wondershare Democreator and download the latest version of the application.
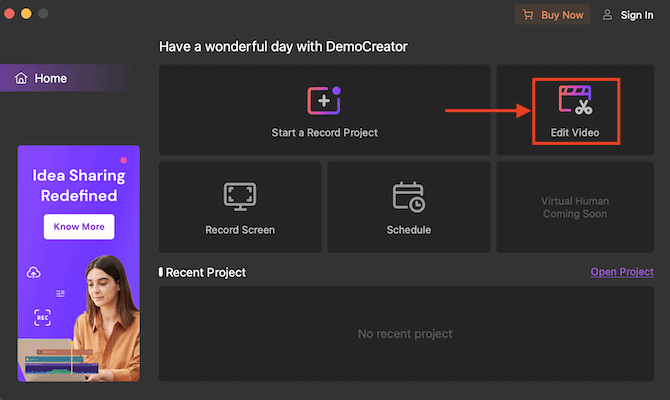
- Install and launch the application on your computer. Then you will find the interface as shown in the screenshot. Click on the “Edit Video” module.
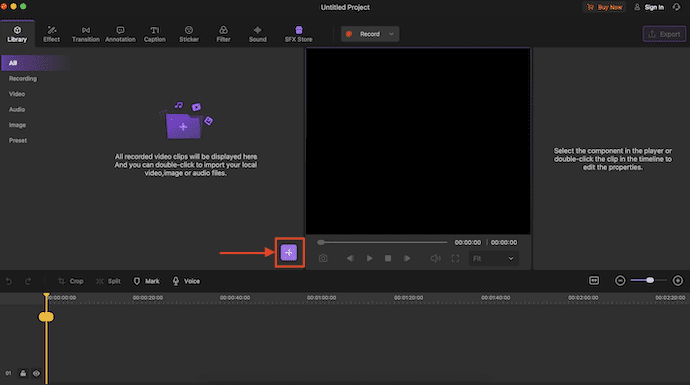
- Then you will be redirected to the main workspace of the Wondershare DemoCreator. Double-click on the plus icon and import the media files to edit. Drag and drop them to the timeline.
- Move to the “Transition” section by clicking on the transition option available at the top menu. Then you will find various transitions. To add transitions to the clips, just drag and drop it in between the clips.

Conclusion
There are a lot of video editing software/tools available in the present world. Among them, we picked a few of the most used video editing software to demonstrate and show you how to add transitions to videos. In recent times, every video editing software provides the basic video transitions for free which are much needed to make the video more effective. The process to add transition is similar in every software but the only thing that varies is the position or location of the transition option.
We recommend using Adobe Premiere Pro for the best features. If you need a less-priced alternative you can go with Movavi Video Suite.
I hope this tutorial helped you to know about How To Add Transition To Videos Online and Offline. If you want to say anything, let us know through the comment sections. If you like this article, please share it and follow WhatVwant on Facebook, Twitter, and YouTube for more Technical tips.
- READ MORE – 5 Ways to merge videos Together free without watermark
- How to Edit Videos with VidClipper
How To Add Transition To Videos Online and Offline – FAQs
Is it necessary to add transitions to videos?
Transitions are a valuable tool for video creators, helping to move the story along, convey a mood or tone to viewers, and set the stage for the next scene.
What is a video Transition?
A Video Transition is a creative way to move from scene to scene.
How long should transitions be?
A transition should typically last no more than half a second (15 frames at 30fps), maybe a full second for the longer ones.
What are 3 common transitions used in video editing?
There are three main types of video transitions used by video editors today: the fade, the wipe, and the cut.
What is the transition effect?
A method of changing the scene from one view to another. The Transition effect can give visual interest to a presentation by introducing an element of motion to the graphics.