Are you planning to backup your Mac to secure your data from unexpected data loss? Are you using the Time Machine to back up the Mac? Do you know that there are a few more best tools/software that help you to back up your Mac securely? Want to Know what they are? Then read this article till the end to gain the information regarding the best software to Back up your Mac.
How to Backup Mac to an external hard drive?
Video Tutorial
We Provided this Article in the form of a Video Tutorial for our reader’s convenience. If you are interested in reading skip the video for now and watch it after the completion of reading this article.
1. Time Machine
Time machine helps to Back up Mac to an external hard drive. Mac Time Machine allows you to back up all files to an external disk like a hard drive or USB. Those can be restored later or you can see them how they were in the previous.
Mac Time Machine allows you to take the below backups and those are safely stored in their destination. Main Backups Time Machine keeps safe.
- Hourly backups for the past 24 hours
- Daily backups for the past month
- Weekly backups for all previous months
Note: The backups that become the oldest will be deleted whenever the disk becomes full with all backups.
How to Backup Mac using Time Machine
To use the Time Machine, you need to set up a backup disk and later backup preferences.
Set up Time Machine
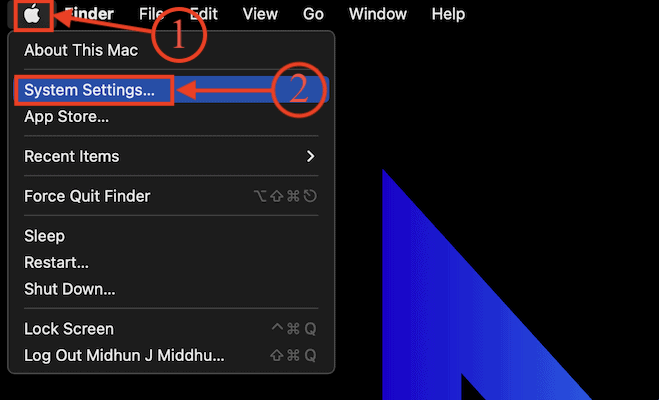
- Click on the “Apple Icon” available in the top left corner to open the options list. Choose the “System Settings” option from that list.
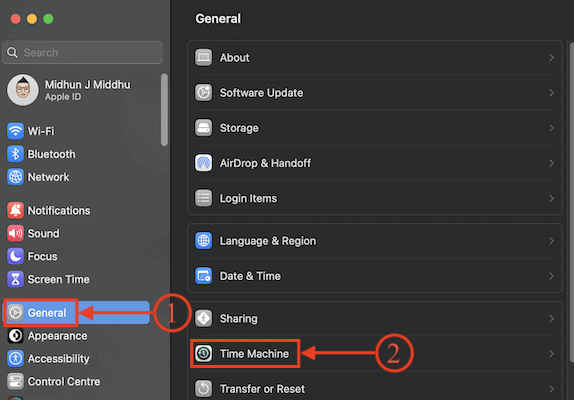
- Then the System settings window will pop up. Move to the “General” section and choose “Time Machine” from that list.
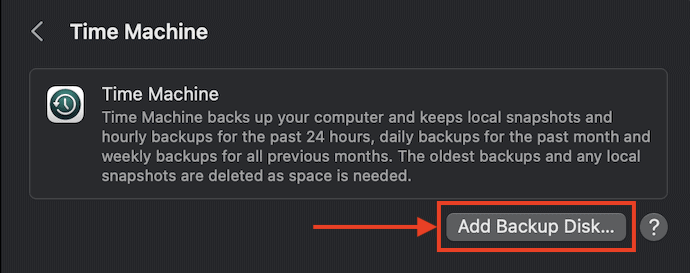
- There, it shows you the “Add Backup Disk” option under the Time Machine setting.
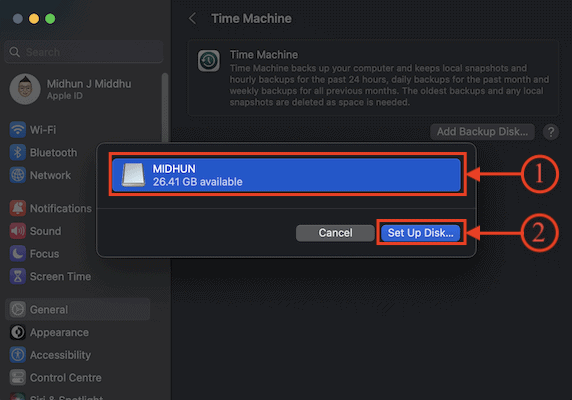
- Then a window will pop up and shows you the list of available storage disks connected to your Mac. Choose the Storage disk and Click on “Set up Disk”.
- A window will pop up and asks you to choose a Password to encrypt the selected storage disk. Later, Click on “Done”.
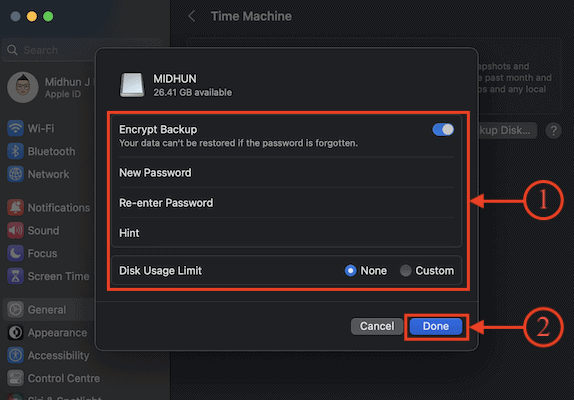
- That’s it, setup of the Storage disk has been successfully completed.
- Related: How to compress files on Mac by creating a Zip file
- Forgot the Mac Admin password? Easy to reset with terminal
Time Machine Backup Preferences
Once the Time Machine setup is done, then Hourly backups for the past 24 hours, Daily backups for the past month, and weekly backups for all previous months will take place automatically.
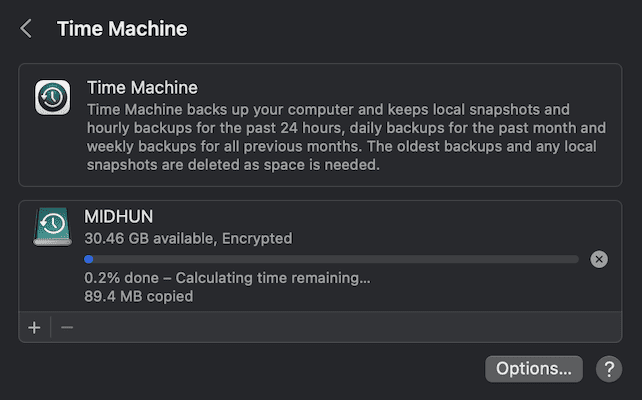
- If you need to take a backup instead of waiting for an automatic backup, the Back up Now option is available.
- To make automatic backups stop, you can turn off the Time Machine.
- Status can be verified and even the items to back up can be excluded by selecting only items required to take back up.
- During the First backup, it takes a long time depending on the number of files.
- The Time Machine takes backup of files that are changed since the previous backup and hence the future backups would be much faster.
- RELATED – Mac OS X Keybard shortcuts everyone must know
- How to resize an image on Mac with the Preview application
2. iCloud

iCloud is the official cloud storage available for Apple users to store the data of their iPhones and Macs. It is a very safe place to store important and confidential files without any other thoughts. It provides 5GB of free storage space for each Apple ID and you can also extend the storage space by spending some money. iCloud allows you to back up various file types like Photos, Videos, Documents, events, and much more.
Highlights of iCloud
- Easy to Backup and Recover
- Provides 5GB of Free Cloud Storage
- Upgradation of Cloud Storage is available
- Syncs Data Automatically
How to Backup Mac to iCloud
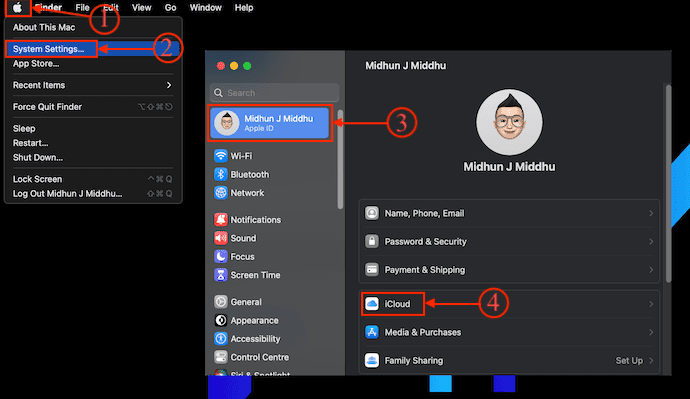
- Click on the Apple Logo Available in the top left corner to open the options list. Choose the “System Settings” option from that list to launch the system settings window. Click on the “Apple ID” to view all the Apple account-related options. Choose the “iCloud Drive” option from that list.
- It shows the options related to iCloud and from here you can modify the iCloud Back up Options. Click on the “iCloud Drive” option to turn it ON and also a window will pop up. Click on “options” to choose what to back up and what not to back up.
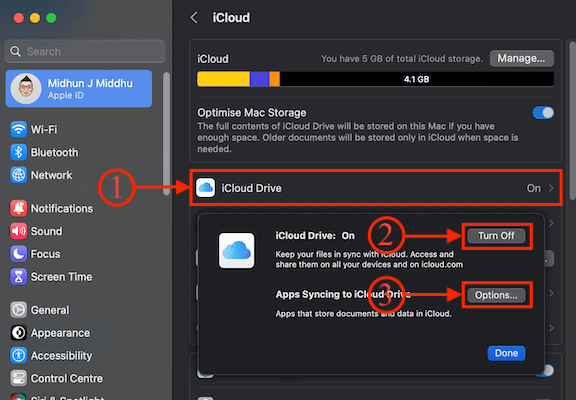
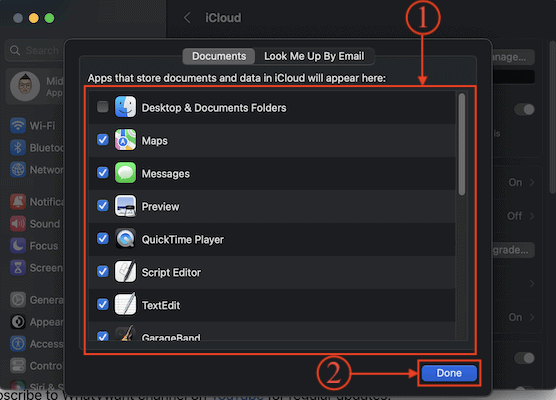
- A window will pop up and allows you to choose the file types to back up. Later, Click on “Done”. That’s it, from now, data starts to back up automatically.
3. Disk Drill
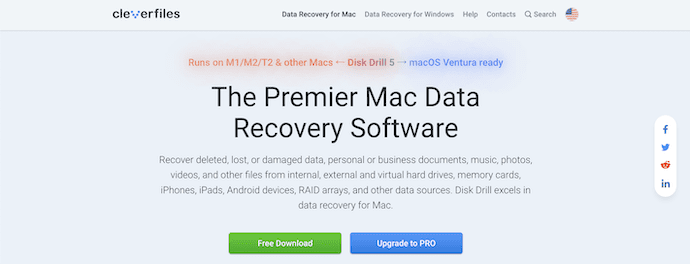
Disk Drill is a premium data backup and recovery software that has a huge user base because of its success rate in recovering data. This has a clean and very interactive interface. This allows you to recover deleted, crashed, and lost data from internal and external hard drives. Along with the hard drives, it supports recovering the data from storage devices like Memory cards, Pendrives, iPhones, iPads, etc., This is compatible with both Windows and Mac Operating systems.
Highlights of Disk Drill
- Safe-to-use
- No Professional skills are required
- Supports all major devices
- It allows recovering 400+ file types
- Compatible with Windows and Mac Operating systems
- Available in Free and Pro versions
Pricing
Disk Drill is available for Windows and Mac Operating systems. It provides its services in three versions, such as Basic, Pro, and Enterprise. The Prices of all three versions are provided in the below screenshot.

How to Backup Mac using Disk Drill
- Visit the Official site of Disk Drill and Download the latest version of the application onto your Mac. Launch the application after successful installation and allow all the required permissions.

- On the Homepage of the application, it shows various options along with the list of storage devices connected to your Mac. Choose the “Byte-to-Byte Backup” from the Extra Tools section and choose your Mac’s Hard Disk. Later, click on “Create Backup”.
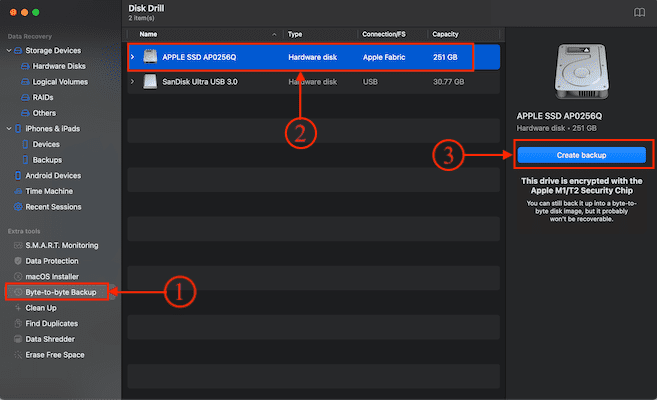
- It asks to choose the destination location to save the backup file. That’s it, this is how you can easily back up your Mac using Disk Drill.
Conclusion:
Time machine is the best tool to Back up Mac to an external hard drive. If you are serious about your Mac backup, it is better to store the backup in cloud storage like iCloud or iDrive(75% Discounted link). Because you will never lose data if you had stored it in the cloud.
I hope this tutorial helped you to know How to Back up Mac completely. If you want to say anything, let us know through the comment sections. If you like this article, please share it and follow WhatVwant on Facebook, Twitter, and YouTube for more Technical tips.
- You May also like: How to transfer files from PC to Mac
- Step-by-step guide to change the Mac admin password
How to backup Mac – FAQs
Does Mac automatically Back up?
When Time Machine is turned on, it automatically backs up your Mac and performs hourly, daily, and weekly backups of your files.
Is it better to backup Mac to iCloud?
In most cases, Apple recommends iCloud Backup. iCloud backup provides an easy and reliable backup solution.
How much GB do I need to backup my Mac?
If you plan to make regular backups of your Mac, the best approach is to choose a drive that is atleast twice the size of the data you are backing up. If all your data is on a Mac with a 500 GB SSD, then a 1 TB external drive might be sufficient.
How long does a full Mac backup take?
Note that your first backup may take several hours depending on how many files you have. However, you can still use your computer while the backup is in progress. Thereafter, further backups will complete faster as Time Machine only backups the files that have changed since the previous backup.
What storage is best for backups?
Flash drives and SSDs are the most efficient physical way to backup your system. Flash drives and solid state drives use flash technology to write and read data very quickly, making for speedy backups.
