
It is possible to Password protect folders or files on your PC or USB. In this tutorial, I am going to discuss possible methods to Password protect a folder. When the security of your folders or files is your first priority and don’t mind spending little money, you can use premium software NordLocker which helps to password protect any folder of the file in your computer or USB. If you don’t want to spend money, then continue reading this article.
You can also protect your USB or external hard drives or your computer drives with a password. You can get file security, even without a password. Here I will discuss all possible methods to get file security.
How to Password protect a folder in Windows PC
Video Tutorial
We provided this article in the form of a Video Tutorial for our reader’s convenience. If you are interested in reading, skip the video for now and watch it after the completion of reading this article.
1.Hide files with Windows Built-in feature
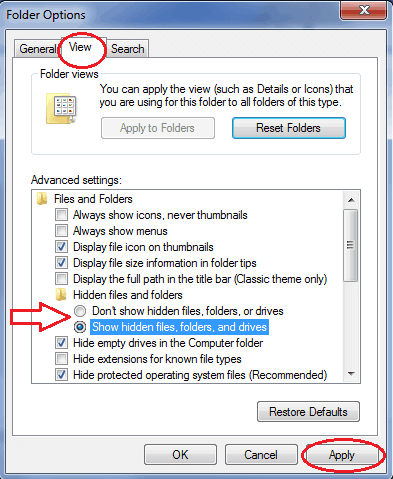
Windows has built-in features to hide files. You can use this feature to hide your files or folders. For a complete procedure to hide files with Windows feature read,
The drawback of the Windows hides feature: When you hide a folder with this feature, even you cannot see the folder. Anyone can see hidden files if they set the folder view option to “show hidden files”.
2.How to lock folder or file free with easy file locker
Easy file locker is open-source software. You can see the folder, and you can lock the folder. You can hide the folder with password protection using this software. Anyone can see the folder, but no one can open the folder. If anyone tries to open the folder, it will show an access denied error message. Only you can change the permission of the folder by opening the software with a password. I think it is the perfect free solution to get file security.
- Download easy file locker. And install the software.
- Open Easy file locker software by clicking on the desktop icon or by going into programs.

- Click on “System” in the top menu.
- Click “Set Password”. You will see another small window where you can enter your password and confirm your password. Just type the password and confirm it.
Now you have set a password for this application. When you open this application, you need to enter a password. You need to add files or folders to this software by following the below procedure.
Open software.
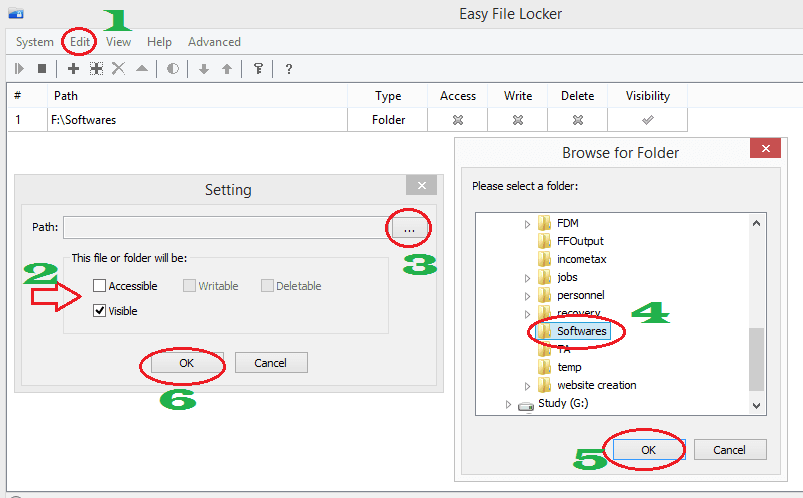
- Click on “Edit” next to “System”. You will see the option to “Add file” and “Add folder”. Click on any one according to your need. You will see the “Settings” window.
- Uncheck “Accessible” and check “Visible”. If you want to hide the folder, uncheck “Visible”.
- Click on “…” near the “Path” rectangular box. You will see the “Browse for folder” window.
- Select any one of your folders to lock.
- Click “Ok”.
- Click “Ok” in the settings Window.
Now you can see the folder in the list with available permissions shows that in the above screenshot. If you want to change permissions, just double-click on the folder name in the application. You will see the settings Window.
When you click on the locked folder on your computer, you will see the Access denied window shows that in the below screenshot.

You can close the application. When you want to open a locked folder or file, Open software then it will ask for your password. Enter password. Delete the locked folder or file from the list or change permission. Then only you can access the file or folder.
3. Password protect folder by Compressing files
The drawback of the above two methods is, you can not password protect each folder. You can only hide files and password-protect the software. If anyone uninstalls the software, then they can access folders.
The solution for this problem is, convert the folder into a zip file with password protection. You can use 7-zip or WinRar to compress and protect files. Want to know how to use 7-zip? read,
You can Compress files by making them into zip files. There are lots of free and paid software available to create zip files.
Windows has a built-in feature to zip and unzip files. But it may not work with big files. If your file size is less than 4 GB, you can use the Windows zip feature. It is always better to have a good zip program in your system.
7-zip has widely used software in the world. It is open-source software. It is one of the best among free zip software. It not only compresses the files but will also give you the option to password protect the archive file. Another outstanding feature in 7-zip is, it will be included in Windows right-click feature.
If you want more features than 7-zip, you need to go for WinRAR. WinRAR is the best among the paid zip software.
How to compress and password protect files with the best free zip and unzip software 7-ZIP
In this section, I am going to discuss how to compress files and how to password protect the file with a well know free zip software 7-zip.
Video Tutorial: How to password protect a folder in windows with 7-zip
We had explained the detailed process of how to secure your files using 7-zip in this video below. Watch it now and have fun!
- Download 7-zip and Install software.
- Go to your file or folder. Right-click on file or folder.
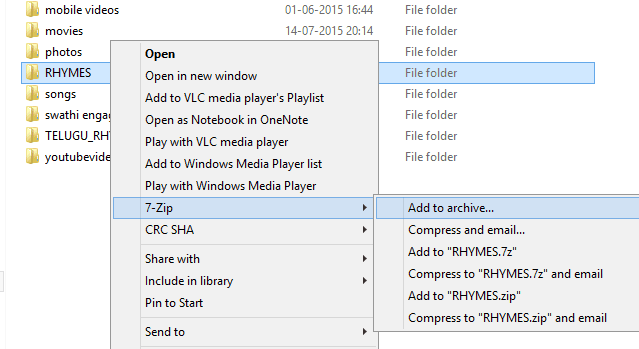
- Click “7-zip”.
- Click “Add to Archive”. You will see the “Add to archive” window shows that in the below screenshot.
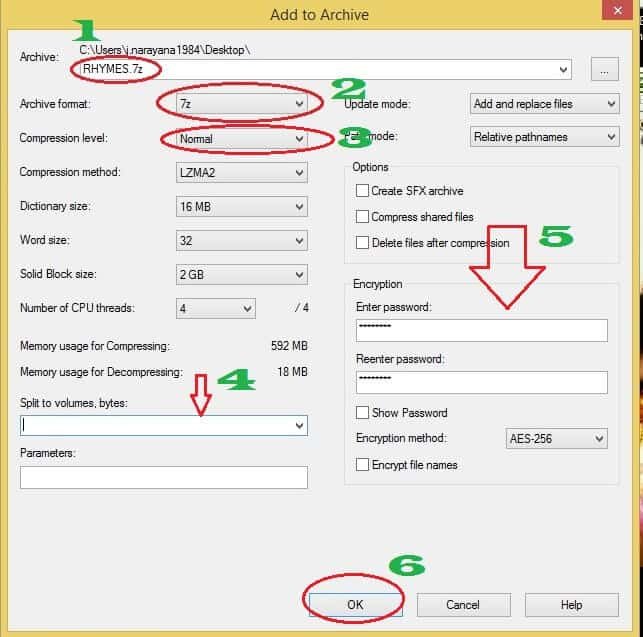
- You can change your “Archive” name. Or keep it as it is.
- It is better to select “Archive Format” as 7z. You can also select zip from the dropdown. 7z format gives a high-compression level compare to zip format. I have tried with the 726MB folder. It produced a 714Mb zip file in zip format. It produced 695 MB zip file in 7z format. So it is better to use the 7z format. Don’t worry about unzipping 7z format. Any other zip program can unzip the 7z format.
- Keep compression level “Normal”. Because there is a minimal effect on other options.
- If you want, you can try the “Split to volumes, bytes” option. It is useful when you have a very big file and if you want them to split into multiple files. You can leave it empty.
- Type a password and confirm in the fields under encryption. You can enter a password only if you want to password protect your files. Otherwise, you can leave it empty.
- Click “Ok”.
Now your zip file is ready. Remember, if you want to get more compression levels and more speed, you must buy WinRAR.
4. Use Free Encryption Tool NordLocker
Read this section to learn about the free encryption tool NordLocker. You will also learn about the need of using the Encryption tool and NordLocker pro version price, features, etc..
Why Should I Use Encryption Tool?
If the last 25 years have taught as anything, it’s that any grain of trust you put into tech will be crushed and then used against you.
Free email sounded like a good idea until we realized that email providers read everything we write.
We were enthusiastic about not paying for news anymore, too. But then we found out that news sites sell our data. Social media is no different.
Now, it’s the turn of cloud storage. Cloud providers like iDrive (75% Discounted link) or Google Drive will happily supply the free space for your media, documents, and everything else you give them. Google will even sync files from your phone with its servers. All so that they can extract as much data about you as possible.
You don’t have to expose yourself. Use NordLocker to encrypt your files before you put them on the cloud.
What is NordLocker?
NordLocker is an encryption tool that can encrypt almost any type of file. It can protect you from data exploitation. Anyone can try NordLocker at no risk.
NordLocker Price
It has two versions free and premium.
- The free version will give you 3 GB of free encryption.
- The premium version will cost you only $3.99/ month with 500GB cloud storage.
How to Encrypt files or folders with NordLocker?
With NordLocker, encryption will be one of the easiest tasks you ever take on. Unlike many similar tools, NordLocker is super easy to use. No IT or cryptography skills are required. Here’s how it works:
- You get a special encrypted folder called ‘a locker’
- You drag files you want to secure into the locker.
- NordLocker encrypts your files instantly.

It’s exactly the same as you dragging files from folder to folder on Windows, macOS, or Linux. The only difference is that NordLocker’s special folder is only accessible to you and the people you share the access with.
After you put files into lockers, you can securely send them via email, transfer them to removable data, or upload them to the cloud. You’re the only one with access to your files.
Hint: If you want to encrypt your entire online activity, you need to use the VPN service. We suggest you use NordVPN(A Special discounted link).
- Related: What is VPN
- NordVPN review
- 2 Ways to create a secret message with an online or offline Encryption tool
Does NordLocker Guarantees Privacy
NordLocker is not a tool that swears to protect your privacy only to turn around and sell your data to the highest bidder. If you use NordLocker, you have complete control. That’s because encryption happens locally — right on your device. NordLocker does not keep any files, passwords, or logs.
You don’t have to take our word for it. NordLocker gives 3 GB of free encryption to every user. Plus, files are not limited by size or type. You can try it without any risk. If you end up using more than 3 GB, don’t worry: NordLocker is just $3.99/month up to 500GB.
5. Use IObit Protected Folder (A less priced software)
IObit Protected Folder is a premium software, but it is less expensive than NordLocker. When you need premium software and want to save money, you can go with this instead of NordLocker.
What is IObit Protected folder?
IObit protected folder is premium software with a simple interface. If you don’t want to spend money to protect your files, you must read,
Let’s come back to my review. Always free software and services come with limited features and support. Premium software provides you excellent features and support also.
It comes with the free version also, but that will give you only 20 free trials. If you want to use this software you must buy it.
Features
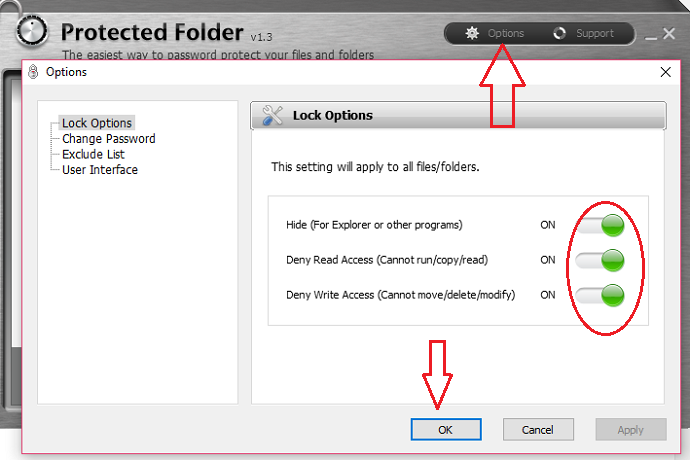
- You can hide your files.
- You can deny read access which will stop running, copying and reading of your files.
- You can deny write access which will stop moving, modifying and deleting your files. You can use all three options or any one of them.
- You can add any file to its exclude list.
Dicount
Offer: Our readers get a special 25% discount on all IObit products. Visit our IObit discount coupon page for the promo code.
How to Password protect folder with IObit Protected Folder?
Buy IObit protected folder. Install the software. Immediately it will ask you to create your password. Enter the complex password. Re-enter the password and enter the password hint. It is best to create a complex password. When it becomes tough to maintain passwords and creating complex passwords, use the sticky password (Special discounted link) the best password manager which provides you a password generator option as well.

Register with your purchased license code using the option at the left bottom.
Click Options at the top right corner to change the options. You can change the options according to your need. Or you can leave them as it was. It is better to disable the Hide option. Anyone can see the file, but cannot open the file without the password. If you hide the file, even you can not see the file in your file Explorer, but you can see and access the file inside the Protected Folder software client.
Now you can drag and drop any file or folder to protect. Or you can use Add option to add the file.
After adding the files or folders close the window.
How to view or unlock locked files?
You can see your locked files in two ways.?
- Right click on the locked folder if you disabled Hide option. Select Unlock by Protected Folder.
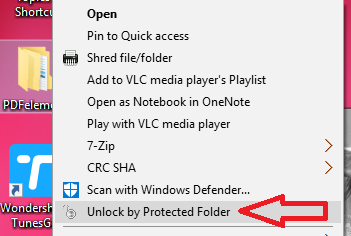
It will ask you to enter the password. Enter the password to unlock the file.
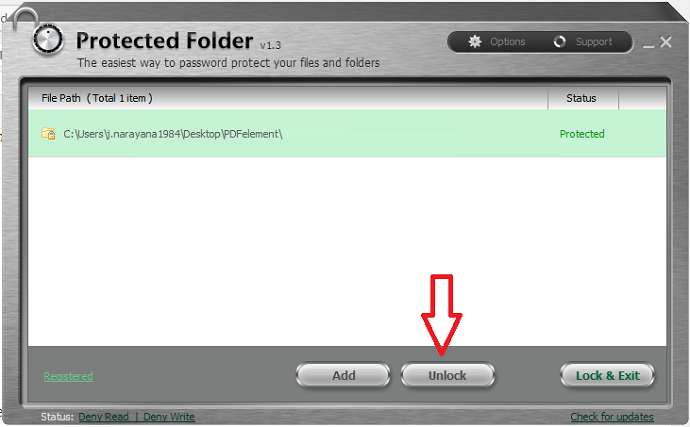
2) Open Protected Folder desktop client. Enter the password. Select the file or folder to unlock. Select Unlock.
6. How to password protect a folder on External hard drive or USB
We have a separate article about how to put a password for a folder or file on a USB or external hard drive.
Read 2 Ways to Hide and password protect files in USB / external hard drive for the complete procedure.
You can encrypt the entire drive or USB with DiskCryptor. No one can open the encrypted drive. They see the option to format the drive. Only you can decrypt with your password.
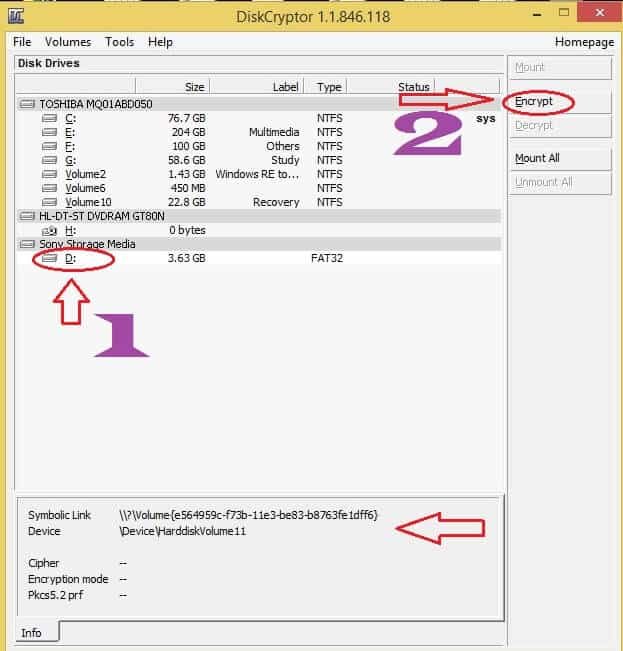
The drawback of DiskCryptor: You will see the only option to format the drive, so someone may format your drive and you may lose data. Before doing encryption, you need to take a data backup. When you think, losing data is Ok instead of revealing data, then only you can go for this method.
Conclusion:
All the above free methods may have some flaws. If you need complete protection, I recommend you to use NordLocker or IObit Protected folder. So that you will have complete protection.
I hope you like my article about how to protect folders with Passwords. If you like it, do me a favor by sharing it with your friends. If you want more tips, follow WhatVwant on Facebook and Twitter. Subscribe WhatVwant channel on YouTube for regular updates.
Ultimate Guide To Password Protect Folder/file – FAQs
Is Nord Locker free to Download?
Yes, Nord Locker is absolutely free to download and use.
What are the Operating Systems that support Nord Locker?
At present, Nord Locker is only available for Windows OS 10, and macOS 10.13, and later.
Is creating a Nord Account is mandatory to access Nord Locker?
Yes, to get cloud access you have to create Nord Account.
Did Iobit offer a free version?
Yes, it offers a free trial version but with limited features.
Great post jinka, it’s helpful to me to protect our documents in safe side.