Want to Deactivate Facebook Account temporarily? Want to Delete Your Facebook account permanently? This article will give you possible methods to deactivate temporarily and to delete your Facebook account permanently. You will also learn How to download your Facebook data.
A lot of people are deactivating their Facebook accounts due to silly reasons like fighting with their beloved ones or they want to be alone for Some time. By deleting your Facebook account, you will miss a lot of opportunities like connecting with new people, job opportunities as well as messages from your loved ones. If you are new to Facebook, then create a Facebook account.
Should I Delete or Deactivate Facebook account?
You can delete and deactivate your Facebook account. You have to know the difference between deleting and deactivating the account. If you delete your account you cannot retrieve but if you deactivate your Facebook account you can Reactivate your account by simply signing in when you want to back. By deactivating your account Facebook does not remove data like Photos and Videos which you have shared on your timeline. You can watch your shared data after reactivating your account.
First, you have to decide whether you want to permanently delete or temporarily deactivate your Facebook account. If you deactivate your Facebook account none of your friends will find your profile. Your profile will be invisible to all of your friends until you sign in to your account.
It is recommended to download your Facebook data before deactivating or deleting your account.
How to Download Your Facebook Data?
Facebook Data consists of all your chat conversations, Pictures, Status Updates, Videos, etc., and all your info. It is advised to download the archive of your Facebook data before removing or deleting your Facebook account. You can save the data on your computer and check into it later. So let’s see how to download your Facebook data.
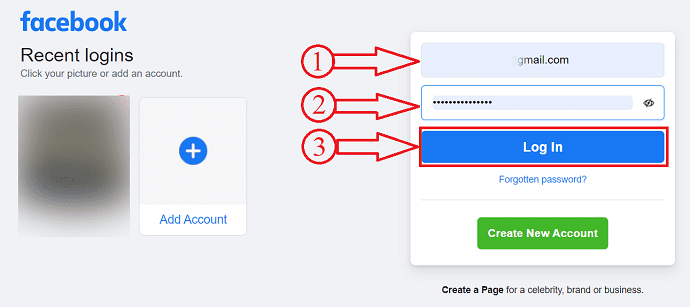
- STEP-1: Open any browser and Visit the Official site of Facebook. Enter the login credentials and click on “Log In” to sign in to your Facebook account.
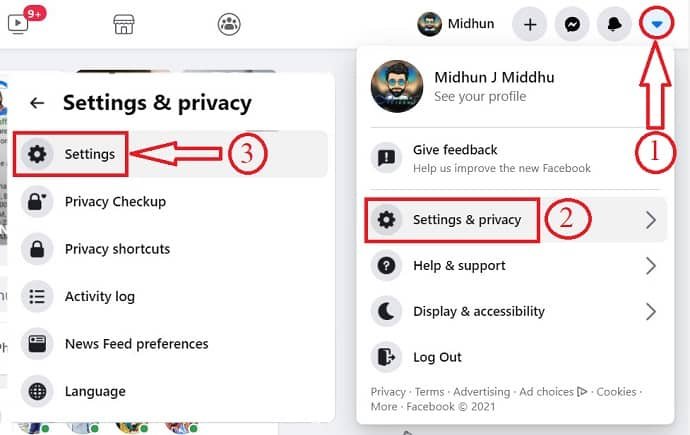
- STEP-2: Click on the “Profile icon” available in the top right corner of the window. An options list will open. Choose the “Settings & Privacy” option and it opens another options list.
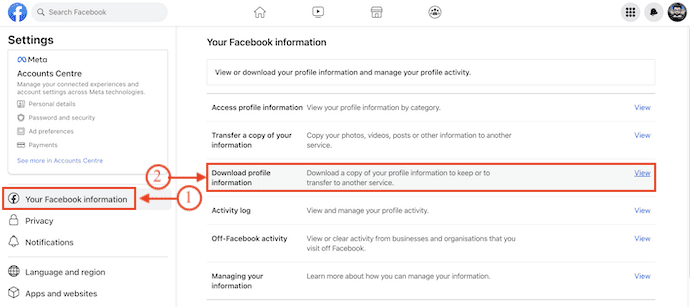
- STEP-3: It redirects you to the settings page. Make sure that you are in the “Your Facebook Information” section. Choose the “Download Profile Information” by clicking on the “View” option.
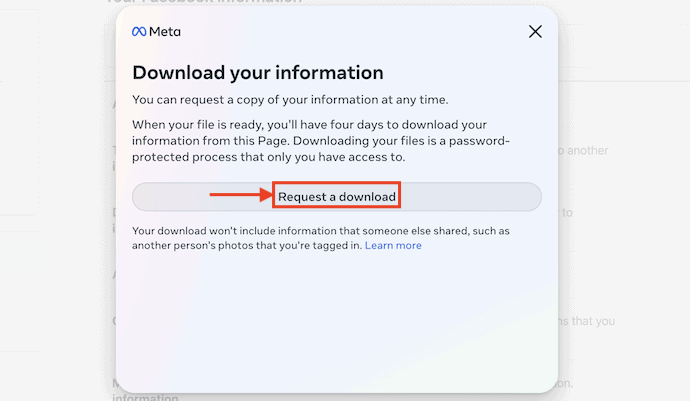
- STEP-4: A pop-up will appear and from there, you need to request to download the information. Click on “Request a Download”.
- STEP-5: If you have multiple accounts, then it shows the list of accounts. Choose the account from that list and click on “Next”. (You can also choose all the accounts to download the data of all accounts).
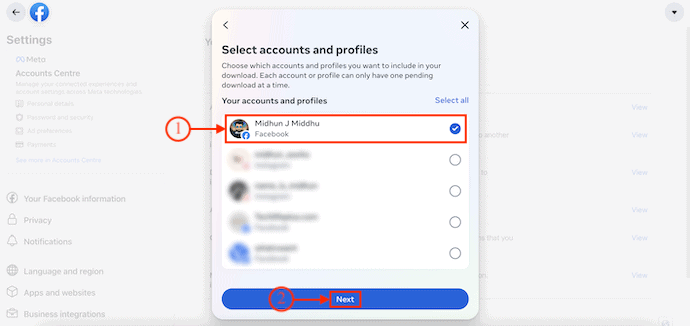
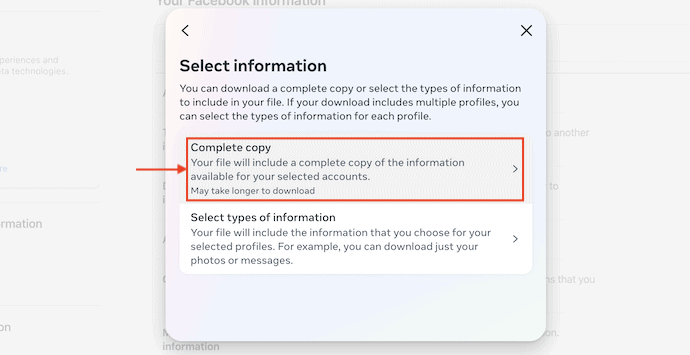
- STEP-6: It shows two options, such as, “Complete Data” and “Select types of information” to download the data. Choose the type of information according to your convenience.
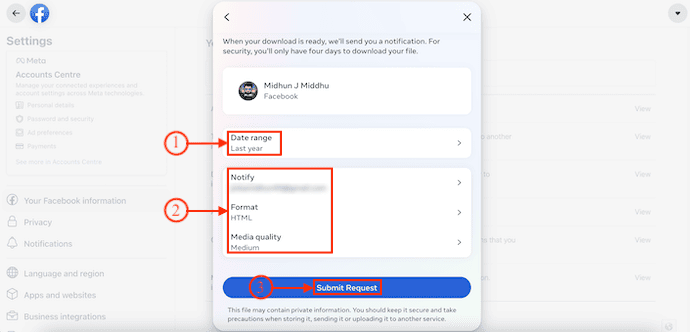
- STEP-7: Then it asks you to select the Data Range, Format, and Media quality. Later, Click on “Submit Request”.
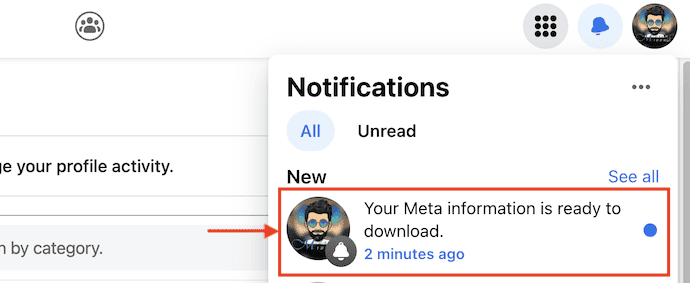
- STEP-8: It takes some time to prepare the download and after the completion of preparation, it sends you a notification as “Your Download is ready”. Click on it.
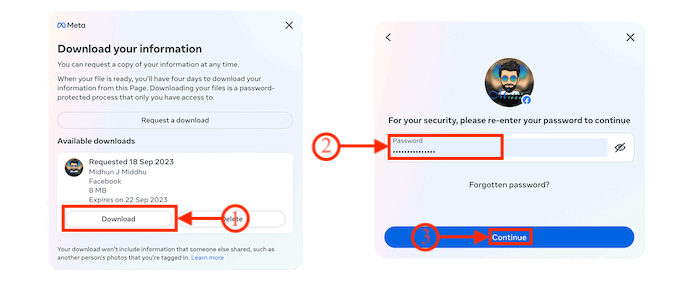
- STEP-9: It takes you to the download page, click on the “Download” option available in the popup. Then it asks you to enter the password to start downloading the prepared information file.
How To Deactivate a Facebook Account Temporarily
To deactivate your Facebook account temporarily, they will ask you questions about the reasons for the deactivation. If you are not sure whether you are ready to delete your Facebook account, then you can try deactivating your account. Deactivating your account hides your profile from all your friends and search but you can activate the account any time you want. All you need is to log in to your Facebook account to activate it.
Video Tutorial
We provided this article in the form of a Video Tutorial for our reader’s convenience. If you are interested in reading, skip the video for now and watch it after the completion of reading this article.
1. How To Deactivate Your Facebook Account from Desktop
In this section, I will show you the step-by-step process to deactivate Facebook Account using a computer.
STEP-1: Login to Facebook
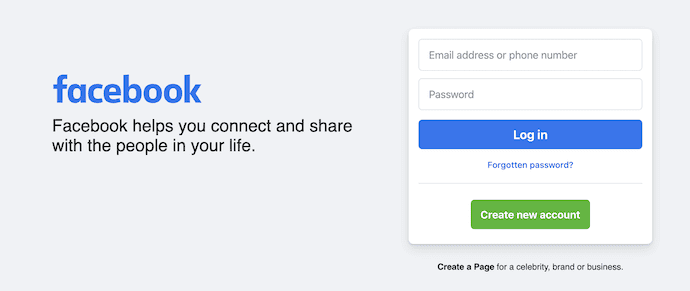
Launch any browser on your computer and visit the Official site of Facebook. Enter your login credentials and sign in to your Facebook account.
STEP-2: Go to Settings

Click on the Profile icon available in the top right of the window and an options list will open. Click on the “Privacy & Security” option from that list. Then another options list will open. Select the “Settings” option from that list.
STEP-3: Accounts Centre

It takes you to the Settings page and on the left side of the window, you will find the Account Centre section. Click on the “See more in Accounts Centre” option.
STEP-4: Personal Details
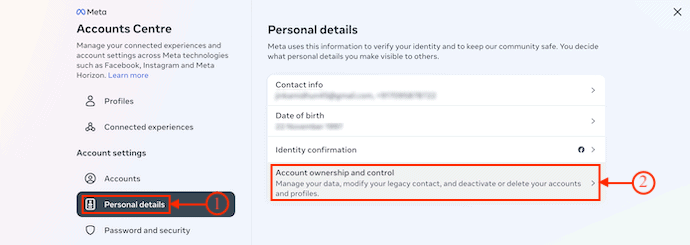
In the Accounts Centre, move to the “Personal details” section. There it displays the “Account ownership and control” option. Click on it.
STEP-5: Deactivation option
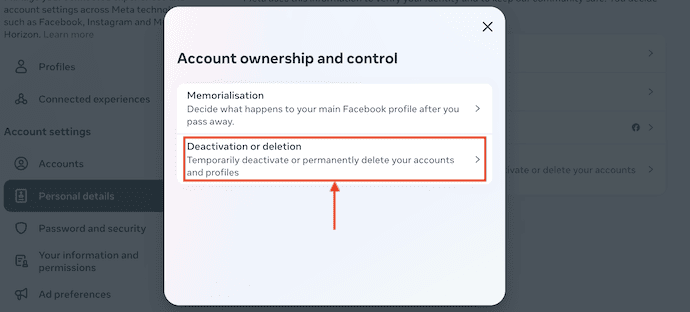
It displays a pop-up with two options, “Memorialisation and Deactivation or deletion”. Choose the “Deactivation or Deletion” option.
STEP-6: Choose the option
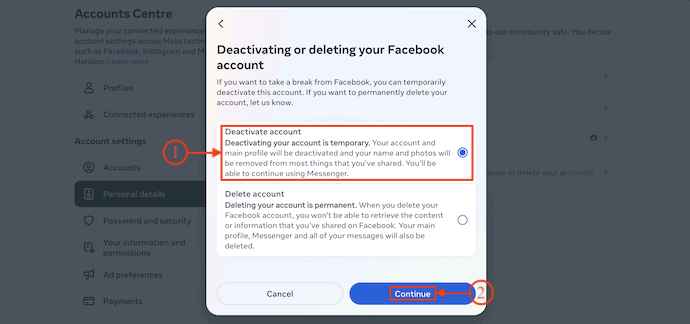
It asks you to choose what you want to perform to your account – Deletion or deactivation. Select “Deactivation” and click on “Continue”.
STEP-7: Enter Password
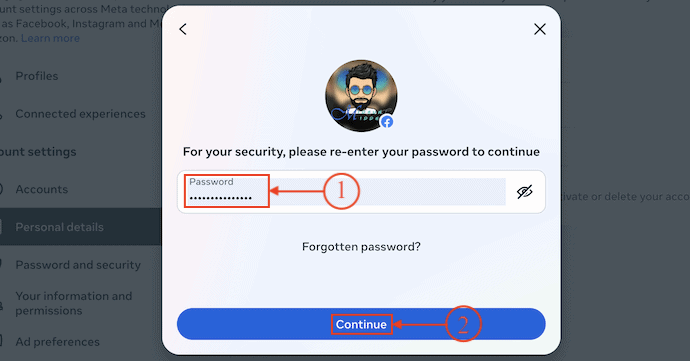
It asks you to enter your Facebook password to confirm your deactivation.
2. How To Deactivate Your Facebook Account on Mobile
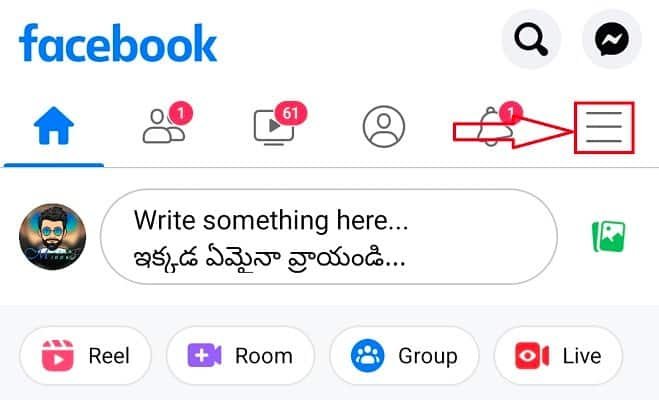
- STEP-1: Launch the Facebook application on your Mobile and tap on the Profile icon available on the right side of the interface.
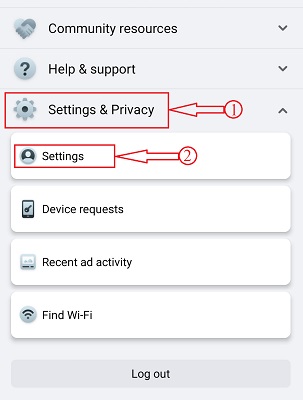
- STEP-2: Then it takes you to the Menu page. Scroll to the bottom of that page to find the “Settings & Privacy” option. Tap on it and it opens another options list. Select the “Settings” option from that list.
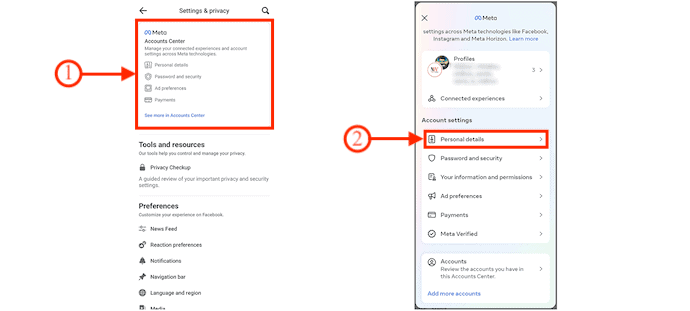
- STEP-3: It takes you to the “Settings & Privacy” page and there tap on the “Accounts Center” section. On the Accounts Centre page, choose the “Personal details” option by tapping on it.
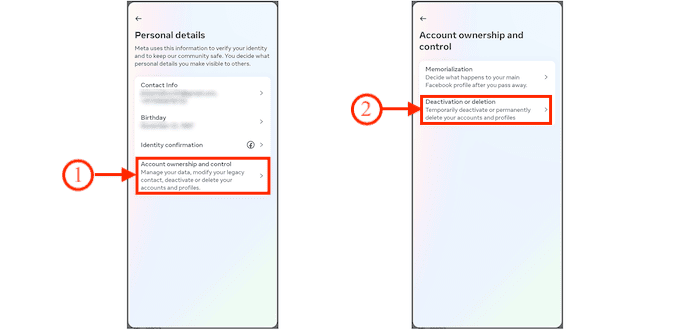
- STEP-4: It displays personal details like Contact info, Birthday, Identity confirmation, and Account ownership and control. Select the “Account ownership and control” option from that list. Then it shows you two options, such as Memorialization and Deactivation or deletion. Select “Deactivation or deletion” by tapping on it.
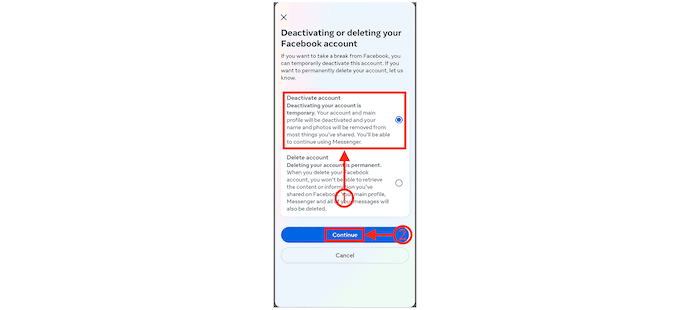
- STEP-5: Again it asks you to select whether you want to deactivate or delete your account. Tap on the deactivate option to select and tap on “Continue”. Then it asks you to enter your Facebook password to deactivate successfully.
How to Delete a Facebook Account Permanently
If you are paranoid about your data then you might also be thinking of deleting your Facebook account as well. You might have used your Facebook account to log in to several applications etc., which won’t work after you delete your Facebook account. Facebook allows users to reactivate your account within 14 days and after that, your account is deleted permanently. So before removing your Facebook account, You need to download your data stored by Facebook. Let’s see How to Download your Facebook data.
If you have decided to delete your Facebook account then it will take a while for Facebook to delete your account. You can log in within 14 days to stop the process of deleting your info forever. Before deleting your account follow the above steps to download your Facebook archive.
- STEP-1: Launch the Facebook application on your mobile and tap on the Profile icon available on the right side of the interface.

- STEP-2: Then the Menu page will open. Scroll to the bottom of that page and tap on the “Settings & Privacy” option. It opens another options list. Select “Settings” from that list by tapping on it.

- STEP-3: Tap on the “Accounts Centre” section and choose the “Personal Details” option.

- STEP-4: From the Personal Details page, tap on the “Account Ownership and Control” option and Select “Deactivation & Deletion” from the list.

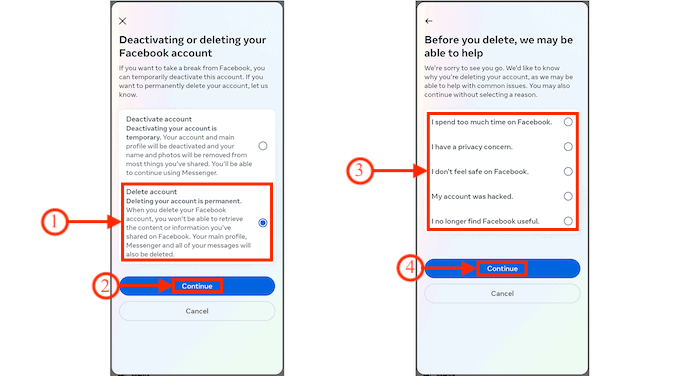
- STEP-5: Then it asks you to select whether to deactivate or delete your Facebook account. Select the “Delete” option from that list and then it asks you the reason why you want to delete your Facebook Account. Choose a reason from that list and tap on “Continue” to delete your Facebook account.
Conclusion
Facebook is a popular social media application that has a huge user base across the globe. Because of the application’s features, users will easily get addicted to it. This makes users spend lots of time. So, to control yourself for the addiction, you need to keep your Facebook account disabled. Follow the simple steps discussed in this article, to disable and delete your Facebook account temporarily or Permanently.
I hope this tutorial helped you to know about “How to Deactivate Facebook Account Temporarily & Permanently”. If you want to say anything, let us know through the comment sections. If you like this article, please share it and follow WhatVwant on Facebook, Twitter, and YouTube for more Technical tips.
How to Deactivate Facebook Account Temporarily & Permanently – FAQs
Will deactivating Facebook delete everything?
Deactivating your Facebook account does not delete it permanently, but while it is deactivated, other users won’t be able to see your profile. While deactivated, other users may be able to see messages you’ve sent them, and if you still have messager, you can still chat with friends.
What happens when you deactivate your Facebook account?
Your Facebook profile (including your posts, photos, and friends) will be hidden after deactivating your account. No one can also send you friend requests. Your messages, however, remain visible to those you have chatted with.
Why do people deactivate Facebook?
People might just want to take a break, and they feel they lack self-control. Perhaps the people have other personal issues that they are dealing with. Currently, the messenger can still be used if the account is deactivated.
How many days after deactivating Facebook does it delete?
Deleted accounts can be recovered too, but only for 30 days after deletion. If you don’t reactivate your deleted Facebook account within 30 days, you’ve permanently deleted Facebook and erased all your data.
What is Facebook ID?
Your user ID is a string of numbers that doesn’t personally identify you but does connect to your Facebook profile. You have a User ID automatically, whether or not you choose to create a username.
