
Are your getting unwanted and spam redirections in your browser on Mac? Want to know the reason for redirects and the possible ways to remove browser redirects from Mac? Then this article is the perfect place for you to know about redirections. So, read this article till the end and know the details completely.
Browser redirects are a kind of virus that lets your browser redirect to other websites and shows lots of irrelevant pop-ups. These are also known as Browser Hijackers. When you download an application from unknown websites then during the installation, it asks you to choose their browsers or homepages as default. if you opt for them, then your default browser settings are modified and lead to browser redirections.
Browser Redirections are seen regularly seen while surfing the internet through browsers on Mac. Most of them redirect to third-party websites and install malicious software on your Mac. They run in the background and collect your sensitive data and saved passwords/credentials. So, if you find more redirections on your Mac, then you need to take the necessary precautions to remove Browser redirections from your Mac.
How to Remove Browser Redirects from Mac
1. Check Browser Extensions
Google Chrome
- Launch the Google Chrome Browser on your Mac and Click on the “Hamburger icon”(Three horizontal lines). An options list will open. Choose the “Settings” option from that list.
- Then a new settings tab will open. Move to the “Extensions” section available on the left menu. You can move to the extensions tab just by searching for “Chrome://Extensions” in the top search bar.

- It takes you to the extensions tab and there you will find the list of all the installed extensions. Check whether there are any unknown suspicious extensions and remove them by clicking on the “remove” option.

Mozilla Firefox
- Launch the Mozilla Firefox Browser on your Mac and click on the “Extensions icon” available on the top right of the browser. Then it opens Add-ons Manager Tab. Choose the “Extensions” option from the left menu.
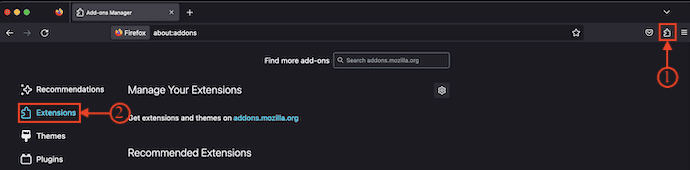
- There it displays all the installed extensions on the Mozilla Firefox browser. Choose the suspicious extension if you find any and remove it from the browser.
Safari Browser
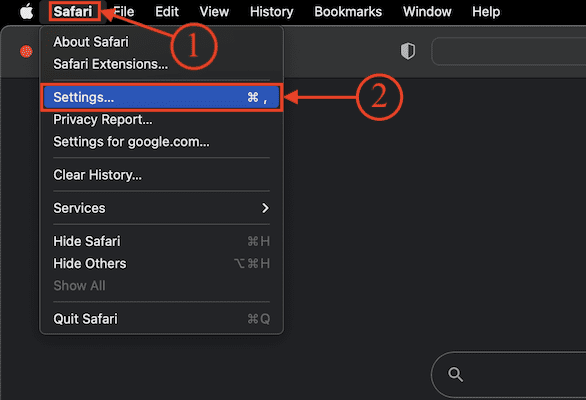
- Open the Safari Browser on your Mac and click on the “Safari” option available on the top menu. An options list will open and shows you various options regarding the Safari Browser. Choose the “Settings” option from that list.
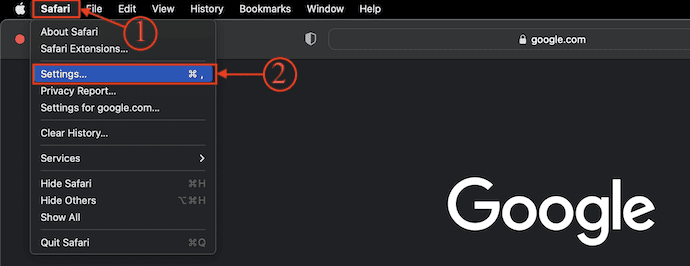
- Then a window will pop up with various setting categories. Move to the extensions section and there it displays all the extensions installed on Safari Browser. Check the extensions list and remove the extensions that you feel suspicious.
2. Update Homepage of Browsers
Safari Browser
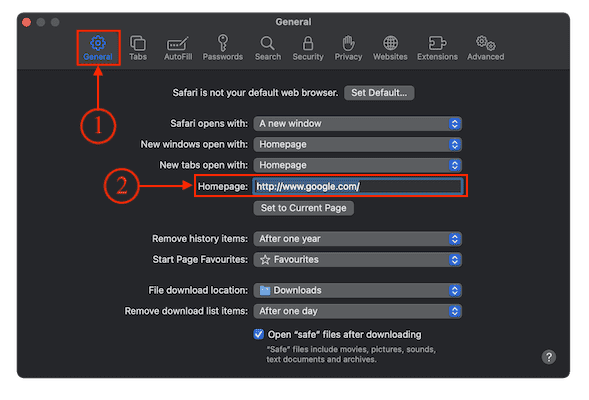
- Launch the Safari Browser on your Mac and click on the “Safari” option available on the top menu. An options list will open. Choose the “Settings” option from that list.
- Then a window will pop up and shows all the setting categories. Move to the “General” section and there you will find the “Homepage” option with the URL. Verify whether the homepage URL is set to any third-party websites. If so, immediately change it to default or trusted search engines like “www.google.com”.
Google Chrome
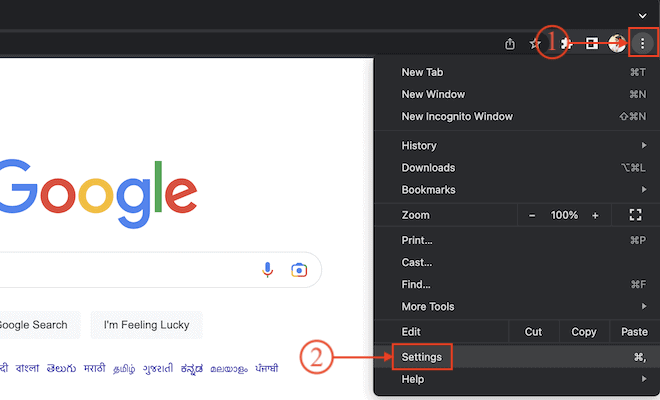
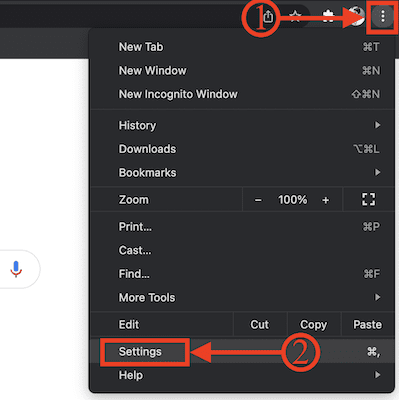
- Open the Google Chrome Browser on your Mac and Click on the “Three dots” available in the top right corner of the window. An options list will open. Choose the “Settings” option from that list.
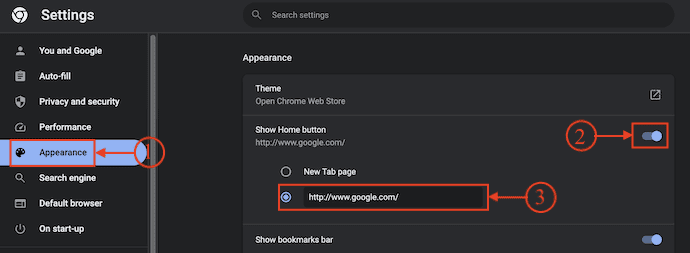
- Then a new tab will open. Move to the “Appearance” section from the left menu. Then you will find options like Theme, Show Home button, Show Bookmarks bar, Font, etc., Click on the “slider” beside the show home button option to turn on the home button and check whether the homepage URL is set to any third-party websites. If so, change it to a trusted search page.
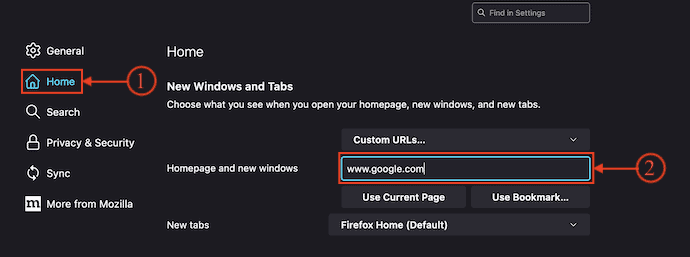
Mozilla Firefox
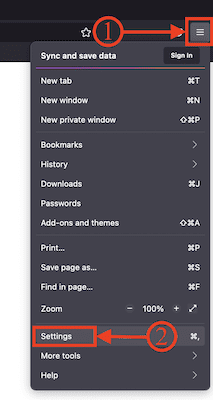
- Launch the Mozilla Firefox browser on your Mac and click on the “Hamburger” option available in the top right corner of the browser. An options list will open. Choose the “Settings” option from that list.
- Then the settings tab will open. Move to the “Home” section. There you will find the Homepage and new windows option. Enter the URL of a trusted site to set it as a homepage.
- RELATED – 5 Best Ways to Clear Autofill on Mac OS X
- How to see External devices connected to Mac and Check their battery percentage and free up space
3. Reset Browser Search Engine to Default
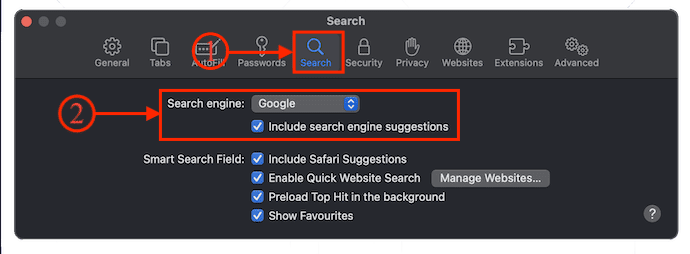
Safari Browser
- Launch the Safari Browser on your Mac and click on the “Safari” option available in the top left corner of the browser window. An options list will open. Choose the “Settings” option from that list.
- Then the settings window will pop up. Move to the “Search” section and there you will find the Search Engine and Smart Search Field options. Click on the “Drop-down” option of the search engine setting and choose “Google” as a default search engine.
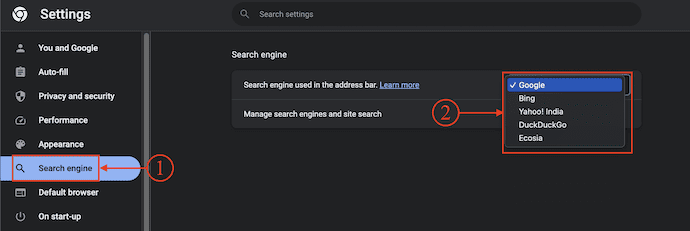
Google Chrome
- Open the Google Chrome browser on your Mac and click on the “Three dots” option available on the top right of the window. An options list will open. Choose the “Settings” option from that list.
- Then the Settings window will pop up. Move to the “Search Engine” section and there click on the “Drop-down” option to see the available search engines list. Choose a search engine from that list.
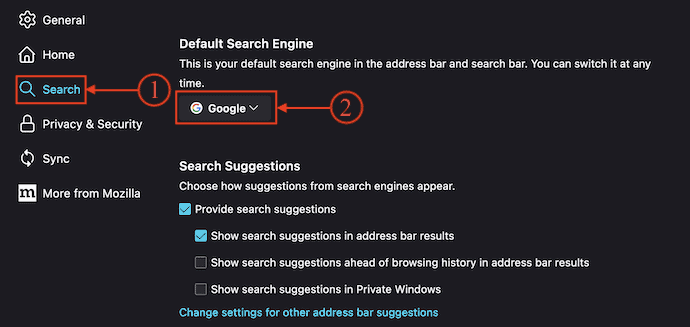
Mozilla Firefox
- Launch the Firefox Browser on your Mac and click on the hamburger icon available in the top right corner of the window. An options list will open. Choose the “Settings” option from that list.
- A New tab will open. Move to the “Search” option by clicking on the option from the left menu. There, you will find the “Default Search Engine” option. Click on the drop-down option and it shows you the list of available. Choose “Google” as the default search engine.
4. Clear Browser Cache
How to Clear Browser Cache on Mac Manually
Safari Browser
- Launch the Safari Browser on your Mac and Click on the “Safari” option available on the top menu. An options list will open. Choose the “Settings” option from that list.
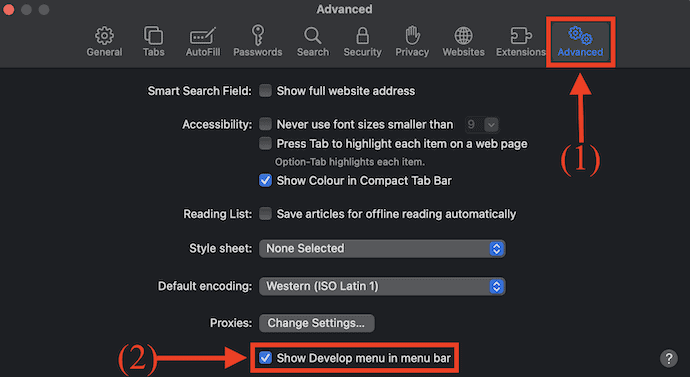
- Then a window will pop up with various options. Move to the “Advanced” section from that list. There you will find the “Show Develop Menu in Menu bar” option. Check in that option and after that, you will find the “Develop” option on the top menu.
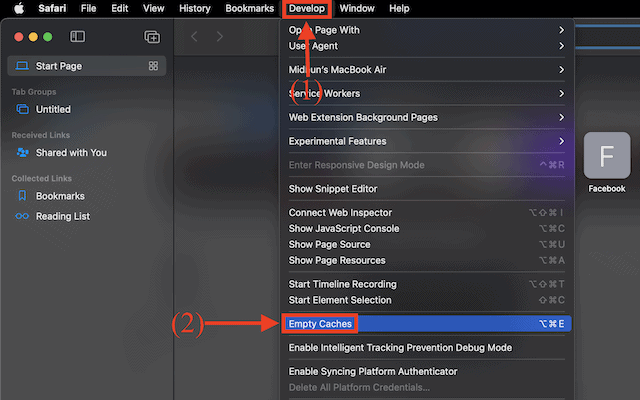
- Choose the “Develop” option from the top menu and an options list will open. Click on the “Empty Cache” option from that list.
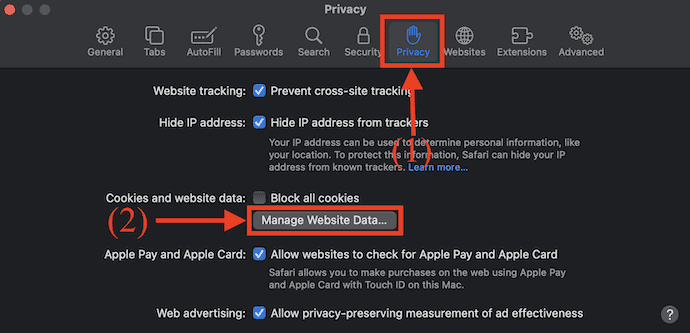
- Now, again move to the “Privacy” section on the settings window(Safari>Settings). There you will find the “Manage Website Data” option. Click on it.
- Then it shows the list of all available website data. Click on the “Remove All” option and it asks you for confirmation. Click on “Remove Now” to confirm the deletion and later click on “Done”.
Google Chrome
- Launch the Google Chrome Browser on your Mac and click on the “Three dots” option available in the top right corner of the window. An options list will open. Choose the “Settings” option from that list.
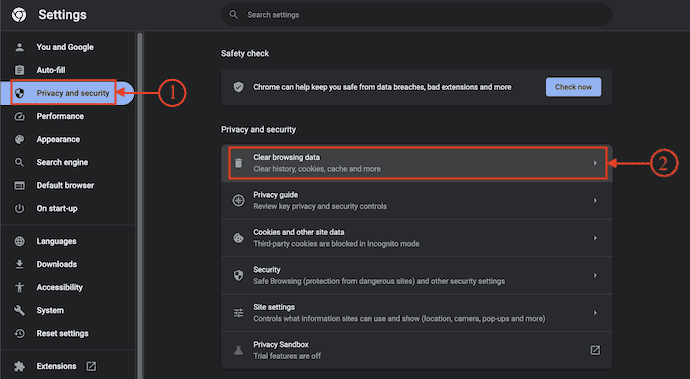
- A new settings tab will open. Move to the “Privacy and Security” section from the left menu. Click on the “Clear Browsing History” option.
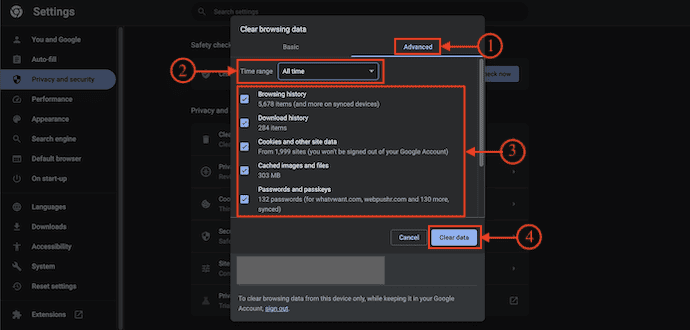
- Then a small window will pop up. Choose the Time Range to “All Time”, Select all the categories from the list, and later click on “Clear Data”.
Mozilla Firefox
- Open the Mozilla Firefox browser on your Mac and click on the “Hamburger” icon available in the top right corner of the browser. An options list will open. Choose the “Settings” option from that list.
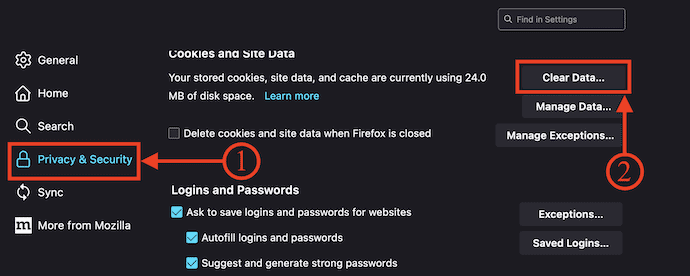
- A new settings tab will open and shows you various setting options. Move to the Privacy & Security section and there you will find various option categories. Click on the “Clear Data” option under Cookies and Site Data option.
- Then a window will pop up and shows you options to select. Check in the cookies and Cached Web Content option and later, click on the “Clear” option.
- RELATED – 5 Best Ways to Clear Log Files on Mac
- 6 Best Ways to Hide or Remove Icons from Mac Desktop
How to Clear Browser Cache on Mac Automatically
Intego Washing Machine

Intego Washing Machine is an amazing Mac cleaner application from Intego. This is a trusted application and has a huge user base across the globe. It allows users to remove malware, virus, and unnecessary files easily. It scans deep into your Mac and provides you with efficient results. It provides different types of cleaning criteria to clean unwanted files and data from Mac. You can organize files and delete duplicate files with a single click.
Features of Intego Washing Machine
- Easy-to-use Interface
- Powerful Mac Cleaning Software
- Provides different types of Deletion Criteria
- Organize the Dock, Homepage, and Smart Folders of the Mac
- 24/7 Customer Support
Pricing
Intego Washing Machine can be availed by purchasing the Intego Premium Bundle(Special Discounted Link) or else the individual Intego Washing Machine application. The prices of the Intego Washing Machine are listed below.
- 1-Year Protection
- 1 Computer – $55.99
- 3 Computers – $109.99
- 2-Year Protection
- 1 Computer – $99.99
- 3 Computers – $209.99
How to Clear Browser Cache on Mac using Intego Washing Machine
- Open any Browser on your Mac and visit the Official site of Intego Washing Machine. Choose a plan, purchase, and download the application onto your Mac.
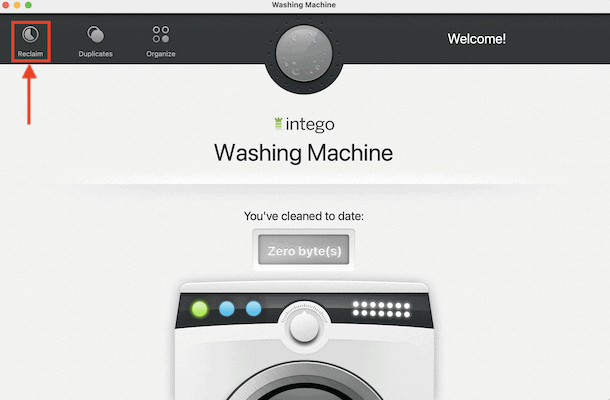
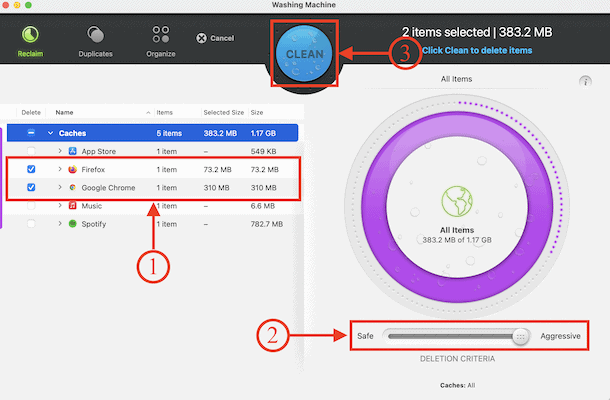
- Launch the application after successful installation. Then you will find the interface of the application as shown in the screenshot. Click on the “Reclaim” option available in the top left corner of the application.
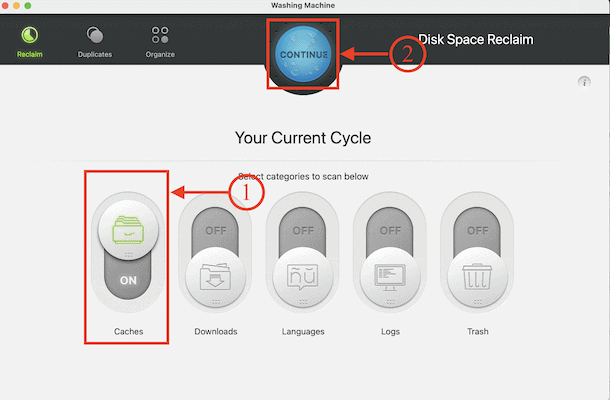
- Then it shows you different categories to select and scan for. Select the “Cache” option among them and click on “Continue”.
- It starts to scan and shows you the results. Click on the “Cache” option and it shows the cache data of the applications and browsers. Choose the browser’s cache and choose the Deletion Criteria using the slider. Later, click on “Clean” to start the cleaning process.
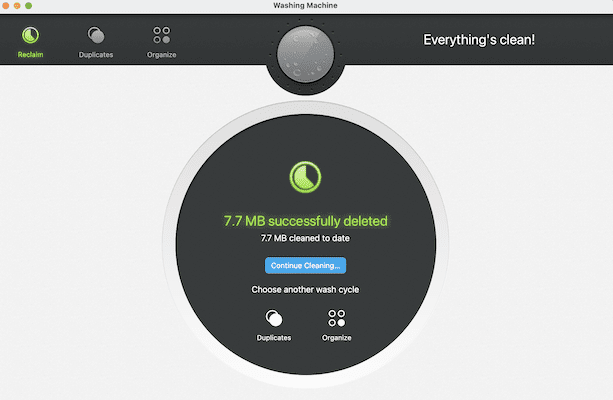
- After the completion of the cleaning process, you will find the interface as shown in the screenshot.
Hint: We recommend you use the Intego Premium bundle (Special discounted link) which included a Washing machine along with Internet security (Special discounted link).
2. CleanMyMac X
CleanMyMac X is a Mac Cleaning Software that allows users to clean unwanted, junk files from their Mac. It has a clean and professional user interface. This comes with lots of advanced features that make your Mac more powerful and work effectively. It allows you to update and uninstall applications completely from Mac without leaving any traces. CleanMyMac X is available in Free and Premium versions.
Highlights of CleanMyMac X
- Easy-to-use
- Scans and clean Mac deep into your Mac
- Keeps applications up-to-date
- Externally connected device feature
- Available in free and Premium versions
- Compatible with all the latest versions of macOS
Pricing
CleanMyMac X is available in Free and Premium versions based on the number of Macs. The Premium plans can be purchased in One-Year Subscription and One-Time Purchase. The prices of all the premium plans are listed below.
- One-Year Subscription
- Plan for 1 Mac – $27.96
- Plan for 2 Macs – $43.96
- Plan for 5 Macs – $63.96
- One-Time Purchase
- Plan for 1 Mac – $71.96
- Plan for 2 Macs – $107.96
- Plan for 5 Macs – 159.96
How to clear Browser Cache on Mac using CleanMyMac X
- Open any browser on your Mac and visit the Official site of CleanMyMac X. Download the latest version of the application onto your Mac.
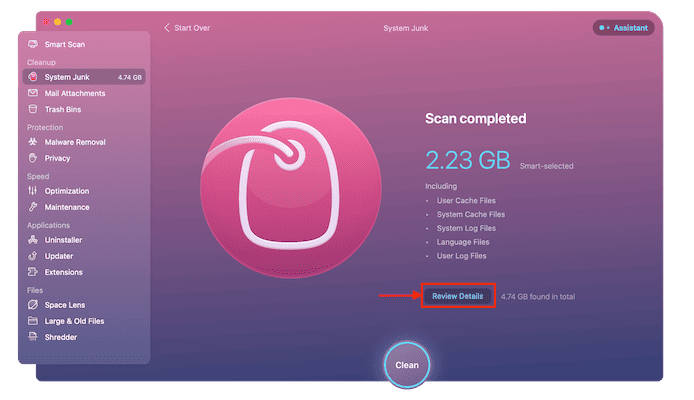
- Launch the application after the successful installation. Then you will find the interface as shown in the screenshot. Move to the “System Junk” section from the left menu and click on the “Scan” option to initiate the scanning process.

- After the completion of the scanning process, it shows you the results page and there click on the “Review Details” option to see a detailed view of the results.
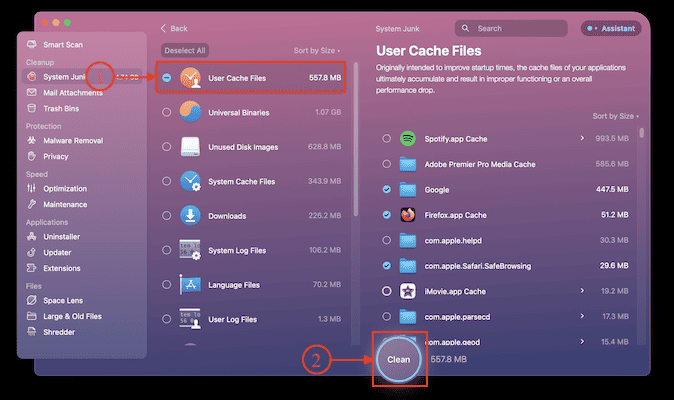
- Then it shows you the details of the files found in the scan. Make sure that browser’s cache is selected and later, click on the “Clean” option.
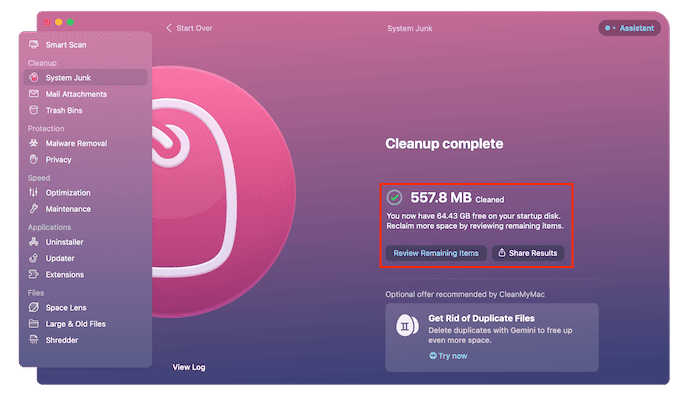
- It takes time to complete the scanning process and after the completion of the cleaning process, it displays the results page.
- RELATED – CleanMyMac X Review: The Best Mac Cleaner
- Intego Mac Washing Machine Review: A Good Mac Cleaner
Conclusion
Browser redirects are more irritative and take you to third-party websites with uneven clicks. Some of them just redirects and some other may install malicious applications into your computer. Whenever you feel like your browser popups more redirection notifications, then you need to take the necessary actions to stop redirections. Some of the best methods are discussed in this article to remove Browser Redirections on your Mac.
You can use Intego’s Washing Machine or Intego Premium bundle to reset and remove the browser’s cache. Intego is one of the promising Mac antivirus software trusted by most users across the globe. It scans deep into your Mac and helps to remove junk files, unwanted data, and malicious files. It optimizes your Mac to the utmost level.
I hope this tutorial helped you to know about “How to Remove Browser Redirections From Mac”. If you want to say anything, let us know through the comment sections. If you like this article, please share it and follow WhatVwant on Facebook, Twitter, and YouTube for more Technical tips.
How to Remove Browser Redirections from Mac – FAQs
Why does my browser keep redirecting?
A browser hijacker is a malware program that modifies web browser settings without the user’s permission and redirects the user to websites the user had not intended to visit.
What do too many redirects mean on Macbook?
The “Too many redirects” error message, also known as a redirect loop, appears on your website when the browser has failed to load any content due to a large number of redirects that followed.
How do I clear redirects in Chrome?
Go to Settings, privacy, and Security, and then click Clear browsing data, select Advanced, and clear everything.
What is a browser redirect virus?
A browser hijacker also called a browser redirect virus, is malware that impacts a user’s web browser settings and fraudulently forces the browser to redirect to websites that a user doesn’t intend to visit.