
Have you upgraded to the latest version of the iPhone and looking to Transfer Photos from iPhone To iPhone? The most complicated part after upgrading to the latest version of iPhone is to transfer photos from iPhone to iPhone. Not only the photos but all the data from an older iPhone to the newer one. There are a lot of best and easiest methods to transfer photos from iPhone to iPhone which are not known to many. This article is the best choice for you to know the best free and premium methods to transfer your photos from your old iPhone to a new iPhone.
In this article, we have embedded all the possible methods to transfer photos from iPhone to iPhone which include Free, Premium, and Online Methods. Without any delay, let’s get into the topic and grab the complete information required to transfer photos from iPhone to iPhone.
Why To Transfer Photos From iPhone To iPhone?
There are a lot of reasons/situations that arise to transfer photos from iPhone to iPhone. Some of them are listed below,
- Upgrading From Old iPhone To New iPhone,
- Sharing Photos to Friends iPhone,
- iPhone Storage Cleanup,
- To have a Backup
- READ MORE – How to reset iPhone to factory settings
- How To Recover Deleted WhatsApp Photos iPhone/Android
How To Transfer Photos From iPhone To iPhone
Video Tutorial
We Provided this Article in the form of a Video Tutorial for our reader’s convenience. If you are interested in reading, skip the video for now and watch it after the completion of reading this article.
1. How to move photos from one iPhone to another iPhone for free using AirDrop
AirDrop is an inbuilt feature available for iOS users to transfer data from one iPhone to another one. It is very handy to use and can be used by having two phones nearby. Follow the steps to transfer photos from iPhone to iPhone using the AirDrop feature.
- STEP-1: Firstly, you have to set up the AirDrop settings on both iPhones. Go to the
“notification center” and click on the network icons. Then you will find the options displayed in the below screenshot. Make sure that the Wi-Fi, Bluetooth, and AirDrop are in “Active” status.
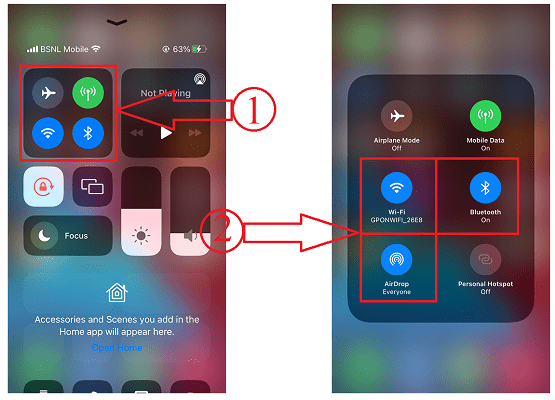
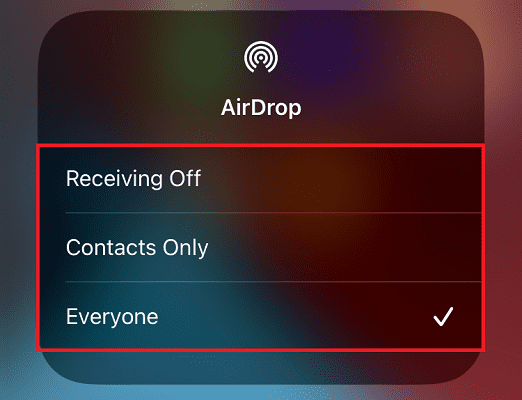
- STEP-2: Click on the AirDrop option and it will show you three options Off, Contacts Only, and Everyone. Choose “Everyone” to share the photos without saving their contact on your Phone.
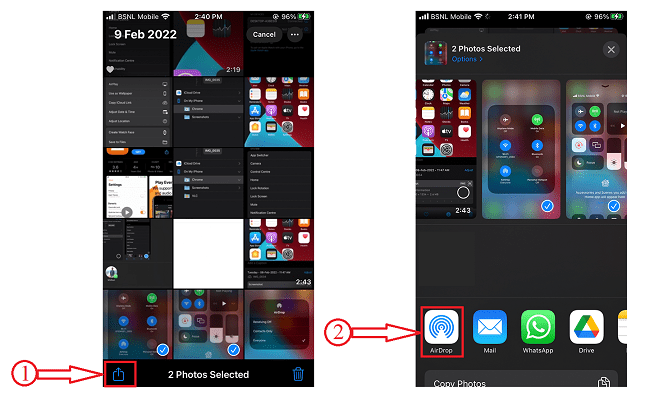
- STEP-3: Now go to the Photos application and Choose the photos that you want to share. Tap on the “Share” option available at the left bottom. Then sharing options will pop up. Choose the “AirDrop” option from the available options.
- STEP-4: Then it scans for the nearby devices that are visible on AirDrop. Choose the “AirDrop Profile” to which you want to transfer photos.

- STEP-5: Then a popup will appear on the receiver’s iPhone. Click on “Accept”. Then the photo will be downloaded and can be seen on the Photos application.
2. Using iMazing
iMazing is a premium tool that helps you to manage all your actions with your iPhone, iPad, and iPod. This is very powerful in action and easy to use. It provides all the best options required to make your work smooth. iMazing is trustworthy and never lets you disappoint at any point in time.
Highlights of iMazing
- Friendly user Interface
- Powerful Performance
- Files can be transferred from the old iPhone to the new one
- Smarter Backups
- Can Easily Upgrade and Downgrade iOS version
- and Much More
How To Transfer Photos From iPhone To iPhone with iMazing
In this section, I will show you the step-by-step procedure involved to transfer photos from iPhone to iPhone.
Total Time: 5 minutes
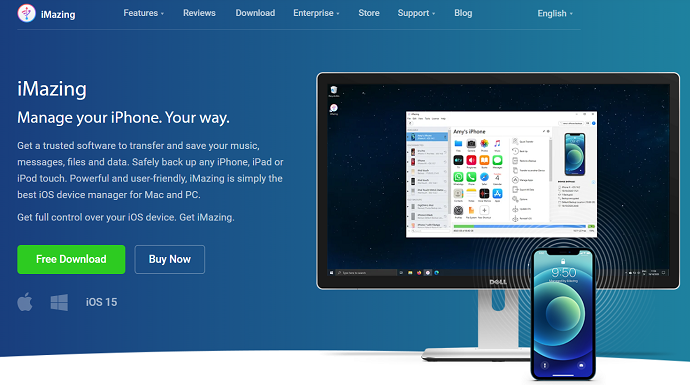
STEP-1: Download and Install iMazing
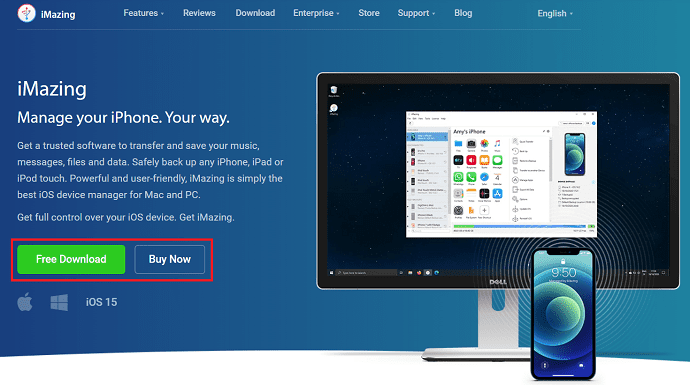
Visit the official site of iMazing. Download and Install the latest version of the application according to your computer’s operating system.
STEP-2: Connect Your iPhone & Link with iMazing
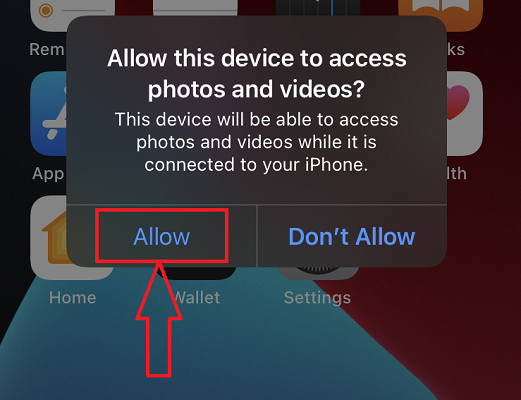
Connect Your iPhone to the computer using the USB cable connector and allow permissions on Your iPhone to grant access.
STEP-3: iMazing Interface and Choose an option
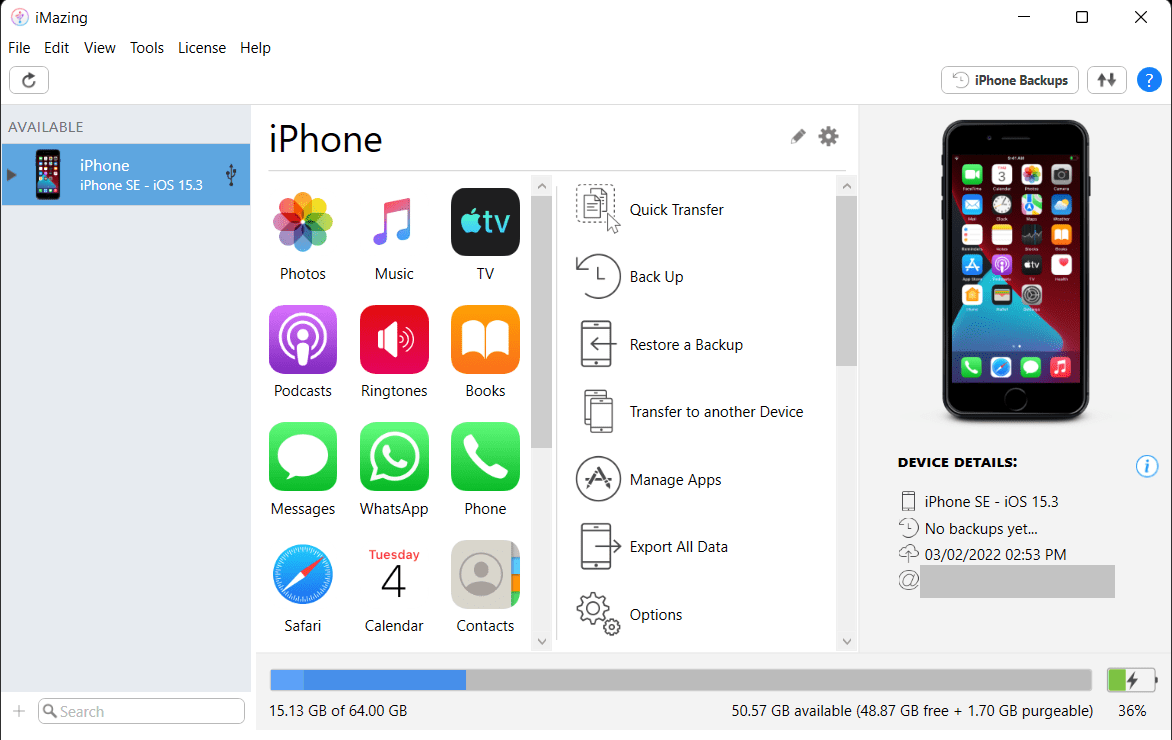
After connecting your iPhone, launch the iMazing and you will find the interface with all the actions that can be performed using the iMazing software. Choose the “Transfer to Another Device” option.
STEP-4: Connect Another iPhone
It starts scanning for another iPhone connected to the computer. So you have to make sure that two iPhones are connected to the computer. Then the iPhone will be shown.
STEP-5: Select Data
Choose the Device and then it shows the data like photos, videos, messages, and more to transfer to another iPhone. Choose the Photos and click on “Save”. That’s it, Photos will be saved to iPhone.
- READ MORE – iSunshare iSyncGenius – Backup and Restore iPhone Effortlessly
- How to delete duplicate photos on Mac, Windows, iPhone & Android
3. Using TunesGO

Wondershare TunesGO is one of the best phone manager software that supports both Android and iOS devices. This software allows transferring and backup of contacts, photos, videos, messages, and much more between devices and computers. It is compatible with all the latest iOS versions and can perform all iOS features without iTunes. It also allows the users to transfer photos from iPhone to iPhone, Android to Android, iOS to Android, and Vice versa.
How To Transfer Photos From iPhone To iPhone with TunesGo
- Visit the Official site of Wondershare TunesGO and Download the latest version of software according to your computer operating system.
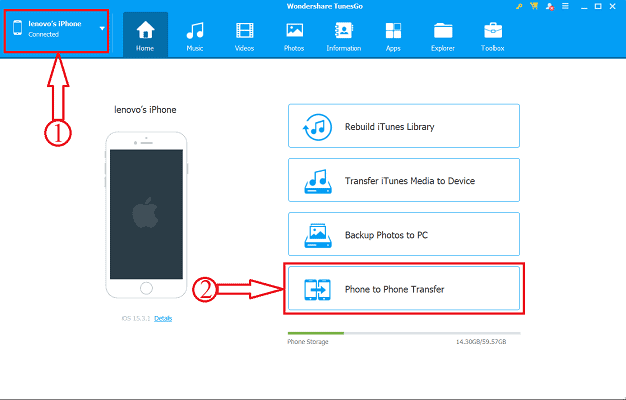
- Install and launch the application. Connect the two iPhones between which you want to transfer photos or any other data.
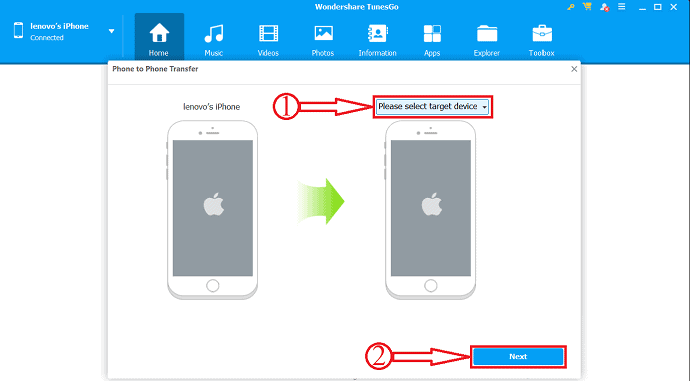
- Firstly, choose the device from which you want to transfer Photos from the option available in the left top corner. Later, click on the “Phone To Phone Transfer” option.
- Then a window will pop up and here you have to choose the targeted phone by clicking on the drop-down list option. After choosing the device, click on “Next”.
- Then it shows the content available to transfer and also shows the size of the transfer at the bottom of the window. Uncheck all the contents except Photos and Click on the “Transfer” option.
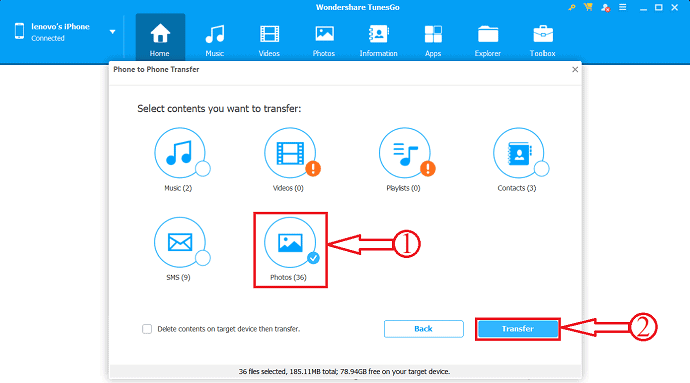
- That’s it, the transfer process starts and this is how you can easily transfer photos from iPhone to iPhone. You can also try this to transfer from iOS to Android and Vice Versa. You can transfer other data like Music, Videos, Playlists, contacts, and SMS.
4. How to shift photos from iPhone to iPhone for free using Windows Explorer
This is the basic and easy-to-use function to transfer photos from iPhone to iPhone that too for free. For this, all you need is a computer, iPhone, and a cable to connect them. Now let’s see the steps involved to transfer photos from iPhone to iPhone.
- STEP-1: Connect your iPhone to your computer using the USB cable.
- STEP-2: Then the storage window of the iPhone will launch on your computer.
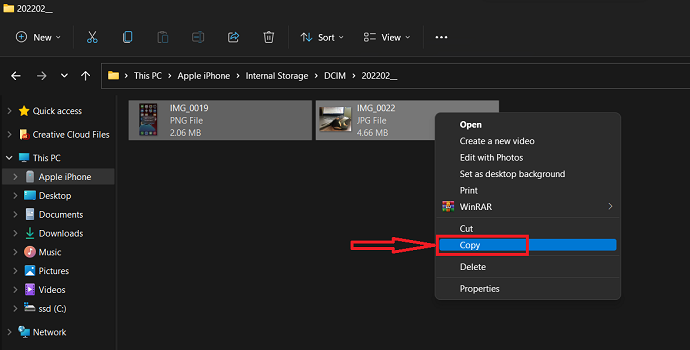
- STEP-3: Locate the photos that you want to transfer and Select by clicking on them. Right-click on them and click on “Copy”. You can also use the keyboard – “CTRL+C”.
- STEP-4: Move to a folder on your computer. Right-click and click on the “Paste” option. Or use the keyboard shortcut – “CTRL+V”.

- STEP-5: Disconnect the iPhone and connect another iPhone to the computer.
- STEP-6: Copy the last-pasted photos by following STEP-3.
- STEP-7: Now head towards the iPhone storage and choose the destination to paste the copied photos.
- STEP-8: Right-click and select the “Paste” option. Or use the keyboard shortcut – “CTRL+V”. This is how you can easily transfer Photos From iPhone To iPhone using Windows Explorer.
5. Windows Photo Import
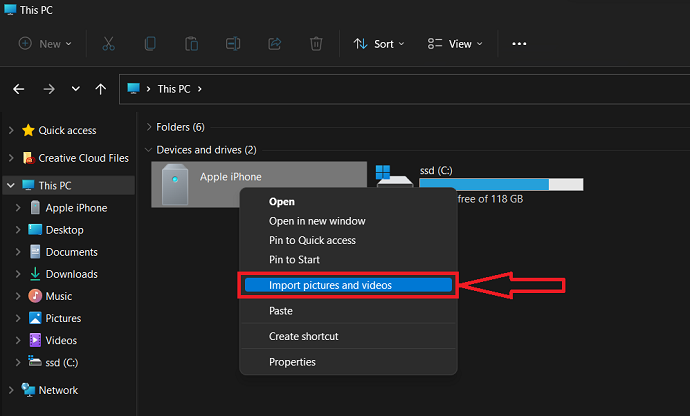
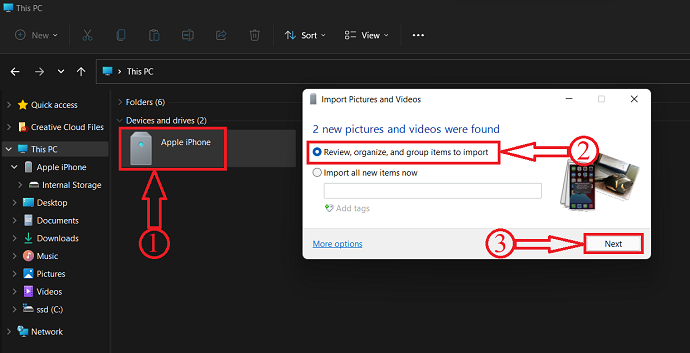
- STEP-1: Connect Your iPhone to the computer and go to “This Pc” and locate the iPhone storage.
- STEP-2: Right-click on that storage and choose the “Import Pictures and Videos” option by clicking on it.
- STEP-3: Then it starts to scan and shows you the results. Choose the first option and click on “Next” to continue.
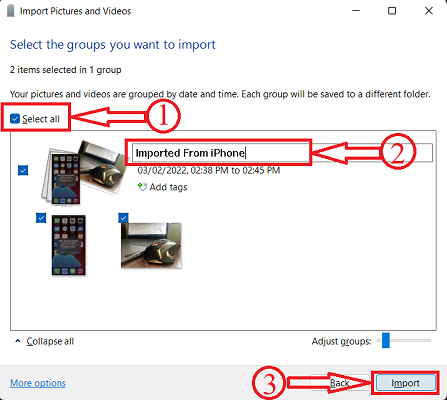
- STEP-4: In this step, choose the photo groups which you want to transfer. After choosing, click on “Import”.
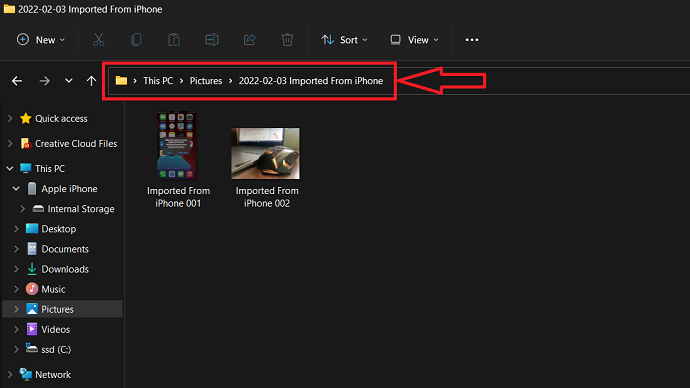
- STEP-5: All the imported photos are found in the pictures folder of the “This Pc” section. Later, disconnect the iPhone and connect another iPhone.
- STEP-6: Head towards the pictures folder and copy them using the keyboard shortcut “CTRL+C” or using the copy option.
- STEP-7: Open the iPhone storage and go to the targetted location. Right-click and select the “Paste” option. Or by using the Keyboard shortcut “CTRL+V”. This is how you can transfer photos from iPhone to iPhone using the Windows Photo import option.
- READ MORE – 5 Safety Keyloggers for iPhone
- IOTransfer 4 Review: A Better Way To Manage Your iPhone or iPad
6. iCloud
iCloud is a cloud storage platform by default available for Apple users. All the data like photos, videos, and more available in the iPhone can be made to sync automatically. This sync setting can be modified from settings. Using this iCloud Account, you can easily transfer data photos from iPhone to iPhone.
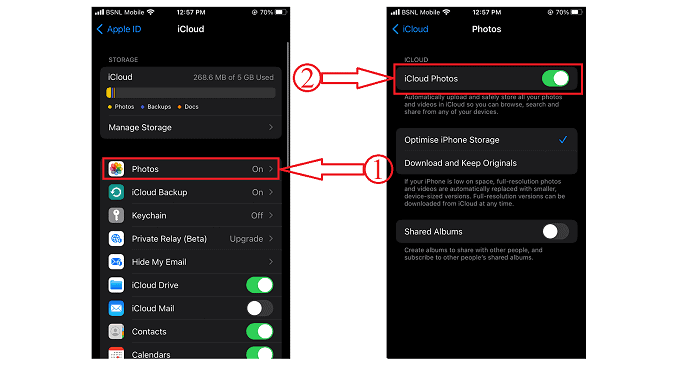
- STEP-1: Firstly, go to “Settings” and tap on the “Apple ID”. Then you will find the settings related to Apple ID. There, iCloud is one among them. Tap on “iCloud”.
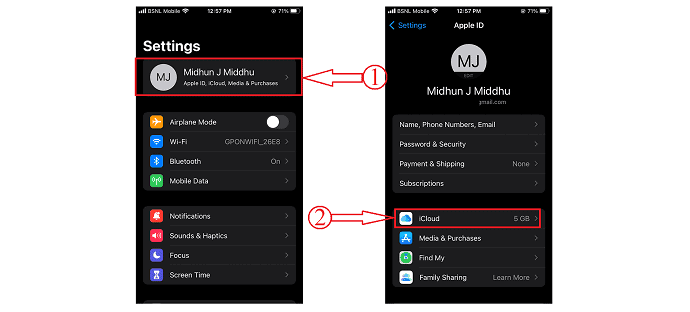
- STEP-2: In the iCloud setting, tap on the “Photos” option. And there you will find the photos sync settings. Make sure the iCloud Photos option is “Turned ON”. Also, choose the “Photo Upload Quality”. That’s it, from now photos will automatically sync to iCloud storage.
- STEP-3: As the photos are synced automatically to iCloud, you can access them from anywhere and on any device just by logging into the iCloud account.
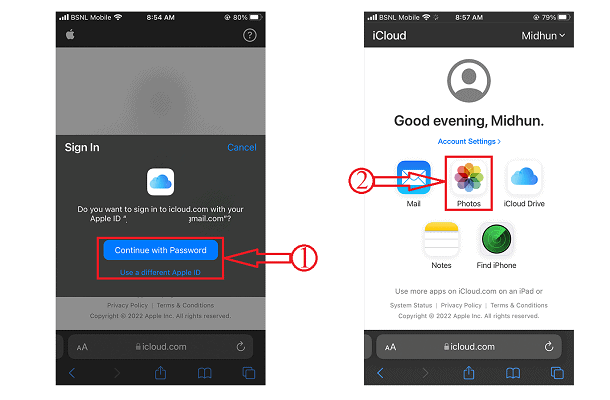
- STEP-4: Open any Browser on the new iPhone and visit the iCloud official site. Sign in to iCloud using the login credentials and then you will find the interface with all the synced data. Click on the “Photos” option and it will show you all the synced photos and videos.
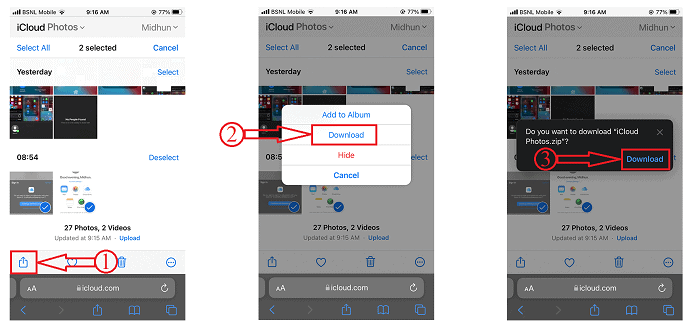
- STEP-5: Select the Photos that you want to download and tap on the “Three Dots”. Then options list will pop up. Choose the “Download” option by tapping on it. Again it asks for confirmation, Tap on the “Download” option and that’s it, the selected photos will start downloading automatically.
7. iTunes
- Download and install the latest version of iTunes on your computer.
- Connect your iPhone to the computer and launch the iTunes application. Move to the File sharing option available on the left side of the window.
- There, choose the application from which you want to share the Photos. Choose the Photos and then click on the “Save” option available at the right bottom. A window will pop up, choose the targeted location, and click on “Save”.
- Now, Disconnect the present iPhone and connect another iPhone to the computer.
- Again move to the File sharing section and choose the application. Click on the “Add Files” option available at the right bottom.
- A window will pop up. Choose the photos saved earlier and click on “OK”. That’s it the files start to transfer into the iPhone. This is how you can easily transfer photos from iPhone to iPhone.
- READ MORE – How to Turn on Dark Mode on iPhone: 3 Methods
- 5 Best iPhone Photography Apps to Enhance Your Photos
8. Google Drive
Just like the way you used iCloud, Google Drive can also be used to store and share data easily. Having a Google Drive cloud storage is very easy and all you need is a Gmail account. Now let’s see how to Transfer Photos from iPhone To iPhone using Google Drive.
- Firstly, Download the Google Drive application from the App store and backup the Photos to the Google Drive from the Photos application using the share option. It takes time to upload to the Drive according to your internet speed.
- Later, Download the Google Drive application on your new iPhone. Or else, you can also open it in any browser on your iPhone.
- Login using the same credentials and there you will find all the photos that you made a backup of earlier. Choose the Photos and click on “Download”.
- Then all the photos will be downloaded to your iPhone in a Rar or zip file.
Conclusion
All the methods discussed above are the best and most easy ways to transfer photos from iPhone to iPhone. There are free, premium, online, and offline methods. You can pick the method according to your need and situations. I’m using iMazing for a long time to transfer my data to computers and another iPhone. I liked its performance and it is price worthy application. So, I placed it in the first position in this article. You can also try this iMazing application as your device manager to perform actions pretty cool and simple. Else, you can also go with Wondershare TunesGo and this works for both Android and iOS devices.
I hope this tutorial helped you to know about “How To Transfer Photos From iPhone To iPhone: 8 Best Methods“. If you want to say anything, let us know through the comment sections. If you like this article, please share it and follow WhatVwant on Facebook, Twitter, and YouTube for more Technical tips.
- READ MORE – 26 Ways To Record Your Screen on PC, Mac, Android & iPhone
- How to Selectively Recover iPhone Data from iTunes Backup
How To Transfer Photos From iPhone To iPhone – FAQs
Can I transfer photos from iPhone to iPhone?
It’s easy to transfer photos from one iPhone to another, even if you don’t have a computer. If you’ve just bought a new iPhone and want to transfer all your old photos onto it, you can do that easily through iCloud.
How many photos can you AirDrop at once?
Theoretically, there’s no limit to how many photos you can send using AirDrop.
Do I need Wi-Fi for AirDrop?
AirDrop uses an interesting combination of technologies to transfer files securely. This transfer does not use the Internet, or a local Wi-Fi network. So, you don’t need to be on a Wi-Fi network to use AirDrop.
Is iMazing any good?
iMazing for Mac is a useful tool for managing backups and other types of data transfer from your iOS device to your computer and vice versa.
Is iMazing safe and secure?
All communications between your web browser and iMazing.com, as well as between our software products and our servers, are secured by strong SSL encryption.
Is Wondershare TunesGO legit?
Overall, TunesGo is a great app for managing the contents of your iOS device and iTunes library.
Is iMazing safe for Mac?
Get trusted software to transfer and save your music, messages, files, and data. Safely back up any iPhone, iPad, or iPod touch. Powerful and user-friendly, iMazing is simply the best iOS device manager for Mac and PC.