
Are you a Mac user and facing redirections issue on your browsers? Do you know that Search Marquis might be the reason for unnecessary redirections? Want to remove Search Marquis from Mac to reduce the redirections? But you didn’t know anything Search Marquis? Don’t worry, this article will help you to know about Search Marquis and the process to remove Search Marquis from Mac.
What is Search Marquis?
Search Marquis is one of the malware types that causes lots of redirections while using browsers on Mac. It shows the unnecessary redirections and third-party advertisement pop-ups which are not much useful. It is a kind of browser hijacker. It modifies the default homepage URL to its own URL. Later on, it installs the third-party extensions on your browsers and opens more unnecessary redirections while using the browser on your Mac.
How to Remove Search Marquis from Mac Manually
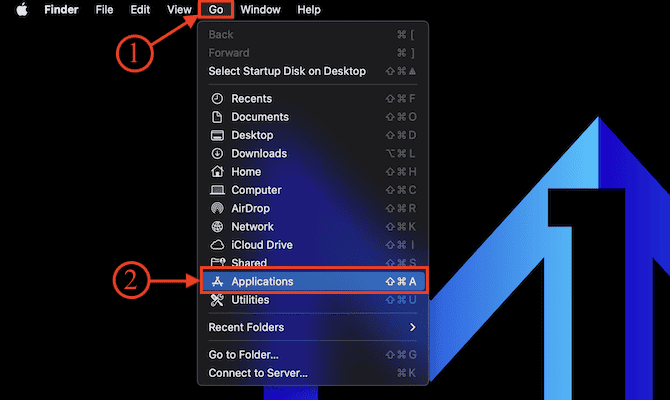
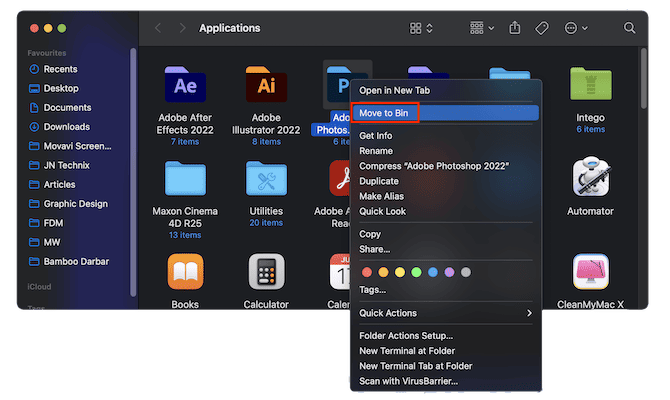
1. Remove Suspicious Software
- Click on the “Go” option available on the top menu bar. Then a menu list will open. Choose the “Applications” option from that menu to open the applications window. You can also use the Keyboard shortcut – “Command+Shift+A” to launch the Applications window.
- From there, choose the application that looks suspicious and malware. Drag and drop it into the trash bin available on the bottom dock to uninstall the selected application.
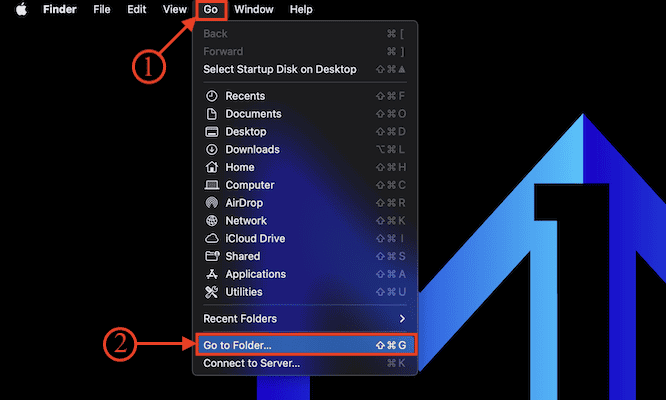
2. Remove LaunchAgents
- Click on the “Go” option available on the top menu. An options list will open. Choose the “Go To Folder” option from that list.
- A small search dialogue box will pop up. Type the path – “/Library/LaunchAgents” and hit enter.
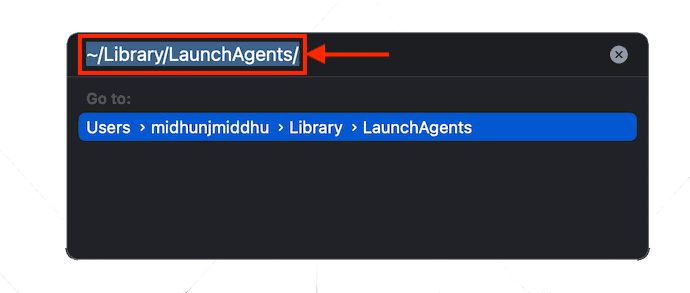
- Then a window will pop up. There it shows all the LaunchAgent files available on your Mac. Choose the unwanted files and drag them onto the trash bin to delete them.
3. Uninstall Browser Extensions
1. Safari Browser
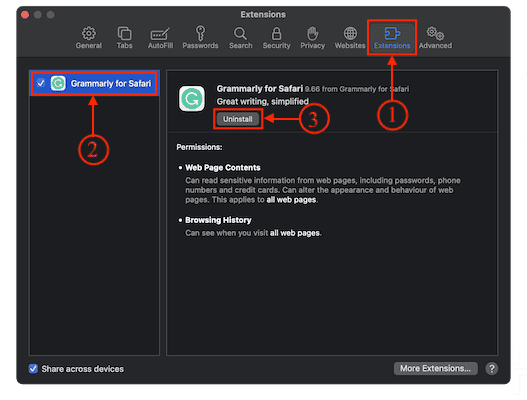
- Launch the Safari Browser on your Mac and click on the “Safari” option available on the top menu bar. An options list will open. Choose the “Settings” option from that list.
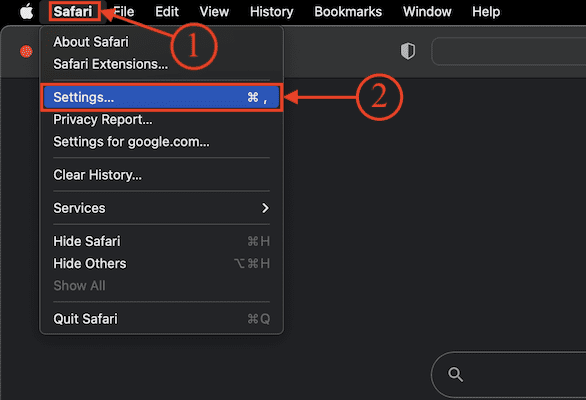
- Then the settings window will pop up. Move to the “Extensions” section from the sections available in the settings window. Then it displays the list of installed extensions. Choose the extension that looks like malware and click on “Uninstall” to remove the extension from Safari Browser.
2. Google Chrome
- Launch the Google Chrome browser on your Mac and Click on the “Three Dots” icon available on the top right of the window. An options list will open. Choose the “Settings” option from that list.
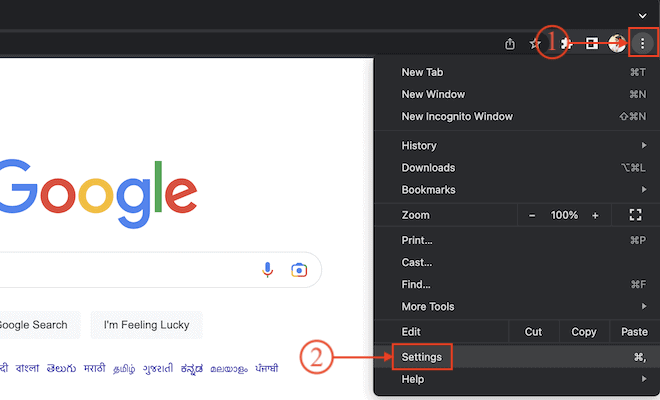
- A new settings tab will open. Scroll to the bottom to find the “Extensions” option on the left side of the window. Click on it and it redirects you to another tab. Else, you can type – “Chrome://Extensions” in the search bar and hit enter to open the extensions tab.

- On that tab, it displays the list of extensions installed in Google Chrome. Choose the extension that might be the reason for Search Marquis and click on “Remove”. Then it asks for confirmation, and choose the “Remove” option to remove the extension successfully from Google Chrome.

3. Mozilla Firefox
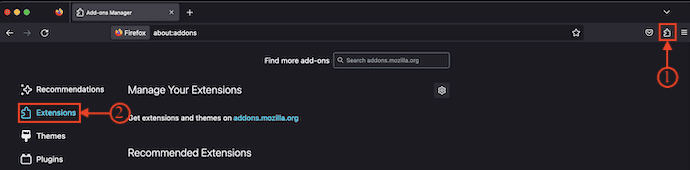
- Launch the Mozilla Firefox Browser on your Mac and click on the “Extensions” icon available on the top right of the window. Then it takes you to the Add-on page. Move to the “Extensions” section and then it displays the list of installed extensions.
- Choose the extension that works suspiciously and a reason for Search Marquis malware. click on “Remove” to delete the extension from Mozilla Firefox Browser.
4. Update the Homepage of Browsers
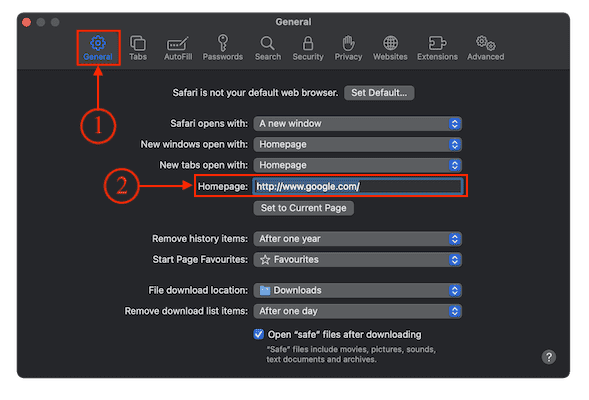
1. Safari Browser
- Launch the Safari Browser on your Mac and click on the “Safari” option available on the top menu bar. An options list will open. Choose “Settings” from that list.
- A settings window will pop up. Be in the “General” section and there you will find the homepage column. Update the homepage to a trusted webpage like Google – “www.google.com”.
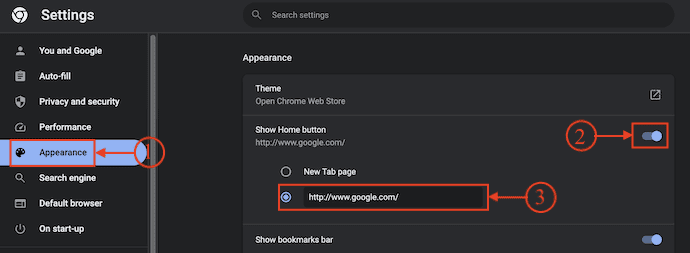
2. Google Chrome
- Open the Chrome Browser on your Mac and click on the “Three Dots” option available on the top right of the window. An options list will open. Choose the “Settings” option from that list.
- A new settings tab will open. Move to the “Appearance” section using the left menu. There toggle the slider to turn on the Homepage setting and enter a trusted webpage URL as Homepage.
3. Mozilla Firefox
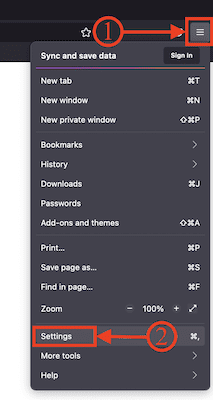
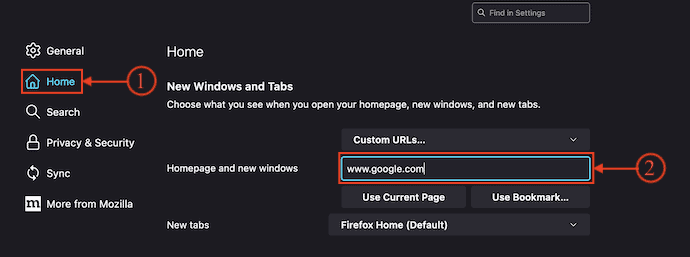
- Launch the Mozilla Firefox Browser on your Mac and click on the “Hamburger”(Three Horizontal lines) icon available on the top right of the window. An options list will open. Choose the “Settings” option from that list.
- A new settings tab will open. Move to the “Home” section and there you will find the “Homepage and new windows” option. Enter a trusted URL of a webpage to update the Homepage of Mozilla Firefox to remove Search Morquis from Mac.
5. Reset Web Browsers
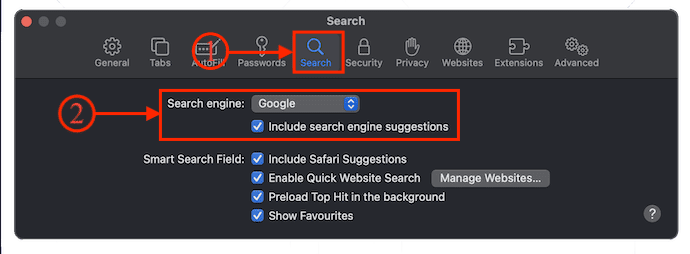
1. Safari Browser
- Launch the Safari Browser on your Mac and click on the “Safari” option available on the top menu bar. An options list will open. Choose the “Settings” option from the list.
- Move to the “Search” section from the settings menu from the available options. Then you will find the “Search Engine” and “Smart Search Field” options. Click on the drop-down option of search engine and choose “Google” as the default search engine.
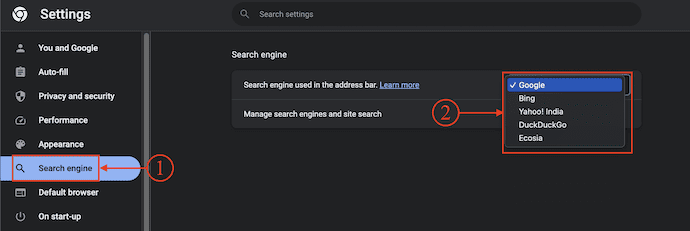
2. Google Chrome
- Launch the Google Chrome browser on your Mac and click on the “Three dots” option available on the right top of the window. An options list will open. Choose the “Settings” option from that list.
- A settings tab will open. Move to the “Search Engine” section from the left side menu and there click on the “drop-down” option and choose “Google” as the default search engine.
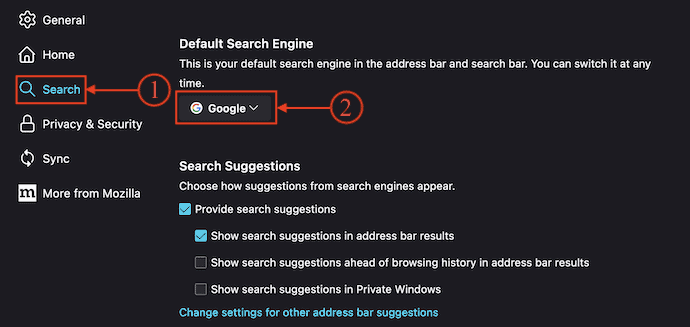
3. Mozilla Firefox
- Open the Mozilla Firefox browser on your Mac and click on the “Hamburger”(Three Horizontal Lines) icon available in the top right corner of the window. An options list will open. Choose the “Settings” option from that list.
- A new settings tab will open. Move to the “Search” option by clicking on the option from the left menu. There it displays options like Default Search Engine and Search Suggestions. Click on the “Drop-down” option of the Default Search Engine and choose “Google” as the default search engine on Mozilla Firefox. This helps you to remove Search Marquis from Mac.
- RELATED – 5 Best Ways to Clear Autofill on Mac OS X
- Review of TheOneSpy Apps for Android, iPhone, PCs & MAC Devices
How to Remove Search Marquis from Mac Automatically
Video Tutorial
We Provided this Article in the form of a Video Tutorial for our reader’s convenience. If you are interested in reading, skip the video for now and watch it after the completion of reading this article.
1. Intego VirusBarrier

Intego VirusBarrier is one of the best and most premium Mac antivirus software. It has a professional user interface and works effectively in removing malware and virus from Mac. This has millions of users across the globe. VirusBarrier is available to purchase individually and also by purchasing the Intego bundle packs. Intego never disappoints its users in removing malware and virus from your Mac.
Highlights of Intego VirusBarrier
- Easy-to-handle
- Professional user interface
- Scans deep into your Mac to find malware
- Allows to schedule scans
Pricing of Intego VirusBarrier
Intego VirusBarrier can be purchased with the bundle packs – Mac Internet Security X9(Special discounted link), Mac Premium Bundle X9(Special discounted link), and Mac Premium Bundle+VPN(Special discounted link). All these bundle packs can be purchased in 1-year and 2-year plans based on the number of Macs. The list of prices of all the bundle packs according to the plan is listed below.
- Mac Internet Security X9
- 1-Year Plan
- 1 Mac – $39.99
- 3 Macs – $54.99
- 5 Macs – $69.99
- 2-Year Plan
- 1 Mac – $74.99
- 3 Macs – $99.99
- 5 Macs – $124.99
- 1-Year Plan
- Mac Premium Bundle X9
- 1-Year Plan
- 1 Mac – $69.99
- 3 Macs – $94.99
- 5 Macs – $119.99
- 2-Year Plan
- 1 Mac – $129.99
- 3 Macs – $174.99
- 5 Macs – $219.99
- 1-Year Plan
- Mac Premium Bundle +VPN
- 1-Year Plan
- 1 Mac – $89.99
- 3 Mac – $114.99
- 5 Macs – $139.99
- 2-Year Plan
- 1 Mac – $149.99
- 3 Macs – $194.99
- 5 Macs – 239.99
- 1-Year Plan
How to Remove Search Marquis from Mac using Intego VirusBarrier
In This Section, I will show you the step-by-step procedure to remove Search Marquis from Mac using Intego VirusBarrier.
Total Time: 5 minutes
STEP-1: Download Intego VirusBarrier
Open any browser on your Mac and visit the Official site of Intego. Purchase the bundle pack that suits you best to get IntegoVirusBarrier and download it.
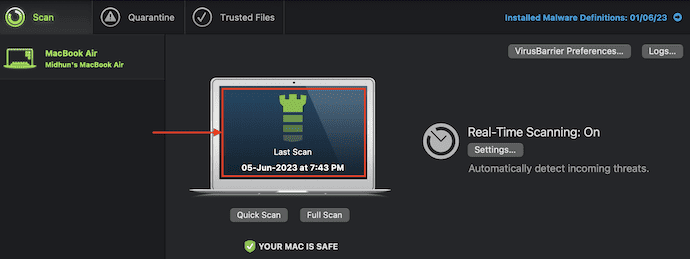
STEP-2: VirusBarrier Interface & Scanning options
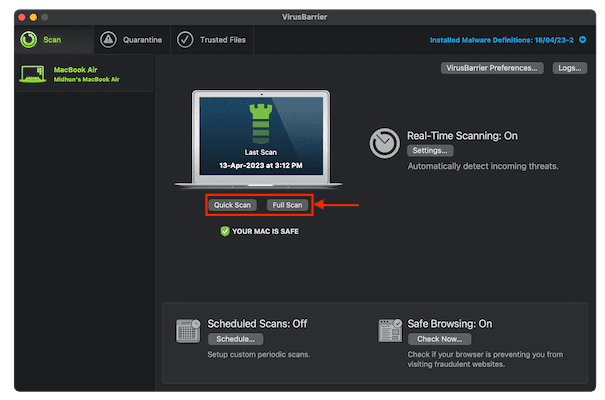
Install the Intego VirusBarrier application by following the instructions. Launch the application after the completion of the installation process and Allow the permissions if it asks for any. On the homepage of the application, it displays scanning options like Quick Scan and Full Scan. Choose the “Full Scan” option to start the scanning process.
STEP-3: Scan Results
It starts to scan your Mac completely and deep into the storage drive. It takes some time to complete the process and later it displays the scan results. If there is any malware or virus found in the scan, you can take actions like Repair, Trust, and Quarantine them. This is how you can easily remove Search Marquis from Mac.
- RELATED – 70% OFF – Intego Coupon Code, Discount Promos
- Intego Mac Premium Bundle Review: Complete Mac Protection
2. CleanMyMac X
CleanMyMac X is a Mac cleaning software that helps you to remove malware from your Mac, Emails, and much more. It has a simple interface with lots of amazing features to help users in removing malware, unwanted files, and broken files in a single click. CleanMyMac X helps you to optimize the performance of your Mac by clearing junk files and unwanted data. This is available in both free trial and premium versions. Moreover, cleanMyMac X is compatible with all the latest versions of macOS.
Highlights of CleanMyMac X
- Easy-to-use
- Simple Interface
- Available in Affordable Price Range
- Removes unwanted data and junk files in a single click
- Scans the mail attachments for malware
- Shows the overview of externally Connected devices
Pricing of CleanMyMac X
CleanMyMac X provides its services in a 7-day free trial and premium versions. The premium is available in three plans based on the number of Macs and these plans can be purchased in One-Year Subscription and One-Time Purchase. The prices are listed below.
- One-Year Subscription
- Plan for 1 Mac – $27.96
- Plan for 2 Macs – $43.96
- Plan for 5 Macs – $63.96
- One-Time Purchase
- Plan for 1 Mac – $71.96
- Plan for 2 Macs – $107.96
- Plan for 5 Macs – $159.96
How to Remove Search Marquis from Mac using CleanMyMac X
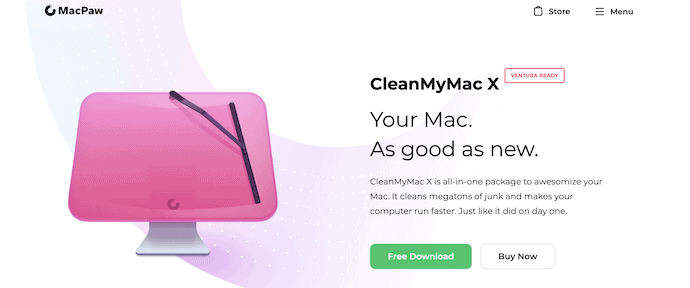
- Open any Browser on your Mac and visit the Official site of CleanMyMac X.
- Choose a plan from the list of available plans list that suits you best and download the application.
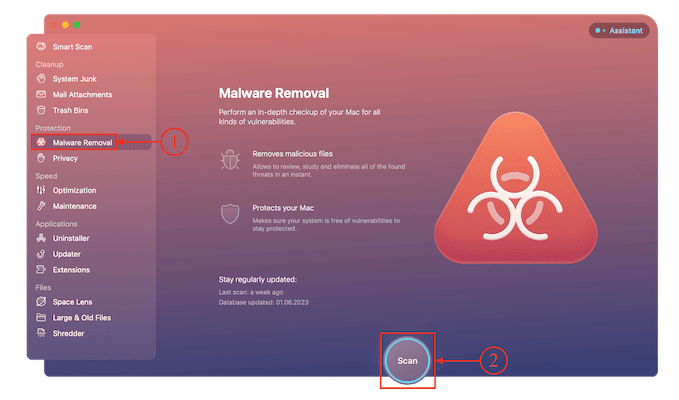
- Launch the application after successful installation. Then you will find the interface as shown in the screenshot. On the left side of the application, you will find various options. Choose the “Malware Removal” option from the left menu and click on the “Scan” option.
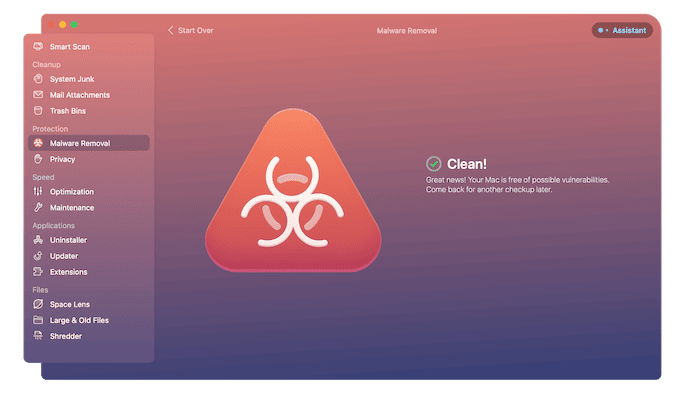
- Then it starts to scan your entire Mac for malware and it takes time depending on your Mac’s storage. After the completion of the scanning process, it shows you the results page as shown in the screenshot.
- That’s it, this is how you can easily remove Search Marquis from Mac.
- RELATED – CleanMyMac X Review: The Best Mac Cleaner
- How to Clean Up Mac Hard Drive Using CleanMyMac X
Conclusion
Getting redirections regularly while using browsers on your Mac is a serious thing to consider. It happens due to some kind of malware or virus installed on your Mac. Search Marquis is one among them. It will steal your important data and information if you haven’t taken any action.
You can use the manual or automatic method to remove Search Marquis from Mac as discussed above. We recommend going with Intego Premium Bundle (Special Discounted link), which works pretty effectively in removing the Search Marquis from Mac. It is known for its professional features and clean interface. It has millions of downloads across the globe and is considered the best Mac Antivirus Software by experts.
I hope this tutorial helped you to know about “How to Remove Search Marquis from Mac“. If you want to say anything, let us know through the comment sections. If you like this article, please share it and follow WhatVwant on Facebook, Twitter, and YouTube for more Technical tips.
How to Remove Search Marquis from Mac – FAQs
Why is my Mac using Search Marquis?
Search Marquis appears in Safari Browser because malware has infected your system with a browser hijacker.
Is Search Marquis a virus?
If your browser redirects you to SearchMarquis.com, your device is infected with the Search Marquis virus. It’s a browser hijacker that is designed to take over most popular browsers, like Safari, Chrome, etc.,
Does Apple send a virus warning?
No, as Apple does not have an in-built antivirus and does not perform malware scans. So, any pop-up virus warnings are fake.
Is a browser hijacker a virus?
A browser hijacker is a malware program that modifies web browser settings without the user’s permission and redirects the user to websites the user had not intended to visit. It is often called a browser redirect virus because it redirects the browser to another, usually malicious, website.
What is VirusBarrier on Mac?
VirusBarrier Scanner is a free anti-virus and malware removal tool for iMac, MacBook, MacBook Air, MacBook Pro, and iMac Pro.